background image

20

E

Indice

Instalación ....................................................................... 20
     Instalación en la videograbadora ................................ 20
     Conexión a un ordenador ............................................ 20
     Ajuste del índice de transferencia de datos ................ 21

Especificaciones de interfaz ......................................... 21
     Conector de 9 pines .................................................... 21
     Formato de datos ........................................................ 21
     Protocolo de comunicación ......................................... 21

Nota

Para obtener información sobre los comandos, consulte
“Tabla de comandos” y “Referencia de comandos” en
inglés.

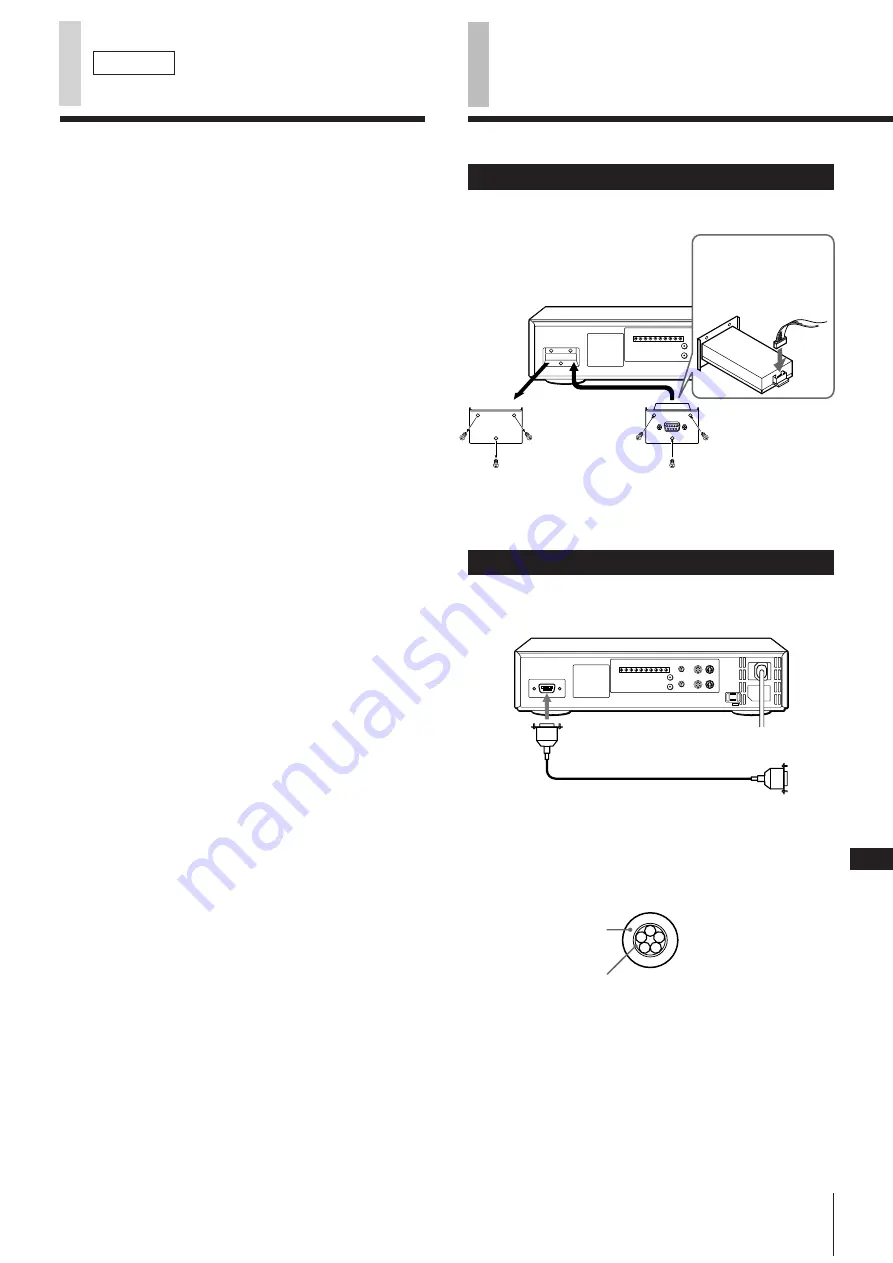
Instalación en la videograbadora

Instale la tarjeta como se muestra en la ilustración.

Nota

Para instalar esta tarjeta, consulte a su proveedor o técnico
de servicio Sony.

Conexión a un ordenador

Realice la conexión como se muestra en la ilustración.

El cable de interfaz que vaya a conectar al conector RS-
232C debe estar reforzado como se muestra a
continuación.

Instalación

Español

Videograbadora de muy
baja frecuencia

Retire la placa
sin información.

Tarjeta de interfaz
de ordenador

Alinee las ranuras en
ambos lados del
conector.

Conector RS-232C
(tipo D-SUB de 9 pines)

Cable de tipo D-SUB de 9 pines
(no suministrado)

A un ordenador

Refuerzo exterior

Protección

Summary of Contents for SVT-RS1A

Page 1: ...ctions Mode d emploi Bedienungsanleitung Manual de instrucciones Istruzioni per l uso 取扱説明書 SVT RS1A お買い上げいただき ありがとうございます 電気製品は安全のための注意事項を守らないと 火災や人身事故になることがあります この取扱説明書には 事故を防ぐための重要な注意事項と製品の 取り扱いかたを示しています この取扱説明書をよくお読みのう え 製品を安全にお使いください お読みになったあとは いつ でも見られるところに必ず保管してください J EN F D E I ...

Page 2: ...情報収集コマンド 6 VTRからのリターンコマンド 8 その他のコマンド 8 目 次 警告表示の意味 この取扱説明書および製品では 次のような表示をしていま す 表示の内容をよく理解してから本文をお読みください この表示の注意事項を守らないと 火災 や感電などにより死亡や大けがなど人身 事故につながることがあります 注意を促す記号 行為を指示する記号 下記の注意を守らないと 火災や感電により死亡や大けがに つながることがあります 本基板はご自分で取り付けないでください 本基板のVTRへの取り付けは お買い上げ店またはソニー のサービス窓口にご依頼ください 本基板をご自分でVTRに取り付けないでください 万一 ご自分で誤った取り付けをしたまま使いますと 火災 感電 の原因となることがあります 警告 注意 強制 感電 火災 警告 強制 ...

Page 3: ...ーへの接続 1 SHOT SET FIELD 1 INTERVAL 1M CLOCK SET TIME ADJ 00 00 OPERATION OUT OTHER REPEAT MODE1 RS 232C 1200 設置 9ピンコネクター仕様 インターフェース仕様 ピ ン 番 号 3 2 4 5 信号 TXD RXD DTR GND 信号の方向 VTR コンピューター VTR コンピューター VTR コンピューター RS 232C端子 9ピンD SUB コンピューター インターフェース ボード タイムラプスビデオ 裏面の目隠し 板を外す データ転送速度の設定 コンピューターとの接続後 VTRの OTHER 画面でデー タ転送速度を設定してください 1 VTRのメニューボタンを押して OTHER 画面を表 示させる 2 シフト ボタンを押してRS 232C の項目を点滅させ 録 画 再生スピ...

Page 4: ...7 MENU POWER ON OFF R P SPEED SET 6 TIMER ON OFF SHIFT z SHIFT SET RP 4 SET RP SECURITY LOCK ON SECURITY LOCK OFF 5 CLEAR 9 4 ENTER CLEAR ERROR REV PLAY STILL 3 0 1 2 3 4 5 6 7 8 9 PLAY STOP 2 AUDIO SEARCH 1 A EJECT FF REW B ALARM SEARCH ALARM SCAN T D SEARCH D COUNT CODE HEAD TIME POWER ON TIME T L STATUS SENSE STATUS SENSE F T L TABLE ON T L TABLE OFF REC DUB REQUEST VCR INQUIRY E MENU RESET COU...

Page 5: ...録画のON OFF SECURITY LOCK ON 69 セキュリティーロックON SECURITY LOCK OFF 6A セキュリティーロックOFF AUDIO SEARCH 22 12 24時間モードで再生中にこのコマンドを送ると 音声再 生をON OFFします テープ停止中にこのコマンドを送ると サーチまたはスキャ ンモードになります メニュー画面表示中にこのコマンドを送ると メニューを終 了します 以上のコマンドを受信すると VTRはACK 0A を返しま す EJECT A3 テープ取出し VTRはコマンド受信時にACK 0A を返し テープ取出し が完了するとCASSETTE OUT 03 を返します REC CA 録画 このコマンドを送る前にREC DUB REQUEST FA を送 る必要があります ALARM SEARCH B0 テープ上の希望のアラーム点へのサーチモ...

Page 6: ... 設定内容を変更します MENU RESET E1 メニュー画面の設定をリセットします コマンド解説 つづき RXD TXD D3 30 32 39 35 30 RXD TXD D7 d2 d4 d5 d3 d1 RXD TXD B2 0A 31 36 31 35 40 AB 0A 0A 0A 0A 0A 0A RXD TXD 7E 39 36 30 40 0A 0A 0A 0A 0A VTR情報収集コマンド COUNT CODE D0 このコマンドを送ると VTRがカウンターの値を6バイトで 返します 1桁目は30Hが 31Hが ー を示します 例 ー1 56 32 VTR INQUIRY FB 接続機器がVTRかどうかを確認します VTRはACK 0A を返します HEAD TIME D2 このコマンドを送ると VTRはヘッドの使用時間を5バイト で返します VTRがメニュー画面を表示...

Page 7: ...DE ON タイマー録画待機 状態になっている 3 0 2 0 1 POWER ON 電源がONになっている 0 AUDIO ON オーディオ再生モードになって いる 第2バイト ビット7 0 6 0 5 0 4 0 3 WARNING ウォーニングが出ている 2 0 1 0 0 0 第3バイト ビット7 0 6 TIMER REC ON タイマー録画状態になって いる 5 COUNTER MEMORY カウンターメモリー がONになっている 4 0 3 0 2 REPEAT MODE リピート録画モードになっ ている 1 0 0 0 第4バイト ビット7 PLAY MODE プレイ状態になっている 6 FF MODE 早送り状態になっている 5 REW MODE 巻戻し状態になっている 4 STOP MODE 停止状態になっている 3 0 2 EJECT テープを取り出す動作をしている ...

Page 8: ...いる 5 T D SEARCH SET タイムデートサーチで日 時の指定を行なっている 4 ALARM SCAN MODE アラームスキャン状 態でテープが動いている 3 0 2 ALARM SEARCH MODE アラームサーチ 状態でテープが動いている 1 ALARM SEARCH SET アラームサーチで サーチ点の指定を行っている 0 0 VTRからのリターンコマンド ACK 0A VTRがコマンドを受付けたとき返します NAK 0B VTRがコマンドを受付けなかったとき返します COMPLETION 01 サーチ スキャンで指定した点に到達したとき返します NOT TARGET 05 サーチ スキャンで指定点が見つからずテープの終わりまた は先頭に達したとき返します CASSETTE OUT 03 カセットを取り出したとき返します ALARM IN 06 アラーム入力があったとき...

Page 9: ... expressly approved in this manual could void your authority to operate this equipment Note This equipment has been tested and found to comply with the limits for a Class A digital device pursuant to Part 15 of the FCC Rules These limits are designed to provide reasonable protection against harmful interference when the equipment is operated in a commercial environment This equipment generates use...

Page 10: ... in the OTHER menu 1 Press the MENU button on the VCR to display the OTHER menu 2 Press the SHIFT button to flash RS 232C and press the REC PLAY SPEED or button to set the data transfer rate 1200 2400 4800 or 9600 bps 3 Press the SEARCH button to return to the normal screen 1 SHOT SET FIELD 1 INTERVAL 1M CLOCK SET TIME ADJ 00 00 OPERATION OUT OTHER REPEAT MODE1 RS 232C 1200 Align the grooves on bo...

Page 11: ... VCR to respond then sends the next byte The response from the VCR may not be a single byte but may be comprised of several bytes such as six bytes for a counter value For commands such as EJECT which take time to be executed the VCR returns a response on receiving the command then sends another response after executing the command Signal flow VCR to computer Computer to VCR VCR to computer Functi...

Page 12: ...N ACK NAK 8 7 MENU POWER ON OFF R P SPEED SET 6 TIMER ON OFF SHIFT z SHIFT SET RP 4 SET RP SECURITY LOCK ON SECURITY LOCK OFF 5 CLEAR 9 4 ENTER CLEAR ERROR REV PLAY STILL 3 0 1 2 3 4 5 6 7 8 9 PLAY STOP 2 AUDIO SEARCH 1 A EJECT FF REW D COUNT CODE HEAD TIME POWER ON TIME T L STATUS SENSE STATUS SENSE F T L TABLE ON T L TABLE OFF REC DUB REQUEST VCR INQUIRY E MENU RESET COUNT RESET COUNT MEMORY B A...

Page 13: ...e time date being located the VCR returns NOT TARGET 05 Command Reference Command Operation To initiate command operation send TL TABLE ON F6 The VCR will respond with ACK 0A The VCR will receive commands until you send TL TABLE OFF F7 to end command operations VCR Control Commands POWER ON OFF 7B Turns on off the VCR PLAY 3A Plays back a tape When this command is sent while recording the VCR ente...

Page 14: ...n time of the video heads This command does not function when the menu is displayed eg 00529H RXD TXD D7 d2 d4 d5 d3 d1 POWER ON TIME D3 In response to this command the VCR returns the power on time five bytes This command does not function when the menu is displayed STATUS SENSE D7 In response to this command the VCR returns its status five bytes Refer to STATUS SENSE bit allocation below STATUS ...

Page 15: ...n audio playback mode Fifth byte Bit 7 MENU MODE the VCR is in menu mode 6 T D SEARCH MODE the VCR is searching for a time date 5 T D SEARCH SET specifying the time date to search 4 ALARM SCAN MODE the VCR is scanning alarm points 3 0 2 ALARM SEARCH MODE the VCR is searching for an alarm point 1 ALARM SEARCH SET specifying the alarm point to search 0 0 Return Commands ACK 0A Acknowledges the comma...

Page 16: ... anglais Alignez les rainures de part et d autre du connecteur Magnétoscope à intervalle variable Enlevez le cache Carte d interface ordinateur Connecteur RS 232C D SUB à 9 broches A un ordinateur Câble D SUB à 9 broches non fourni Gaine extérieure Blindage Installation sur le magnétoscope Installez la carte comme illustré Remarque Pour installer cette carte consultez votre fournisseur ou un centr...

Page 17: ...exécuté l instruction Broche n 3 2 4 5 Signal TXD RXD DTR GND Function Transmission données Réception données Terminal de données prêt Masse Réglage du débit de transfert des données Après avoir effectué le raccordement à un ordinateur réglez le débit de transfert des données dans le menu OTHER 1 Appuyez sur la touche MENU du magnétoscope de manière à afficher le menu OTHER 2 Appuyez sur la touche...

Page 18: ...weis Ziehen Sie bei der Installation dieser Karte bitte Ihren Händler oder den Sony Kundendienst hinzu Anschließen an einen Computer Nehmen Sie den Anschluß an den Computer wie auf der Abbildung zu sehen vor Das Schnittstellenkabel das mit dem RS 232C Anschluß verbunden werden soll muß folgendermaßen abgeschirmt sein Installation Deutsch Richten Sie die Einkerbungen an beiden Seiten des Anschlusse...

Page 19: ...XD DTR GND Funktion Transmit Data Daten übertragen Receive Data Daten empfangen Data Terminal Ready Datenterminal bereit Ground Masse Einstellen der Datenübertragungsrate Nachdem Sie die Verbindung zum Computer hergestellt haben müssen Sie noch die Datenübertragungsrate einstellen und zwar im Menü OTHER 1 Drücken Sie die Taste MENU am Videorecorder so daß das Menü OTHER angezeigt wird 2 Drücken Si...

Page 20: ...omo se muestra en la ilustración Nota Para instalar esta tarjeta consulte a su proveedor o técnico de servicio Sony Conexión a un ordenador Realice la conexión como se muestra en la ilustración El cable de interfaz que vaya a conectar al conector RS 232C debe estar reforzado como se muestra a continuación Instalación Español Videograbadora de muy baja frecuencia Retire la placa sin información Tar...

Page 21: ...otra respuesta después de ejecutarlo Pin nº 3 2 4 5 Señal TXD RXD DTR GND Ajuste del índice de transferencia de datos Después de realizar la conexión a un ordenador ajuste el índice de transferencia de datos en el menú OTHER 1 Pulse el botón MENU en la videograbadora para que aparezca el menú OTHER 2 Pulse el botón SHIFT para que RS 232C parpadee y pulse el botón REC PLAY SPEED o para ajustar el í...

Page 22: ...gistratore Installare la scheda come illustrato Nota Per installare questa scheda consultare il rifornitore o il responsabile dell assistenza Sony Collegamento al computer Collegamento al computer come illustrato Il cavo di interfaccia da collegare al connettore RS 232C deve essere protetto come segue Installazione Italiano Inserimento delle pause Scheda di interfaccia del computer Rimuovere la pi...

Page 23: ...eguire il comando Pin n 3 2 4 5 Segnale TXD RXD DTR GND Funzione Trasmissione dei dati Ricezione dei dati Terminale dati pronto Terra Impostazione della velocità di trasferimento dei dati Dopo essersi collegati ad un computer impostare la velocità di trasferimento dei dati nel menu OTHER 1 Premere il tasto MENU sul videoregistratore per visualizzare il menu OTHER 2 Premere il tasto SHIFT per far l...

Page 24: ...022 257 7830 営業所 048 645 6880 出張所 025 270 3253 営業所 043 297 8531 営業所 03 5448 6740 営業所 0425 75 0201 出張所 0263 25 4551 営業所 045 243 6711 営業所 054 253 8162 営業所 052 201 6871 営業所 0762 40 8110 営業所 075 691 7860 営業所 06 531 4111 営業所 078 322 0851 営業所 082 241 9211 営業所 0878 51 3942 営業所 092 741 2761 Printed in Japan 東京システム営業所 03 5448 6740 システム営業1部 2部 03 5448 5446 ...

Reviews: