


8
Rear of the TV
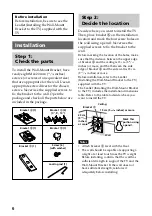
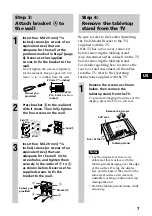
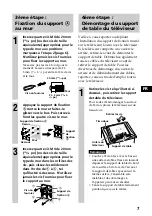
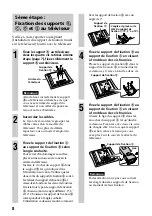
Step 5:
Attach brackets
B
,
C
,
D
, and
E
to the TV
Be sure to see the Leaflet (Installing the
Wall-Mount Bracket to the TV) supplied
with the TV.
1
Attach bracket
B
to the TV.
Using the four screws removed in
Step 4 (page 7), secure bracket
B
to the TV firmly.
Note
To secure bracket
B
to the TV, use the
screws removed from the tabletop
stand, not the ones from the hinge
cover.
2
Connect the cables.
How to connect/bundle the cables
differs depending on the TV model.
For details, refer to the Operating
instructions of the TV.
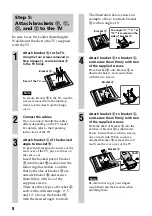
3
Attach bracket
C
of the desired
angle to bracket
B
.
To prevent damaging the surface of the
rear cover of the TV, put a soft mat on
the rear cover.
Insert the hooked part of bracket
C
into bracket
B
as shown in the
following illustration. Confirm
that both sides of bracket
C
are
outside bracket
B
, and secure
them firmly with two of the
supplied screws.
There are three types of bracket
C
,
each with a different angle: 0°, 5°,
and 10°. Choose the bracket
C
with the desired angle to attach.
Bracket
B
The angle “0°,” “5°,” or
“10°” is marked on the
side of bracket
C
.
Bracket
C
Bracket
D
Bracket
E
The illustration below shows an
example of how to attach bracket
C
with an angle of 0°.
4
Attach bracket
D
to bracket
C
,
and secure them firmly with two
of the supplied screws.
Place bracket
D
onto bracket
C
as
illustrated below, and secure them
with the two screws.
5
Attach bracket
E
to bracket
C
,
and secure them firmly with two
of the supplied screws.
Slide the shaft of bracket
E
into the
notches of bracket
C
as illustrated
below. Secure them with two screws,
one on each side. When you have
attached bracket
E
, remove the soft
mat from the rear cover of the TV.
Note
Be careful not to get your fingers
caught between the brackets when
attaching them.
Shaft


