


5
Getting Started
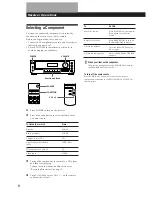
Antenna Hookups
Overview
This section describes how to connect AM and FM
antennas to the receiver. If you want to receive radio
broadcasts with the receiver, complete these
connections first, then go to the following pages.
For specific locations of the terminals, see the
illustration below.
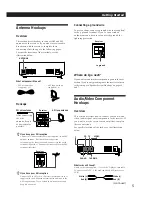
What antennas will I need?
ANTENNA
AM
Connecting a ground wire
To prevent hum, connect a ground wire (not supplied)
to the
y
ground terminal. If you’ve connected an
outdoor antenna, be sure to connect the ground for
lightning protection.
Where do I go next?
If you want to connect other components, go on to the next
section. If you’re only planning to use the receiver to listen
to the radio, go to “Speaker System Hookups” on pages 6
and 7.
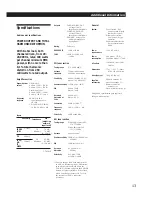
Audio/Video Component
Hookups
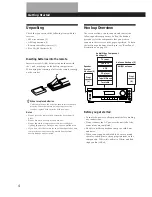
Overview
This section describes how to connect your audio, and
video (audio signal only) components to the receiver. If
you want to use the receiver as an amplifier, complete
these connections.
For specific locations of the jacks, see the illustration
below.
What cords will I need?
Audio cords (not supplied) (1 for each CD player, turntable,
TV tuner or cable TV; 2 for each tape deck, MD recorder or
VCR)
ANTENNA
AM
FM
300
• FM wire antenna
(supplied) (1)
• AM loop antenna
(supplied) (1)
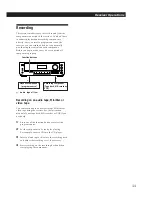
Hookups
FM wire antenna
After connecting
the wire
antenna, keep it
as horizontal as
possible.
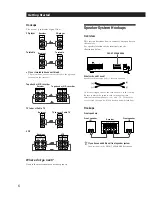
If you have poor FM reception
Connect a 75-ohm coaxial cable (not supplied) to an FM
outdoor antenna. Pull back the mesh portion
surrounding the inner cable and connect it to the earth
terminal (right side). Connect the inner cable to the FM
terminal (left side).
If you have poor AM reception
Connect a 20 to 50 ft. (6 to 15-meter) insulated wire (not
supplied) to the AM antenna terminal in addition to the
AM loop antenna. Try to extend the wire outdoors and
keep it horizontal.
Receiver
AM loop antenna
ANTENNA
ANTENNA
FM
75
Receiver
Receiver
.
to ground
PHONO
TAPE/MD
y
CD
TV
VIDEO
Red (R)
White (L)
Red (R)
White (L)
(continued)


