background image

30

Playback/Recording

To change a preset station

Preset a new station at the number you want to change.

Note

If the AC power cord is disconnected for about 1 week, the
preset stations will be cleared.  Preset the stations again.

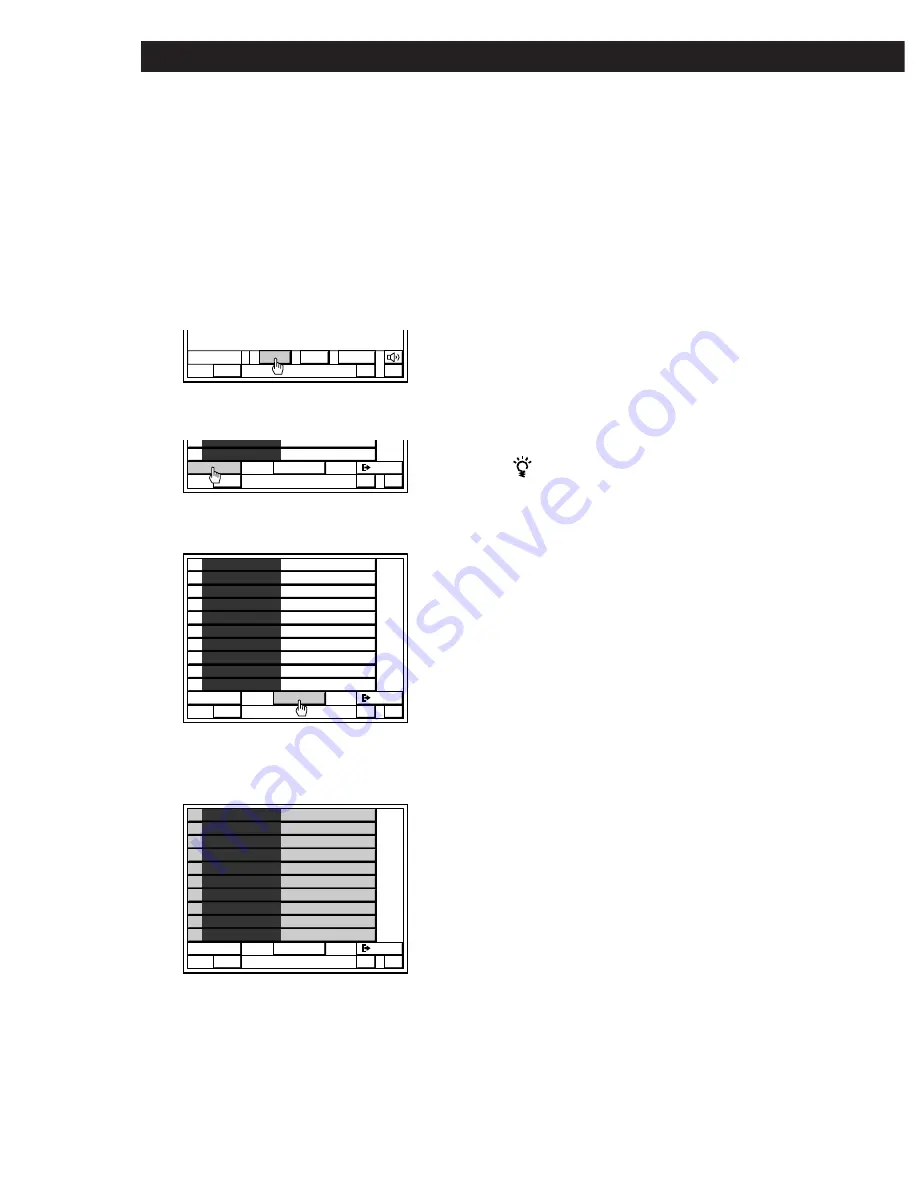
Tuning preset stations (Preset Tuning)

1

Click FUNCTION in the main menu, then click
TUNER.

2

Click LIST.

3

Click A B C repeatedly to select the page, then
click the number button (0 to 9) of the station you
want.

To recall preset stations from the SUB menu

Click SUB, then click A B C repeatedly to select the
page, and then click the number button (0 to 9).

Presetting the radio stations

The receiver can store a total of 30 FM or AM stations.
You can store up to 10 stations in three different
“pages”: A, B and C, and recall them later with a
simple click.  You can also assign names to the preset
stations (see page 43).

1

Tune in the station you want.

2

Click LIST.
The memory list appears.

3

Click A B C repeatedly to select the page (A, B, or
C) you want.

4

Click MEMORY.
MEMORY turns red.

5

Click the number button (0 to 9) you want.
The number button lights up and the station is
stored.

6

Repeat steps 1 to 5 to preset up to 30 stations.
You can also use + or – next to the frequency to
tune stations from the LIST menu.

USER

SUB

LIST

+

FM/AM FM 102.50MHz


STEREO

+

FM/AM FM 102.50MHz


STEREO

A   B   C  

MEMORY

  EXIT

9

102.50MHz

FM

0

102.50MHz

FM

+

FM/AM FM 102.50MHz


STEREO

A   B   C  

MEMORY

  EXIT

1

102.50MHz

FM

2

102.50MHz

FM

3

102.50MHz

FM

4

102.50MHz

FM

5

102.50MHz

FM

6

102.50MHz

FM

7

102.50MHz

FM

8

102.50MHz

FM

9

102.50MHz

FM

0

102.50MHz

FM

+

FM/AM FM 102.50MHz


STEREO

A   B   C  

MEMORY

  EXIT

1

102.50MHz

FM

2

102.50MHz

FM

3

102.50MHz

FM

4

102.50MHz

FM

5

102.50MHz

FM

6

102.50MHz

FM

7

102.50MHz

FM

8

102.50MHz

FM

9

102.50MHz

FM

0

102.50MHz

FM

Summary of Contents for STR-D760Z

Page 1: ... 1997 by Sony Corporation 3 860 819 12 1 Operating Instructions STR DE1015G STR DE815G STR D760Z FM Stereo FM AM Receiver ...

Page 2: ...mber in the space provided below Refer to them whenever you call upon your Sony dealer regarding this product Model No STR DE1015G STR DE815G STR D760Z Serial No For customers in Canada CAUTION TO PREVENT ELECTRIC SHOCK DO NOT USE THIS POLARIZED AC PLUG WITH AN EXTENSION CORD RECEPTACLE OR OTHER OUTLET UNLESS THE BLADES CAN BE FULLY INSERTED TO PREVENT BLADE EXPOSURE This receiver incorporates the...

Page 3: ... this manual Indicates hints and tips for making the task easier Table of contents Welcome 4 Hooking Up the System Hookup Overview 5 Infrared IR Repeater Hookups 7 Antenna Hookups 7 Audio Component Hookups 8 Speaker System Hookups 9 TV VCR Hookups 11 Digital Component Hookups STR DE1015G only 13 AC Hookups 14 Setting Up the Remote for On Screen Control Using the Remote 15 Registering a TV or Monit...

Page 4: ...ow 2 This controls the movement of the pointer hand shaped icon in the on screen display see 2 below 3 When you move the pointer to an on screen icon and press the center of the direction control button on the remote the infrared IR emitter on the front panel transmits the corresponding IR control code to the respective component see 3 below For USA and Canada RM H501 For other countries RM VR101 ...

Page 5: ...and control the following audio video components For details on connection of each component see the pages in parentheses p STR DE1015G Infrared IR Repeater Hookups 7 TV VCR Hookups 11 Digital Component Hookups 13 Antenna Hookups 7 Audio Component Hookups 8 IR Repeater Video camera video game TV tuner Digital Broadcasting Satellites DBS receiver LD DVD player VCR TV MONITOR DVD player etc AM FM an...

Page 6: ...s only Turn off the power to all components before making any connections Do not connect the AC power cords until all of the connections are completed Be sure to make connections firmly to avoid hum and noise p STR DE815G and STR D760Z Speaker System Hookups 9 DBS receivers can be used with USA Canadian and Australian models only Infrared IR Repeater Hookups 7 TV VCR Hookups 11 Antenna Hookups 7 A...

Page 7: ...ponents Connect the IR repeater if You experience difficulty controlling a certain component using the on screen display control Your installation configuration prevents the IR repeater on the receiver s front panel from reaching all of the components you need to control After connecting the IR repeater set it above or below the IR sensor on the component s to be controlled Each IR repeater can se...

Page 8: ...eiver Use a CONTROL A1 cord not supplied to connect the CTRL A1 jack on each component to the S LINK CTRL A1 jack on the receiver See the instructions for each component z You can display the operating status of the component connected to the CTRL A1 jack See page 58 for DTR DE1015G See page 59 for STR DE815G z To use a Sony CD changer with a COMMAND MODE selector If the changer does not have a VI...

Page 9: ...cording to the shape of your room If you feel that this placement reduces the surround effects you can adjust the center and rear delay parameters to obtain the effect you desire see page 39 Note To take full advantage of Dolby Digital AC 3 surround effects we reccommend using high quality speakers We also reccommend using front center and rear speakers that are of the same size and quality Notes ...

Page 10: ...less rear speaker system connect the transmitter to the WIRELESS REAR SPEAKER connector Note Do not connect any other components to the WIRELESS REAR SPEAKER connector Selecting the speaker system You can connect one set or two sets of speakers Set the SPEAKERS selector on the front panel according to your speaker system To drive Set SPEAKERS selector to Speaker system A A connected to the FRONT S...

Page 11: ...jacks instead of the video jacks Ç signal flow a MONITOR to TV or monitor Be sure to use your TV as a monitor and use the TV tuner built in to the VCR to watch TV programs If you use your TV s tuner the on screen display will change to a TV program when you switch channels Also do not connect anything to the TV DBS IN jacks If you connect a Sony TV with TV OUT jacks you can use the TV tuner in you...

Page 12: ...skip channels where there is no broadcast so that an image is always displayed on the TV screen otherwise the on screen display is distorted Playing decoded Dolby Digital AC 3 soundtracks STR DE815G and STR D760Z If you have a Dolby Digital AC 3 decoder you can use the receiver to amplify decoded Dolby Digital AC 3 soundtracks with the following connections These audio signals are paired with the ...

Page 13: ... LD player to the analog LD DVD in jacks be sure to connect the LD player s AC 3 RF output to the LD DVD IN AC 3 RF jack c CD IN OPTICAL to CD player d DAT MD IN OUT OPTICAL to DAT or MD deck Note This unit is only compatible with digital components using 32 kHz 44 1 kHz 48 kHz sampling frequencies It is not compatible with 96 kHz DAT MD OUT DIGITAL OPTICAL DAT MD IN OPTICAL CD IN OPTICAL LD DVD I...

Page 14: ...so you can turn on off the entire system when you turn on off the receiver Caution Make sure that the power consumption of the component s connected to the receiver s AC outlet s does not exceed the wattage indicated on the rear panel Do not connect high wattage electrical home appliances such as electric irons fans or TVs to this outlet to a wall outlet SWITCHED AC OUTLET s Before using for the f...

Page 15: ...or humid place Do not use a new battery with an old one Do not expose the remote sensor to direct sunlight or lighting apparatuses Doing so may cause a malfunction If you don t use the remote for an extended period of time remove the batteries to avoid possible damage from battery leakage and corrosion Turning on the receiver and bringing up the on screen display on your TV or monitor To turn on t...

Page 16: ...ntrol button M m  µ in the direction you want to move the pointer hand shaped icon on the on screen display 3 To click on an item position the pointer so that it is on one of the on screen items then press and quickly release the center of the direction control button indicated by PUSH ENTER To make the on screen display disappear Position the pointer in the blank area and press the center of the...

Page 17: ... 16 x 9 click WIDE except for Australian and Singaporean models The IR codes are automatically registered and registration is complete Non Sony TV 1 Click OTHER TV 2 Click VIDEO 1 2 or 3 to select the video input of the TV that is connected to the receiver 3 If you are using a wide TV click WIDE except for Australian and Singaporean models 4 Go to step 5 5 Cover the IR sensor on the TV to prevent ...

Page 18: ...tered correctly Point the remote at the IR sensor on the receiver from a distance of less than 2 inches 5 cm Hold down the button on the remote for about 2 or 3 seconds until the RECEIVING display switches to RELEASE YOUR REMOTE Keep the remote pointed horizontally at the IR sensor until the code is registered 8 Repeat step 7 for the remaining buttons that appear in the on screen display If NG is ...

Page 19: ...s VIDEO 1 jack The following cases require registration of Sony products When connecting a Sony MD deck to the DAT MD jacks When connecting a Sony audio product with CONTROL A1 compatibility When connecting a Sony product to jacks other than those specified in the previous table e g when connecting a Sony LD player to the VIDEO 3 jacks When exchanging a non Sony audio or video component with a Son...

Page 20: ...on procedure is complete click OTHER then go to step 6 6 When PUSH YOUR REMOTE appears press the button on your audio video component s remote that corresponds to the control button highlighted is the POWER switch After you have registered all the IR codes the IR CODE SETTING menu reappears When registering the IR code be sure to do the following otherwise the IR code may not be registered correct...

Page 21: ...mum limit may be less than 100 It may be difficult or impossible to register about 200 codes under the following conditions When registering from remotes with weak batteries When registering IR codes that have been registered to a programmable remote e g any IR code not originally supplied in the respective remote Keep the IR sensor away from fluorescent light or direct sunlight Otherwise the IR c...

Page 22: ...ufficient surround effects when playing a Dolby Digital AC 3 source a source for which the DISCRETE indicator lights select SMALL The bass frequencies for the rear speakers will be output from the sub woofer or other LARGE speakers If you do not connect rear speakers select NO Rear speaker place REAR This parameter lets you specify the location of your rear speakers for proper implementation of th...

Page 23: ...y Rear speaker balance Click REAR BALANCE or to adjust the balance between the rear left and right speakers 8 dB 1 dB steps During this adjustment the test tone is emitted from both speakers simultaneously 5 Click TEST again to turn off the test tone To return to the main menu Click EXIT To return to a previous menu Click RETURN You can adjust all speakers at one time Use MASTER VOL on the remote ...

Page 24: ... speaker Rear speaker R Rear speaker L Front speaker L Front speaker R Center speaker Rear speaker R Rear speaker L PHANTOM mode Select this mode if you have front and rear speakers but no center speaker The sound of the center channel is output from the front speakers 3 CH LOGIC mode Select this mode if you have front and center speakers but no rear speakers The sound of the rear channel is outpu...

Page 25: ... the test tone is emitted from the center speaker Click REAR or to adjust the level of the rear speakers from 15 0 dB to 10 0 dB 1 dB steps During this adjustment the test tone is emitted from both speakers simultaneously 6 Click TEST when you are done adjusting The test tone is turned off To return to the main menu Click EXIT To return to a previous menu Click RETURN You can adjust all speakers a...

Page 26: ...V programs only for Sony TV TV DBS or TV 3 with TV OUT jacks or Digital Broadcasting Satellites DBS 2 Digital Audio Tapes DAT or DAT MD MiniDiscs MD Compact Discs CD CD Radio programs 4 TUNER Records PHONO 5 Analog audio tapes TAPE 1 If you connect the component to jacks other than those specified in the table click the appropriate one according to your connection e g If you connect the LD player ...

Page 27: ... 3 RF IN jack LD DVD only To listen to decoded Dolby Digital AC 3 program sources STR DE815 D760Z Click FUNCTION then click 5 1 INPUT The video signal from the LD DVD VIDEO IN jack is automatically paired with the audio signals from the 5 1 INPUT jacks When set to this mode the audio signals bypass the receiver s sound fields To customize the sound of the 5 1 INPUT use the controls on your Dolby D...

Page 28: ...eceiver except for SELECT which substitutes for the enter button Click the boarders at the edge of the screen to move the DBS cursor To jump between the current and the previous channels Click JUMP To control StarSight functions of a Sony VCR USA and Canada only 1 Select the component to which you assigned StarSight VCR IR codes e g VIDEO 1 2 Click SUB 3 Click STARSIGHT The StarSight control panel...

Page 29: ...ave entered the right frequency If not reenter the frequency you want If the entered numbers still flash the frequency is not used in your area If you enter a frequency not covered by the tuning interval The entered value is automatically rounded up or down to the closest covered value Tuning intervals for Direct Tuning are FM 50 kHz intervals AM 10 kHz intervals except for Australian and Singapor...

Page 30: ...le click You can also assign names to the preset stations see page 43 1 Tune in the station you want 2 Click LIST The memory list appears 3 Click A B C repeatedly to select the page A B or C you want 4 Click MEMORY MEMORY turns red 5 Click the number button 0 to 9 you want The number button lights up and the station is stored 6 Repeat steps 1 to 5 to preset up to 30 stations You can also use or ne...

Page 31: ...R to operate the playback component To return to the main menu Click EXIT Digital recording STR DE1015G only If you connect your CD player and DAT or MD deck using digital connections see page 13 and specify the OPTICAL jacks for both components see page 27 the previous operations will let you make digital recordings from CD to DAT or MD Notes If you leave the REC EDIT menu by clicking FUNCTION SO...

Page 32: ...ton on the PLAYER control Recording starts Do not click any RECORDER controls while recording This will cut off the source being recorded To stop recording Click the recording component s p control To control the recorder after recording Click RECORDER RECORDER becomes the operative component and you can use the RECORDER controls to rewind and playback the recording etc Click PLAYER to operate the...

Page 33: ...he front speakers without using actual rear speakers The virtual speakers are reproduced as shown in Ill B on page 34 VIRTUAL REAR SHIFT Uses 3D sound imaging to shift the sound of the rear speakers away from the actual speaker position Ill C on page 34 The shift position differs according to the setting of the rear speaker position see page 22 VIRTUAL MULTI REAR Uses 3D sound imaging to create an...

Page 34: ...or REAR SP SIDE For REAR SP BEHIND Ill D VIRTUAL MULTI REAR For REAR SP SIDE For REAR SP BEHIND L Front speaker left See page 10 for details on R Front speaker right how to set the rear speaker C Center speaker place SL Rear speaker left SR Rear speaker right Virtual speaker L C R L C R L C R SR SL L C R SR SL L C R SR SL L C R SR SL SPORTS ARENA Reproduces the feeling of a large concert arena Gre...

Page 35: ...namic range for listening at low volume levels MONO MOVIE Creates a theater like environment from movies with monaural soundtracks MUSIC SMALL HALL Reproduces the acoustics of a rectangular concert hall Ideal for soft acoustic sounds LARGE HALL JAZZ CLUB Reproduces the acoustics of a jazz club LIVE HOUSE Reproduces the acoustics of a rock and roll club ACOUSTIC 2 Reproduces normal 2 channel stereo...

Page 36: ...n the source are decoded and output directly If a sound field other than ACOUSTIC or KARAOKE is set to ON The DISCRETE indicator lights up and the number of channels recorded in the source are decoded The effects provided by each sound field are then added to each channel before the sound is output If the ACOUSTIC soundfield is selected or the sound field is set to OFF The source signal is downmix...

Page 37: ...eters to suit your listening situation Also since this receiver uses Digital Signal Processing DSP you can adjust the sound parameters electronically DSP automatically converts analog audio signals to digital which lets you adjust the sound with virtually no degradation in sound quality Once you customize the sound fields they are stored in memory unless the receiver is unplugged for about 1 week ...

Page 38: ...EQ kHz 1 0 100 10k 10 10 1k TREBLE DOWN UP FRONT EQUALIZER EDIT LEVEL CHANNEL dB RETURN STANDARD EXIT BASS FLAT 10 FREQ kHz 1 0 100 10k 10 10 1k TREBLE b B DOWN UP REAR D E L A Y C E N T E R R E A R E F F E C T T O N E M O D E G E N R E PRO LOGIC ENHANCED PRO LOGIC C STUDIO A C STUDIO B THEATER N THEATER MONO MOVIE S HALL L HALL JAZZ CLUB LIVE HOUSE ACOUSTIC STADIUM GAME PRO LOGIC MOVIE MUSIC SPOR...

Page 39: ...P in the main menu then click DELAY Click the buttons next to each setting to adjust the delay time as you desire CENTER Use this adjustment to add a sense of depth to the center channel Longer delay times create a greater sense of depth The CENTER delay can be set from 0 to 5 ms in 1 ms steps REAR Use this adjustment to add a sense of depth to the rear channel Longer delay times create a greater ...

Page 40: ...ng environment by simulating a softer SOFT or harder HARD wall The midpoint designates a neutral wall made of wood SURROUND EDIT DELAY TIME LEVEL ms RETURN STANDARD EXIT TEST 20 15 30 C MODE LONG SHORT 3 Click DELAY 4 Click SHORT or LONG to adjust the delay time To reset the delay time to the factory settings Click STANDARD Adjusting surround sound parameters except for delay time Adjust the surro...

Page 41: ...ension channel output from the sub woofer without effecting the level of the bass frequencies sent to the sub woofer from the front center or rear channels via the bass redirection circuitry The level can be adjusted in 0 5 dB steps from 20 0 dB to 0 dB line level 0 dB outputs the full LFE signal at the mix level determined by the recording engineer Selecting MUTE mutes the sound of the LFE channe...

Page 42: ...or on the respective component to prevent accidental operation during the registration procedure 7 Click START When PUSH YOUR REMOTE appears on the TV screen press the button you want to register When registering the IR code be sure to do the following otherwise the IR code may not be registered correctly Point the remote at the IR sensor on the receiver from a distance of less than 2 inches 5 cm ...

Page 43: ...ng click NO Indexing The Index functions let you specify icons for each function button and names up to 8 characters long for each function button and preset radio station 1 Click SETUP in the main menu to display the SETUP menu then click FUNC INDEX or TUNER INDEX 2 For the function buttons FUNCTION INDEX 1 Click the icon to be specified 2 Click the icon you want from the icon menu then click RET...

Page 44: ...cted from the FUNCTION SELECT menu The receiver comes from the factory with Auto Play set to on 1 Click SETUP in the main menu to display the SETUP menu then click OSD SETUP 2 Click AUTO PLAY ON or OFF Notes The Auto Play function does not work when you operate the receiver from the front panel The receiver cancels the automatic playback function of components designed to start playing when they a...

Page 45: ...r and the highlight moves to next macro step number 6 Repeat steps 4 and 5 to enter up to 8 IR codes To erase an entered IR code 1 Click the code you want to erase 2 Click or repeatedly until NO SET appears at the right of the screen 3 Click NO SET Note The ALL OFF command is not available for the Macro Play selected for Auto Start Starting a Macro Play Click FUNCTION in the main menu then click M...

Page 46: ...When you click POINTER ONLY SET the on screen display disappears except for the pointer and an EXIT button To freeze the pointer hold down the direction control button on the remote DEMO This display mode activates a program that explains the various functions of the receiver Note that when the program is running it replaces previously stored data such as surround sound parameters with data from t...

Page 47: ...l be output from the IR emitter on the front panel When the IR OUTPUT is set to OFF IR OFF appears in the main menu Normally IR OUTPUT should be set to ON Note Even if you have selected SEE THROUGH ON the display changes to the factory set color when there is no video signal being input When a video signal is input the display reverts to SEE THROUGH ON Adjusting the position of the on screen displ...

Page 48: ...s SLEEP Operating a CD Changer Downloading the CD name data in a Sony CD changer with a CTRL A1 jack You can download all of the CD name data in a Sony CD changer that is equipped with a CTRL A1 jack thus saving you the trouble of adding names one by one Make sure that the CONTROL A1 connection is complete see page 8 and the CD changer is registered as a Sony CONTROL A1 CD in the IR CODE SETTING m...

Page 49: ... disc you want does not appear click or 3 Click the names of the groups to which you want to assign the CD To remove the CD from one or more groups Click the highlighted group name so that it goes out in step 3 You can assign the CD to one or more group For example to assign the CD to both GROUP 1 and GROUP 4 click both group names in step 3 CD INDEX SETTING 3 4 5 6 7 2 1 8 9 10 TITLE GROUP SELECT...

Page 50: ...isc number 1 Click NUMBER to display the discs in numerical order 2 Click the disc If the disc you want is not displayed click or Playback starts automatically Notes Depending on the type of CD changer connected 3 or 5 disc changer etc you may not be able to select the CD by clicking the disc name In this case select the CD from the normal CD control panel If the CD changer is made by another manu...

Page 51: ...buttons FM MODE button FM AM button SHIFT button DISPLAY button PHONES jack 53 SPEAKERS selector 10 DPC MODE button 55 56 59 1 POWER switch 2 SUR indicator 56 EQ indicator STR DE1015G 55 TONE indicator STR DE815G D760Z 56 INDEX indicator 59 3 Digital Processing Controls 4 IR emitter 4 5 FUNCTION indicators 6 DISCRETE indicator STR DE1015G 36 5 1 INPUT indicator STR DE815G D760Z 53 7 DIRECT PASS in...

Page 52: ...DE MODE 29 DISC SKIP MULTI CD Press repeatedly to skip between discs 0 buttons CD searches tracks Forward or backward Tape MD VCR LD fast forwards or rewinds buttons CD MD LD skips tracks CD Tape MD LD VCR starts play CD Tape MD LD VCR pauses play or record also starts recording with components in record standby π CD Tape MD LD VCR stops play VCR MENU displays the menu of the connected VCR ª GUI d...

Page 53: ...he volume To Do This Reinforce the bass Press BASS BOOST to turn on the BASS BOOST indicator Adjust the balance Turn the BALANCE control to the left L or right R Enjoy high quality sound Press DIRECT PASS to bypass audio effects the equalizer bass reinforcement and surround effects The DIRECT PASS indicator lights up When you listen with headphones Connect the headphones to the PHONES jack and set...

Page 54: ...to Remote Descriptions on page 52 for details To turn off the components Press SYSTEM OFF This will also turn off the video and audio components connected to the SWITCHED AC OUTLETs on the back of this unit at the same time Tuning Radio Stations The receiver lets you tune a station by scanning stations Automatic Tuning and by selecting preset stations Preset Tuning For the on screen operations see...

Page 55: ...usting the Sound The adjusted sounds are stored automatically To select the sound fields For the on screen operations see page 36 Press GENRE repeatedly to display the sound fields genres then press MODE repeatedly to display the sound fields mode For the list of sound fields see page 33 STR DE1015G or 35 STR DE815G D760Z To turn off the sound fields Press SOUND FIELD ON OFF To adjust the equalize...

Page 56: ...st the amount of reverberation present in the current digital cinema sound surround effect Low Frequency Extension LFE mix level DISCRETE only Initial setting is LFE MIX 0dB This parameter lets you attenuate the level of the LFE Low Frequency Extension channel output from the sub woofer without effecting the level of the bass frequencies sent to the sub woofer from the front center or rear channel...

Page 57: ...It lets you adjust the delay time of the Dolby Pro Logic surround sound See page 39 for details Rear speaker level Initial setting is REAR SP 0 dB Lets you adjust level of the rear speakers See pages 24 and 25 for details Center speaker level Initial setting is CENT SP 0 dB Lets you adjust the level of the center speaker See pages 24 and 25 for details Customizing the Receiver Operations The menu ...

Page 58: ...character that the receiver cannot display appears for that character Set up parameters STR DE1015G p SPEAKER SETUP see pages 22 to 23 for details Front speaker Initial setting is FRONT SP LARGE Center speaker Initial setting is CENTER SP LARGE Rear speaker Initial setting is REAR SP LARGE Rear speaker place Initial setting is REAR SP SIDE Sub woofer Initial setting is SUB WOOFER YES p FUNCTION HO...

Page 59: ...to the Control A1 operations Example CD PLAY n index name PLAY n disc memo 2 n track memo 3 2 Up to 13 characters for CD 15 for MD 3 Up to 14 characters for CD 15 for MD Note The display mode returns to FREQUENCY automatically when you press TUNING Set up parameters STR DE815G D760Z Center mode Initial setting is CENTER NORMAL See page 24 for details p DISPLAY set up Dimmer level This setting lets...

Page 60: ...R ON OFF 1 0 p P DISC SKIP TUNER FLASHER OFF PRESET CH PRESET CH TAPE FLASHER OFF POWER ON OFF 0 p P REC DAT FLASHER OFF 0 p P REC MD FLASHER OFF POWER ON OFF 0 p P REC PHONO FLASHER OFF TV DBS FLASHER OFF POWER ON OFF CH CH 5 1 INPUT 2 FLASHER OFF POWER ON OFF 0 p P 1 Sony CD player only 2 STR DE815G and STR D760Z only 3 Click the remote when the operation you want appears in the front panel disp...

Page 61: ...erating the unit because the on screen display is distorted If you connect two or more VCRs to the receiver make sure to use a distributor when connecting the TV antenna to the VCRs to preserve video signal quality Clean the head of the VCR Do not select channels where there is no broadcast Set your VCR etc to skip channels where there is no broadcast The remote does not function Replace weak batt...

Page 62: ...he sound field function Set DIRECT PASS to OFF Make sure you set the SPEAKERS selector correctly see page 10 Tuner Radio stations cannot be tuned in Check that the antenna is connected securely Adjust the antenna and connect an external antenna if necessary The signal strength of the stations is too weak when you tune in with Automatic Tuning Use Direct Tuning see page 29 Make sure you set the tun...

Page 63: ...els 4 ohms DIN 1 kHz 100W 100W Other models 8 ohms 20 Hz 20 kHz THD 0 09 100 W 100 W Singaporean models 4 ohms DIN 1 kHz Front 100 W 100 W Center 100 W Rear 100 W ch Other models 8 ohms at 1kHz THD 0 8 Front 100 W ch Center 100 W Rear 100 W ch No sound may be output when using certain sound sources and or sound mode settings Singaporean models 4 ohms DIN 1 kHz Front 100 W 100 W Center 100 W Rear 1...

Page 64: ...PRESET button press the POWER switch When you change the interval all the preset stations will be erased To reset the interval repeat the same procedure 0 5 2 General System Power requirements Power consumption AC outlets Dimensions Mass Approx Supplied accessories Design and specifications are subject to change without notice Tuner section PLL quartz locked digital synthesizer system Preamplifier...

Page 65: ...r speaker s we recommend that you customize the Dolby Surround sound field by selecting the appropriate center mode to take advantage of Dolby Pro Logic Surround sound Effect level Combination of the level of early reflections and reverberation You can adjust the effect level in 6 levels As you select higher levels the room becomes live and as you select lower levels the room becomes dead Paramete...

Page 66: ...66 ...

Page 67: ...67 ...

Page 68: ...ing the controls on the front panel 59 Inserting batteries into the remote 15 IR repeater 7 46 47 L Labeling See Indexing M Macro operations 45 N O Naming See Indexing NORMAL mode 24 P Q Parameter 37 38 65 PHANTOM mode 24 Playing audio components without TV 60 Preset station 30 Presetting radio stations 30 Preset tuning 30 54 Program source indexing 43 59 selecting 26 53 R Rear panel 5 6 Receiving...

Reviews: