

SR-D1 4-432-314-12(1)
Overview
The SR-D1 Memory Drive Unit is a SRMemory card drive capable of high-speed
transfer of F65RAW and SStP data. The unit can be connected to a computer via
USB or eSATA interface.
Parts Identification
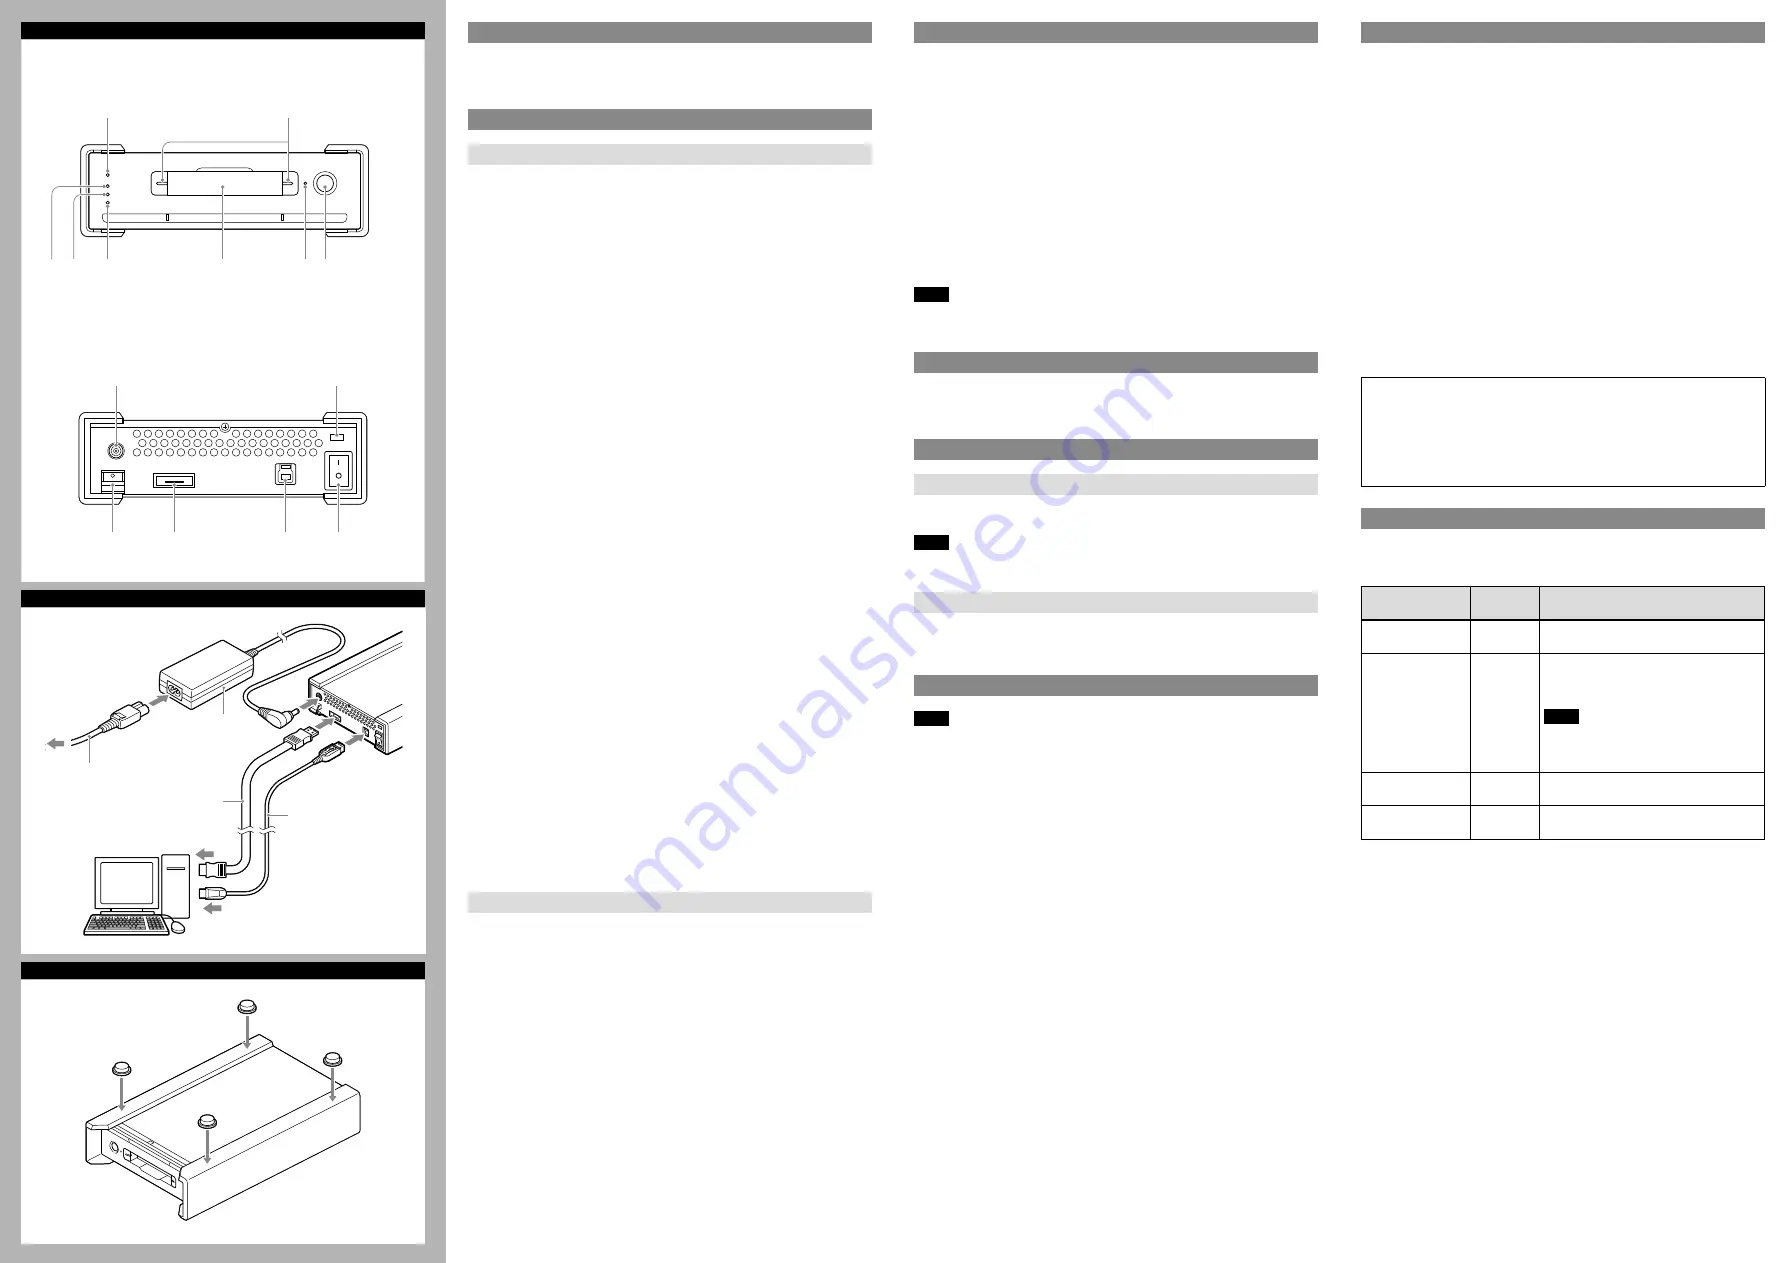
-1 Front
POWER indicator
Light or blinks based on the operating status of the unit.
Lit green:
The unit is turned on.
Blinking red:
The power supply voltage may be incorrect.
If the indicator blinks red, stop operation and contact your local Sony
representative.
STATUS indicator
Displays the status of the unit.
Lit green:
Operating normally.
Lit orange:
A warning has occurred.
Blinking red:
An error has occurred.
Blinking purple:
Firmware update in progress. For details, refer to “Updating the
Firmware of the Drive” in the SRMemory Drive Utility Help.
If a warning or error occurs, follow the instructions in the message displayed by
SRMemory Drive Utility to resolve the problem.
USB indicator
Displays the status of connection to the computer via USB.
Off:
Not connected via USB.
Lit blue:
Connected via USB 3.0.
Lit green:
Connected via USB 2.0.
Blinking red:
An error has occurred. Check that the cable is properly connected
and that the cable is not damaged.
eSATA indicator
Displays the status of connection to the computer via eSATA.
Off:
Not connected via eSATA.
Lit green:
Connected via eSATA.
Blinking red:
An error has occurred. Check that the cable is properly connected
and that the cable is not damaged.
SRMemory slot
Insert the SRMemory card here.
Manual eject hole
For details, see “Ejecting an SRMemory Card without a Power Supply.”
UNLOCK button
Unlocks the SRMemory slot when the SRMemory indicator is lit blue.
Press this button to unlock the slot before removing an SRMemory card.
SRMemory indicators
Display the status of the SRMemory card inserted in the slot.
Off:
The SRMemory card is logically detached from the unit.
Lit blue:
The SRMemory card is connected to the unit and available for use.
Lit green:
Files on the SRMemory card are being accessed.
Blinking red:
An error has occurred. The file system or data on the SRMemory
card may be damaged. Follow the instructions in the message
displayed by SRMemory Drive Utility, and eject or salvage the card
or resolve the problem as indicated.
-2 Rear
DC IN connector
Connect the supplied AC adapter here, and plug the adapter into a wall outlet.
DC cable clamp
Use this to secure the cable.
eSATA connector
Connect an eSATA cable here.
USB connector
Connect the USB cable here.
Power switch
Turns the unit on or off.
Anti-theft key hole
Connect a commercially available anti-theft key here.
Connecting the Unit to a Computer
1
Connect the AC adapter
to the power cord
.
2
Connect the unit to the computer.
When using the USB cable
2-1
Insert the supplied USB cable securely into the USB connector on the
unit.
2-2
Connect the USB cable to the USB connector on the computer.
When using an eSATA cable
2-1
Insert the eSATA cable securely into the eSATA connector on the unit.
2-2
Connect the eSATA cable to the eSATA connector on the computer.
3
Confirm that the operating system on the computer has started up, and then
turn on the unit.
CAUTION
When you connect the USB cable of the unit to peripheral device, use the
supplied cable to prevent malfunction due to radiation noise.
Note
Use either the USB cable or an eSATA cable to connect the unit to a computer.
Do not use both cables at the same time.
Attaching the Rubber Feet
Depending on the installation environment, the unit may slide when an
SRMemory card is being inserted, causing difficulty during insertion. In such
cases, attach the supplied rubber feet in the locations illustrated.
Inserting an SRMemory Card
Inserting
1
Fully insert the SRMemory card straight into the slot.
2
Check that the SRMemory indicators light blue.
Note
If there is a large number of files stored on the SRMemory card, it may take the
computer a few minutes to recognize the card.
Ejecting
1
Press the UNLOCK button.
2
Check that the SRMemory indicators change from blinking blue to off.
3
Remove the SRMemory card.
Ejecting an SRMemory Card without a Power Supply
Note
If you press the UNLOCK button before turning the power off, the SRMemory
card can be removed normally.
If you do not press the UNLOCK button before turning the power off, the
SRMemory card will remain locked and cannot be removed normally. In such
cases, turn the unit on and press the UNLOCK button to unlock the card. The
SRMemory card can then be removed normally.
If an SRMemory card is locked and you cannot turn on the unit or the UNLOCK
button does not function, remove the SRMemory card as follows.
1
Check that the SRMemory card is fully inserted.
2
Insert a long, thin object such as a straightened paper clip (1 mm or less in
diameter) into the manual eject hole, and remove the SRMemory card while
gently pressing the inserted object.
A
-1
Front
-2
Rear
B
A
B
C
Specifications
Memory Drive Unit
Power Requirements
12 V DC
Power Consumption
30 W (maximum)
Operating Temperature
5 °C to 40 °C (41 °F to 104 °F)
Storage Temperature
–20 °C to +60 °C (–4 °F to +140 °F)
Mass
1.5 kg (3 lb 4.9 oz.)
Dimensions (W × H × D)
1)
154 × 49 × 227mm (61⁄8 × 115⁄16 × 9 inches)
(excluding protrusion)
USB
Hi-Speed USB (USB2.0 compliant) / SuperSpeed USB
(USB3.0 compliant)
eSATA
eSATA 1.0 / eSATA2.0
Supplied Accessories
AC adapter (1) (part number: 1-468-626-6X)
USB cable (1) (part number: 1-839-351-1X)
Rubber feet (4)
Operation manual
Japanese (1)
English (1)
Chinese (1)
1) The values for dimensions are approximate.
Note
Always verify that the unit is operating properly before use. SONY WILL NOT
BE LIABLE FOR DAMAGES OF ANY KIND INCLUDING, BUT NOT LIMITED TO,
COMPENSATION OR REIMBURSEMENT ON ACCOUNT OF THE LOSS OF PRESENT
OR PROSPECTIVE PROFITS DUE TO FAILURE OF THIS UNIT, EITHER DURING THE
WARRANTY PERIOD OR AFTER EXPIRATION OF THE WARRANTY, OR FOR ANY
OTHER REASON WHATSOEVER.
Notes on Software
The following applications are available for use with the SR-D1.
Download the following software from the Sony Professional Products site
1)
for
use with this unit.
Software
Supported
OS
Description
SRMemory Driver
Software
Windows/
Macintosh
Software driver that allows the computer
to recognize the SR-D1.
SRMemory Drive
Utility
Windows/
Macintosh
Utility software that allows you to manage
the SR-D1 software version and other
operations.
Note
The utility software is installed
automatically when you install the
SRMemory Driver Software.
SR Viewer Software Windows/
Macintosh
Application software that enables playback
of MXF SStP (Simple Studio Profile) files.
F65RAW Viewer
Software
Windows/
Macintosh
Application software that enables playback
of F65RAW files.
1) Sony Professional Products site
U.S.A.
http://pro.sony.com
ˎ
ˎ
Canada
http://www.sonybiz.ca
ˎ
ˎ
Latin America
http://sonypro-latin.com
ˎ
ˎ
Europe, Middle East and Africa
http://www.pro.sony.eu
ˎ
ˎ
Japan
http://www.sonybsc.com
ˎ
ˎ
Asia Pacific
http://pro.sony-asia.com
ˎ
ˎ
Korea
http://bp.sony.co.kr
ˎ
ˎ
China
http://pro.sony.com.cn
ˎ
ˎ
System requirements
For details on the functions of the above recommended software and their
system requirements, refer to the following file and Help.
SRMemory Drive Software:
ReadmeFirst (available on the download page of the software)
SRMemory Drive Utility:
Help (refer to the “Features” section or “Recommended Operating
Environment” within that section)
Other software:
Readme (available on the download page of each respective software)
eSATA cable
To eSATA connector
To USB connector
USB cable