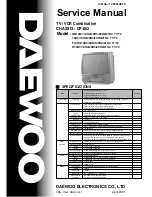
background image

47

Editing

AUDIO DUB

P

 PAUSE

Audio dubbing

This feature lets you record over the
normal audio track.  The monaural
sound previously recorded is replaced
while the original hi-fi sound remains
unchanged.  Use this feature to add
commentary to a tape that you have
recorded with a camcorder.  You can also
record your karaoke performances.

Audio dubbing from a
stereo system or other
external source

Before you start dubbing

• Turn on your TV and set it to the video

channel.

• Press INPUT SELECT or PROG +/–  to

display “LINE 2” (or “LINE 1”) in the
display window.

1

Insert a source tape into the stereo system (or the playback VCR).
Search for the point to start playback and set it to playback pause.

2

Insert a prerecorded tape with its safety tab in place into this
(recording) unit.  Search for the end of the section to be replaced and
press 

P

 PAUSE.

3

Press CLEAR to reset the counter to “0:00:00.”

4

Rewind the prerecorded tape to the beginning of the section to be
replaced.

The unit enters pause mode.

CLEAR

1

2

3

4

5

6

7

8

9

0

continued

Summary of Contents for SLV-KH9ME/PS

Page 1: ...PAL NTSC Video Cassette Player 1999 Sony Corporation SLV KH9ME PS Operating Instructions G 3 867 114 15 1 ...

Page 2: ...unit near heat sources such as radiators or air ducts or in a place subject to direct sunlight excessive dust mechanical vibration or shock Do not install the unit in an inclined position It is designed to be operated in a horizontal position only Keep the unit and cassettes away from equipment with strong magnets such as microwave ovens or large loudspeakers Do not place heavy objects on the unit...

Page 3: ... the index function 28 Enjoying the surround sound Virtual Surround 29 Adjusting the picture 31 Changing menu options 32 Adjusting the LCD contrast Karaoke sing along 33 Singing along with karaoke video tapes 39 Searching for a song using the AMS function 41 Playing a tape in a programmed order Karaoke Programme 43 Grading your singing Editing 45 Connecting to a VCR or stereo system 46 Basic editi...

Page 4: ...emote commander R6 size AA batteries Aerial cable Getting Started Audio video cable 3 phono to 3 phono Microphone Plug adaptor SLV KH9ME only Step 1 Unpacking Check that you have received the following items with the unit ...

Page 5: ...icks into position Using the remote commander You can use this remote commander to operate this unit and a Sony TV Buttons on the remote commander marked with a dot can be used to operate your Sony TV If the TV does not have the g symbol near the remote sensor this remote commander will not operate the TV Remote sensor TV VIDEO continued To operate the unit a Sony TV 1 2 3 Set TV VIDEO to VIDEO an...

Page 6: ...ot control this unit With normal use the batteries should last about three to six months If you do not use the remote commander for an extended period of time remove the batteries to avoid possible damage from battery leakage Do not use a new battery with an old one together Do not use different types of batteries together Some buttons may not work with certain Sony TVs ...

Page 7: ...s 2 Connect the mains lead to the mains Step 3 Connecting the unit To a TV that has audio video input jacks This connection improves picture and sound quality and is necessary if you want to use the Trinitron TV Synchro Play function If your TV does not have audio video input jacks skip this step and go to page 9 LINE IN Mains lead to mains LINE 1 OUT Signal flow Audio video cable supplied continu...

Page 8: ...me follow the procedure below to set up the unit see page 31 1 Press MENU 2 Press to move the cursor to SET UP MENU and press OK 3 Press to move the cursor to CONNECT L1 then select TV 4 Press OK Note When you connect the LINE 1 IN jacks of the unit to other equipment set CONNECT L1 to OTHER LINE 1 IN LINE OUT Audio video cable not supplied Signal flow Step 3 Connecting the unit continued SET UP M...

Page 9: ...he unit and the aerial input of your TV using the supplied aerial cable 3 Connect the mains lead to the mains AERIAL IN To a TV that does not have audio video input jacks If you connect the unit to your TV using the audio video cable skip this step AERIAL IN Mains lead to mains AERIAL OUT Aerial cable supplied Signal flow AERIAL IN OUT AERIAL IN OUT continued ...

Page 10: ...ecting a stereo system as shown on the right To a satellite tuner You can record programmes from other equipment such as a satellite tuner LINE IN LINE 1 OUT AUDIO Audio cable not supplied LINE 1 IN LINE OUT Audio video cable not supplied Signal flow Signal flow Step 3 Connecting the unit continued ...

Page 11: ...e position for the video playback Choose a channel between UHF 30 and 39 on the TV where there is no picture and no sound or only a standby rustling sound This channel will now be referred to as the video channel Step 4 Tuning your TV to the unit If you have connected the unit to your TV using the audio video cable skip this step I u ON STANDBY INPUT SELECT continued ON STANDBY INPUT SELECT ...

Page 12: ...he RF CH screw at the rear of the unit with a screw driver to a position where the TV clearly displays the blue screen To set another RF channel number on the VCR select a channel number that does not receive a broadcast signal in your area and is clear of interference from other channels To select the TV system For your TV to receive the correct signal from your unit you must set the TV SYSTEM sw...

Page 13: ...set it to the video channel 2 Insert a tape The unit turns on and starts playing automatically if you insert a tape with its safety tab removed 6 EJECT CLEAR DISPLAY TRINITRON TV SYNCHRO PLAY COLOR SYSTEM NTSC PB switch AUDIO MONITOR continued PLAY P PAUSE FF p STOP 03 REW 1 2 3 4 5 6 7 8 9 0 ...

Page 14: ...to conform to the system that the tape was recorded in Normally the colour system is correctly set whenever the tape is inserted If your tape was recorded in PAL MESECAM NTSC Press COLOR SYSTEM until the indicator below appears in the display window PAL PAL NTSC Set NTSC PB to ON PAL TV NTSC 4 43 NTSC 3 58 If your TV is PAL NTSC 4 43 NTSC 3 58 To play an NTSC recorded tape Set NTSC PB at the rear ...

Page 15: ...the STEREO indicator appears in the display window SP APC Sound level indicator Left channel indicator Right channel indicator To check the audio channel and sound level You can check the audio channel and sound level visually with the indicators in the display window To listen to Stereo Left channel Right channel Standard sound Usually the mixed sound of the left and right channels To listen to M...

Page 16: ...difference between the counting cycles of the two colour systems Depending on your TV the following may occur while playing an NTSC recorded tape the picture becomes black and white the picture shakes no picture appears on the TV screen black streaks appear horizontally on the TV screen the colour density increases or decreases To listen to playback sounds in stereo you must use the AUDIO OUT conn...

Page 17: ...ng it at the unit Operation Make sure that the TV s power is in standby mode Press TRINITRON TV SYNCHRO PLAY and hold the remote commander in place for about two seconds The unit and TV turn on and the TV is set to the video channel If there is a tape in the unit playback starts automatically Notes If the Trinitron TV Synchro Play function does not work properly Wait a few moments and press the bu...

Page 18: ...mes You can record TV programmes from your TV by connecting the TV to the unit s LINE 1 IN jacks Before you start Connect the LINE 1 IN jacks of the unit to the audio video output jacks of your TV see Additional connection on page 8 Set CONNECT L1 to TV in the SET UP MENU see page 8 PROG SP LP SP EP r REC DISPLAY INPUT SELECT p STOP REC indicator 1 2 3 4 5 6 7 8 9 0 ...

Page 19: ...the unit lights up To stop recording Press p STOP To check the remaining tape length Press DISPLAY The white bar indicates the approximate length of tape remaining To record stereo and bilingual programmes Set the connected TV to output stereo or bilingual sound When stereo or bilingual sound is received through the line inputs the STEREO indicator lights up in the front display You cannot select ...

Page 20: ...e tab hole with adhesive tape To record NTSC colour system programmes NTSC colour signals can be recorded on this unit For tape speed select SP or EP in step 4 EP Extra Play provides recording time three times as long as SP however SP produces better picture and audio quality When playing back the unit automatically detects the tape speed Hi fi audio track main track Stereo sound left right channe...

Page 21: ...de the unit displays the karaoke information page 38 If a tape has portions recorded in both PAL and NTSC systems the time counter reading will not be correct This discrepancy is due to the difference between the counting cycles of the two colour systems The remaining tape indicator bar may differ in length between the PAL and NTSC system When you insert a non standard commercially available tape ...

Page 22: ... play To resume normal playback Press PLAY Operation During fast forward hold down FF FF During rewind hold down 03 REW 0 REW During playback press FF or 03 REW on the remote commander During playback hold down FF FF or 03 REW 0 REW When you release the button normal playback resumes During playback press 2 During playback or pause press SLOW During pause press FF or 03 REW on the remote commander...

Page 23: ...y shake while playing or searching at various speeds The picture may have snow when playing at high speed in reverse Normal speed Double speed Double speed in reverse High speed in reverse Mark on the TV screen Playback mode High speed Normal speed in reverse Slow motion Slow motion in reverse pause Using the click shuttle ring With the click shuttle ring you can operate a variety of playback opti...

Page 24: ...ing its timer The connected equipment must have a timer function for this feature to work When the connected equipment turns on the unit also automatically turns on and starts recording a programme from LINE 1 IN How to connect for Synchronised recording Connect the other equipment to the LINE 1 IN jacks of this unit LINE 1 IN VMC 810HG audio video cable not supplied LINE OUT Signal flow This unit...

Page 25: ...ur system and SP or EP for the NTSC colour system 4 Hold down SYNCHRO REC for more than two seconds The SYNCHRO REC indicator on the unit lights up and the unit stands by for recording The unit automatically turns on and starts recording when it receives video signals from the connected equipment To cancel the Synchronised recording function Press SYNCHRO REC The SYNCHRO REC indicator lights off T...

Page 26: ...Synchronized recording also stops automatically When the connected equipment turns on while the SYNCHRO REC indicator is lit recording starts automatically Some equipment keeps transmitting signals even though the power is off In this case the Synchronised recording feature does not work because the VCR will not be able to know when to start recording Synchronised recording continued ...

Page 27: ...n karaoke mode is set to on you can search using the AMS function For details about the AMS function see Searching for a song using the AMS function on page 39 Note No index signal will be added when recording starts from recording pause However an index signal will be marked if you change the programme position during recording pause INDEX SEARCH 5 Searching using the index function The unit mark...

Page 28: ...UAL SURROUND repeatedly to select the effect you want 2 Press to adjust the level of the effect selected To cancel the Virtual Surround function Press VIRTUAL SURROUND repeatedly until the VIRTUAL SURROUND knob lights off Tip You can also set the Virtual Surround effect using the MENU option Notes This function is available only when the sound is reproduced on a stereo TV or other stereo audio equ...

Page 29: ...pear as you press one of the two buttons the indicator lights up If you cannot get a clear picture with manual adjustment press TRACKING AUTO MANUAL to return to automatic adjustment About the R2 Reality Regenerator function The R2 function automatically adjusts the picture to the most suitable quality during playback When playback starts the R2 function activates and the R2 button lights up Each ...

Page 30: ...cted To deactivate the APC Set APC to OFF in the SET UP MENU The APC indicator in the display window goes off Tip To set the tracking to the centre position press the TRACKING and buttons on the unit at the same time Note There is a delay of a few seconds before the unit actually starts recording while the unit analyses the tape To avoid the delay first set the unit to recording pause the APC indi...

Page 31: ...utton will not function OFF to listen to the hi fi and normal audio tracks separately Select the sound using the AUDIO MONITOR button For details see page 48 TV to record TV programmes using the LINE 1 IN jacks OTHER to record other audio video sources using the LINE 1 IN jacks For details see page 8 ON to switch on the APC Adaptive Picture Control function and improve picture quality OFF to switc...

Page 32: ...y 1 Hold down LCD CONTR on the unit for more than three seconds The contrast level appears in the display window 2 Turn LCD CONTR to adjust the contrast 3 Press LCD CONTR Tip If you do not turn the LCD CONTR knob within 10 seconds the LCD contrast mode will be deactivated LCD CONTR knob SP APC ...

Page 33: ...nd the KARAOKE CONTROL knob light up 2 Insert a karaoke video tape The unit starts playing automatically if you insert a tape with its safety tab removed 3 Press PLAY If you want to play back a specific song see Searching for a song using the AMS function on page 39 4 Switch the microphone on Now you can enjoy singing karaoke To cancel karaoke mode Press KARAOKE ON OFF The KARAOKE ON OFF button li...

Page 34: ...o effect Turn ECHO This adjusts both microphones echo effect to the same level To get the best effect adjust the microphone volume to a slightly higher level than the music volume Tip When you sing along with TV broadcasts or music played back on equipment connected to the LINE 1 IN or LINE 2 IN jacks on the unit play the music source and follow steps 1 and 4 When CONNECT L1 in the SET UP MENU is ...

Page 35: ...f tone intervals To return to the original pitch Turn KARAOKE CONTROL until 0 appears in the display window Tip You can also change the pitch using the supplied microphone To change the pitch set the KEY S D OFF selector to KEY then press the n buttons To Raise the pitch Lower the pitch Range 8 half tones 8 half tones Display window n1 to n8 1 to 8 Turn KARAOKE CONTROL clockwise anticlockwise KARA...

Page 36: ...e supplied microphone to S D 2 Press n or on the supplied microphone to select a high or low harmony voice S D Score indication Time counter Remaining tape length Key Control indication Displaying the karaoke information Press DISPLAY when the unit is in karaoke mode The karaoke information appears on the TV screen If you press the DISPLAY button once more the remaining tape length and time counte...

Page 37: ... the display window changes as follows PON n ASSIST n ASSIST n Normal No indicator This ASSIST is for the Assist Pro function To cancel the Karaoke Pon function Press KARAOKE CONTROL repeatedly until the indicator disappears Note The Karaoke Pon function does not work with the following tapes Tapes on which different vocal sounds are recorded on the left and right channels such as a duet Monaural ...

Page 38: ...changes as follows PON n ASSIST n ASSIST n Normal No indicator This ASSIST is for the Assist Pro function Hiding the lyrics Assist Pro The Assist Pro function of Vocal Assist will hide the lyrics that appear on the screen If you stop singing into the microphone the lyrics will reappear To set to Assist Pro press KARAOKE CONTROL repeatedly until ASSIST PRO appears on your TV screen To cancel the Vo...

Page 39: ... OK 2 Press to set SEARCH MODE to AMS 3 Press OK Searching for a song using the AMS function You can search for the start of a specific song on a karaoke video tape To search for a song using the AMS function you need to set Search mode to AMS Before you start Turn on the unit and the TV Set the TV to the video channel INDEX SEARCH AMS MENU OK continued SET SELECT SET UP KARAOKE B b V v SCORE LEVE...

Page 40: ...ackwards press INDEX SEARCH AMS The unit starts searching and the number of blank spaces on the TV screen counts down to zero Playback starts automatically from that point To stop searching Press p STOP Note You cannot use the AMS function on tapes that have many blank spaces in a short time span such as dramas and dialogues In this case set SEARCH MODE to INDEX in step 2 of Selecting the AMS func...

Page 41: ...s to return to that number and reset it Playing a tape in a programmed order Karaoke Programme You can sing songs in the order you want Before you start Turn on your TV and set it to the video channel Set SEARCH MODE to AMS in the SET UP KARAOKE menu For details see Selecting the AMS function on page 39 Programme number buttons OK SELECT SET KARAOKE PROGRAM 9 OK AMS b b b b b b b b b 0 PLAY No SEL...

Page 42: ...ke Programme mode When you press the INDEX SEARCH AMS buttons while in Karaoke Programme mode the unit does not search beyond the current song but rewinds the tape to the beginning of the song being played back or fast forwards to the next song When the unit exits Karaoke Programme mode pressing the INDEX SEARCH AMS buttons returns it to its normal function See Searching for a song using the AMS f...

Page 43: ...d above your present score To score automatically Auto Score The unit automatically scores each song in order during Karaoke Programme mode Press MENU and select SET UP KARAOKE then set AUTO SCORE to ON Each time a song ends the score appears for five seconds To set the score level This unit has two different score levels To set the score level press MENU and select SET UP KARAOKE Then set SCORE L...

Page 44: ...h the total score appears on the TV screen for 5 seconds To end the competition early press SCORE at any time The total score for each group s songs appears on the TV screen for 5 seconds Tips The highest possible score is 99 points To display your score on the TV screen again press DISPLAY The highest score is cleared each time you set karaoke mode to off Note The grading is not absolute Please u...

Page 45: ...acks of the same colour If the other VCR is a monaural type connect the audio plug to the AUDIO L white jack The sound is recorded on both right and left channels If you connect to the AUDIO R red jack the sound is recorded only on the right channel If you connected this unit to both the LINE IN and LINE OUT jacks of the other VCR select the input correctly to prevent humming noise Signal flow Con...

Page 46: ...se 4 To start editing press the P PAUSE buttons on both units at the same time To stop editing Press the p STOP buttons on both units Tips To cut out unwanted scenes while editing press P PAUSE on this unit when an unwanted scene begins When it ends press P PAUSE again to resume recording You can dub sound onto the normal audio track through a microphone while editing Set karaoke mode to on before...

Page 47: ...art dubbing Turn on your TV and set it to the video channel Press INPUT SELECT or PROG to display LINE 2 or LINE 1 in the display window 1 Insert a source tape into the stereo system or the playback VCR Search for the point to start playback and set it to playback pause 2 Insert a prerecorded tape with its safety tab in place into this recording unit Search for the end of the section to be replace...

Page 48: ... this unit and the stereo system or other VCR To listen to both the hi fi and normal audio Set AUDIO MIX to ON in the SET UP MENU page 31 Use this feature to listen to dubbed audio over the original hi fi audio When AUDIO MIX is set to ON the AUDIO MONITOR button does not function Remember to reset AUDIO MIX to OFF after playing the tape To listen to the dubbed sound normal audio Press AUDIO MONIT...

Page 49: ...et karaoke mode to on The KARAOKE ON OFF button lights up 2 Insert the prerecorded tape with its safety tab in place into the unit Search for the end of the section to be replaced and press P PAUSE 3 Press CLEAR to reset the counter to 0 00 00 4 Rewind the prerecorded tape to the beginning of the section to be replaced The unit enters pause mode 5 Press AUDIO DUB The AUDIO DUB indicator on the uni...

Page 50: ...aoke LD 1 Insert a tape with its safety tab in place into the unit 2 Press KARAOKE ON OFF to set karaoke mode to on 3 Press INPUT SELECT to select LINE 2 4 Press r REC 5 Start playback the karaoke LD and singing into the microphone The mixed sound is recorded on the normal audio track and the sound input from the LINE 2 IN jacks is recorded on the hi fi audio track Tip When dubbing from the microp...

Page 51: ...tracking with the 4 TRACKING buttons Make sure the colour system is correctly set to the system that the tape was recorded in If you made connections using the aerial cable only make sure the TV system is set correctly for your area The video heads are dirty see below Clean the video heads using the Sony T 25CLD E 25CLDR or T 25CLW video head cleaning cassette If these cleaning cassettes are not a...

Page 52: ...o use the Sony T 25CLD T 25CLW or E 25CLDR head cleaning cassette If these cleaning cassettes are not available in your area have the heads cleaned at your nearest Sony service facility a standard service charge will be required Note When you manually adjust the tracking the Head Condition Sensor will not operate Remedy The safety tab has been removed To record on this tape cover the tab hole Chec...

Page 53: ...p p 75 ohms unbalanced sync negative AUDIO OUT phono jack 2 each Standard output 327 mVrms Load impedance 47 kilohms Output impedance less than 10 kilohms General Power requirements 110 240 V AC 50 60 Hz Power consumption 19W Operating temperature 5 C to 40 C Storage temperature 20 C to 60 C Dimensions Approx 430 100 286 mm w h d including projecting parts and controls Mass Approx 4 7 kg Supplied ...

Page 54: ... I u ON STANDBY switch indicator 11 3 LINE 2 IN VIDEO AUDIO L R jacks 45 4 R2 Reality Regenerator button 29 5 Tape compartment 6 6 EJECT button 14 7 0 REW rewind button 14 22 8 FF fast forward button 14 22 9 PLAY button 13 º p STOP button 14 19 r REC record button 19 Click shuttle ring 23 P PAUSE button 14 46 LINE 2 OUT VIDEO AUDIO L R jacks ...

Page 55: ...SELECT button 11 6 REC record indicator 19 7 SYNCHRO REC synchronised recording indicator 25 8 AUDIO DUB dubbing indicator 47 9 VIRTUAL SURROUND LCD CONTR contrast knob 28 32 0 KARAOKE CONTROL knob 33 35 37 TRACKING buttons 30 SYNCHRO REC synchronised recording button 25 CONTROL jack 33 MIC microphone IN 1 2 jacks 33 Front panel continued continued ...

Page 56: ...or 37 5 ASSIST indicator 38 6 S D self duet indicator 36 7 KEY indicator 35 8 SCORE indicator 44 9 Audio channel sound level indicator 15 º Time counter line pitch adjustment self duet setting karaoke score contrast indicator 15 19 32 Tracking indicator 29 Colour system indicators Tape speed indicators 19 L SP STEREO APC PON ASSIST S D KEY SCORE PAL NTSC LEP R 6 3 dB 0 3 10 ...

Page 57: ... 7 9 2 LINE 1 IN VIDEO AUDIO L R jacks 8 3 AERIAL IN connector 9 4 TV SYSTEM switch 12 Rear panel 5 RF CH Radio Frequency channel screw 12 6 AERIAL OUT connector 9 7 NTSC PB playback switch 14 8 LINE 1 OUT VIDEO AUDIO L R jacks 7 continued ...

Page 58: ...ON TV SYNCHRO PLAY button 17 4 K PROG karaoke programme button 41 5 SCORE button 43 6 INPUT SELECT button 19 7 r REC record button 19 8 TRACKING AUTO automatic MANUAL button 29 9 SP Standard Play LP Long Play SP EP Extra Play button 19 º 4 TRACKING NORM normal SLOW STILL ADJUST buttons 29 MENU button 8 CLEAR button 15 1 2 3 4 5 6 7 8 9 0 ...

Page 59: ...47 AUDIO MONITOR button 15 48 ª Programme number ten s digit buttons 41 º DISPLAY button 15 38 PROG programme buttons for TV VOL volume buttons for TV INDEX SEARCH AMS buttons 27 39 SLOW button 22 P PAUSE button 8 14 p STOP button 8 14 03 REW rewind button 8 14 FF fast forward button 8 14 PLAY OK button 8 14 2 button 22 Remote commander continued 1 2 3 4 5 6 7 8 9 0 ...

Page 60: ...rching 27 K Karaoke sing along 33 grading your singing 43 karaoke Pon 37 karaoke programme 41 key control 35 self duet 36 vocal assist 38 L LP mode 19 M Monaural 20 Monitoring during playback 15 N Normal audio track 20 O Optional setting 31 P Q Picture adjustment See Adjusting Playback 13 at various speeds 22 frame by frame 22 selecting the sound 15 slow motion 22 Index R R2 29 Recording 18 biling...

Reviews: