background image

8

Part Names and Functions

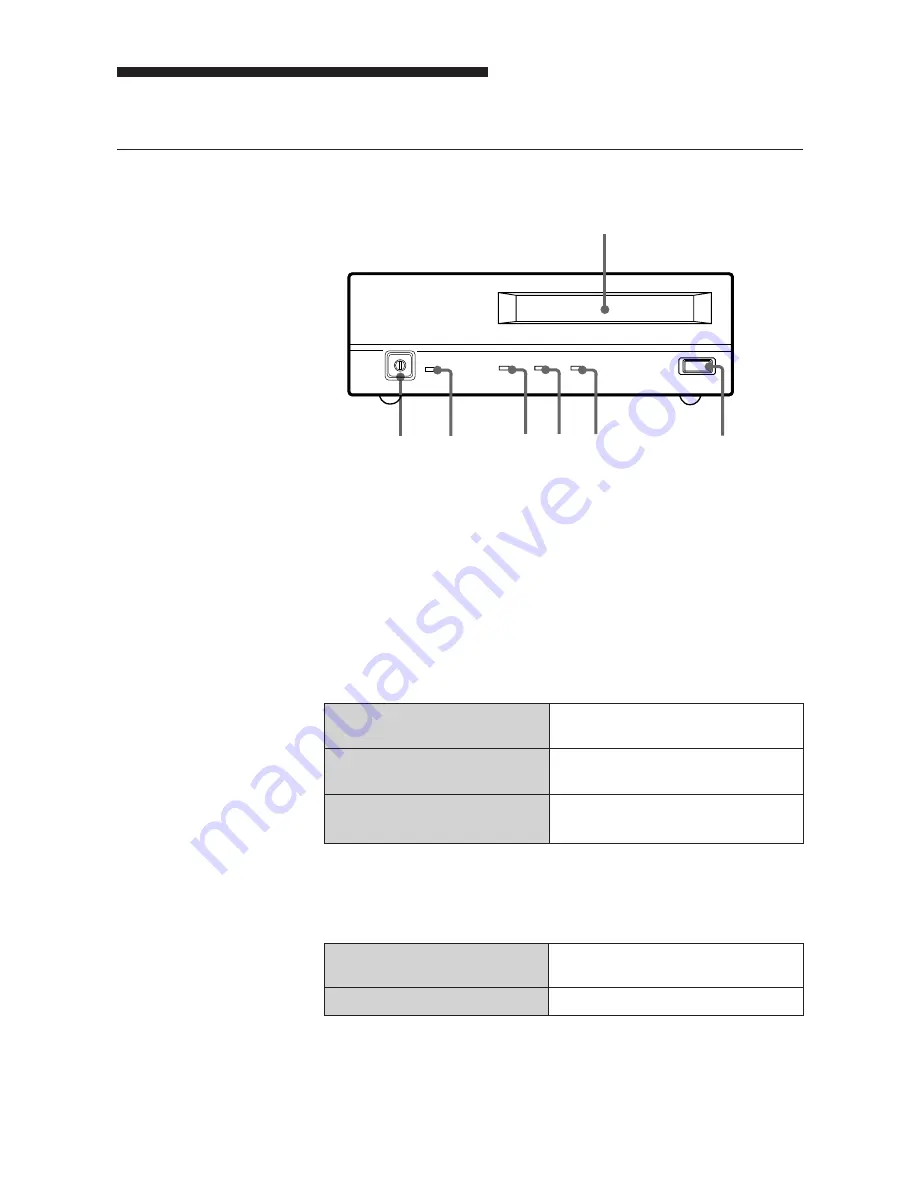
Front panel

1

2

3

4

5

6

7

POWER

BUSY

TAPE

STATUS

EJECT

1

DDS Data Cartridge Receptacle

See page 15 for information on inserting and removing a DDS data
cartridge.

2

EJECT Button

Push to remove a data cartridge from the drive.

3

STATUS Indicator

Lights when an inserted cartridge is write-protected. This indicator also
lights under the following conditions:

Drive needs cleaning:

repeating long-on, short-off

blinking.

End of Tape during cleaning:

repeating blinking (same on-off

interval).

Drive Malfunctioning:

repeating short-on (once or twice),

 long-off blinking.

4

TAPE Indicator

When a DDS cartridge is installed, this indicator lights. This also lights
under the following conditions:

Inserting and removing

repeated blinking (same on-off

a cartridge:

interval).

Cartridge deteriorated:

alternating long-short blinking.

Part 1. Introduction

Summary of Contents for SDT-S9000 - DDS Tape Drive

Page 1: ...SDT S9000 BM DDS Drive Unit 3 860 267 12 1 User s Guide ...

Page 2: ...Sony Corporation Printed in Japan 1997 SDT S9000 BM DDS Drive Unit User s Guide ...

Page 3: ... of the FCC Rules These limits are designed to provide reasonable protection against harmful interference in a residential installation This equipment generates uses and can radiate radio frequency energy and if not installed and used in accordance with the instructions may cause harmful interference to radio communications However there is no guarantee that interference will not occur in a partic...

Page 4: ... DO NOT USE ANY OTHER POWER CORD Plug Cap Tandem blade with ground pin NEMA 6 15P Configuration Cord Type SVT or SJT three 16 or 18 AWG wires Length Maximum 14 7 feet 4 5m Rating Minimum 10A 250 V NOTICE This notice is applicable for countries other than USA and Canada In the countries other than USA and Canada use the power cord set approved by the appropriate testing organization for the specifi...

Page 5: ...ms 11 Interconnections 12 SCSI ID Setting 13 Configuration Switches Setting 13 Part 3 Operation How to use the DDS Drive 15 Cartridge Removal 16 Taking Care of the Drive 17 Safety Considerations 17 Avoiding Damage 17 Taking Care of Cartridges 19 Use Precautions 19 Storage Precautions 19 Head Cleaning 20 How to Clean 20 Specifications SDT S9000 BM 21 Third Party Support Contact In the USA 22 Append...

Page 6: ...of each part Part 2 describes the necessary connections between the drive and the host computer If other SCSI devices are being used you may need to change the SCSI ID setting Read this part if you are installing the drive Part 3 describes how to use the drive including how to turn it on and how to insert and remove cartridges Read this part if you are going to operate the drive Part 4 describes h...

Page 7: ... third level error correction code guarantee high data reliability Data Compression provides 24 gigabytes of storage on a 125 m tape length cartridge 1 The native capacity is 12 gigabytes of storage on a 125 m tape length cartridge Stored data are automatically checked for compression The SCSI 2 ANSI SCSI 2 X3T9 2 86 109 REV 10C interface is fully supported for host computer access Read Write oper...

Page 8: ...ogo DDS 3 Logo DDS 2 Logo DDS 1 logo CAUTION Be sure to use only the cartridges designed specifically for DDS do not use DAT cartridges for music System Components The SDT S9000 BM connects to the host computer via a SCSI 2 interface SDT S9000 BM This Device Peripheral Devices Host Computer Part 1 Introduction ...

Page 9: ...This indicator also lights under the following conditions Drive needs cleaning repeating long on short off blinking End of Tape during cleaning repeating blinking same on off interval Drive Malfunctioning repeating short on once or twice long off blinking 4 TAPE Indicator When a DDS cartridge is installed this indicator lights This also lights under the following conditions Inserting and removing ...

Page 10: ...he SCSI interface This indicator also lights under the following conditions Drive is reading or writing repeated blinking same on off normally interval 6 POWER Indicator Lights while the drive is on 7 POWER Switch Press to turn the drive on or off Part 1 Introduction ...

Page 11: ...lied power cable here 2 GND Ground Terminal Connect the ground terminals of other devices to the unit s frame ground 3 Rotary Selector Switch SCSI ID selector 4 Cooling Fan 5 SCSI Connector Connects to the SCSI bus connector of the host computer or another SCSI peripheral Part 1 Introduction ...

Page 12: ...ion connect the drive to the host computer and select the SCSI ID with the rotary switch on the rear panel Supplied Items When you first open the box make sure it contains the following items Contact your supplier if anything is missing or broken DDS Drive Unit Power Cable External only Part 2 Preparation ...

Page 13: ...ectors are pressed tightly together If this unit is the last or only device on the SCSI bus make sure to connect a SCSI bus terminator to the open connector The total length of the SCSI cable s between the host computer and the last device should be less than 6 meters 1 SCSI CONNECTOR AC IN SCSI ID GND 1 When using high speed data transfer with the SDT S9000 BM it is recommended that total length ...

Page 14: ...om the factory SCSI parity is enabled and Term power is ON Since the terminating resistor inside the drive is disabled a SCSI bus terminator must be connected to the SCSI bus before use Before changing the SCSI ID setting be sure to turn off the power with the POWER switch on the front panel Configuration Switches Setting 1 Sony SDT S9000 BM has a set of configuration switches located on its botto...

Page 15: ...ix System Configuration Host Unix SW Setting PC based WS SCO Unix Xenix Digital WS Sun WS Solaris 2 X Sun WS Sun OS 4 1 X IBM RS 6000 WS AIX IBM RS 6000 WS AIX HP WS HP UX SGI WS IRIX To be supported by the firmware ver 1260 or higher Part 2 Preparation ...

Page 16: ...ator should light and the STATUS BUSY and TAPE indicators should blink as the self test is performed 2 When the three indicators stop blinking you can insert a data cartridge as shown below The TAPE indicator will blink and if the cartridge is write protected the STATUS indicator will light 3 Computer software controls the reading and writing of tapes While reading or writing the BUSY indicator bl...

Page 17: ...Cartridge Removal Press the EJECT button The cartridge ejects automatically Caution Do not push the EJECT button while the BUSY indicator is blinking to do so may destroy data on the tape Part 3 Operation ...

Page 18: ...ping the drive will damage it Environmental considerations Do not store or use the drive in locations subject to high humidity excessive dust high temperature intense vibration direct sunlight sudden changes in temperature Proper ventilation To avoid overheating install the drive where it will have free air circulation around the case and do not cover it during operation The drive can malfunction ...

Page 19: ...nd contact your supplier for assistance Cabinet cleaning Wipe the cabinet with a soft dry cloth For heavy dirt wipe with a soft cloth moistened with a gentle liquid soap then wipe again with a soft dry cloth Do not use alcohol paint thinner bug sprays or other volatile solvents as they can damage the finish Part 4 Care and Maintenance ...

Page 20: ...ch to the write protect position in the direction of the arrow Using your fingernail push the switch in the direction of the arrow to protect the tape from writing or accidental erasure Return the switch to its original position to re enable writing In case of a sudden change in temperature condensation may interfere with reading and writing to a tape Avoid unnecessary insertion and removal of car...

Page 21: ...Insert the head cleaning cartridge DG 5CL into the DDS Data cartridge receptacle Cleaning starts automatically 2 After about 10 seconds cleaning will stop and the cartridge DG 5CL will eject automatically One head cleaning cartridge can be used about 30 times Notice Do not rewind the cleaning cartridge and reuse it When you reach the end of the cartridge dispose of it and buy a new one Part 4 Care...

Page 22: ...onds with 125 m tape Operating Environment Operating Temperature 10 to 35 C Humidity 30 to 80 no condensation Maximum wet bulb temperature 26 C Non Operating Temperature 40 to 70 C Humidity 10 to 90 Power Supply Miscellaneous Power Supply 100 to 240 V AC 50 60 Hz 0 5 to 0 3 A Case Dimensions 160 52 4 300 mm W H D excluding protruding parts Weight 2 2 kg Accessories Power Cable 1 User s Guide 1 Spe...

Page 23: ...728 8200 Dantz 510 253 3000 NovaStor 805 579 6700 OS 2 Cheyenne 516 484 5110 Corel 613 728 8200 IBM 800 426 3333 NovaStor 805 579 6700 Sytron 407 333 7500 Windows Arcada 407 333 7500 Cheyenne 516 484 5110 Corel 613 728 8200 Creata 909 595 8811 NovaStor 805 579 6700 ST Bernard Software 619 676 2277 Sytron 508 898 0100 Windows NT Arcada 407 333 7500 Cheyenne 516 484 5110 Creata 909 595 8811 Microsof...

Page 24: ...on Solutions 603 880 0080 AIX Unix Cheyenne 516 484 3150 Legato 415 812 6000 NovaStor 818 707 9900 Software Moguls 612 933 8790 Work Station Solutions 603 880 0080 Interactive Unix Sun Soft 310 348 8649 SGI Unix Software Moguls 612 933 8790 Work Station Solutions 603 880 0080 Novell UNIXware Novell 801 263 3500 Novell NLM Arcada 407 263 3500 Avail Systems 303 444 4018 Cheyenne 516 484 3150 Columbi...

Reviews: