background image

3

SCD-XE597

SECTION 1

SERVICING NOTES

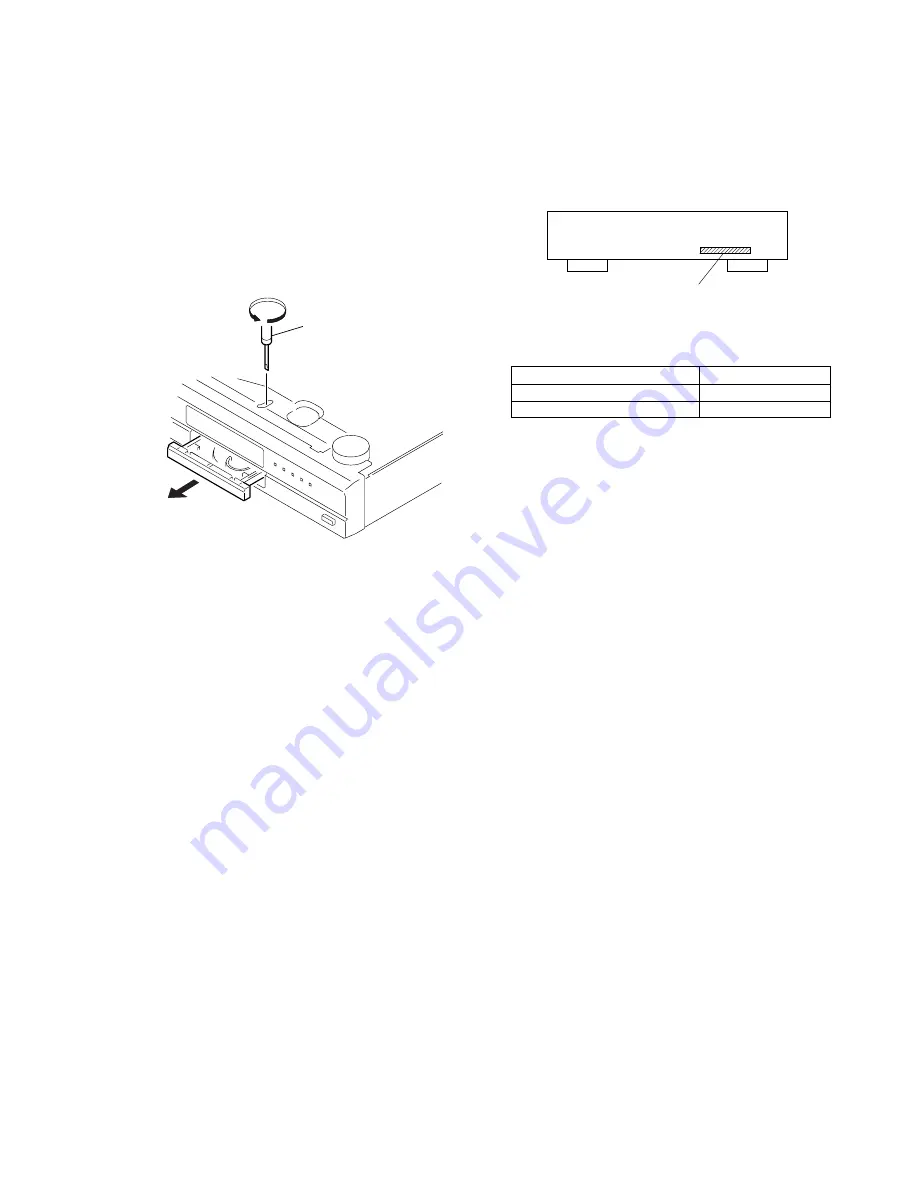
HOW TO OPEN THE DISC TRAY WHEN POWER SWITCH
TURNS OFF

Insert a tapering driver into the aperture of the unit bottom, and turn
in the direction of arrow.
Use a flat (-) head screwdriver to open the disc tray by manual
operation. (Flat head screwdriver with nominal blade length of
3mm.)
* To close the disc table, turn the driver in the reverse direction.

tapering driver

Parts No.

MODEL

Part No.

AEP Model

4-255-245-0

[  ]

UK Model

4-255-245-1

[  ]

MODEL  IDENTIFICATION
– Back Panel –

Summary of Contents for SCD-XE597

Page 1: ...out notice When a Super Audio CD is played Playing frequency range 2 Hz to 100 kHz Frequency response 2 Hz to 40 kHz 3 dB Dynamic range 100 dB or more Total harmonic distortion rate 0 0035 or less Wow and flutter Value of measurable limit 0 001 W PEAK or less When a CD is played Frequency response 2 Hz to 20 kHz Dynamic range 96 dB or more Total harmonic distortion rate 0 0039 or less Wow and flut...

Page 2: ... included in the repair parts The flexible board is easily damaged and should be handled with care NOTES ON LASER DIODE EMISSION CHECK The laser beam on this model is concentrated so as to be focused on the disc reflective surface by the objective lens in the optical pick up block Therefore when checking the laser diode emission observe from more than 30 cm away from the objective lens NOTES ON HA...

Page 3: ...t bottom and turn in the direction of arrow Use a flat head screwdriver to open the disc tray by manual operation Flat head screwdriver with nominal blade length of 3mm To close the disc table turn the driver in the reverse direction tapering driver Parts No MODEL Part No AEP Model 4 255 245 0 UK Model 4 255 245 1 MODEL IDENTIFICATION Back Panel ...

Page 4: ...lti channel playback area by pressing MULTI 2CH F A button 9 G x button 9 14 H m M buttons 12 I l AMS L dial AMS Automatic Music Sensor 8 9 10 12 14 15 16 18 J X button 9 K H button 9 12 13 14 L Display window 10 M Remote sensor 6 N TIME TEXT button 11 Each time you press the button the playing time of the track the remaining time of the disc or TEXT information appears in the display O MULTI 2CH ...

Page 5: ...ess to adjust the output level balance for the Multi channel management function page 15 H ENTER button 8 9 10 12 14 15 17 18 I CHECK button 14 Press to check the programed order J REPEAT button 13 K H button 9 12 13 14 X button 9 x button 9 14 L AMS buttons AMS Automatic Music Sensor 8 9 10 12 14 15 17 18 M SA CD CD button 5 9 Each time you press the button while playing back a hybrid disc the la...

Page 6: ...T DVBU50 Page 9 3 7 CD MECHANISM DECK CDM66D DVBU50 Page 9 3 4 LOADING PANEL Page 7 3 3 MAIN BOARD Page 7 3 5 FRONT PANEL SECTION Page 8 3 6 KEY BOARD DISPLAY BOARD Page 8 3 2 COVER Page 6 5 4 4 cover 3 screw BVTP 3 8 1 two screws case 3 2 two screws case 3 This set can be disassembled in the order shown below The dotted square with arrow prompts you to move to the next job when all of the works w...

Page 7: ...re flat type 31 core CN702 1 connector 5p CN151 2 connector 8p CN901 3 wire flat type 13 core CN703 6 screw BVTP 3 8 5 three screws BVTP 3 8 7 PWB holder 8 MAIN board 3 4 LOADING PANEL tapering driver 3 two claws 4 loading panel 1 2 ...

Page 8: ...BVTP 3 8 7 front panel section 1 wire flat type 13 core CN703 2 connector CN891 3 connector CN101 q seven screws BVTP 2 6 8 4 two screws BVTP 2 6 8 2 two screws BVTP 2 6 8 7 three screws BVTP 2 6 8 3 bracket 6 LED board 9 KEY board qa DISPLAY board 5 connector CN814 8 connector CN813 1 knob AMS ...

Page 9: ...ws BVTP 3 8 1 wire flat type 31 core CN702 2 connector 5p CN151 4 CD mechanism deck CDM66D DVBU50 4 Remove the Base unit DVBU50 to the direction of arrow 1 Turn the cam to the direction of arrow counter clock wise by tapering driver 2 Take off the tray 3 screw DIA 12 floating DVBU50 ...

Page 10: ...4 CN001 7 three screws step screw M 8 pick up unit DBU 3 holder 66D 2 hook 5 wire flat type CN002 3 flexible board CN003 3 10 BELT LD LOADING BOARD MOTOR L ASSY 7 two screws B 2 6 4 5 gear LD 6 belt LD 1 claw 2 claw 0 motor L assy 9 LOADING board 8 Removal the solders 4 tray 66 3 ...

Page 11: ...Input impedance 10 MΩ Voltage variations may be noted due to normal production tolerances Waveforms are taken with a oscilloscope Voltage variations may be noted due to normal production tolerances Circled numbers refer to waveforms Signal path J CD c CD DIGITAL OUT OPTICAL Caution Pattern face side Parts on the pattern face side seen from Side B the pattern face are indicated Parts face side Part...

Page 12: ...IN4 IN4 SLA SLA 28 27 M SPINDLE MOTOR DO5 DO5 46 47 OPIN1 OPIN1 SPM SPM 17 16 REV FWD 39 PS 19 MUTE12 20 MUTE34 21 D509 D511 MUTE5 25 24 M LOADING MOTOR DO6 DO6 LOADP LOADN 100 D OUT PCMD1 96 CDBCK 95 CDLRCK 94 DSAL 83 DSAR 84 DSALS 85 DSARS 86 DSAC 89 DSASW 90 DSPHREFO 78 206 XRAS XCAS XMWR MCKE MMCK LDQM UDQM RAS CAS WE CKE CLK LDQM UDQM MD0 15 DQ0 15 12 16 7 9 8 5 IC701 RESET IC702 EEPROM C OUT...

Page 13: ...RF SECTION See page 11 for Circuit Boards Location Uses unleaded solder IC001 MAIN BOARD CN702 Page 15 M901 SPINDLE MOTOR M902 SLED MOTOR OPTICAL PICK UP BLOCK DBU 3 A Semiconductor Location Ref No Location D001 C 9 D004 D 9 IC001 C 9 Q001 D 5 Q002 D 5 ...

Page 14: ...38 C040 R006 R005 C026 R018 C036 C038 R004 C047 C043 C031 C032 C022 C025 C039 R037 C035 C033 C028 C048 C046 C004 C027 C011 CN002 R052 R053 R054 R055 C005 C006 C007 C008 C019 C015 R009 R045 C016 C002 C001 CN001 R002 100 6 3V 10 16V 10 16V 100 6 3V 10 16V SP3726A 2SB1132 T100 QR 2SB1132 T100 QR 1SS355TE 17 1SS355TE 17 100 10k 9P 100 47k 0 001 33 33 100 0 001 33 47k 33 0 022 2 2M 150p 27k 100k 0 01 1...

Page 15: ...RD Semiconductor Location Ref No Location D321 E 4 D509 G 6 D511 E 6 D921 C 12 D922 C 12 D923 C 12 D924 C 12 D931 C 12 D932 C 12 D933 C 12 D934 C 12 D936 B 12 D937 C 10 D960 B 4 D961 C 8 D963 B 4 D971 D 11 D972 D 8 D973 D 8 IC200 C 4 IC230 D 4 IC260 E 4 IC320 S 5 IC330 G 16 IC400 D 15 IC430 D 15 IC460 E 15 IC701 E 11 IC702 D 12 IC703 F 12 IC705 E 5 IC706 G 3 IC708 H 15 IC712 F 7 IC920 D 13 IC950 B...

Page 16: ...843 CL844 CL845 CL846 CL847 CL848 CL849 CL850 CL851 CL864 CL865 CL866 CL867 CL869 CL870 CL871 CL872 CL873 CL874 CL875 CL876 CL877 CL852 CL853 CL854 CL855 CL856 CL857 CL858 CL859 CL860 CL861 CL862 CL863 CL737 SL871 SL872 TP730 STP702 C746 C745 C749 R781 R782 C751 C788 C753 R783 C755 C789 C759 C761 C762 TP715 C764 C765 C766 C767 C768 RB617 RB616 RB615 C769 C770 C771 RB604 C733 C743 C742 C736 C734 C7...

Page 17: ...883 CL888 CL889 CL890 CL891 CL892 CL893 CL894 FL606 CL708 CL709 CL710 CL730 R701 CL736 CL743 CL738 STP703 D511 FB703 FB710 C721 RB612 RB606 C748 C712 C711 C704 IC701 C702 C705 R703 R702 C701 R707 C703 RB605 RB611 C715 R708 RB601 RB607 CN701 CN703 IC705 IC702 R731 S701 100 16V 0UH 1k XX DAP202UT106 0UH 0UH 0 1 10k 10k 0 1 0 1 0 1 0 1 M51957BFP 600C 1 0 1 10k 10k 0 1 1k 0 1 10k 10k 0 1 100 10k 10k 9...

Page 18: ...C809 R846 R853 C813 C830 C822 R857 R892 R872 R820 R819 R874 C820 R893 C821 RB609 R869 R870 C817 R899 R865 C816 R866 C832 R897 R831 R840 C800 R852 C793 R878 R877 R860 C825 C815 R861 R858 C814 C804 RB610 IC708 CN705 FAN8035L 100 16V 220 4V 100 16V DAP202UT106 56k 56k 15k 15k 82k 82k 100 16V XX XX 0 068 0 068 0 220 4V 100 16V 0 1 0 1 0 1 0 1 47 10p 0 1 0 1 0 1 0 1 10 0 1 330 0 1 100k 1 10k 0 033 56k ...

Page 19: ... TX 470 16V NJM4565M T E2 NJM4565M T E2 NJM4565M T E2 NJM4565M T E2 NJM4565M T E2 NJM4565M T E2 BA50BC0FP E2 2SC3624A T 1L15L16 2SC3624A T 1L15L16 2SC3624A T 1L15L16 2SC3624A T 1L15L16 BA12FP E2 UDZSTE 179 1B 470 10V 0 47 63V BA33BC0T 1000 6 3V 2 2k 2 2k 2 2k XX 6 8k 150p 220 47 25V 0 1 330 100k 3 3k 0 1 3 3k 220 330 47 25V 100k 0 1 6 8k 0 001 0 001 220 220 100k 330 47 25V 0 1 3 3k 100k 330 0 1 47...

Page 20: ...nleaded solder IC801 IC802 S891 X x H A M m AWS PUSH ENTER MAIN BOARD CN703 Page 15 B MAIN BOARD CN901 Page 15 C AC IN MULTI CHANNEL DECODING TIME TEXT PLAY MODE MULTI 2CH SA SD CD MENU Semiconductor Location Ref No Location D801 B 12 IC801 E 12 IC802 E 16 Q821 E 14 Q822 E 10 Q823 E 10 Q824 E 10 Q825 D 9 Q826 E 8 ...

Page 21: ...32 CN102 CN101 C101 CN892 S891 CN891 CN801 CN804 CN814 D801 CN805 IC802 FL801 R818 Q822 Q821 C833 R834 CN813 IC801 Q826 Q824 Q825 Q823 10k 10k 100k 100k 100k 1k 1k 2 2k 2 2k 2 2k 2 2k 4 7k 4 7k 10k 100k 100k 100k 100k 100k 1k 2 2k 2 2k 4 7k 0 0022 250V 10k 47 6 3V 100 6 3V 10k 10k 82 0 1 0 01 10k 0 1 0 01 0 01 ENCORDER 5MHz 10k 0 001 0 001 0 001 0 001 FB 0 1 0 001 0 001 0 001 0 001 0 1 0 1 0 001 0...

Page 22: ...G starting from the top 3 Sircs Receive Check Procedure 1 The message SIRCS CHECK is displayed on the fluorecent indicator tube 2 With the machine in the status that is set in step 2 press any on the remote commander The machine enters the key check standby state When the H key or the x key is pressed the reception check is canceled 4 Key Check Procedure 1 In the key check mode the fluorecent indi...

Page 23: ...SCREW CASE 3 TP2 AEP BLACK 2 3 363 099 11 SCREW CASE 3 TP2 AEP SILVER SILVER for Hair line Finish 2 4 227 843 21 SCREW TP FLAT HEAD UK 3 2 660 400 31 CASE SILVER SILVER for Hair line Finish 3 4 232 149 31 CASE 408226 BLACK 3 4 232 580 31 CASE 408226 6 1 MAIN SECTION The components identified by mark 0 or dotted line with mark 0 are critical for safety Replace only with part number specified 8 7 6 ...

Page 24: ... PANEL FRONT ASSY BLACK 53 X 4956 441 1 PANEL FRONT ASSY SILVER 54 4 255 244 01 BUTTON POWER BLACK 54 4 255 244 11 BUTTON POWER SILVER 54 4 255 244 31 BUTTON POWER SILVER for Hair line Finish 55 1 862 182 11 POWER SW BOARD 56 3 087 053 01 BVTP2 6 3CR 57 1 862 179 11 KEY BOARD 58 1 828 333 11 WIRE FLAT TYPE 13 CORE 59 A 4752 665 A DISPLAY BOARD COMPLETE 60 4 977 358 01 CUSHION 6 2 FRONT PANEL SECTI...

Page 25: ...ADING BOARD 203 4 231 530 12 TRAY 66 204 4 232 712 05 CAM 66 205 4 232 710 01 PULLEY LD 206 4 232 713 01 BELT LD 207 4 232 711 01 GEAR LD 208 3 053 844 01 YOKE 209 4 231 529 01 CHASSIS 66 210 4 232 682 01 CUSHION 66 M901 A 4604 363 A MOTOR L ASSY LOADING 3 7 621 775 10 SCREW B 2 6X4 M901 3 not supplied not supplied DVBU50 202 203 204 207 201 208 206 209 210 205 ...

Page 26: ... TYPE 31 CORE 254 4 240 953 05 HOLDER 66D The components identified by mark 0 or dotted line with mark 0 are critical for safety Replace only with part number specified 6 4 BASE UNIT DVBU50 258 252 251 254 256 257 255 256 257 253 256 257 0255 A 4713 410 A PICK UP UNIT DBU 3 256 3 053 847 31 INSULATOR 257 4 981 923 01 SCREW M STEP 258 1 824 106 12 CABLE FLEXIBLE FLAT 24 CORE ...

Page 27: ...89 11 ELECT 47uF 20 6 3V C832 1 162 970 11 CERAMIC CHIP 0 01uF 10 25V CONNECTOR CN801 1 779 281 11 CONNECTOR FFC LIF NON ZIF 13P FERRITE BEAD FB801 1 414 595 11 INDUCTOR FERRITE BEAD FILTER FL801 1 518 992 11 INDICATOR TUBE FLUORESCENT IC IC801 6 804 318 01 IC uPD780232GC 706 8BT A IC802 8 759 826 33 IC NJL73H400A TRANSISTOR Q821 8 729 027 43 TRANSISTOR DTC114EKA T146 Q822 8 729 027 43 TRANSISTOR ...

Page 28: ...2uF 10 50V C302 1 164 156 11 CERAMIC CHIP 0 1uF 25V C303 1 164 156 11 CERAMIC CHIP 0 1uF 25V C305 1 164 156 11 CERAMIC CHIP 0 1uF 25V C321 1 162 917 11 CERAMIC CHIP 15PF 5 50V C322 1 162 917 11 CERAMIC CHIP 15PF 5 50V C324 1 115 156 11 CERAMIC CHIP 1uF 10V C325 1 126 206 11 ELECT CHIP 100uF 20 6 3V C331 1 164 156 11 CERAMIC CHIP 0 1uF 25V C351 1 164 156 11 CERAMIC CHIP 0 1uF 25V C362 1 164 156 11 ...

Page 29: ...164 156 11 CERAMIC CHIP 0 1uF 25V C767 1 164 156 11 CERAMIC CHIP 0 1uF 25V C768 1 164 156 11 CERAMIC CHIP 0 1uF 25V C769 1 164 156 11 CERAMIC CHIP 0 1uF 25V C770 1 164 156 11 CERAMIC CHIP 0 1uF 25V C771 1 164 156 11 CERAMIC CHIP 0 1uF 25V C772 1 164 156 11 CERAMIC CHIP 0 1uF 25V C775 1 164 156 11 CERAMIC CHIP 0 1uF 25V C776 1 164 156 11 CERAMIC CHIP 0 1uF 25V C777 1 162 915 11 CERAMIC CHIP 10PF 0 ...

Page 30: ...1 JACK PIN 6P TRANSISTOR Q301 8 729 924 04 TRANSISTOR UN5116 TX Q303 8 729 924 04 TRANSISTOR UN5116 TX Q305 8 729 924 04 TRANSISTOR UN5116 TX Q401 8 729 141 73 TRANSISTOR 2SC3624A T1L15L16 Q402 8 729 141 73 TRANSISTOR 2SC3624A T1L15L16 Q431 8 729 141 73 TRANSISTOR 2SC3624A T1L15L16 Q432 8 729 141 73 TRANSISTOR 2SC3624A T1L15L16 Q462 8 729 141 73 TRANSISTOR 2SC3624A T1L15L16 Q463 8 729 141 73 TRANS...

Page 31: ...16 849 11 METAL CHIP 220K 5 1 10W R961 1 216 821 11 METAL CHIP 1K 5 1 10W R962 1 216 821 11 METAL CHIP 1K 5 1 10W R963 1 216 821 11 METAL CHIP 1K 5 1 10W R971 1 216 833 11 METAL CHIP 10K 5 1 10W R972 1 216 833 11 METAL CHIP 10K 5 1 10W R973 1 216 827 11 METAL CHIP 3 3K 5 1 10W R975 1 216 839 11 METAL CHIP 33K 5 1 10W R976 1 216 809 11 METAL CHIP 100 5 1 10W R977 1 216 809 11 METAL CHIP 100 5 1 10W...

Page 32: ...N001 1 815 031 11 CONNECTOR FFC FPC ZIF 24P CN002 1 784 879 21 CONNECTOR FFC LIF NON ZIF 31P CN003 1 784 861 21 CONNECTOR FFC LIF NON ZIF 9P DIODE D001 8 719 988 61 DIODE 1SS355TE 17 D004 8 719 988 61 DIODE 1SS355TE 17 IC IC001 6 703 445 01 IC SP3726A COIL L001 1 412 031 11 INDUCTOR 47uH L002 1 412 031 11 INDUCTOR 47uH TRANSISTOR Q001 8 729 903 46 TRANSISTOR 2SB1132 T100 QR Q002 8 729 903 46 TRANS...

Page 33: ...SERVICE MANUAL SUPPLEMENT 1 AEP Model UK Model Ver 1 2 2005 05 9 879 005 81 Subject TEST MODE and ELECTRICAL ADJUSTMENT SCD XE597 ...

Page 34: ...l servo 1A DISC STOP Stop the disc rotation useful as overdrived 24 ADJ FCSBIAS Automatically adjust the focus bias 1 27 FOCUS AGC Automatically adjust the focus servo gain 1 31 PI FE OFSET Automatically adjust the offset signal of PI PE and TE 1 45 TRACKING AGC Automatically adjust the focus servo gain 1 61 DISC DETECT Judge the disc type when SA CD SL or DL is displayed 7C FJUMP TEST Focus jump ...

Page 35: ...ton to close the tray 11 Press the POWER button to turn the set off Do not continue with another test mode without power off 3 Optical Sensitivity Check CHECK DISC LIST Use the following hybrid disc on this check HLXA 509 PART No J 6090 090 A SACD HYBRID DISC MARKET DISC Connection Procedure 1 Press the Z button 2 Insert SACD hybrid disc market disc 3 Connect the oscilloscope to pin 27 and pin31 o...

Page 36: ...pper right on the revised page allows you to jump to the next revised page Ver Date Description of Revision 1 0 2004 06 New 1 1 2004 11 Addition of silver model for UK 1 2 2005 05 Addition of TEST MODE and ELECTRICAL ADJUSTMENT with SUPPLEMENT 1 9 879 005 81 1 3 2006 02 Addition of silver Hair line Finish model SPM 06013 ...

Reviews: