background image

57

Settings and Adjustments

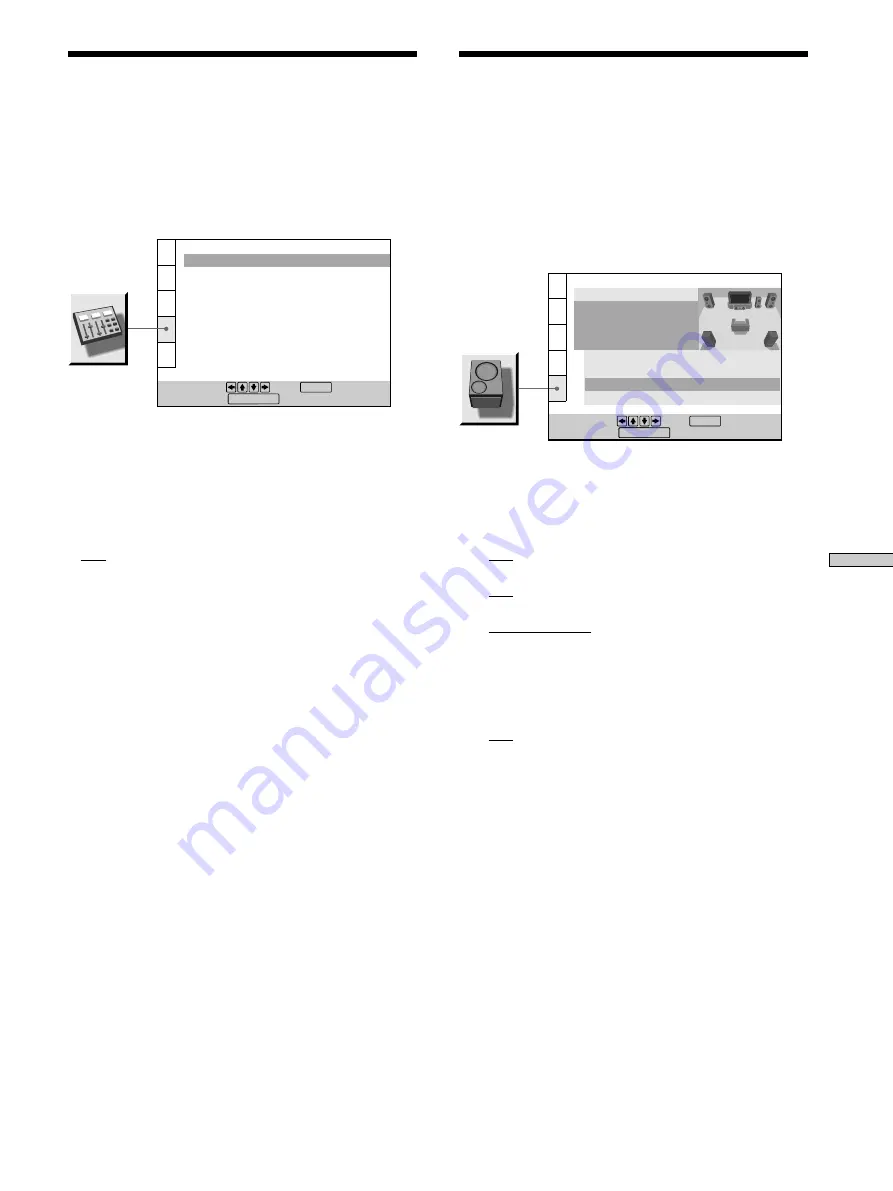
Settings for Sound
(AUDIO SETUP)

Select “AUDIO SETUP” after pressing the DVD SETUP
button on the remote.
“AUDIO SETUP” allows you to select the sound track.
The default settings are underlined.

x

TRACK SELECTION

Gives the sound track which contains the highest number
of the channels priority when you play a DVD on which
multiple audio formats are recorded. If multiple audio
channels are recorded in PCM, DTS or Dolby Digital
format, the higher-numbered channel audio recorded in
PCM, DTS or Dolby Digital format is played.
• OFF : No priority given.
• AUTO : Priority given.

Notes

• When you set this item to “AUTO,” the language may change

depending on the “AUDIO” settings in “LANGUAGE SETUP.”
The “TRACK SELECTION“ setting has higher priority than
that of “AUDIO” settings in “LANGUAGE SETUP” (page 52).

• If PCM, DTS and Dolby Digital sound tracks have the same

number of the highest channels, the system selects PCM, DTS
and Dolby Digital sound tracks, in this order.

• Depending on the DVD, the audio with priority may be

predetermined.  In this case, you cannot give priority to the
DTS or Dolby Digital format by selecting  “AUTO.”

Settings for Speakers
(SPEAKER SETUP)

Select “SPEAKER SETUP” after pressing the DVD SETUP
button on the remote.
To obtain the best possible surround sound, first specify
the distance of the speakers from your listening position,
then set the balance and level.  Then use the test tone to
adjust the speaker volumes to the same level.

x

SIZE

Since the front speaker, center speaker and subwoofer
settings are fixed, you cannot change them. The default
settings are underlined.
• FRONT

— YES:  You cannot select otherwise.

• CENTER

— YES:  You cannot select otherwise.

• REAR

— BEHIND (LOW), BEHIND (HIGH), SIDE (LOW),

SIDE (HIGH):  Specify the position and height to
implement the Digital Cinema Surround modes in
the “Virtual Multi Dimension” sound field (page 17)
properly.

• SUBWOOFER

— YES:  You cannot select otherwise.

Notes

• When you select an item, the sound cuts off for a moment.
• Depending on the settings of other speakers, the subwoofer

may output excessive sound.

AUDIO SETUP

TRACK SELECTION: 

To set, press                , then            .
To quit, press            .

OFF

ENTER

SETUP

.

DVD SETUP

SPEAKER SETUP

SIZE:
DISTANCE:
BALANCE:
LEVEL: 

OFF

TEST TONE:

FRONT:
CENTER:

YES

BEHIND(LOW)

YES

YES

REAR:
SUBWOOFER:

To set, press                , then            .
To quit, press            .

ENTER

SETUP

.

DVD SETUP

Continued to the next page

Summary of Contents for SAVA-D900

Page 1: ...tem Operating Instructions 2000 Sony Corporation SAVA D900 1 2 3 4 5 6 7 8 9 10 10 0 ENERGY STAR is a U S registered mark As an ENERGY STAR Partner Sony Corporation has determined that this product meets the ENERGY STAR guidelines for energy efficiency ...

Page 2: ...e limits are designed to provide reasonable protection against harmful interference in a residential installation This equipment generates uses and can radiate radio frequency energy and if not installed and used in accordance with the instructions may cause harmful interference to radio communications However there is no guarantee that interference will not occur in a particular installation If t...

Page 3: ...lecting a Start Point Using the Time Code 40 Checking the Information of the Disc 41 Changing the Sounds 41 Displaying the Subtitles 43 Changing the Angles 43 Selecting the Disc Mode 1 Disc or All Discs 44 Playing Repeatedly Repeat Play 45 Repeating a Specific Portion AyB Repeat 45 Checking the Play Information 46 Displaying Different Angles Simultaneously 47 Dividing a Track into 9 Sections Strob...

Page 4: ...nce this system plays DVDs and VIDEO CDs according to the disc contents the software producers designed some playback features may not be available Also refer to the instructions supplied with the DVDs or VIDEO CDs About This Manual Conventions Instructions in this manual describe the controls on the system You can also use the controls on the remote if they have the same or similar names as those...

Page 5: ...pictures as well as music Play interactive software using menu screens displayed on the TV screen PBC Playback in addition to the video playback functions of Ver 1 1 discs Moreover you can play high resolution still pictures if they are included on the disc DVD structure VIDEO CD or CD structure Disc Title Chapter Disc Track Index Discs that the system cannot play The system cannot play discs othe...

Page 6: ...ening to a portion with very low level inputs or no audio signals If you do the speakers may be damaged when a peak level portion is played On cleaning Clean the cabinet panel and controls with a soft cloth slightly moistened with a mild detergent solution Do not use any type of abrasive pad scouring powder or solvent such as alcohol or benzine Clean the disc tray if it becomes dusty On your TV s ...

Page 7: ...r vinyl LPs 1 5 2 3 4 4 Stocker Disc tray Playing unit Note on DVD 5 disc changer with EXCHANGE mechanism You can change other discs while playing a disc EXCHANGE mechanism Disc changer system The disc changer consists of a playing unit trays which hold the discs and a stocker which transports the discs on their trays to the disc slot and the playing unit For example if you press DISC 3 the stocke...

Page 8: ...nit left 1 Main unit right 1 Satellite speakers SS T900 3 one for the center speaker and two for the rear speakers Remote commander remote RM PP900 1 AM loop antenna 1 FM wire antenna 1 Main unit L R connecting cord 12 ft 3 5 m 1 Center speaker connecting cord 8 ft 2 1 2 in 2 5 m 1 Rear speaker connecting cords 32 ft 9 3 4 in 10 m 2 Audio connecting cord 5 ft 1 5 m 1 Video connecting cord 5 ft 1 5...

Page 9: ...r g on the system z You can control TVs VCRs LD players digital satellite receivers and MD decks using the supplied remote See page 59 Notes Do not leave the remote in an extremely hot or humid place Do not use a new battery with an old one Do not drop any foreign object into the remote casing particularly when replacing the batteries Do not expose the remote sensor to direct sunlight or lighting ...

Page 10: ...r System not supplied for the rear speakers connect the transmitter supplied with the SA IF70 system to this connector For details refer to the Operating Instructions provided with the SA IF70 system STEP 3 STEP 1 STEP 4 STEP 3 STEP 2 STEP 3 STEP 1 STEP 6 Rear speaker right Center speaker Transmitter for Wireless Rear Speaker option Rear speaker left To wall outlet Main unit left VCR TV set Main u...

Page 11: ...ks on the left main unit to the AUDIO OUTPUT jacks on your TV Important If your TV set has an on off switch for its internal speaker set this to off and enjoy the sound of this speaker system If your TV set does not set the volume on your TV set to minimum Use the supplied video connecting cord to connect the MONITOR OUT jack on the left main unit to the VIDEO INPUT jack on your TV If you use AUDI...

Page 12: ...of the TV 2 Follow the Operating Instructions supplied with your TV set to set it to operate this speaker system z If you use the S video connector instead of the video jack Your TV must also be connected via an S video connector S video signals are on a separate bus from the video signals and will not be output through the video jack STEP 5 Connecting the FM AM antennas Set up the AM loop antenna...

Page 13: ...TICAL D I G I T A L AUDIO IN VIDEO S VIDEO AUX VIDEO R AUDIO L OUTPUT I N P U T R L Main unit left Digital satellite receiver Main unit left MD deck Attaching the supplied foot pads to the center speaker Attach the supplied foot pads to the bottom of the speaker one in each of the four corners to place the center speaker on your TV set Make sure the speaker is solidly placed on the top of the TV s...

Page 14: ...e system 2 Press A of DISC 1 and remove the dummy disc from the disc tray 3 Press A to close the disc tray Notes on the dummy disc You must use the dummy disc for protection when transporting the system Be sure to keep the dummy disc in a secure place page 6 There are no signals recorded on the dummy disc 1 1 Mounting brackets If you wish to hang the rear speakers on a wall with hooks not supplied...

Page 15: ...ult setting is ENGLISH 1 While in stop mode press DVD SETUP on the remote and select LANGUAGE SETUP using the M m buttons and then press ENTER 2 Select OSD using the M m buttons then press or ENTER 1 2 3 4 5 6 7 8 9 10 10 0 M m LANGUAGE SETUP OSD DVD MENU AUDIO SUBTITLE To set press then To quit press ENGLISH ENGLISH ORIGINAL AUDIO FOLLOW ENTER SETUP DVD SETUP LANGUAGE SETUP OSD DVD MENU AUDIO SUB...

Page 16: ...rear speakers farther away from the listening position than the front speakers 45 90 20 A A B C C When the rear speakers are placed to the side When the rear speakers are placed behind you 45 90 20 A A B C C zPositioning the center and rear speakers for better surround sound effect For better surround sound quality position each speaker as shown below Each rear speaker should be placed as its twee...

Page 17: ...located in the section B R PLACE SIDE Select this if the rear speakers are located in the section A 45 90 20 A B A B Specifying the speaker parameters To obtain the best possible surround sound first specify the distance of the speakers from your listening position then set the balance and level Use the test tone to adjust the speaker volumes to the same level Details of each item will follow the ...

Page 18: ...splay 5 Repeat Steps 3 and 4 to adjust other parameters within LEVEL If you do not operate the remote for a few seconds the value turns off and is stored in the system 6 Press TEST TONE again to turn off the test tone Speaker Setup 60 30 D C D C xBALANCE You can vary the balance of each speaker as follows The default adjustments are in the parentheses FRNT L __ __ R center front speakers Adjust th...

Page 19: ... A preset number appears on the front panel display 1 2 3 4 5 6 7 8 9 10 10 0 BAND PRESET TUNE ENTER MEMORY 4 Press PRESET or to select the preset number you want 5 Press ENTER The station is stored 6 Repeat Steps 1 to 5 to store other stations To tune in a station with a weak signal Press TUNE or repeatedly in Step 2 to tune in the station manually To change the preset number Start over from Step...

Page 20: ...ront panel display 3 Press one of A of DISC 1 DISC 5 and place the disc on the disc tray Press A of the same disc tray number to close the disc tray Press other A of DISC 1 DISC 5 to place other discs With the playback side facing down Playing Discs MASTER VOLUME Playing Discs This chapter describes how to play a DVD CD VIDEO CD You can playback all the discs up to 5 discs placed on the disc tray ...

Page 21: ...SC 1 DISC 5 of the disc tray you want to playback After following Step 4 xWhen playing a DVD A DVD menu or title menu may appear on the TV screen see page 29 xWhen playing a VIDEO CD The menu screen may appear on the TV screen depending on the VIDEO CD You can play the disc interactively following the instructions on the menu screen PBC Playback see page 30 zOn Auto Function If a disc is already p...

Page 22: ...nd discs are marked with DTS Note When you play sound tracks with 96 kHz sampling frequency the output signals will be converted to 48 kHz sampling frequency Sound field Effect Notes A F D AUTO FORMAT DECODE NORM SURROUND NORMAL SURROUND C STUDIO A CINEMA STUDIO A C STUDIO B CINEMA STUDIO B C STUDIO C CINEMA STUDIO C SOUNDFIELD MODE SOUND FIELD Automatically detects the type of audio signal being ...

Page 23: ...of virtual rear speakers positioned higher than the listener from a single pair of actual rear speakers This mode creates 5 sets of virtual speakers surrounding the listener at approximately a 30 angle of elevation Reproduces the acoustics of a rectangular concert hall Reproduces the acoustics of a jazz club Reproduces the acoustics of a 300 seat live house Obtains maximum audio impact from video ...

Page 24: ...g OFF Signals with Dolby surround encoded flag ON Notes The system performs Pro Logic decoding and the display conforms to 2 0 when using the following movie sound modes with 2 0 or STEREO PCM format signals C STUDIOA B C V MULTI D When using music sound modes like HALLwith standard audio formats like PCM the system creates rear signals from the front Land R signals However a center speaker signal...

Page 25: ...s 1 Start playing a program source encoded with multi channel surround sound 2 Press LEVEL 3 Sit at your listening position and select the item to be adjusted using the M m buttons 4 Adjust the volume level using the buttons The adjusted value will appear on the front panel display If you do not operate the remote for a few seconds the value turns off and is stored in the system x BALANCE You do n...

Page 26: ...may not notice much difference when using 0 1 0 9 Therefore we recommend using the MAX setting This greatly compresses the dynamic range and allows you to view movies late at night at low volumes Unlike analog limiters the levels are predetermined and provide a very natural compression Customizing Sound Fields Adjusting the surround parameters The surround parameters let you customize various aspe...

Page 27: ...lt ones z You can change the dimmer level of the front panel display in the CUSTOMIZE menu See page 33 Note This operation resets the preset radio stations too Adjusting the equalizing parameters You can adjust the bass and treble levels and select the subwoofer mode The settings available here are stored individually for each sound field To adjust the bass and treble levels Press BASS or TREBLE r...

Page 28: ...tomizing Sound Fields BASS z z z z z z z z z z S W MODE z z z z z z z z z z LEVEL Adjustable parameters for each sound field AUTO FORMAT DECODE NORMAL SURROUND CINEMA STUDIO A CINEMA STUDIO B CINEMA STUDIO C VIRTUAL MULTI DIMENSION HALL JAZZ CLUB LIVE HOUSE GAME If you change an item in LEVEL the changes apply to all sound fields The sound field of which you can change the dts LFE setting depends ...

Page 29: ...s you do not open the disc tray Resume Play is available even if you turn the power off 1 While playing a disc press s to stop playback RESUME appears in the front panel display and When playing next time disc restarts from point you stopped To start from beginning press STOP again appears on the TV screen If RESUME does not appear Resume Play is not available 2 Press H The system starts playback ...

Page 30: ...the operating procedure may differ according to the VIDEO CD Using the DVD menu Some DVDs allow you to select the disc contents using the menu When you play these DVDs you can select the language for the subtitles the language for the sound etc using the DVD menu 1 Press DVD MENU on the remote The DVD menu appears on the TV screen The contents of the menu vary from disc to disc 2 Press M m to sele...

Page 31: ...remote z When playing VIDEO CDs with PBC functions PBC playback starts automatically z To cancel PBC playback of a VIDEO CD with PBC functions and play the disc in Continuous Play mode There are two ways Before you start playing select the track you want using the l or L buttons then press ENTER or H Before you start playing select the track number using the number buttons on the remote then press...

Page 32: ...or 4 then press ENTER Then do Steps 3 and 4 To change the title chapter and track select the desired one in Step 4 To cancel the programmed order To cancel all the titles chapters or tracks in the programmed order select ALL CLEAR after Steps 1 or 4 then press ENTER To cancel the selected program select the program using the M m buttons after Step 1 or 4 then press CLEAR z The program remains even...

Page 33: ...anges as follows High t Low t Off DISPLAY OFF appears When playing back a DVD Display information while playing the disc Playing status Lights up when you can change the angle Current play mode Playing time Current title number Current surround format Current chapter number Disc tray number Playable channel indicators DISPLAY 1 2 3 4 5 6 7 8 9 10 10 0 Continued to the next page AMP MENU M m The sy...

Page 34: ...are not displayed When playing back a CD VIDEO CD Display information while playing a disc z When playing VIDEO CDs with PBC functions The track number index number and playing time may not appear In this case the remaining time and playing time of the disc are not displayed Playing time and number of the current chapter Remaining time of the current chapter Playing time and number of the current ...

Page 35: ...he CD If there is no CD TEXT NO TEXT is displayed Notes While you are doing Shuffle Play Program Play or PBC playback the playing time of the disc and the remaining time of the disc are not displayed Playing time and number of the current track Remaining time of the current track Playing time of the disc Remaining time of the disc Sound field CD TEXT Press DISPLAY Press DISPLAY Press DISPLAY Press...

Page 36: ... display item see pages 39 to 48 1 Press DVD DISPLAY on the remote to show the Control Menu display on the TV screen Using Various Functions with the Control Menu This chapter describes how to play discs in various modes and how to use the convenient features of the on screen menu Control Menu ENTER M m DVD DISPLAY 1 2 3 4 5 6 7 8 9 10 10 0 1 8 3 4 1 2 2 7 C 0 1 3 2 5 5 DVD PLAY To select press th...

Page 37: ... first three items from the top are changed to other items m ADVANCED display See page 46 m Control Menu display off Only while playing a DVD z You can display some items using the remote Some items can be displayed by pressing the button of the remote In this case only the item you selected is displayed For the item and operations using the remote see the pages of each item Items Items Current it...

Page 38: ...ly page 43 With DVDs on which various angles multi angles are recorded you can change the angles on the scene for which multi angles are recorded 1 ALL DISCS page 44 Select the 1 DISC play mode or ALL DISCS play mode to set Shuffle Play and Repeat Play REPEAT page 45 You can play all the titles tracks on a disc or a single title chapter track repeatedly A B REPEAT page 45 You can play a specific p...

Page 39: ...2 5 5 DVD PLAY 3 4 Enter with number buttons then ENTER You can search by selecting the title chapter track index scene Select TITLE CHAPTER TRACK INDEX or SCENE after pressing the DVD DISPLAY button on the remote When you play back a DVD TITLE and CHAPTER are displayed When you play back a VIDEO CD CD TRACK and INDEX are displayed When you play back a VIDEO CD with PBC functions SCENE is displaye...

Page 40: ...lay quickly Press DISPLAY on the remote Each time you press the button the time information changes 1 8 3 4 1 2 2 7 C 0 1 3 2 5 5 DVD PLAY To select press then ENTER TIME TEXT Selecting a Start Point Using the Time Code Z You can search by inputting the time code Select TIME TEXT after pressing the DVD DISPLAY button on the remote The time code corresponds to the approximate actual playing time Fo...

Page 41: ...output the instrumental If you only want to hear the instrumental you can select the left channel and hear it from both speakers Select AUDIO after pressing the DVD DISPLAY button on the remote xAUDIO When playing a DVD Select the language The languages you can select are different depending on the DVD When 4 digits are displayed they represent the language code Select the language code from the l...

Page 42: ...w Frequency Effect The display examples are as follows PCM stereo Dolby Surround Dolby Digital 5 1 ch DTS z You can find Dolby Surround encoded software by looking at the packaging Use discs with the logo In order to enjoy Dolby Digital playback you must use discs bearing this logo 1 8 3 4 1 2 2 7 C 0 1 3 2 5 5 1 ENGLISH DVD PLAY L DOLBY DIGITAL 3 2 1 R LS RS C PROGRAM FORMAT LFE To select press t...

Page 43: ...ge is displayed as a 4 digit number refer to the language code list on page 73 The type and number of languages for subtitles vary from disc to disc Depending on the DVD you may not be able to change the subtitles even if multilingual subtitles are recorded on it While playing the DVD the subtitle may change when you open or close the disc tray you change the title OFF 1 ENGLISH 2 FRENCH 3 SPANISH...

Page 44: ...d z You can select the angle directly Press ANGLE on the remote Each time you press the button the angle changes To select press then ENTER 1 8 3 4 5 9 1 2 2 7 C 0 1 3 2 5 5 DVD PLAY Selecting the Disc Mode 1 Disc or All Discs Z Before setting Program Play Shuffle Play or Repeat Play you need select whether to set those play modes on one disc or all discs Select 1 ALL DISCS after pressing the DVD ...

Page 45: ... Play mode the system repeats the titles or tracks in the shuffled or programmed order You cannot do Repeat Play during PBC playback of VIDEO CDs page 30 You may not be able to do Repeat Play depending on the DVD Select REPEAT after pressing the DVD DISPLAY button on the remote When you do not select OFF the indicator of the REPEAT lights in green xREPEAT Selects the setting of Repeat Play When pl...

Page 46: ...01 32 55 B 18 01 34 30 CHAPTER TIME PLAY To select press then ENTER ON Checking the Play Information Z You can check the play information on the bit rate bit rate history or the portion where the disc is played layer While playing a disc the approximate bit rate of the playback picture is always displayed by Mbps Mega bit per second and the audio by kbps Kilo bit per second Select ADVANCED after p...

Page 47: ...ed angle only is displayed To cancel displaying multi angles Press ORETURN Notes Depending on the DVD you may not be able to change the angles even if multi angles are recorded on the DVD When a scene for which various angles multi angles are not recorded comes while displaying different angles simultaneously the player returns to the normal play 1 8 3 4 1 2 2 7 C 0 1 3 2 5 5 DVD PLAY To select pr...

Page 48: ...ded in 9 sections and start playback from the chosen title chapter or track Select TITLE VIEWER DVD only CHAPTER VIEWER DVD only or TRACK VIEWER VIDEO CD only after pressing the DVD DISPLAY button on the remote To start playback from the selected picture Select the picture using the M m buttons then press ENTER The playback starts from the selected picture zWhen there are over 9 titles or chapters...

Page 49: ... display only when the system is in stop mode 1 Press DVD SETUP on the remote to display the setup display on the TV screen Settings and Adjustments This chapter describes how to set and how to adjust using the on screen SETUP menu Most settings and adjustments are required to be set when you first use the system ENTER M m DVD SETUP 1 2 3 4 5 6 7 8 9 10 10 0 LANGUAGE SETUP OSD DVD MENU AUDIO SUBTI...

Page 50: ...ress ENGLISH ENGLISH ORIGINAL AUDIO FOLLOW ENTER SETUP SCREEN SETUP TV TYPE SCREEN SAVER BACKGROUND To set press then To quit press 4 3 LETTERBOX ON JACKET PICTURE ENTER SETUP DVD SETUP DVD SETUP SCREEN SETUP TV TYPE SCREEN SAVER BACKGROUND To set press then To quit press 4 3 LETTERBOX ON JACKET PICTURE ENTER SETUP SCREEN SETUP TV TYPE SCREEN SAVER BACKGROUND To set press then To quit press 4 3 LE...

Page 51: ...ESE DANISH SWEDISH FINNISH NORWEGIAN RUSSIAN TRACK SELECTION OFF AUTO SCREEN SETUP page 53 TV TYPE 4 3 LETTER BOX 4 3 PAN SCAN 16 9 4 3 WIDE MODE BACKGROUND JACKET PICTURE GRAPHICS BLUE BLACK SCREEN SAVER ON OFF AUDIO SETUP page 57 SIZE FRONT CENTER DISTANCE FRONT CENTER REAR TEST TONE OFF ON REAR SUBWOOFER BALANCE FRONT REAR LEVEL CENTER REAR SUBWOOFER SPEAKER SETUP page 57 CUSTOM SETUP page 54 P...

Page 52: ...es according to the language for the setting you selected in AUDIO Select LANGUAGE SETUP after pressing the DVD SETUP button on the remote LANGUAGE SETUP allows you to set various languages for on screen display or sound The default settings are underlined Note When you select a language that is not recorded on the DVD one of the recorded languages is automatically selected except for the OSD xOSD...

Page 53: ... for Display SCREEN SETUP Z 4 3 WIDE MODE xSCREEN SAVER Turns on and off the screen saver If you turn on the screen saver the screen saver image appears when you leave the system or the remote in pause or stop mode for 15 minutes or when you play back a CD for more than 15 minutes The screen saver is useful to prevent your display from becoming damaged ON turns on the screen saver OFF turns off th...

Page 54: ...ote Playing some DVDs can be limited depending on the age of users The Parental Control function allows you to set a playback limitation level CUSTOM SETUP PAUSE MODE PARENTAL CONTROL To set press then To quit press AUTO ENTER SETUP DVD SETUP CUSTOM SETUP To set press then To quit press ENTER SETUP PAUSE MODE PARENTAL CONTROL AUTO DVD SETUP CUSTOM SETUP To set press then To quit press ENTER SETUP ...

Page 55: ...STOM SETUP PARENTAL CONTROL LEVEL STANDARD CHANGE PASSWORD USA To set press then To cancel press ENTER SETUP 4 PG13 DVD SETUP 2 Enter a password in 4 digits using the number buttons then press ENTER The digits change to asterisks and the display for confirming the password appears 3 To confirm your password enter it using the number buttons then press ENTER The display for setting the playback lim...

Page 56: ...w password z You can turn off the Parental Control function just after inserting the DVD Parental Control Temporarily Canceled When you set a playback limitation level and insert the DVD the PARENTAL CONTROL display appears Enter the password to turn off the Parental Control function When you stop playing the DVD the level returns to the original level z If you have forgot your password Enter the ...

Page 57: ... priority to the DTS or Dolby Digital format by selecting AUTO Settings for Speakers SPEAKER SETUP Select SPEAKER SETUP after pressing the DVD SETUP button on the remote To obtain the best possible surround sound first specify the distance of the speakers from your listening position then set the balance and level Then use the test tone to adjust the speaker volumes to the same level xSIZE Since t...

Page 58: ...t setting is underlined OFF The test tone is not emitted from speakers ON During adjustment of BALANCE or LEVEL the test tone is emitted from both speakers simultaneously To adjust the volume of all the speakers at one time Use the MASTER VOLUME buttons To return to the default setting Select the item then press CLEAR on the remote Settings for Speakers SPEAKER SETUP Adjusting the speaker volume 1...

Page 59: ...1 Hold down the button corresponding to the component you want to assign to a function button e g button 6 for the LD player Each button and its corresponding components are shown below Button Sony component 1 VCR mode 1 Betamax 2 VCR mode 2 8mm 3 VCR mode 3 VHS 4 Digital satellite receiver 5 MD deck 6 LD player 7 TV Factory setting VCR mode 1 2 3 stand for Sony s Betamax 8mm video cassette deck V...

Page 60: ...nent s can then be controlled using this remote 5 Repeat Steps 1 to 4 to control other components z If the function button flashes three times consecutively the programming has failed Check that the numeric codes corresponding to the component and the make of the component are correct Start again from Step 1 If you do not do Step 2 within twenty seconds after pressing the IR SET button in Step 1 t...

Page 61: ...n this remote may not be available when used with your particular component To control a TV the TV function button only Make Code s DAEWOO 000 001 002 003 004 005 FISHER 010 011 LG GOLDSTAR 012 013 014 015 016 017 GRUNDIG 020 021 HITACHI 012 025 026 027 ITT NOKIA 028 029 JVC 030 031 032 MAGNAVOX 012 013 036 037 MITSUBISHI MGA 012 013 040 041 NEC 012 013 042 PANASONIC 045 046 047 048 PHILIPS 016 03...

Page 62: ...2 125 145 146 147 PIONEER 125 RCA PROSCAN 118 119 122 124 125 148 149 150 SAMSUNG 150 151 152 153 154 155 SANYO 113 116 156 SHARP 160 161 TELEFUNKEN 170 171 TOSHIBA 148 149 ZENITH 175 To control a digital satellite receiver the AUX function button only Make Code s JERROLD 200 201 202 203 204 205 206 207 208 PANASONIC 210 211 212 PIONEER 220 221 RCA 225 TOCOM 235 ZENITH 240 241 To control an LD pla...

Page 63: ...e receiver z z z Listening to the Radio Preset radio stations in the system s memory first see Presetting Radio Stations on page 19 1 Press TUNER on the remote The last received station is tuned in 2 Press PRESET repeatedly to select the preset station you want Each time you press the button the system tunes in one preset station at a time 3 Adjust the volume by pressing the MASTER VOLUME buttons ...

Page 64: ...buttons Press m M to select a character then press to move the cursor to the next position If you ve made a mistake Press or repeatedly until the character to be changed flashes then press m M to select the right character 5 Press ENTER COMPLETE appears on the front panel display followed by the assigned name To assign index names to other stations Repeat Steps 2 to 5 M m 1 2 3 4 5 6 7 8 9 10 10 0...

Page 65: ... can check the time remaining before the system turns off Press SLEEP on the remote The remaining time appears on the front panel display zYou can extend the sleep timer up to 9 hours Press M on the remote while the time indication is flashing Each time you press M the time is extended by 30 minutes up to 9 hours When you press m it is shortened by 30 minutes SLEEP 1 2 3 4 5 6 7 8 9 10 10 0 n 2 00...

Page 66: ...ur system has to go through your VCR to get to your TV the copy protection applied to some DVD programs could affect picture quality If you still experience problems after checking your connections please try connecting the system directly to your TV s S video input if your TV is equipped with this input page 12 The aspect ratio of the screen cannot be changed even though you set TV TYPE in SCREEN...

Page 67: ... stereo even if the sound track is recorded in Dolby Digital format The sound comes from the center speaker only Depending on the disc the sound may come from the center speaker only No sound is heard from the center speaker Make sure the sound field function is on page 22 Select a sound field containing the word cinema or virtual page 22 Adjust the speaker volume page 17 No sound or only a very l...

Page 68: ...yback stops automatically Depending on the disc the auto pause signal is recorded While playing such a disc the system stops playback at the signal Cannot stop playback Search Slow motion Play Repeat Play Shuffle Play or Program Play etc Depending on the disc you may not do some of the operations above Messages do not appear on the TV screen in the language you want In the setup display select the...

Page 69: ...In this case check the following table First three characters C 13 C 31 E xx xx is any number Cause and or Corrective Action The disc is dirty Clean the disc with a cleaning cloth page 6 The disc is not inserted correctly Open the disc tray and insert the disc correctly To prevent the system from malfunctioning the self diagnosis function has worked When you contact your Sony dealer or local autho...

Page 70: ...ce of 200 mm from the objective lens surface on the Optical Pick up Block with 7 mm aparture Signal format system NTSC Frequency response DVD PCM 2 Hz to 22 kHz 1 0 dB CD 2 Hz to 20 kHz 1 0 dB Signal to noise ratio More than 80 dB TV VIDEO AUDIO AUX AUDIO connectors only Harmonic distortion Less than 0 03 FM tuner section System PLL quartz locked digital synthesizer system Tuning range 87 5 108 0 ...

Page 71: ...ma Sound DCS This is the generic name of the surround sound produced by digital signal processing technology developed by Sony Unlike previous surround sound fields mainly directed at the reproduction of music Digital Cinema Sound is designed specifically for the enjoyment of movies Dolby Digital This sound format for movie theaters is more advanced than Dolby Pro Logic Surround In this format the...

Page 72: ... and processed in digital DVD A disc that contains up to 8 hours of moving pictures even though its diameter is the same as a CD The data capacity of a single layer and single sided DVD at 4 7 GB Giga Byte is 7 times that of a CD Furthermore the data capacity of a dual layer and single sided DVD is 8 5 GB a single layer and double sided DVD 9 4 GB and a dual layer and double sided DVD 17 GB The pi...

Page 73: ...gla 1253 Icelandic 1408 Oriya 1535 Tonga 1067 Tibetan 1254 Italian 1417 Punjabi 1538 Turkish 1070 Breton 1257 Hebrew 1428 Polish 1539 Tsonga 1079 Catalan 1261 Japanese 1435 Pashto Pushto 1540 Tatar 1093 Corsican 1269 Yiddish 1436 Portuguese 1543 Twi 1097 Czech 1283 Javanese 1463 Quechua 1557 Ukrainian 1103 Welsh 1287 Georgian 1481 Rhaeto Romance 1564 Urdu 1105 Danish 1297 Kazakh 1482 Kirundi 1572 ...

Page 74: ... the disc is being play backed off when there is no disc orange when a disc is placed on the disc tray however the disc tray is not chosen 8 Disc tray 20 Place a disc on the tray 9 Indicators Shows the function mode q SOUND FIELD buttons 22 Select the sound field qa MASTER VOLUME buttons 20 Adjust the volume qs HPLAY button 20 Plays a disc qd SPAUSE button 21 Pauses playing a disc qf sSTOP button ...

Page 75: ...tellite receiver with OPTICAL jack or VCR LD player MD deck 8 AM loop antenna terminals 12 Connect to the supplied AM loop antenna 9 FM 75 Ω COAXIAL wire antenna connector 12 Connects to the supplied FM wire antenna 0 MONITOR OUT VIDEO S VIDEO connectors 11 Connect to a TV monitor qa R ch SPEAKER OUTPUT connector 11 Connects to the supplied front right speaker Rear Panel MONITOR OUT CONTROL S IN T...

Page 76: ...ilt in DVD Built in tuner TV VCR VCR MD deck LD player digital satellite receiver Factory setting Sony TV Factory setting Sony VCR mode 3 VHS Factory setting no setting See the table on page 63 for information on the buttons you can use to control each component Note that the function buttons are factory set as described in the table If you want to change the factory setting of the buttons to matc...

Page 77: ... 30 Select the items or settings wd DVD SETUP button 49 Shows the DVD SETUP menu on the TV screen wf AUDIO button 41 Changes the sound while playing a DVD or VIDEO CD wg ANGLE NAME button ANGLE Changes the angles when playing a DVD 43 NAME Inputs name of the preset radio stations 64 wh SUBTITLE MEMORY button SUBTITLE Displays the SUBTITLE menu in the Control Menu display 43 MEMORY Memorizes preset...

Page 78: ...78 Additional Information ...

Page 79: ...79 Additional Information ...

Page 80: ...peed search 21 Hooking up 10 I J K INDEX 39 L M N LANGUAGE SETUP 52 LETTER BOX 53 LEVEL 18 Locating a specific point 21 Main unit 9 Numeric codes 61 O On screen display Control Menu display 36 Setup display 49 OSD 52 P Q PAN SCAN 53 PARENTAL CONTROL 54 PBC functions 30 PBC Playback 30 PRO LOGIC 71 Program Play 31 R Remote 8 76 REPEAT 45 Resume Play 29 S S video output 12 Scene 5 SCENE 39 SCREEN SA...

Reviews: