background image

8-3

Ref. No.

Part No.

Description

Remarks

Ref. No.

Part No.

Description

Remarks

T001

9-885-104-34 ASSY CYLINDER 6HD

T003

1-796-434-11 LOADING ASSY, MOTOR

T010

9-885-101-27 ASSY ACE HEAD

T015

9-885-101-25 ASSY UNIT PINCH

T019

9-885-101-23 REEL S

T020

9-885-101-22 REEL T

T023

9-885-101-21 ASSY LEVER TENSION

T024

3-067-782-01 SPRING-TENSION LEVER

T025

9-885-101-20 ASSY BAND BRAKE

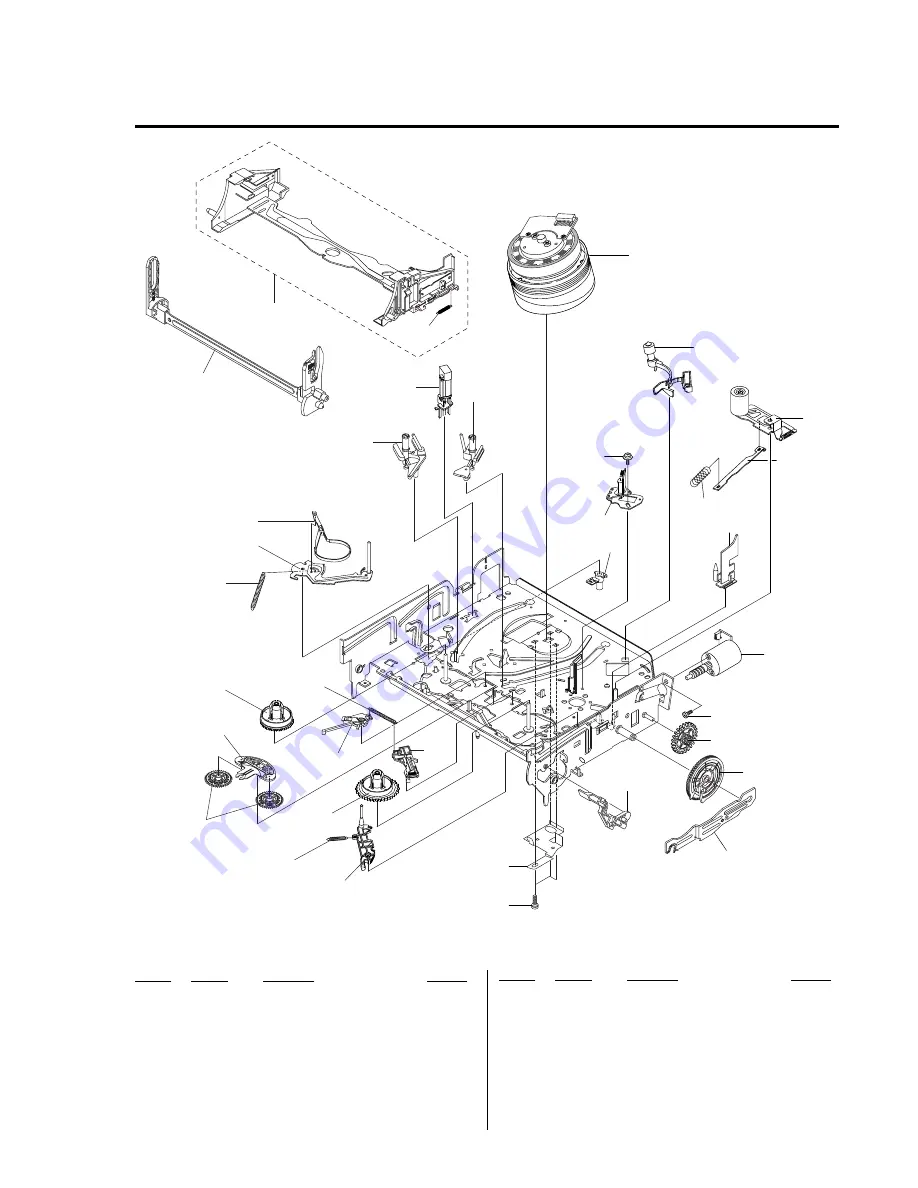
8-1-2  VCR Mechanical Parts (Top Side)

T001

W016

T010

T015

T077

T071

T003

W201

W015

T028

T020

T027

T019

T028

T024

T023

T025

not supplied

not supplied

not supplied

not supplied

not supplied

not supplied

not supplied

not supplied

not supplied

not supplied

not supplied

not supplied

not supplied

not supplied

not supplied

not supplied

not supplied

not supplied

T027

9-885-101-24 ASSY LEVER BRAKE T

T028

3-067-786-01 SPRING-BRAKE

T071

9-885-101-28 GUIDE CASSETTE DOOR

T077

9-885-101-18 ASSY HEAD CLEANER

W015

3-075-254-01 SCREW ASSY MAC 3X6

W016

9-885-061-04 SCREW TAP 2.6X5.6

W201

9-885-067-38 SCREW MAC 3X3.3

Summary of Contents for RMT-V503C

Page 1: ...S01 to S05 S1 to S20 HYPER S21 to S41 Aerial out 75 ohm asymmetrical aerial socket Tape speed SP PAL 23 39 mm s recording playback NTSC 33 35 mm s playback only LP PAL 11 70 mm s recording playback NTSC 16 67 mm s playback only EP NTSC 11 12 mm s playback only Maximum recording playback time 10 hrs in LP mode with E300 tape Rewind time Approx 2 min 30 sec with E180 tape Inputs and outputs LINE 1 E...

Page 2: ...B CR 0 7 Vp p 75 ohms S VIDEO OUT 4 pin mini DIN Y 1 0 Vp p C 0 3 Vp p PAL 0 286 Vp p NTSC 75 ohms Timer section Clock Quartz locked Timer indication 24 hour cycle Timer setting 6 programs max General Power requirements 220 240 V AC 50 Hz Power consumption 20 W Standby power consumption 2 6 W Power Save On mode minimum Operating temperature 5 C to 40 C Storage temperature 20 C to 60 C Dimensions i...

Page 3: ...MARK 0 OR DOTTED LINE WITH MARK 0 ON THE SCHEMATIC DIAGRAMS AND IN THE PARTS LIST ARE CRITICAL TO SAFE OPERATION REPLACE THESE COMPONENTS WITH SONY PARTS WHOSE PART NUMBERS APPEAR AS SHOWN IN THIS MANUAL OR IN SUPPLEMENTS PUB LISHED BY SONY CAUTION The use of optical instrument with this product will increase eye hazard Unleaded solder Boards requiring use of unleaded solder are printed with the l...

Page 4: ...nter Removal 2 15 2 4 18 Guide Cassette Door Removal 2 15 2 4 19 Ass y Lever Unit Pinch Plate Joint Spring Pinch Drive Removal 2 16 2 4 20 Ass y Lever 9 Guide Removal 2 16 2 4 21 FE Head Removal 2 17 2 4 22 Ass y ACE Head Removal 2 17 2 4 23 Ass y Slider S T Removal 2 18 2 4 24 Plate Ground Deck Ass y Cylinder Removal 2 18 2 4 25 Hook Capstan Belt Pulley Removal 2 19 2 4 26 Ass y Motor Capstan Rem...

Page 5: ...e customer 4 Insulation Resistance Test Cold Check 1 Unplug the power supply cord and connect a jumper wire between the two prongs of the plug 2 Turn on the power switch of the instrument 3 Measure the resistance with an ohmmeter between the jumpered AC plug and all exposed metallic cabinet parts on the instrument such as screwheads antenna control shafts handle brackets etc When an exposed metall...

Page 6: ... them with components rated for higher voltage wattage etc Parts that have special safety characteristics are identified by shading an or a on schematics and parts lists Use of a substitute replacement that does not have the same safety characteristics as the recommended replacement part might create shock fire and or other hazards Product safety is under review continuously and new instructions a...

Page 7: ...he service precautions are indicated or printed on the cabinet chassis or components When servicing follow the printed or indicated service precautions and service materials 3 The components used in the unit have a specified flame resistance and dielectric strength When replacing components use components which have the same ratings Components identified by shading by or by in the circuit diagram ...

Page 8: ...sembly 3 Use only a grounded tip soldering iron to solder or unsolder ESD devices 4 Use only an anti static solder removal devices Some solder removal devices not classified as anti static can generate electrical charges sufficient to damage ESD devices 5 Do not use freon propelled chemicals These can generate electrical charges sufficient to damage ESD devices 6 Do not remove a replacement ESD de...

Page 9: ...s them the same ground as the sheet 4 Remove the optical pick up block 5 Perform work on top of the conductive sheet Be careful not to let your clothes or any other static sources to touch the unit Be sure to put on a wrist strap grounded to the sheet Be sure to lay a conductive sheet made of copper etc Which is grounded to the table Fig 3 6 Short the short terminal on the PCB which is inside the ...

Page 10: ...lder land 2 points short on Pick up See Fig 4 4 Disassembly the Pick up 5 2 Assembly 1 Replace the Pick up 2 Remove the soldering 2 points on Pick up 3 Reassemble the Deck Assy Note If the assembly and disassembly are not done in correct sequence the Pick up may be damaged PICK UP ASS Y SOLDER LAND 2 POINTS SHORT Fig 4 ...

Page 11: ... DVD VIDEO with a different region code A disc that has a non standard shape e g card heart A disc with paper or stickers on it A disc that has the adhesive of cellophane tape or a sticker still left on it Some DVD RWs DVD Rs DVD RWs DVD Rs or CD Rs CD RWs cannot be played on this player due to the recording quality or physical condition of the disc or the characteristics of the recording device a...

Page 12: ...ode number using the number buttons Then release 1 Buttons Operations 1 Turns your TV on or off VOL Adjusts the volume of your TV PROG Selects the channel on your TV Number buttons and Selects the channel on a Sony TV MUTING Mutes a Sony TV equipped with the muting function TV VIDEO Switches your TV s input source continued 12 Setting up the remote commander Code numbers of controllable TVs If mor...

Page 13: ...AV Scart cable not supplied Signal flow Scart EURO AV 16 Setting up the DVD VCR with the Auto Set Up function Step 4 Setting up the DVD VCR with the Auto Set Up function Before using the DVD VCR for the first time set up the DVD VCR using the Auto Set Up function With this function you can set TV channels guide channels for the VIDEO Plus system and DVD VCR clock automatically Before you start Set...

Page 14: ...06 SUN Time Date Auto Clock RETURN CLOCK SET SET UP ENTER v V b B Year On ENTER 12 00 01 JAN 2006 SUN Time Date Auto Clock RETURN CLOCK SET SET UP ENTER v V b B Year On continued 20 Setting the clock Tip If you set Auto Clock to On the Auto Clock Set function is activated whenever the DVD VCR is turned off The time is adjusted automatically by making reference to the time signal from the station N...

Page 15: ...v B continued 24 Presetting channels After setting channels you can disable unused programme positions The disabled positions will be skipped later when you press the PROG buttons 5 Press ENTER then press V v to move to the desired programme position 6 Press ENTER to confirm the setting To change the programme position of another station repeat steps 4 through 6 7 Press O RETURN then press SET UP ...

Page 16: ...D only TV S VIDEO cord not supplied TV DVD VCR to S VIDEO OUT Component video cord not supplied red green blue to COMPONENT VIDEO OUT continued 28 S Video Component Video hookup A Use this hookup if your TV has an S VIDEO input jack Connect an S VIDEO cord not supplied You will enjoy high quality images B Use this hookup if your TV has component video input jacks Connect a component video cord not...

Page 17: ...n For DVDs see page 66 For VIDEO CDs see page 89 appears when no disc is loaded Additional operations To Press Stop play x Pause play X If you pause the DVD player for more than 5 minutes the DVD player will automatically stop Resume play after pause H Go to the next frame in pause mode SKIP Go to the previous frame in pause mode REPLAY Go to the next chapter track or scene in continuous play mode...

Page 18: ...isc Current title track number Current chapter number Counter position Voice language Subtitle language Custom AV Mode continued 36 Guide to the on screen display To playback the desired title track or chapter You can playback the desired title track or chapter using this menu The title track or chapter icon will appear on the DVD playback screen followed by the current title track or chapter numb...

Page 19: ...ss or You can change the playback speed as follows REW 3 y PLAY2 y PLAY y SLOW y STILL y SLOW y PLAY y PLAY2 y FF 4 continued 40 Playing a tape To turn off the power while rewinding Rewind Shut Off Press 1 while the tape is rewinding The power will turn off but the tape will keep rewinding until it reaches the end To use the time counter Press CLEAR at the point on the tape that you want to find l...

Page 20: ...ect additional equipment to a LINE connector or jack you can select the input signal using the INPUT SELECT or PROG buttons The display appears on the TV screen indicating information about the tape but the information will not be recorded on the tape If you do not want to watch TV while recording you can turn off the TV When using a satellite or digital tuner make sure to leave it on Notes If a t...

Page 21: ...confirm the setting 8 Press ENTER to confirm all settings 9 Press 1 to turn off the DVD VCR The indicator appears in the display window and the VCR stands by for recording To record from other equipment leave the connected equipment switched on ENTER 35 SP Off 19 19 00 20 00 CLEAR ENTER SETUP v V b B SA PR DATE START STOP SPEED PDC ENTER ENTER continued 48 Recording TV programmes using the VIDEO P...

Page 22: ...g see Checking changing cancelling timer settings on page 52 You can also display the timer programming menu by first pressing SET UP then V v to select TIMER and pressing ENTER in step 2 Notes When setting the timer with PDC signals enter the start times exactly as indicated in the TV programme guide Otherwise the PDC function will not work If the PDC signal is too weak or the broadcasting statio...

Page 23: ...en the player is connected to an audio component lacking a built in DTS decoder On Select this when the player is connected to an audio component with a built in DTS decoder ENTER SET UP continued 56 Audio Setup Audio DRC Dynamic Range Control Makes the sound clear when the volume is turned down when playing a DVD that conforms to Audio DRC This affects the output from the following jacks OUT AUDI...

Page 24: ...ent Out signals Off Select this not to output DVD Component Out signals To set the Progressive setting 1 Follow step 1 and 2 on page 57 then press V v to select Progressive 2 Press B b to select On then press ENTER DVD LINE1 RGB Out TV Type DVD S Video Out RETURN SCREEN SETUP SET UP v V b B On DVD Component Out On Progressive Off Off 4 3 Letter Box DVD LINE1 RGB Out TV Type DVD S Video Out RETURN ...

Page 25: ...d RETURN PARENTAL SETUP SET UP No B b continued 64 Parental Control limiting playback by children 3 Press b to select Yes If you have not entered a password The display for registering a new password appears Enter a 4 digit password using the number buttons The display for confirming the password appears Re enter the password When you have already registered a password The display for entering the...

Page 26: ...te page 10 1 Press ZOOM appears 2 Press V v B b to move to the position where you want to zoom in 3 Press ENTER repeatedly to change the magnification Each time you press the button the magnification changes as shown below 2 t 4 t 2 t normal magnification ZOOM V v B b ENTER MUTING ZOOM ENTER ENTER 68 Changing the angles Changing the angles Note Depending on the DVD VIDEO you may not be able to cha...

Page 27: ...start programme play Programme play starts When the programme ends you can restart the same programme again by pressing H 1 Follow steps 1 to 3 of Creating your own programme Programme play 2 Press v repeatedly to select Clear last track then press ENTER Each time you press the button the last programmed number is canceled You can also cancel the last programmed number by pressing CLEAR 3 Follow s...

Page 28: ...el and the instruments on the left channel you can hear the instruments from both speakers by selecting the left channel 1 Press AUDIO during playback 2 Press B b repeatedly to select the desired language audio setting When playing a DVD Depending on the DVD the choice of language varies Refer to DVD Audio Subtitle Language on page 118 for the abbreviation of the language When playing a VIDEO CD o...

Page 29: ...to select the desired track in the right column then press ENTER The selected track starts playing When a track or album is being played the title is shown in a box The playing track number appears on the display window ENTER RETURN MP3 ENTER DIRECTORY 007 album 1 album 2 album 3 album 4 album 5 album 6 album 7 track 1 00 00 OFF FILES 014 mp3 track 1 mp3 track 2 mp3 track 3 mp3 track 4 mp3 track 5...

Page 30: ...acks recorded with different specifications may result in loud noise sound skipping or speaker damage Depending on the disc playback may take some time to start The Playback order of MP3 audio tracks The playback order of albums and tracks recorded on a DATA CD or DATA DVD is as follows Structure of disc contents When you insert a DATA CD or DATA DVD and press H the numbered tracks are played sequ...

Page 31: ...niversal Disk Format UDF for the player to recognize the tracks or files You can also play DATA CDs or DATA DVDs recorded in Multi Session or Multi Border see Note on Multi Session Border discs on page 88 Refer to the instructions supplied with the CD R CD RW DVD R DVD RW drives and the recording software not supplied for details on the recording format Notes If both video data and JPEG image file...

Page 32: ...g To extend the duration Press z REC repeatedly to set a new duration time To cancel the duration Press z REC repeatedly until the indicator disappears and the VCR returns to normal recording mode To stop while recording Press x Notes You cannot display the current tape time in the display window when setting the recording duration time During DVD playback DVD VCR does not standby even if the VCR ...

Page 33: ...g pause However an index signal will be marked if you change the programme position during recording pause 4 Index scan To find a specific recording by scanning 1 Press m M The VCR starts scanning each recording for five seconds in the corresponding direction 2 Press H to start playback when you find the desired point Index search To search a specific recording 1 Press m M twice To search ahead pr...

Page 34: ... change V v B b ENTER SET UP SET UP Language Install Auto Power Off Screen Messages Power Save User Set Clock English Off Off On RETURN OPTION SET UP ENTER v V ENTER Tape Select Repeat Play RETURN VIDEO SETUP SET UP v V b B E180 Off ENTER Tape Select Repeat Play RETURN VIDEO SETUP SET UP v V b B E180 Off continued 100 Changing menu options Menu choices The default settings are indicated in bold pr...

Page 35: ...tion to change 3 Press B b to change the setting V v B b ENTER SET UP SET UP ENTER Language Install Auto Power Off Screen Messages Power Save User Set Clock English Off Off On RETURN OPTION SET UP ENTER v V ENTER NICAM Colour System VideoPlus Extend Smart Trilogic RETURN USER SET SET UP v V b B Off On On Auto ENTER 105 General setup information Additional Information Menu choices Initial settings ...

Page 36: ...r Moisture has condensed inside the player The player cannot play a recorded disc that is not correctly finalized page 7 Make sure the TV DVD VIDEO switch is set correctly Select correctly VIDEO or DVD with SELECT DVD VIDEO button The MP3 audio track cannot be played The DATA CD or DATA DVD is not recorded in the MP3 format that conforms to ISO9660 Level 1 Level 2 or UDF The MP3 audio track does n...

Page 37: ...ains up to 8 hours of moving pictures even though its diameter is the same as a CD The data capacity of a single layer and single sided DVD is 4 7 GB Giga Byte which is 7 times that of a CD The data capacity of a double layer and single sided DVD is 8 5 GB a single layer and double sided DVD is 9 4 GB and double layer and double sided DVD is 17 GB The picture data uses the MPEG 2 format one of the...

Page 38: ...32 Z O RETURN button 22 36 wj MENU button 66 Number 5 AUDIO and H buttons have a tactile dot Use the tactile dot as a reference when operating the DVD VCR 117 Index to parts and controls Additional Information Remote commander for VCR A Z eject button 39 B TV DVD VIDEO switch 10 C SELECT VIDEO button 10 D Number buttons 11 45 E CLEAR button 25 40 F SET UP button 18 G TIMER button 49 H AUDIO button...

Page 39: ...cording 93 MP3 6 79 N NICAM broadcasts 93 Normal audio track 94 P Parental Control 63 PBC Playback control 89 PDC Programme Delivery Control 47 Picture adjustment 97 Playback 31 38 at various speeds 33 39 JPEG image files 85 MP3 audio track 79 programme play 71 repeat play 73 selecting the sound 75 94 shuffle play 73 shuttle play 39 slow motion 33 39 VIDEO CDs 89 Playback quickly or slowly with so...

Page 40: ...1 30E MEMO ...

Page 41: ...om Cover Removal 2 1 3 Ass y Front Panel Removal Fig 2 3 Ass y Front Panel Removal 2 1 4 Function Timer PCB Removal Fig 2 4 Function PCB Removal 1 REMOVE 3 SCREWS 2 Lift up the Cabinet Top in the direction of arrow 1 RELEASE 2 HOOKS Bottom View 1 RELEASE 4 HOOKS Top view 2 RELEASE 3 HOOKS Bottom view 1 RELEASE 1 HOOKS SLV D973P E D983P D D983P GI ...

Page 42: ... 6 VCR Main PCB Removal Fig 2 6 VCR Main PCB Removal 2 REMOVE 4 SCREWS 1 REMOVE 2 SCREWS 3 REMOVE 3 SCREWS 4 REMOVE 2 SCREWS 5 REMOVE 3 SCREWS VCR MAIN PCB VCR DECK DVD MAIN PCB DVD DECK 6 REMOVE 1 SCREWS FUNCTION TIMER PCB VCR MAIN PCB 1 REMOVE 4 SCREWS ...

Page 43: ...2 3 Fig 2 7 Circuit Board Locations 2 2 CIRCUIT BOARD LOCATIONS VHS MAIN PCB DVD MAIN PCB FUNCTION TIMER PCB ...

Page 44: ...2 4 2 3 VCR DECK PARTS LOCATIONS 2 3 1 Top View Fig 2 8 Top parts Location 1 1 GEAR FL CAM 2 ASS Y MOTOR LOADING 3 ASS Y LEVER ARM 4 ASS Y HOLDER CASSETTE 5 LEVER FL DOOR 6 SLIDER FL DRIVE 2 3 4 5 6 1 ...

Page 45: ...S Y CYLINDER 3 ASS Y ACE HEAD 4 ASS Y LEVER UNIT PINCH 5 ASS Y LEVER 9 GUIDE 6 ASS Y LEVER TENSION 7 ASS Y BAND BRAKE 8 DISK S REEL 9 ASS Y LEVER S BRAKE 0 GEAR IDLE qa LEVER IDLE qs ASS Y LEVER T BRAKE qd DISK T REEL 1 2 6 7 8 9 qa 0 qs qd 0 3 4 5 ...

Page 46: ... Fig 2 10 Bottom Parts Location 1 GEAR JOINT 1 2 GEAR JOINT 2 3 BRAKET GEAR 4 ASS Y MOTOR CAPSTAN 5 ASS Y LEVER T LOAD 6 GEAR LOADING DRIVE 7 ASS Y LEVER S LOAD 8 ASS Y CLUTCH 9 BELT PULLEY 0 SLIDER CAM 1 2 3 4 5 6 7 8 9 0 ...

Page 47: ...ck 2 Continuously until theAss y Holder Cassette 1 is taken out completely Note Be sure to insert Lever Lock 2 in the direction of A to prevent separation and breakage of the Lever Lock 2 at disassembling and reassembling Fig 2 11 Ass y Holder Cassette Removal 2 4 2 Ass y Lever Arm Removal 1 Push the hole A in the direction of arrow B use the pin about Dia 2 5 2 Pull out the Ass y Lever Arm 1 from...

Page 48: ...nsert the Boss of Lever ARM R in Groove of Slider FL drive 1 Assembly Align the Gear FL Cam 1 with the Gear worm wheel Post as shown drawing Refer to Timing point Fig 2 14 Slider FL Drive Removal Fig 2 15 Gear FL Cam Gear Worm 2 4 3 Lever Door Removal 1 Release the Hook 2 and Remove the Lever Door 1 in the direction of arrow A Fig 2 13 Lever Door Removal B C A 2 LEVER FL DOOR 1 SLIDER FL DRIVE 1 S...

Page 49: ... WAFER 2 4 5 Gear Worm Wheel Removal 1 Remove the Gear Worm wheel 1 Fig 2 16 Gear Worm Wheel Removal 2 4 6 Cable Flat Removal 1 Remove the Drum connecting part of Cable Flat 1 from Connector Waffer 2 3 Fig 2 17 Cable Flat Removal 1 GEAR WORM WHEEL ...

Page 50: ...ove the Bracket Gear 2 3 Remove the Gear Joint 2 3 4 Remove the Gear Joint 1 4 Assembly 1 Be sure to align dot mark of Gear Joint 1 1 with dot mark of Gear Joint 2 2 as shown Fig 2 20 Refer to Timing point1 2 Confirm the Timing Point 2 of the Gear Joint 2 2 and Slider Cam 3 Fig 2 19 Bracket Gear Gear Joint 1 2 Removal Fig 2 20 Gear Joint 1 2 Assembly 2 ASS Y MOTOR LOADING 1 SCREW TIMING POINT 1 TI...

Page 51: ...lling be sure to align dot of Ass y Lever Load T 1 with dot of Ass y Lever Load S 2 as shown in drawing Refer to Timing Point 1 2 Insert the Pin A B C D into the Slider Cam 3 hole 3 Be sure to align dot of Ass y Lever Load T 1 and dot of Gear Loading Drive 4 Refer to Timing Point 2 4 Aline dot of Gear Loading drive 4 with mark of Slider Cam 3 as shown in drawing Refer to Timing Point 3 Fig 2 22 Ge...

Page 52: ... Brake S Refer to Fig 2 25 2 Remove the Spring Tension Lever 1 3 Rotate stopper of Main Base in the direction of arrow A 4 Lift the Ass y Lever Tension 2 Ass y Band brake 3 Note 1 When replacing the Ass y Lever Tension 2 be sure to apply Grease on the post 2 Take care not to touch stain on the felt side and not to be folder and broken Ass y Band brake 3 After Ass y Lever Tension seated Rotate stop...

Page 53: ...nd transformed Spring Brake at removing or reinstalling Fig 2 25 Ass y Lever Brake S T Removal 2 4 14 Ass y Gear Idle Removal 1 Push the Lever Idle 1 in the direction of arrow A B 2 Lift the Lever Idle 1 Assembly 1 Apply oil in two Bosses of Lever Idle 1 2 Assemble the Gear Idle 2 with the Lever Idle 1 Note When replacing the Gear Idle 2 be sure to add oil in the boss of Lever Idle 1 Fig 2 26 Ass ...

Page 54: ...Clutch 1 Check the condition of spring as shown in detail A 2 Don t push Ass y Holder Clutch down with excessive force Just insert Holder Clutch Ass y into post center with dead force and Rotate it smoothly Be sure to confirm that spring is in the slit of Ass y Gear Center as shown in detail B Fig 2 28 Ass y Holder Clutch Removal 1 WASHER SLIT 2 ASS Y CLUTCH DETAIL A BAD SPRING GOOD BAD SPRING GOO...

Page 55: ... Base 5 Push down theAss y Lever Up Down 1for locking of the Hook Note 1 Take care not to separate and sentence does not mark sense 2 Be sure to confirm that Ring of the Ass y Gear Center 2 is in the Guide of the Ass y Lever Up Down 1 after finishing assembly of Ass y Lever Up Down 1 and Ass y Gear Center 2 Fig 2 29 Ass y Lever Up Down Removal Fig 2 30 Ass y Lever Up Down Removal 2 4 18 Guide Cass...

Page 56: ...installing be sure to apply grease on the post pinch roller Fig 2 32 Ass y Lever Unit Pinch Plate Joint Spring Pinch Drive Removal 2 4 20 Ass y Lever 9 Guide Removal 1 Remove the Spring 9 Guide 1 2 Lift theAss y Spring 9 Guide 2 in the direction of arrow A Note 1 Take extreme care not to get grease on the tape Guide Post 2 After reinstalling check the bottom side of the Post 9 Guide to the top sid...

Page 57: ...ead Removal 1 Rotate the FE Head 1 in the direction of life up Fig 2 34 FE Head Removal 2 4 22 Ass y ACE Head Removal 1 Pull out the FPC from connector of Ass y ACE Head 2 2 Remove the screw 1 3 Lift the Ass y ACE Head 2 Fig 2 35 Ass y ACE Head Removal ...

Page 58: ...ft the Plate Ground Deck 2 3 Lift the Ass y Cylinder 3 Assembly 1 Match the 3 holes in the bottom of Ass y Cylinder 3 to the 3 holes of Main Base as attending not to drop or knock the Ass y Cylinder 3 2 Tighten the 1 Screw 1 3 Match the Plate Ground Deck 2 to the Hole of Base Main 4 Tighten the other 2 Screws 1 Note 1 Take care not to touch the Ass y Cylinder 3 and the tape guide post at reinstall...

Page 59: ...s 1 2 Remove the Ass y Motor Capstan 2 Assembly 1 Match the 3 holes of Ass y Motor Capstan 2 to the 3 holes of Main Base Be careful not to drop or knock the Ass y Motor Capstan 2 2 Tighten the 3 Screws 1 in the direction of arrow as shown detail drawing Note After tightening screws check if there is gap between the head of screws and the top side of Main Base There should have no gap between the h...

Page 60: ...e Screw of Ass y Motor Load Separate the Ass y Motor Load Fig 2 42 2 When Slider S T are approched in the position of unloading rotate holder Clutch counterclockwise after inserting screw driver in the hole of frame s bottom in order to wind the unwinded tape Refer to Fig 2 43 If you rotate Gear Worm 1 continuously when tape is in state of unwinding you may cause a tape contamination by grease and...

Page 61: ...O O O O O O O O FE HEAD O O O O O O O ACE HEAD O O O O O O O O O PINCH ROLLER O O O O O O O O O POST REEL S T SLEEVE TENSION POST CENTER LEVER IDLE BOSS 2Point CAPSTAN MOTOR PULLEY O O O O O BELT PULLEY O O O O O O O HOLDER CLUTCH ASS Y O O O O O O O O O GEAR CENTER ASS Y O O O O O O O O O GEAR IDLE 2Point O O O O O O O O O LOADING MOTOR O O O O O O O O O BAND BRAKE ASS Y O O O O O O O O O BRAKE T...

Page 62: ...2 22 2 6 DVD DECK 2 6 1 Holder Chuck Removal 1 Push 4 Hooks 1 in the direction of arrow A and lift up the Holder Chuck 2 Fig 2 44 Holder Chuck Removal 2 HOLDER CHUCK 1 2 HOOKS 1 2 HOOKS A A ...

Page 63: ... 1 into Emergency Hole 2 and push the Slider Housing 3 in the direction arrow A 2 When the Tray Disc 4 comes out a little pull it in the direction arrow B by hand Fig 2 45 Tray Disc Removal B 3 SLIDER HOUSING 4 TRAY DISC A 1 SCREW DRIVER 2 EMERGENCY HOLE ...

Page 64: ... Remove the 4 Soldering 1 SL SL SP SP 2 Remove the 1 Screw 2 and lift up the Ass y P U Deck 3 Fig 2 46 Ass y P U Deck Removal 2 1 SCREW 3 ASS Y P U DECK 4 CHASSIS SUB 1 4 SOLDERING Assembly Point SL BLK SP BLK TM BLK TM BLK SL RED SP RED ...

Page 65: ...ldering 1 TM TM 2 Push the 2 Hooks 2 in the direction of arrow A and remove Ass y PCB Deck 3 3 Push the Slider Housing 4 in the direction arrow B 4 Push the 1 Hook 5 in the direction of arrow C and lift up the Slider Housing 4 5 Remove the Belt Pulley 6 and 2 Screws 7 Ass y Motor Load 8 6 Push the 1 Hook 9 in the direction of arrow D and lift up the Gear Pulley 0 Gear Tray qa Fig 2 47 Ass y Housin...

Page 66: ...4 Remove the 2 Screws 7 and lift down Motor Spindl Ass y 8 5 Remove the 3 Screws 9 and remove 3 Holder Cam Skew q Shaft Pick Up qa Ass y Pick Up qs 6 Remove the 1 Screws qf and remove Gear Back Lash qg Fig 2 48 Ass y Bracket Deck Removal 2 GEAR FEED B 4 GEAR FEED A 5 2 SCREWS 6 MOTOR FEED ASS Y qf 2 SCREWS 7 2 SCREWS 8 MOTOR SPINDLE CHASSIS SUB q 3 HOLDER CAM SKEW 9 3 SCREWS qa SHAFT PICK UP qs AS...

Page 67: ... L R DIC2 S29AL016M IMB Flash Memory DIC4 TC74VHCT125 Level Shifter IC802 Bu4053 output signal switch IC501 LA72646 Hi FI Audio Processor IC301 LA71750EM Video Signal Processor IC601 uPD7B4928GF VCR Main Micom Pb COMPONENT A V Common Y Pr AUDIO L VIDEO AUDIO R Front A V Jack DIC5 64MB SDRAM IC605 EEPROM SCART JACK RF LD Control Notes PWB MAIN ASSY DVD must be replaced if DIC2 Flash Memory is damag...

Page 68: ...3 4E MEMO ...

Page 69: ...4 2 4 1 4 PCB Diagrams 4 1 VCR Main 4 3 4 2 DVD Main 4 7 4 3 Function Timer 4 11 SLV D973P E D983P D D983P GI ...

Page 70: ...4 4 4 3 4 1 VCR Main COMPONENT SIDE ...

Page 71: ...4 6 4 5 CONDUCTOR SIDE ...

Page 72: ...4 8 4 7 4 2 DVD Main COMPONENT SIDE ...

Page 73: ...4 10 4 9 CONDUCTOR SIDE ...

Page 74: ...4 12E 4 11 4 3 Function Timer COMPONENT SIDE CONDUCTOR SIDE ...

Page 75: ...PCB 5 1 S M P S 5 3 5 2 Power Drive 5 5 5 3 VPS PDC 5 7 5 4 A2 NICAM 5 9 5 5 A V 5 11 5 6 Hi Fi 5 13 5 7 I O 5 15 5 8 TM 5 17 5 9 Syscon 5 19 5 10 Function Timer 5 21 DVD Main PCB 5 11 DVD Decoder Servo 5 23 5 12 DVD A V 5 25 Function Timer PCB 5 13 Function Timer 5 27 ...

Page 76: ...5 4 5 3 5 1 S M P S ...

Page 77: ...5 6 5 5 5 2 Power Drive ...

Page 78: ...5 8 5 7 5 3 VPS PDC ...

Page 79: ...5 10 5 9 5 4 A2 NICAM ...

Page 80: ...5 12 5 11 5 5 A V ...

Page 81: ...5 14 5 13 5 6 Hi Fi ...

Page 82: ...5 16 5 15 5 7 I O ...

Page 83: ...5 18 5 17 5 8 TM ...

Page 84: ...5 9 Syscon 5 20 5 19 ...

Page 85: ...5 22 5 21 5 10 Function Timer ...

Page 86: ...5 11 DVD Decoder Servo 5 24 5 23 ...

Page 87: ...5 26 5 25 5 12 DVD A V ...

Page 88: ...5 13 Function Timer 5 28E 5 27 ...

Page 89: ...nd NVRAM option setting 3 When replacing the cylinder ass y be sure to adjust the X Point and Head switching adjustment 4 How to adjustment Intermittently short circuit the Test Point on VCR Main PCB with pincers to the adjustment mode If the corresponding adjustment button is pressed the adjustment is performed automatically When the adjustment is completed be sure to turn the power off 6 1 1 a L...

Page 90: ...6 2 TEST TEST BUTTON ...

Page 91: ... Select the option number See table 6 1 of corresponding model with buttons on the remote control 4 After selecting the option number is completed press the ENTER button of remote control If ENTER button is pressed the selected number is changescolor See Fig 6 4 5 Press the RETURN button of remote control again to store the option number 6 Turn the Power off Fig 6 3 Fig 6 4 CHG OK SAVE RETURN 01 0...

Page 92: ...3 15 16 32 33 34 35 36 38 40 42 45 47 48 50 58 61 63 65 67 68 69 70 71 72 SLV D983P GI 3 4 5 6 8 9 10 11 12 13 15 25 26 32 33 34 35 36 38 40 41 45 47 48 50 58 61 63 65 67 68 69 70 71 SLV D983P D 2 4 5 6 7 9 10 11 12 13 15 16 32 33 34 35 36 38 40 42 45 47 48 50 58 61 63 65 67 68 69 70 71 72 ...

Page 93: ...rt adjustment To maintain the height of the tape guide and prevent damage do not apply excessive force onto the main base Fig 6 6 Tape Travel Diagram POST TENSION MAIN BASE FE HEAD CYLINDER ASS Y PINCH ROLLER GUIDE ROLLER S GUIDE ROLLER T 8 GUIDE POST 9 GUIDE POST CAPSTAN SHAFT ACE HEAD 3 GUIDE POST Fig 6 5 Location of Tape Transport Adjustment TENSION POST 3 GUIDE POST GUIDE ROLLER S SUPPLY REEL ...

Page 94: ...d at the tape guide perform the tilt adjustment of the ACE head 1 ACE Head Assembly Adjustment a ACE HEAD HEIGHT ADJUSTMENT 1 Run the alignment tape Color bar in the playback mode 2 Observe surface of the audio head using a dental mirror 3 Turn screw C clockwise or counterclockwise until the gap of lower tape edge and the lower edge of the control head is about 0 25mm Refer to Fig 6 7 and 6 8 Fig ...

Page 95: ...de as shown in Fig 6 9 B 3 If a curl or wrinkle of the tape occurs slightly turn the screw A tilt adjust on the ACE head ass y 4 Reconfirm the ACE head height A B BAD WRINKLE GOOD Fig 6 9 Tape Guide Check c AUDIO AZIMUTH ADJUSTMENT 1 Load alignment tape Mono scope and playback the 7KHz signal 2 Connect channel 1 scope probe to audio output 3 Adjust screw B to achieve maximum audio level See Fig 6 ...

Page 96: ...erates automatically See Fig 6 1 4 Connect the CH 1 probe to Envelope the CH 2 probe to H D switching pulse and then trigger to CH 1 5 Insert the driver into the X Point adjustment hole and adjust it so that envelope waveform is maximum Test point TP2 Audio Output TP3 Envelope TP4 H D S W Trigger TP5 Control Pulse Fig 6 10 Location of Test point VCR Main PCB Top View AUDIO OUTPUT CONTROL PULSE HEA...

Page 97: ...output of the video RF envelope b Minimum output of the video RF envelope at the entrance side c Minimum output of the video RF envelope at the center point d Maximum output of the video RF envelope at the exit side 4 If the section A in Fig 6 12 does not meet the specification adjust the guide roller S up or down 5 If the section B in Fig 6 12 does not meet the specification adjust the guide roll...

Page 98: ...e Changes from RPS to Play Mode ENTRANCE SIDE ENVELOPE 3 Check Transitional Operation from RPS to Play Check transition from RPS mode to play mode Using a pre recorded SP tape make sure the entry side of envelope comes to an appropriate steady state within 3 seconds as shown in Fig 6 14 If the envelope waveform does not reach specified peak to peak amplitude within 3 seconds adjust as follows 1 Ma...

Page 99: ...ape wrinkle is observed perform the following adjustments in Playback mode Tape wrinkle at the guide roller S T section Linearity adjustment Tape wrinkle at tape guide flange ACE head assembly coarse adjustment 6 2 3 Reel Torque 1 The rotation of the capstan motor causes the holder clutch ass y to rotate through the belt pulley 2 The spring wrap PLAY REV of holder clutch ass y drives the disk reel...

Page 100: ...6 12E MEMO ...

Page 101: ...LED OFF F1SS01 is normal D1SS11 D1SF02 SHORT and OPEN are normal Check feedback IC1SS2 Change short circuited or opened parts Change fuse Check 2 st Voltage and D1SS12 Replace SCS11A NO NO Is there voltage at Collector of SCS11A NO YES YES YES Operation of SCS11A is normal NO YES ...

Page 102: ... around IC601 reset Check the soldering around the IC601 Change IC701 NO NO Key operatious such as STOP PLAY OPEN are normal Check the circuity around the swich check the condition of commmunication with Main Micom IC601 11 SCLK 12 TXD 13 RXD 52 RRQ 66 SRQ NO YES YES Check the circuity around IC601 reset Check the soldering around IC601 good NO YES XT602 8MHz oscillation is normal NO YES YES STOP ...

Page 103: ...SPLAY PRESS PLAY KEY IN REMOTE CONTROL MECHANISM OPERATION SEE PB VIDEO AUDIO MISSING IN PLAY MODE SEE MECHANISM DOES NOT OPERATE IN PLAY MODE CHECK TIMER CHECK IC601 XT602 SEE VIDEO MISSING IN EE MODE NO NO NO YES NO PB VIDEO SEE VIDEO MISSING IN PLAY MODE NO YES YES YES DOES NOT OPERATE OR OPERATES BUT STOP SOON YES VCR Section ...

Page 104: ...URN VCR POWER ON MECHANISM DOESN T OPERATE IN PLAY MODE TAPE LOADING OPERATION LOAD IC601 75 LOW CYLINDER ROTATION SW 25Hz IC601 24 CYL FG PG IC601 97 CHECK CYLINDER CHECK SW604 NO NO NO NO YES YES YES YES CHECK CN604 Pin8 12V VCR Section A ...

Page 105: ...TION S T REEL IC601 98 99 PROG SW STATE IC601 76 77 78 CHANGE IC601 CHECK LOADING MOTOR MECHANISM OR SW601 TAKE UP REEL SENSOR SUPPLY REEL SENSOR PT601 PT602 SEE CAPSTAN DOES NOT ROTATE NO DC STOP MODE YES PULSE YES A ...

Page 106: ...LANK TAPE AND PRESS RECORD BUTTON REC MODE SAFETY TAB D REC A H IC601 68 SEE AUDIO MISSING IN RECORD MODE CHANGE SW602 CHECK IC601 CHANGE TAPE SEE PLAY MODE DOESN T OPERATE EJECT NO NO YES NO REC VIDEO SEE VIDEO MISSING IN RECORD MODE NO YES YES YES YES VCR Section ...

Page 107: ...NDICATOR IN THE DISPLAY PRESS FF KEY IN REMOTE CONTROL MECHANISM STATE IC601 76 77 78 CHECK TIMER CHANGE IC601 XT602 NO STOP NO NO YES CAPSTAN MOTOR ROTATION SEE CAPSTAN DOES NOT ROTATE SEE MECHANISM DOES NOT OPERATE IN PLAY MODE YES F FWD ROTATE CHECK MECHANISM VCR Section ...

Page 108: ...FWD FOR FORWARD SEARCH CHECK IC601 CHECK CAPSTAN MOTOR IS CAPSTAN SPEED CHANGED SEARCH OPERATION NOISE BAR LOCKING END ADJUST A CE HEAD CHANGE DECK CHANGE IC601 SEE PLAY DOESN T OPERATE NO NO NO YES NO CONTROL PULSE IC601 89 NO YES YES YES YES VCR Section ...

Page 109: ...ANISM DOES NOT OPERATE TAPE DETECTED CST IN MODE IC601 75 HIGH 5V CHANGE IC601 CHECK SW604 IC601 CHECK DM B LINE CHANGE IC601 NO NO NO YES IC601 38 LOW 0V IC601 39 HIGH 5V IC601 38 HIGH 5V IC601 39 LOW 0V CHECK CASSETT LOADING MECHANISM YES YES NO CN604 8pin 12V YES NO YES VCR Section ...

Page 110: ...MODE OPERATION VIDEO MISSING IN EE MODE IC301 61 VIDEO OUT NO NO NO IC802 13 VIDEO IN YES YES IC802 14 VIDEO OUT YES CHECK Q811 R844 NO CHECK C355 NO NO IC301 48 CHECK IC601 NO IC301 68 CLOCK 69 DATA VIDEO YES YES CHECK IC802 CHECK IC802 CHECK LINE OUT VCR Section ...

Page 111: ...301 48 50 52 VIDEO signal out NO DEFECT RECORD MODE E E mode and IC301 61 CHECK VIDEO signal out NO YES IC301 78 CHECK REC FM signal CHANGE C392 NO YES IC301 94 SP IC301 88 SLP CHECK REC FM signal CHECK CN301 CONNECTION NO YES VCR Section ...

Page 112: ...C6P01 Q6P01 R6P10 CHECK VIDEO HEAD CHECK C392 CHECK IC601 24 CHECK VIDEO OUT LINE SEE PAGE 7 10 VIDEO MISSING IN EE MODE NO YES YES NO YES YES YES VIDEO FM IC301 21 VIDEO IC301 78 IC301 65 VIDEO SIGNAL IC6P01 19 VIDEO SIGNAL IC301 61 NO H D SW IC301 70 NO YES YES NO NO NO CHECK IC802 C380 VCR Section ...

Page 113: ...RD MODE VIDEO IN RECORD MODE VCR Section COLOR signal IC301 58 COLOR KILLER IC301 33 2V CHANGE IC301 CHECK THE REC LINE SEE PAGE 7 11 VIDEO MISSING IN RECORD MODE NO NO NO YES YES YES CHECK XT301 CHANGE XT301 NO NO CHANGE IC301 ...

Page 114: ...FM ENV IC301 25 COLOR MONITOR IC301 58 COLOR KILLER IC301 33 2V COLOR ROTERY IC301 57 CHANGE IC301 CHECK IC301 27 34 XT301 CHECK IC601 29 SEE PAGE 7 12 VIDEO MISSING IN PLAY MODE NO NO NO NO YES YES YES YES VCR Section CHECK IC301 61 ...

Page 115: ...7 15 OSD PICTURE MISSING 2fsc IN IC6P01 2 STB CLK DATA IC6P01 9 10 11 OSC IN IC6P01 6 CHANGE IC6P01 CHECK IC6P01 CHECK L6P05 C6P04 C6P05 YES NO YES YES NO VCR Section ...

Page 116: ...NGE IC601 SELECT LINE MODE WITHOUT INPUT SIGNAL IC601 72 H CHECK IC6P01 8 TO IC601 72 NO YES YES CHECK IC6P01 IC6P01 9 10 11 STB CLK DATA CHECK IC601 6 7 8 NO YES IC6P01 8 H SYNC JUDGE VIDEO SIGNAL IC6P01 19 NO CHECK OSD VIDEO IN LINE YES YES NO VCR Section ...

Page 117: ...PUT CHOICE MODE CHECK TUNER AND IC4N01 CHECK IC601 CHECK R517 R518 R519 R510 LINE NO NO CHANGE IC501 NO CHECK C851 C852 L803 L804 TUNER YES YES YES YES IC501 78 80 AUDIO SIGNAL CHECK IC501 38 39 CLK DATA IC501 51 53 AUDIO SIGNAL INPUT IC801 1 3 AUDIO SIGNAL YES NO VCR Section CHECK IC802 NO ...

Page 118: ... MISSING AUDIO IC501 7 69 AUDIO SIGNAL IC501 26 AUDIO FM CHECK CYLINDER CHANGE IC501 R503 C513 CHANGE IC501 CHECK AUDIO MISSING IN EE MODE AUDIO MISSING IN REC MODE MONO HIFI MONO NO NO YES YES VCR Section ...

Page 119: ... IC301 68 69 CHECK CLOCK DATA CHECK C523 R511 J905 YES NO NO NO YES YES YES YES YES YES CHECK IC301 12 14 AND CHANGE IC301 CHANGE IC501 IC301 10 AUDIO SIGNAL IC301 100 AUDIO FM SIGNAL IC301 5 MIX SIGNAL AUDIO 70KHz CN3A01 4 OSCILLATION NO CHECK AUDIO MISSING IN PB MODE CHECK PB MODE CHECK A CE HEAD MONO NO ...

Page 120: ... MODE CHANGE IC501 AUDIO MISSING IN PB MODE CHECK L3A01 R3A25 CHANG IC301 CHECK ACE HEAD C3A16 AND CHANGE IC301 AUDIO SELECT IC501 78 80 AUDIO FM MIXED CHECK IC501 40 A H D SW CHANGE CYLINDER OR IC501 NO HIFI MONO YES IC301 5AUDIO SIGNAL NO YES VCR Section ...

Page 121: ...7 21 PLAY NO SERVO LOCK IC601 93 C FG IC601 87 CTL PULSE CHECK CTL PULSE AC LEVEL SP SLP OVER 1Vp p CHANGE IC601 CHECK A CE HEAD CHECK CN604 1 NO NO NO YES YES YES VCR Section ...

Page 122: ... CN604 3 PC 5V CN604 9 3 2V CN604 5 2 6V CN601 3 OUTPUT PWM IC601 10 OUTPUT PWM CHECK CAPSTAN MOTOR CHECK R660 CHECK R609 CHANGE IC601 CHECK IC601 CHECK B IN THE POWER BLOCK CHECK PC5V 5V AT LINE IN THE POWER BLOCK NO NO NO NO YES NO YES NO YES YES YES YES VCR Section ...

Page 123: ... ROTATE CN604 8 12V CN604 3 5V CN604 12 2 5V CHECK CYLINDER MOTOR IC601 5 9 DRUM CTL L CHECK PC5V LINE CHECK AL12V 12V AT LINE IN THE POWER BLOCK NO NO NO YES YES YES CHANGE IC601 NO CHECK R608 C659 R617 C661 VCR Section ...

Page 124: ...o focus incoming PWMO in DIC1 148 is within specified range PWMO Waveform DRIC 25 26 output are normal Check open state from DRIC1 to pick up Check DIC1 and A B C D input Check DRIC1 Yes Yes No No DVD Section ...

Page 125: ...7 25 No pick up home positing Check the Sled Motor and connection SLED SLED DRIC 13 14 output are normal Check DRIC1 Yes No DVD Section ...

Page 126: ...7 26 NO DVD LD ON DIC1 124 is H Check LD of Pick up Check DIC1 Yes No QLP2 Collector is L Check QLP2 Yes No MDQ1 Collector is H Check MDQ1 Yes No DVD Section ...

Page 127: ...output is normal DIC1 76 DIC1 140 SPDL SENS Input is normal Check disc motor Check DRIC1 soldering Resoldering DIC1 Yes Yes No No Input of A B C D signal is normal DIC1 131 134 Check DIC1 perpheral circuit and DCON3 connector Yes No DVD Section ...

Page 128: ...lose H DIC1 58 is Open H Close L Check DRIC 17 18 output at OPEN CLOSE Check signal line state from DRIC 17 18 to tray motor Check DIC1 perpheral circuit Check DRIC1 perpheral circuit and DCON1 connector Yes Yes No No OPEN Waveform DVD Section ...

Page 129: ... output is normal Check PCB peripheral Pattern shot Check DIC1 176 output Check DIC1 163 CD VCD 16 9344MHz DVD 18 432MHz Yes Yes No No AIC4 1 7 output is normal Check AIC4 peripheral circuit Yes No Base terminal level of AQ3 AQ6 are L Check VCR MICOM mute Yes No ADOUT Waveform Vout Waveform DVD Section ...

Page 130: ...ideo output error VIC1 28 31 output is normal Check the circuit of DIC1 VIC1 No S JACK output is normal Check the connection between VIC1 and S JACK Yes No Yes Check the connection of s video cable DVD Section ...

Page 131: ...output error VIC1 21 23 25pin output is normal Check the circuit DIC1 and VIC1 No JACK1 output level is normal Check the connection between VIC1 and JACK1 Yes No Yes Check the connection component cable DVD Section ...

Page 132: ...is normal JK801 Output is normal Check the connection between DVD part and VCR part Check the connection between IC801 and JK801 Yes No No Yes VIC1 33 Output is normal Check the circuit of DIC1 VIC1 Yes No Check the connection of CVBS cable ...

Page 133: ...D D983P GI 8 REPAIR PARTS LIST 8 1 Exploded Views 8 1 1 Cabinet Assembly 8 1 2 VCR Mechanical Parts Top Side 8 1 3 VCR Mechanical Parts Bottom Side 8 1 4 DVD Mechanical Parts 8 2 Electrical Parts List 8 2 8 2 8 3 8 4 8 5 8 6 ...

Page 134: ...OVER COMBO EURO for RMT V503C 2 9 885 104 33 ASSY DECK 3 9 885 101 41 SPRING ETC DOOR TRAY 4 9 885 079 64 ASSY DVD DECK 05 1 823 023 11 POWER CORD KKP419C D973P E D983P D 05 1 823 025 11 POWER CORD Y352 D983P GI A001 9 885 067 47 COMMANDER RMT V503C TYPE C001 9 885 104 40 ASSY PANEL FRONT D973P E D973P E C001 9 885 104 41 ASSY PANEL FRONT D983P D D983P D C001 9 885 104 42 ASSY PANEL FRONT D983P GI...

Page 135: ...anical Parts Top Side T001 W016 T010 T015 T077 T071 T003 W201 W015 T028 T020 T027 T019 T028 T024 T023 T025 not supplied not supplied not supplied not supplied not supplied not supplied not supplied not supplied not supplied not supplied not supplied not supplied not supplied not supplied not supplied not supplied not supplied not supplied T027 9 885 101 24 ASSY LEVER BRAKE T T028 3 067 786 01 SPRI...

Page 136: ... not supplied not supplied not supplied not supplied not supplied not supplied not supplied not supplied not supplied W018 T044 9 885 101 26 MOTOR CAPSTAN T046 3 067 790 01 BELT PULLEY Ref No Part No Description Remarks Ref No Part No Description Remarks W018 9 885 056 92 SCREW TAP M2 6 L7 W019 9 885 061 03 SCREW CAP 2 6X6 ...

Page 137: ...9 885 079 52 MOTOR DC SPINDLE H210 9 885 037 22 MOTOR FEED ASSY 0H211 9 885 079 63 ASSY PICK UP H241 9 885 081 64 FFC DVD DECK W010 3 078 592 01 SCREW TAP 2X6 W011 9 885 037 07 SCREW MAC 1 7X3 W012 9 885 037 08 SCREW TAP 1 7X5 W212 9 885 079 48 SCREW TAPTITE ZPC YEL L3 W273 9 885 079 47 SCREW TAPTITE ZPC BLK L6 The components identified by mark 0 or dotted line with mark 0 are critical for safety ...

Page 138: ...IXED REG VIC1 9 885 037 03 IC LA73054 VIDEO PROCESS VIC2 9 885 068 25 IC MM1503XN SELECTOR FERRITE BEAD AL1 1 400 316 11 CORE FERRITE BEAD 220ohm AL2 1 400 316 11 CORE FERRITE BEAD 220ohm AL3 1 400 316 11 CORE FERRITE BEAD 220ohm AL4 1 400 316 11 CORE FERRITE BEAD 220ohm CNL1 1 400 316 11 CORE FERRITE BEAD 220ohm CNL2 1 400 316 11 CORE FERRITE BEAD 220ohm CVL0 1 400 316 11 CORE FERRITE BEAD 220ohm...

Page 139: ...1 804 407 11 DIODE 1N4148 D702 1 804 407 11 DIODE 1N4148 D703 1 804 407 11 DIODE 1N4148 D704 1 804 407 11 DIODE 1N4148 D705 1 804 407 11 DIODE 1N4148 D805 1 804 407 11 DIODE 1N4148 D806 9 885 101 32 DIODE DAN202K D807 1 805 009 11 DIODE DAN217 D808 9 885 101 32 DIODE DAN202K D810 1 804 407 11 DIODE 1N4148 D1P104 1 804 407 11 DIODE 1N4148 D1P105 1 804 407 11 DIODE 1N4148 D1P106 1 804 407 11 DIODE 1...

Page 140: ...11 INDUCTOR 100uH L701 1 400 074 11 INDUCTOR 100uH L702 1 400 074 11 INDUCTOR 100uH L814 1 400 085 11 INDUCTOR 70uH L890 1 400 074 11 INDUCTOR 100uH L1P102 1 424 828 11 COIL CHOKE 10uH L1SS03 1 424 828 11 COIL CHOKE 10uH L1SS04 1 424 828 11 COIL CHOKE 10uH L1SS05 1 424 828 11 COIL CHOKE 10uH L301A 1 400 074 11 INDUCTOR 100uH L3A02 1 400 074 11 INDUCTOR 100uH L3A03 1 400 074 11 INDUCTOR 100uH L4N04...

Page 141: ...401 9 885 104 36 TM BLOCK VIBRATOR XT301 1 795 330 11 VIBRATOR CRYSTAL 4 433619MHz XT602 1 795 331 11 VIBRATOR CRYSTAL 8MHz XT4N01 9 885 043 29 CRYSTAL 18 432MHz MISCELLANEOUS 05 1 823 023 11 POWER CORD KKP419C D973P E D983P D 05 1 823 025 11 POWER CORD Y352 D983P GI 0151 9 885 079 63 ASSY PICK UP DSW1 9 885 037 05 SWITCH DETECTOR H104 9 885 061 33 MOTOR LOADING ASSY H207 9 885 079 52 MOTOR DC SPI...

Page 142: ... 164 Sony Corporation Home Electronics Network Company 9 883 918 11 2006E0500 1 2006 5 Published by Quality Assurance Dept SLV D973P E D983P D D983P GI ...

Reviews: