background image

21

GB

Operations for Sony Amplifiers/Receivers / 2 Way Remote Operations

Operating the amplifier/
receiver

You can operate a Sony 2 way amplifier/
receiver. You can also download the names of
components (inputs). Before operating, register
the Sony amplifier/receiver using the IR
SETUP function (page 10).

When performing the following procedure,
be sure to turn on the amplifier/receiver
and point the commander towards the IR
receptor on the amplifier/receiver.

To register a 2 way amplifier/
receiver

Use the RM SETUP screen.

Note

You cannot register the amplifier/receiver if it is not
set to use the 2 way remote system. Refer to “Setting
up the 2 way remote” in the operating instructions
supplied with the amplifier/receiver.

1

Touch RM SETUP.

2

Touch AMP REGIST.

3

Touch START.

The communication starts and the amplifier/
receiver is registered to the commander.
The registered amplifier/receiver name
appears in the screen. The amplifier/receiver
name also appears in the RM SETUP screen
as the current setting.

Note

If the amplifier/receiver name appears as “model
others”, the amplifier/receiver is not registered
correctly. In this case, some 2 way operations may
not be possible.

To operate the amplifier/
receiver

1

Select the Sony amplifier/receiver in the
RM SELECT screen.

“1WAY 2WAY” appears.

Tip

When you can select several Sony amplifiers/
receivers in the RM SELECT screen, touch the
AMP icon that appears first.

2

Touch 2WAY.

The screen for the 2 way operation appears
and you can operate the amplifier/receiver
registered in the RM SETUP screen.

To download the names of components
(inputs), touch INPUT SELECT, then touch
INPUT NAME DOWNLOAD.

To download the names of sound fields,
touch SOUND FIELD, then touch S.F.
NAME DOWNLOAD.

Notes

• 2 way operations may not be possible immediately

after turning on the amplifier/receiver.

• You cannot use the jog dial when using the 2WAY

screen.

• You cannot use the Learning function for the keys

in the 2WAY screen.

Summary of Contents for RM-TP2

Page 1: ...n Owner s Record The model and serial numbers are located on the rear of the unit Record the serial number in the space provided below Refer to them whenever you call upon your Sony dealer regarding this product Model No Serial No Operating Instructions Mode d emploi GB FR ...

Page 2: ...on between the equipment and control amplifier Connect the equipment into an outlet on a circuit different from that to which the control amplifier is connected Consult the dealer or an experienced radio TV technician for help CAUTION You are cautioned that any changes or modifications not expressly approved in this manual could void your authority to operate this equipment If you have any questio...

Page 3: ...erating the amplifier receiver 21 Operating the tuner 22 Operating the CD player or MD deck 22 Table of Contents Advanced Operations Performing several commands in sequence automatically Macro Play 23 Learning the commands of other remote commanders 26 Switching the input on the amplifier receiver automatically AMP LINK 29 Changing the name of the remote component 29 Adjusting the commander s oper...

Page 4: ...commands You can program the Commander to execute a series of operations up to 24 steps from a single key page 22 You can program up to 16 Macro Plays Learning Function for programming additional remote control signals This Commander has a Learning Function to learn the signals from other remotes and operate non preset components or functions page 26 The Learning Function can be used with preset o...

Page 5: ...tion this commander is equipped with 2 remote code transmitter receiver sections in order to provide a greater operating range Preparations Preparing the commander Charging the battery Before you use the commander charge the battery The exclusive rechargeable battery is built in 1 Connect the AC adapter to the battery charger 2 Place the commander on the battery charger The indicator lights in red...

Page 6: ... be replaced On replacing the battery please consult your nearest Sony dealer RECYCLING NICKEL METAL HYDRIDE BATTERIES For customers in the United States and Canada Nickel Metal Hydride batteries are recyclable You can help preserve our environment by returning your used rechargeable batteries to the collection and recycling location nearest to you For more information regarding recycling of recha...

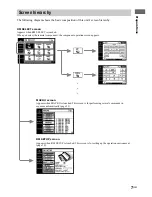
Page 7: ...s when RM SELECT is touched When you select the remote component the component operation screen appears MACRO screen Appears when MACRO is touched This screen is for performing several commands in sequence automatically page 23 RM SETUP screen Appears when RM SETUP is touched This screen is for setting up the operation environment page 30 ...

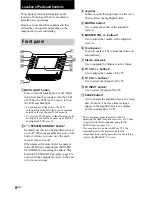
Page 8: ...ion SYSTEM OFF program page 23 even when the amplifier receiver in the 2nd or 3rd zone is on use Location of Parts and Controls 3 Jog dial Rotate to scroll through items in a list etc Push to select the highlighted item 4 MUTING button Use to mute the sound of the amplifier receiver 5 MASTER VOL buttons Use to adjust the volume of the amplifier receiver 6 Touch panel Touch to operate The commander...

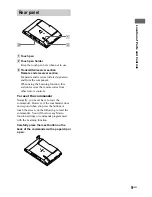
Page 9: ...ng function this section receives the remote codes from other remote controls To reset the commander Normally you never have to reset the commander However if the commander does not respond when you press the buttons or touch the screen do the following to reset the commander You will not lose any Macro function settings or commands programmed with the Learning function Carefully press the reset b...

Page 10: ... or touch v or V to scroll through the list To display the components in the RM SELECT screen Touch YES instead of NO in step 4 Tip Components that have been registered see below are set to YES automatically Registering the components IR SETUP 1 Touch RM SELECT The RM SELECT screen appears 2 Touch the remote component you want to register VIDEO1 for example Or turn the jog dial to select the remot...

Page 11: ...program the commands of the remote supplied with the component page 26 To operate the amplifier in the 2nd room select AMP in the IR SETUP CATEGORY screen and select Sony MULTI ROOM1 in the IR SETUP MAKER CODE screen This is initially registered in the RM SELECT screen 2 2 as 2ND ZONE To operate the amplifier in the 3rd room select AMP in the IR SETUP CATEGORY screen and select Sony MULTI ROOM2 in...

Page 12: ...additional remote codes page 28 TUNER Sony TUNER AU1 Sony TUNER AU2 Sony TUNER SYS1 Sony TUNER SYS2 Sony TUNER MLT1 Sony TUNER MLT2 Select this when the command mode of the amplifier receiver is AV1 AV SYSTEM1 Also select this when the tuner does not operate under Sony TUNER SYS1 Select this when the command mode of the amplifier receiver is AV2 AV SYSTEM2 Also select this when the tuner does not ...

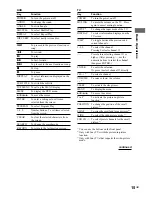
Page 13: ...VIDEO 3 VIDEO 4 To select the input source VIDEO 4 VIDEO 5 To select the input source VIDEO 5 LD To select the input source LD DVD To select the input source DVD TV SAT To select the input source TV SAT TAPE To select the input source TAPE MD DAT To select the input source MD DAT CD SACD To select the input source CD SACD TUNER To select the input source TUNER PHONO To select the input source PHON...

Page 14: ... 1 You can use the buttons on the front panel 2 Sony amplifier receiver only For details see page 19 For details on the controls of each key refer to the operating instructions supplied with the amplifier receiver VIDEO Key Function POWER To turn the power on off Z To eject the video tape To rewind at high speed INPUT To change the input mode of the VCR SELECT X2 To play in the double speed CH To ...

Page 15: ...n the power on off MUTING To mute the volume on the TV Press again to cancel muting function INPUT3 To change the input mode of the TV DISPLAY To select information displayed on the TV screen JUMP To toggle between the previous and current channels 1 9 0 To select the channel Pressing 0 selects channel 10 Press before selecting channel 11 or higher After pressing use the numeric buttons to select ...

Page 16: ...orm editing operation CD SACD Key Function POWER To turn the power on off To select the previous track m To rewind N To play M To fast forward To select the next track DISC SKIP To select a disc x To stop X To pause CONTINUE To select continuous play mode SHUFFLE To play in random order PROGRAM To use for program play REPEAT To select repeat play mode 1 9 0 To select the track number 0 selects tra...

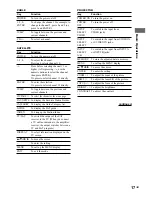
Page 17: ...lay the SAT guide INDEX To bring up the Station Index TV SAT To switch the output of the SAT receiver to the TV When you connect a TV cable or antenna to the amplifier receiver the output switches between a TV and SAT program DISPLAY To select information displayed on the TV screen v V b B To move the cursor To enter the setting MENU To call up the MENU display EXIT To exit the mode PROJECTOR Key ...

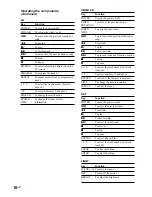
Page 18: ...PREVIOUS INDEX To go to the next menu NEXT To proceed to the previous location or song m To rewind N To play M To fast forward To proceed to the next location or song x To stop X To pause 1 9 0 To select the track number 0 selects track 10 10 To select numbers 10 and above RETURN To return to the last previous screen TIME To change the time information SELECT To select the menu DAT Key Function PO...

Page 19: ...The RM SELECT screen appears 2 Touch AMP The screen for operating the amplifier receiver appears 3 Touch B or b to select the screen For details on each screen see below Notes Depending on the amplifier receiver some commands may not function For details about the operations refer to the operating instructions supplied with the amplifier receiver Screen 1 6 This screen is mainly for switching the ...

Page 20: ...ote system refer to Setting up the 2 way remote in the operating instructions supplied with the amplifier receiver Component Commander 2 Way Remote Operations Operation example When a 2 way component is connected to the amplifier receiver with a Control A1 A1 cord When operating the 2 way CD changer directly Notes for the 2 way remote operation To ensure good communication conditions carry out the...

Page 21: ... amplifier receiver name appears in the screen The amplifier receiver name also appears in the RM SETUP screen as the current setting Note If the amplifier receiver name appears as model others the amplifier receiver is not registered correctly In this case some 2 way operations may not be possible To operate the amplifier receiver 1 Select the Sony amplifier receiver in the RM SELECT screen 1WAY ...

Page 22: ...les etc from Sony 2 way CD player or MD deck Before operating register Sony CD player or MD deck using the IR SETUP function page 10 Compatible with Sony CD changers 5 50 200 300 400 CD Select the CD SACD CD player or MD deck in the RM SELECT screen The communication starts and the information such as disc titles and song names are displayed Tip When the song number or song title is not displayed ...

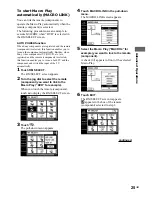
Page 23: ...M OFF has been factory set to turn off all Sony AV components The same program is also executed when the 1 SYSTEM STANDBY button on the front panel is pressed more than 2 seconds Setting the sequence of IR codes 1 Touch MACRO The MACRO screen appears 2 Turn the jog dial so that the Macro Play number you want to program MACRO3 for example comes to the middle box Advanced Operations 3 Touch The pull...

Page 24: ... under the Macro Play function Select RESERVE KEYS from the CATEGORY list Then select the button for the learned IR code To cancel programming Touch EXIT or CANCEL during any step To clear the programmed IR code Select the macro step number BOX you want to clear the IR code then select MACRO CLEAR from the CATEGORY list To change the name of the Macro Play In step 4 touch MACRO NAME EDIT Touch the...

Page 25: ...ote component is selected this function enables you to turn on both TV and the component and switch the input of the TV automatically 1 Touch RM SELECT The RM SELECT screen appears 2 Turn the jog dial to select the remote component you want to link to the Macro Play DVD for example When you touch the remote component touch B to display the RM SELECT screen 3 Touch The pull down menu appears 4 Touc...

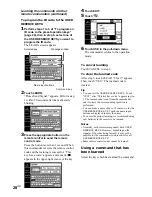
Page 26: ...rs Setting remote control codes that are not stored in the commander When a remote control code is not one of the presets stored in the commander it is possible for the commander to learn the code using the Learning function Learning function can be used for each preset operation keys and USER RESERVE KEYS To program an IR code to the preset operation keys 1 Touch RM SELECT The RM SELECT screen ap...

Page 27: ...he key you want to overwrite the learned code The same display as To clear the learned code appears Touch OVER WRITE A mark s blinks in the bottom right corner of the key Then follow steps 7 to 9 About 5 cm 15 cm 5 Point the remote code receiver section of this commander toward the receiver transmitter on the remote control to be learned 6 Touch the key on this commander you want to use the Learni...

Page 28: ...ns to the operation mode To cancel learning Touch CANCEL in step 2 To clear the learned code After step 3 touch CLEAR Clear appears Then touch YES The learned code is cleared Tip You can test the USER RESERVE KEYS Touch TEST after This key have code appears in step 3 The learned code is sent from the commander and if correct the corresponding operation is performed You can make a name of up to 14 ...

Page 29: ...ppears Switching the input on the amplifier receiver automatically AMP LINK You can set the commander to switch the input on the amplifier receiver to the component selected in the RM SELECT screen automatically The following procedure uses an example to switch the input on the amplifier receiver to CD when CD SACD is selected in the RM SELECT screen 1 Touch RM SELECT The RM SELECT screen appears ...

Page 30: ...uch RM SETUP The RM SETUP screen appears 2 Touch the menu you want to adjust See below for details about each menu 3 Touch EXIT to return to the RM SETUP screen x Adjusting the contrast of the display CONTRAST You can adjust the contrast of the display Touch or to adjust the contrast Tips Depending on the brightness of the room and the angle at which the commander is viewed the LCD may be difficul...

Page 31: ...R Touch YES to erase all memorized settings and return them to their factory presets A long beep is emitted and all settings return to the factory settings Please note that once erased settings cannot be returned x Registering the 2 way amplifier receiver AMP REGIST When using Sony 2 way amplifier receiver touch START to download the amplifier receiver information For details see page 21 x Setting...

Page 32: ...rwise wire disconnection or malfunction may result Do not cover the main unit and or AC adapter with a cloth or cushion Otherwise heat build up may cause deformation of the case or a fire hazard Install the unit on a stable surface Do not install the unit on an unstable bench or tilted surface Also do not install it sideways or upside down Otherwise the unit may fall or topple down causing human i...

Page 33: ...ean water including tap water Also penetration of the battery fluid may cause loss of eyesight Should this happen immediately rise the eye with clean water such as tap water and consult your doctor Do not immerse the unit in either fresh or sea water or moisten it with water This may cause heat generation from the battery as well as corrosion of the battery terminals The ambient temperatures durin...

Page 34: ...apter and battery charger on an unstable surface during recharging Also do not cover or wrap them with a cloth or cushion Otherwise heat build up may cause a fire hazard Replace the AC adaptor with one of the same type if replacement is necessary Please ask the nearby Sony dealer of a model name Precautions On power sources For customers in Europe The unit is not disconnected from the AC power sou...

Page 35: ...l Contrast is too light or too dark Adjust the contrast page 30 The LCD shifts from the normal operating position Adjusting the position of the touch panel page 31 When a component is connected to the amplifier receiver with Control A1 A1 cord Auto Function does not work properly Download the amplifier receiver data page 21 Commands of components made by manufacturers other than Sony do not functi...

Page 36: ...ch panel Resistant membrane system Analog type Power requirements Rechargeable Ni MH battery Maximum external dimensions width height depth including projecting parts and controls 166 25 126 mm Mass 392 g Main unit only including the rechargeable battery Supplied accessories Battery charger 1 AC adapter 1 Design and specifications are subject to change without notice ...

Page 37: ...laupunkt Brocsonic Bush Canon CGM Citizen Clatronic Craig Curtis Mathis Daewoo DBX Dimensia Emerson Ferguson Fisher Funai GE GoldStar Goodmans Grundig Hitachi Instant Replay Itt Nokia JC Penny JVC Kendo Kenwood Loewe Luxor LXI Magnavox Marantz Marta Matsui Memorex Minolta Mitsubishi Multitech NEC Nokia Nokia Oceanic Nordmende Okano Olympic Orion Panasonic Pentax Philco Philips Phonola Pioneer Quas...

Page 38: ... DVD SONY DENON JVC Panasonic Pioneer RCA Samsung Toshiba YAMAHA TV SONY Admiral Aiwa Akai Alba AOC Bell Howell Bestar Blaupunkt Blue sky Brandt Brocsonic Bush Clatronic Craig Croslex Curtis Mathis Daewoo Daytron Dual Emerson Ferguson First line Fisher Fraba Funai GE GoldStar Goodmans Grundig Hitachi ICE Irradio Itt Nokia JC Penny JVC Kendo KTV Loewe LXI Magnavox Mark Maker compatibility list cont...

Page 39: ...eider Scott Sharp Siemens Signature Sylvania Symphonic Tatung Telefunken Thomson Thorn Toshiba Universum Videch Wards Watson W W House YAMAHA Zenith TAPE SONY DENON Fisher JVC Kenwood Nakamichi Onkyo Panasonic Philips Pioneer Teac Technics YAMAHA MD SONY Denon JVC Kenwood Pioneer Sharp YAMAHA CD SONY DENON Fisher JVC Kenwood Magnavox Marantz Onkyo Panasonic Philips Pioneer RCA Sanyo Sharp Teac Tec...

Page 40: ...neer RCA Sansui Sharp Teac Technics YAMAHA CABLE Hamlin Regal Jerrold G I Oak Panasonic Pioneer Scientific Tocom Zenith SATELLITE SONY DSS SONY BS DIGITAL SONY CS DIGITAL Blaupunkt Goldstar Grunding HNS HUGHES Itt Nokia NEC Philips RCA Samsung Siemens PROJECTER SONY LD SONY DENON Kenwood Magnavox Panasonic Philips Pioneer YAMAHA VIDEO CD SONY DAT SONY LIGHT LUTRON Maker compatibility list continue...

Page 41: ...Additional Information 41GB ...

Reviews: