background image

22

GB

1

Turn on the TV and choose a program. 

Refer to the operating instructions of your 
TV for details.

2

Turn the stand on.

3

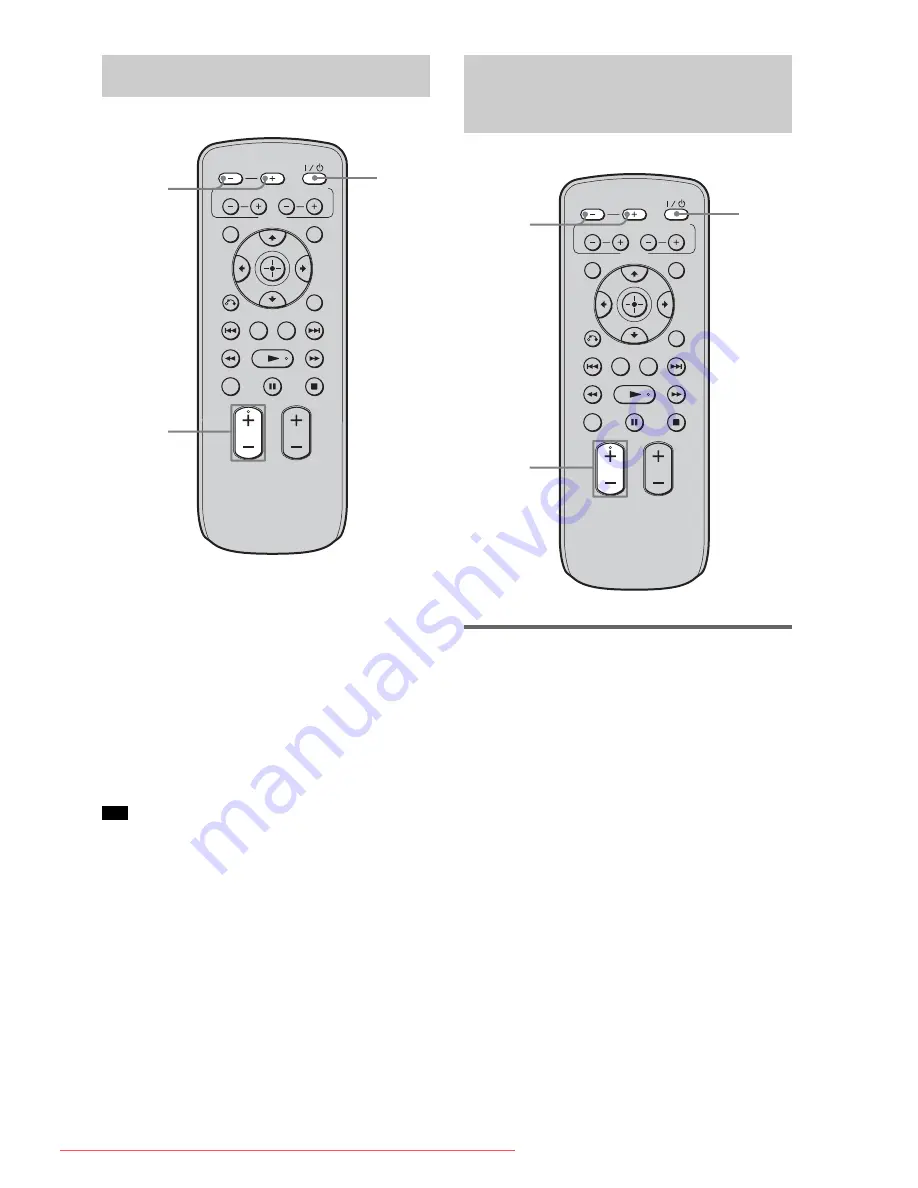
Press INPUT SE or – 
repeatedly until “TV” appears in the 
front panel display.

4

Adjust the volume by pressing 
/–.

• The sound may be output from the TV’s speaker. In 

this case, turn the volume of the TV’s speaker down 
to the minimum.

Enjoying a satellite tuner or 
cable television tuner

1

Turn on the TV.

Refer to the operating instructions of your 
TV for details.

2

Turn the satellite/cable television tuner 
and stand on.

3

Press INPUT SE or – 
repeatedly until “SAT/CATV” appears 
in the front panel display.

4

Change the TV input. 

Refer to the operating instructions of your 
TV for details.

5

Adjust the volume by pressing 
/–.

Enjoying TV

Tip

VOLUME

MUTING

TUNING

-

PRESET

-

NIGHT

DISPLAY

CENTER

SUBWOOFER

INPUT SELECTOR

AMP MENU

LEVEL

DIMMER

TUNING

+

PRESET

+

RETURN

MENU

SOUND FIELD

?/1

VOLUME
 +/–

INPUT 
SELECTOR 
+/–

Enjoying other 
components

VOLUME

MUTING

TUNING

-

PRESET

-

NIGHT

DISPLAY

CENTER

SUBWOOFER

INPUT SELECTOR

AMP MENU

LEVEL

DIMMER

TUNING

+

PRESET

+

RETURN

MENU

SOUND FIELD

?/1

INPUT 
SELECTOR 
+/–

VOLUME
 +/–

Downloaded From TheatreSystem-Manual.com Manuals

Summary of Contents for RHT-G950

Page 1: ...4 129 925 12 1 Theatre Stand System 2009 Sony Corporation Operating Instructions RHT G950 Downloaded From TheatreSystem Manual com Manuals ...

Page 2: ...ackaging indicates that the battery provided with this product shall not be treated as household waste On certain batteries this symbol might be used in combination with a chemical symbol The chemical symbols for mercury Hg or lead Pb are added if the battery contains more than 0 0005 mercury or 0 004 lead By ensuring these batteries are disposed of correctly you will help prevent potentially nega...

Page 3: ...radio stations 24 Listening to the radio 25 Naming preset stations 26 Using the Radio Data System RDS 27 Surround Function Enjoying the surround effect 28 BRAVIA Sync Features What is BRAVIA Sync 31 Preparing for the BRAVIA Sync 31 Enjoying Blu ray Disc DVD 33 One Touch Play Enjoying the TV sound from the stand 34 System Audio Control Turning off the stand TV and the connected compornents 35 Syste...

Page 4: ...power cord mains lead or the connecting cable may be damaged resulting in fire or electric shock When moving the stand be careful not to trap the AC power cord mains lead or the connecting cable under the stand Do not allow children to climb on the stand or crawl between the shelves If children climb on the stand or get between the shelves serious injury or death can result if the glass breaks or ...

Page 5: ...nfirm whether this stand is mentioned as a supported product in the operating instructions of the TV Note on load capacity Do not place any equipment exceeding the specified maximum weight on the stand as indicated in the illustration below Otherwise it may fall or break Notes on installation Be careful not to pinch your hand or fingers between the TV and the stand To prevent the stand from distor...

Page 6: ...tion to prevent heat buildup and prolong the life of the stand Use caution when placing the stand on surfaces that have been specially treated with wax oil polish etc as staining or discoloration of the surface may result The floor may be damaged if sand trash etc gets caught under the legs of the stand On operation Before connecting other components be sure to turn off and unplug the stand On cle...

Page 7: ...n surround technology and the vast amounts of acoustic data accumulated as a result has led to the development of all new processing method and advanced DSP to handle this task effectively which we call S Force PRO Front Surround Compared with previous front surround technologies S Force PRO Front Surround reproduces a more convincing sense of distance and space resulting in a true surround sound ...

Page 8: ...batteries to the markings inside the compartment Do not leave the remote in an extremely hot or humid place Do not use a new battery with an old one Do not drop any foreign object into the remote casing particularly when replacing the batteries Do not expose the remote sensor to direct light from the sun or lighting apparatus Doing so may cause a malfunction If you do not intend to use the remote ...

Page 9: ...o pinch your fingers when setting up the stand Preventing the TV from toppling over As a protective measure secure the TV Perform following steps as a protective measure if you have a Sony LCD TV 1 Place the TV on the stand The TV should be placed in the centre of the stand aligning the rear edge of the TV s base with the stand s rear edge 2 Attach the support belt supplied with the TV to the stan...

Page 10: ...p the AM loop antenna aerial 3 Connect the cords to the AM antenna aerial terminals The cords can be connected to either terminal Do not place the AM loop antenna aerial near the system or other AV component as noise may result Adjust the direction of the AM loop antenna aerial for best AM broadcast sound 4 Make sure the AM loop antenna aerial is connected firmly by pulling softly Note Tip TV OUT ...

Page 11: ... connecting cables of the stand and other components using the cable ties supplied 1 Connect the components to the stand For details refer to pages 13 to 17 2 Insert a cable tie supplied into each of the two holes at the rear of the stand until they click 3 Bundle the cables and then insert the end of the cable tie through the slit of the cable tie Notes Tip TV OUT DVD IN DMPORT HDMI SAT CATV IN D...

Page 12: ...he lever of the cable tie 2 While pushing the lever pull the cable tie from the slit To remove the cable tie from the rear of the stand 1 Pinch the two tabs of the cable tie 2 While pinching the tabs pull off the cable tie 2 1 1 1 2 Downloaded From TheatreSystem Manual com Manuals ...

Page 13: ... simpler page 31 Connect the AC power cord mains lead after you have finished connecting all components to the stand Connecting components with HDMI jacks TV OUT DVD IN TV ANALOG OPT OPT OPT COAX SAT CATV DVD R L DMPORT HDMI INPUT SAT CATV IN DC 5V 0 7A MAX BD IN ANTENNA AM 75 COAXIAL FM TV monitor projector etc Audio signal Audio video signal A Audio video signal B A A A Audio video signal Audio ...

Page 14: ...does not come out of a component connected via the HDMI cable Audio signals sampling frequency bit length etc transmitted from an HDMI jack may be suppressed by the connected component Sound may be interrupted when the sampling frequency or the number of channels of audio output signals from the playback component is switched When the connected component is not compatible with copyright protection...

Page 15: ...onents without HDMI jacks TV OUT DVD IN TV ANALOG OPT OPT OPT COAX SAT CATV DVD R L DMPORT HDMI INPUT SAT CATV IN DC 5V 0 7A MAX BD IN ANTENNA AM 75 COAXIAL FM TV monitor projector etc C A Optical cable not supplied B Optical cable supplied C Coaxial digital cord not supplied An audio cord not supplied can be used when the TV does not have DIGITAL OPTICAL OUTPUT Signal flow Video signal Video sign...

Page 16: ...you connect both the audio output of the TV to the INPUT OPT and INPUT ANALOG jack of the stand Depending on the audio output settings of the connected component the sound may output in 2 channel sound format only In this case set the connected component to output the sound in multi channel sound format PCM DTS Dolby Digital For details on audio output settings refer to the operating instructions ...

Page 17: ...TAL MEDIA PORT adapter be sure the connector is inserted with the arrow mark facing toward the arrow mark on the DMPORT jack To detach the DIGITAL MEDIA PORT adapter press and hold A and then pull out the connector Connecting the DIGITAL MEDIA PORT adapter TV OUT DVD IN TV ANALOG OPT OPT OPT COAX SAT CATV DVD R L DMPORT HDMI INPUT SAT CATV IN DC 5V 0 7A MAX BD IN ANTENNA AM 75 COAXIAL FM Signal fl...

Page 18: ...ect all the other components or TVs to the unit Connect the unit to an easily accessible AC outlet Should you notice an abnormality in the unit disconnect the main plug from the AC outlet immediately Connecting the AC power cord mains lead Note Downloaded From TheatreSystem Manual com Manuals ...

Page 19: ...ntrol for HDMI function is not working B 1 on standby Press to turn the stand on or off C INPUT SELECTOR Press to select the input source to play back Each time you press the button the input source changes cyclically as follows TV t BD t DVD t SAT CATV t FM t AM t DMPORT t TV D VOLUME Press to adjust the volume Playback Options Index to parts and controls Front panel display Front panel buttons a...

Page 20: ... a radio station is received D HDMI 13 42 Lights up when an HDMI equipment is being used E ST MONO 24 Lights up according to the stereo or monaural status of the radio F COAX OPT Lights up according to the cable which you are using G remote sensor 42 Point the remote commander towards here H MUTING Lights up when the sound is turned off I Message display area Displays volume selected input source ...

Page 21: ...ress to select a preset radio station page 25 N O RETURN Press to return to the previous menu O DISPLAY Press to switch the information in the front panel display P INPUT SELECTOR Press to select an input source such as the tuner or other connected component Each time you press the button the input source changes cyclically as follows TV y BD y DVD y SAT CATV y FM y AM y DMPORT y TV Buttons for th...

Page 22: ... details 2 Turn the satellite cable television tuner and stand on 3 Press INPUT SELECTOR or repeatedly until SAT CATV appears in the front panel display 4 Change the TV input Refer to the operating instructions of your TV for details 5 Adjust the volume by pressing VOLUME Enjoying TV Tip VOLUME MUTING TUNING PRESET NIGHT DISPLAY CENTER SUBWOOFER INPUT SELECTOR AMP MENU LEVEL DIMMER TUNING PRESET R...

Page 23: ...njoying a connected component through DMPORT connection 1 Press INPUT SELECTOR or repeatedly until DMPORT appears in the front panel display 2 Start playback of the connected component You can enjoy optimum sound quality from portable audio components in any sound field except for STANDARD joining the effect of Portable Audio Enhancer When you connect the video output jack of the DIGITAL MEDIA POR...

Page 24: ... MENU 4 Press X x repeatedly until Memory appears in the front panel display 5 Press A preset number appears in the front panel display 6 Press X x to select the preset number you want 7 Press Complete appears in the front panel display and the station is stored 8 Press MENU 9 Repeat 2 to 8 to store other stations To change the preset number Restart from step 3 Tuner Functions Presetting radio sta...

Page 25: ...c tuning press and hold TUNING or The automatic tuning stops when the stand tunes in a station To stop the automatic tuning manually press TUNING or If an FM program is noisy If an FM program is noisy you can select monaural reception There will be no stereo effect but reception will improve 1 Press MENU 2 Press X x repeatedly until FM Mode appears in the front panel display then press or c 3 Pres...

Page 26: ...me for 3 Press MENU 4 Press X x repeatedly until Name In appears in the front panel display 5 Press 6 Create a name by using C X x c Press X x to select a character then press c to move the cursor to the next position Letters numbers and other symbols can be input for a radio station name If you enter a wrong character Press C c repeatedly until the character to be changed flashes then press X x t...

Page 27: ... such as station name display RDS is available only for FM stations RDS may not work properly if the station you are tuned to is not transmitting the RDS signal properly or if the signal strength is weak Not all FM stations provide RDS service nor do they provide the same type of services If you are not familiar with the RDS system check with your local radio stations for details on RDS services i...

Page 28: ... time you press the SOUND FIELD button the display changes cyclically as follows STANDARD y MOVIE y DRAMA y NEWS y SPORTS y GAME y MUSIC y JAZZ y CLASSIC y ROCK y POP y LIVE y FLAT y STANDARD Surround Function Enjoying the surround effect VOLUME MUTING TUNING PRESET NIGHT DISPLAY CENTER SUBWOOFER INPUT SELECTOR AMP MENU LEVEL DIMMER TUNING PRESET RETURN MENU SOUND FIELD SOUND FIELD Downloaded From...

Page 29: ...und field Effect All STANDARD Suits various sources Video source MOVIE Recreates powerful and realistic sound along with clear dialog DRAMA Best suited for TV dramas NEWS Produces the announcer s voice clearly SPORTS Produces the play by play commentary clearly and realistic sound with surround effects such as cheering etc GAME Produces powerful and realistic sound best suited for playing video ga...

Page 30: ...on is useful for enjoying sound at night Press NIGHT To cancel the night mode press NIGHT again You can listen to Dolby Digital sound at low volume by using AUDIO DRC page 39 Tip VOLUME MUTING TUNING PRESET NIGHT DISPLAY CENTER SUBWOOFER INPUT SELECTOR AMP MENU LEVEL DIMMER TUNING PRESET RETURN MENU SOUND FIELD NIGHT Downloaded From TheatreSystem Manual com Manuals ...

Page 31: ...ts using other than HDMI connection We recommend that you connect this stand to products featuring BRAVIA Sync Depending on the connected component the Control for HDMI function may not work See the operating instructions of the component To use the BRAVIA Sync set the Control for HDMI function to on for the connected component When you connect a Sony TV with the Control for HDMI function the Cont...

Page 32: ...turns off The Control for HDMI function is set to on 6 Set the Control for HDMI function of the connected component to on For details on setting the connected component refer to its operating instructions 7 Select the input of the stand connected to the component you want to use the Control for HDMI function for SAT CATV DVD BD and repeat step 6 If you add or reconnect the component Perform steps ...

Page 33: ...ack a connected component The TV turns on automatically and switches to the appropriate HDMI input Even if the stand is turned off active standby mode the HDMI signal will be sent from the connected component to the TV via the HDMI connection You can enjoy image and sound of the component on the TV Depending on the TV the start of the content may not be output VOLUME MUTING TUNING PRESET NIGHT DIS...

Page 34: ... maximum volume level 1 Press AMP MENU 2 Press X x repeatedly until SET HDMI appears then press or c 3 Press X x repeatedly until VOL LIMIT appears then press or c 4 Press X x to select the maximum volume level you want The maximum volume level changes as follows 5 Press AMP MENU The AMP menu turns off This function is available only when the Control for HDMI function is set to on This function is...

Page 35: ...ion stops and power consumption is reduced 1 Press AMP MENU 2 Press X x repeatedly until SET HDMI appears then press or c 3 Press X x to select POWER SAVE then press or c 4 Press X x to select the setting ON Reduces power consumption in active standby mode HDMI signal transmission occurs only when the TV is on OFF No reduction HDMI signal transmission occurs continuously even if the stand is turne...

Page 36: ...ion may not work for some TVs compatible with the BRAVIA Sync In this case set POWER SAVE to OFF Depending on your components it may take time before image or sound is output Notes Downloaded From TheatreSystem Manual com Manuals ...

Page 37: ... item and the setting 3 Press AMP MENU to turn off the AMP menu These settings are retained even if you disconnect the AC power cord mains lead The following pages show details for each setting Advanced Settings Settings and adjustments using the amplifier menu AMP MENU SET HDMI CTRL HDMI ON OFF POWER SAVE ON OFF VOL LIMIT MAX 49 48 2 1 MIN DUAL MONO MAIN SUB MAIN SUB A V SYNC ON OFF AUDIO DRC MAX...

Page 38: ...sound and the image A V SYNC You can delay the sound using this function when the image is slower than the sound 1 Press AMP MENU 2 Press X x repeatedly until A V SYNC appears then press or c 3 Press X x to select the setting OFF Does not adjust ON Adjusts the difference between picture and sound 4 Press AMP MENU The AMP menu turns off You may not be able to adjust the delay between sound and imag...

Page 39: ...the display setting 1 Press AMP MENU 2 Press X x repeatedly until DISPLAY appears then press or c 3 Press X x to select the setting of the front panel display ON The display appears all the time OFF The display appears for a few seconds when you operate the stand The display appears all the time when the muting or protection function is working even if you set the DISPLAY to OFF 4 Press AMP MENU T...

Page 40: ...ess or c 3 Press X x to select the preset time you want The minutes display remaining time changes as follows This function is only for this stand not for the connected TV or other components Note VOLUME MUTING TUNING PRESET NIGHT DISPLAY CENTER SUBWOOFER INPUT SELECTOR AMP MENU LEVEL DIMMER TUNING PRESET RETURN MENU SOUND FIELD AMP MENU C X x c OFF y 10M y 20M Y Y 90M y 80M 30M Downloaded From Th...

Page 41: ...nd processing may not work page 28 No sound or only a very low level sound is heard from the speakers Press VOLUME and check the volume level Press MUTING or VOLUME to cancel the muting function Press SOUND FIELD and check the selected sound field Depending on the source the sound effect of the speakers may be less noticeable Sound lags behind the TV image Set A V SYNC to OFF when A V SYNC is set ...

Page 42: ... turn connected components off automatically when you turn off the TV For details refer to the operating instructions of the TV The stand is turned off when you turn off the TV When the Control for HDMI function is on the System Power Off function is active and the stand is turned off when you turn off the TV An image does not appear on the TV Check whether HDMI IN and HDMI OUT are connected in re...

Page 43: ...ss 1 while pressing INPUT SELECTOR and VOLUME COLD RESET appears and the stand is reset AMP menu sound field etc return to the default settings The shelf board can be installed at three levels 1 2 or 3 Specifications Dimensions mm approx A 1 115 B 400 C 500 Adjustable shelf dimensions mm approx Depth 340 mm 1 2 3 D 86 104 122 E 123 105 87 F 980 Mass kg 49 continued Downloaded From TheatreSystem Ma...

Page 44: ...tuner section Tuning range 531 kHz 1 602 kHz with the interval set at 9 kHz Antenna aerial AM loop antenna aerial Intermediate frequency 450 kHz HDMI section Connector HDMI 19pin standard connector Video inputs outputs SAT CATV DVD BD 640 480p 60 Hz 720 480p 59 94 60 Hz 1280 720p 59 94 60 Hz 1920 1080i 59 94 60 Hz 1920 1080p 59 94 60 Hz 720 576p 50 Hz 1280 720p 50 Hz 1920 1080i 50 Hz 1920 1080p 50...

Page 45: ...ccurs Dolby Pro Logic II Dolby Pro Logic II creates five full bandwidth output channels from 2 channel sources This is done using an advanced high purity matrix surround decoder that extracts the spatial properties of the original recording without adding any new sounds or tonal colorations DTS Digital audio compression technology developed by Digital Theater Systems Inc This technology conforms t...

Page 46: ...nd reproduces a more convincing sense of distance and space resulting in a true surround sound experience without the need for rear speakers S Master S Master is an all digital amplifier technology developed by Sony which effectively minimizes the occurrence of sound fragmentation and jitter delivering superb dialog clarity and faithful reproduction of the original sound The compact amplifier sect...

Page 47: ...cting 17 DISPLAY 27 39 DUAL MONO 38 DVD player recorder connecting 13 15 N NIGHT mode 30 P PlayStation 3 connecting 13 R Radio 25 Radio stations 24 Remote before use 8 operating 21 S Satellite tuner connecting 13 15 Setting 9 S Force PRO Front Surround 7 Sleep timer 40 Sound field 28 Index Downloaded From TheatreSystem Manual com Manuals ...

Page 48: ...Sony Corporation Printed in Malaysia 1 Downloaded From TheatreSystem Manual com Manuals ...

Reviews: