Sony Qualia 016 Owner'S Manual Download Page 14

24

25

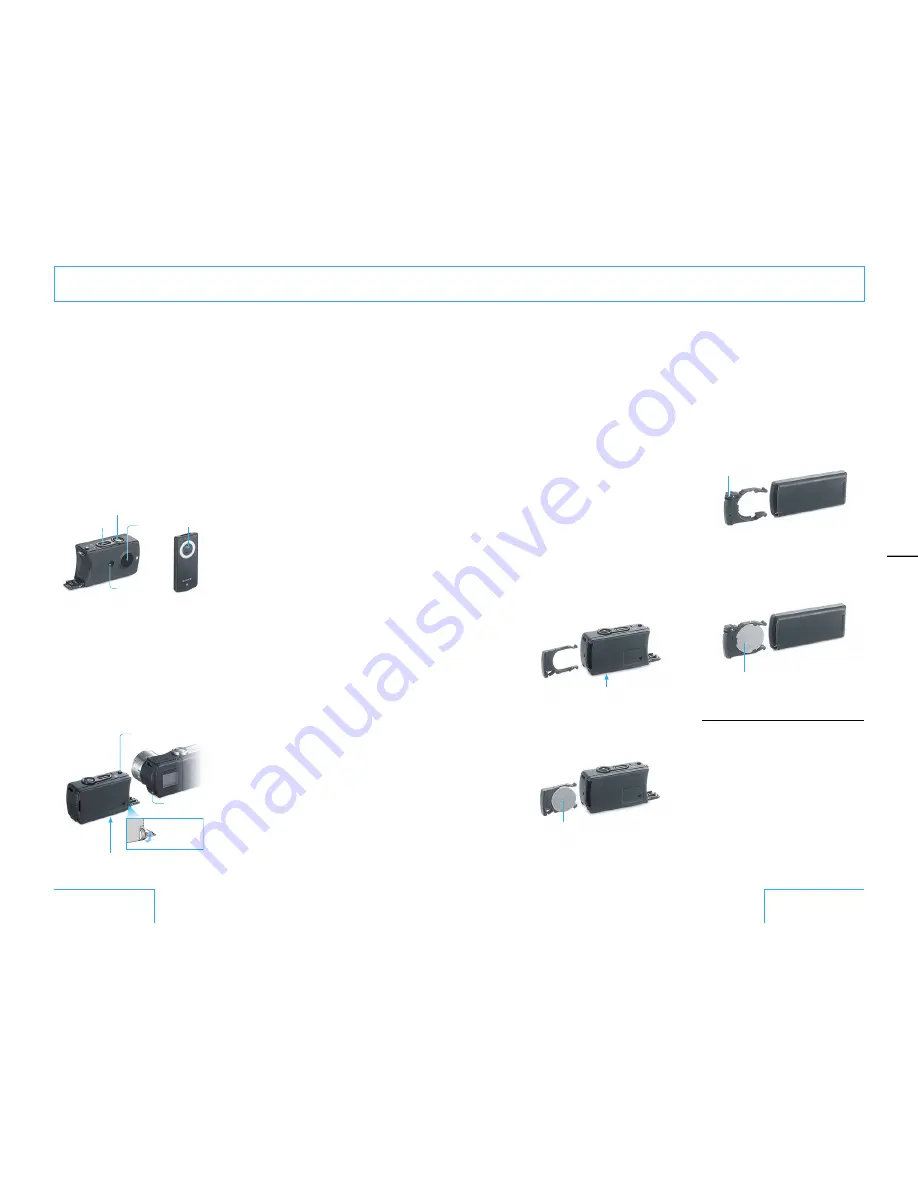
To replace the button battery in the remote

1

  Pull out the battery holder from the 

remote.

Depress here to pull 

out the battery holder.

2

  Install a new battery (CR2025 lithium 

battery) as illustrated below. Reinsert the 
battery holder.
Use of batteries other than the CR2025 
may present a risk of fire or explosion.

With the “+” side facing forward

Note

•  Batteries may explode if mistreated. Do no recharge, 

disassemble or dispose of in fire.

To use the remote

Aim the remote at the remote sensor on the 
front of the timer remote unit. The red timer 
lamp lights up for 2 seconds before the 
picture is taken.
The range of the remote is approximately 5 
m (16 ft) when aimed straight ahead at the 
remote sensor and 15 degrees to each side.
Before using the unit for the first time, pull 
out the insulation sheet.
If the range of the remote becomes 
noticeably shorter or the timer remote unit 
no longer responds to remote operation, 
replace the button battery in the remote.

To replace the button battery in the timer 
remote unit

1

  Press the release button and then pull 

out the battery holder from the timer 
remote unit.

Release button

2

  Install a new battery (CR1616 lithium 

battery) as illustrated below. Reinsert the 
battery holder.
Use of batteries other than the CR1616 
may present a risk of fire or explosion.

With the “+” side facing forward

Using the self-timer

Use the timer remote unit (supplied) to take 
pictures using the self-timer or remote 
control. The timer remote unit is equipped 
with a terminal for attaching the flash unit or 
video-out unit. You can use flash with the 
self-timer or take pictures using the remote 
control while viewing them on a TV screen.  

Power button

Timer remote unit

Remote

Button

Timer button

Remote 

sensor

Timer lamp

1

  Remove the terminal cover of the 

camera and attach the timer remote unit 
to the camera. To steady the camera, 
attach a tripod (available commercially) 
to the tripod screw hole of the timer 
remote unit.
To detach the timer unit, loosen the 
locking screw and pull the timer unit 
straight out while pressing the release 
button.

Timer 

remote unit

Tripod screw hole

Remove the 

terminal cover.

Tighten the 
locking screw.

Release button

Taking pictures (continued)

2

  Turn on the camera.

3

  Press the power button on the timer 

remote unit so that the power lamp 
lights up (green). Before using the unit 
for the first time, pull out the insulation 
sheet.
If you do not use the timer remote unit 
for approximately 10 minutes, the unit 
will turn off automatically.
If the power lamp does not light up when 
you press the power button, replace the 
button battery. 

4

  Press the timer button on the timer 

remote unit. The red timer lamp flashes 
for about 10 seconds then lights steadily 
for 2 seconds before the picture is 
taken.
To cancel the shot, press the timer 
button again.

Taking & Reviewing 

Pictur

es

Summary of Contents for Qualia 016

Page 1: ... ...

Page 2: ...adio frequency energy and if not installed and used in accordance with the instructions may cause harmful interference to radio communications However there is no guarantee that interference will not occur in a particular installation If this equipment does cause harmful interference to radio or television reception which can be determined by turning the equipment off and on the user is encouraged...

Page 3: ......

Page 4: ......

Page 5: ...s 20 Zooming in 22 Instant shooting from power off Direct Shutter 23 Using the flash 23 Using the self timer 24 Reviewing pictures 26 Viewing pictures on a TV 27 Viewing pictures on a computer screen 27 Checking camera settings 28 Checking the screen display in camera mode 29 Checking the screen display in playback mode 30 About the number of pictures that can be taken 30 Getting Started Introduct...

Page 6: ... printing print 41 Changing the date and time clock 42 Changing the date format Y M D 42 Turning off the beep sound beep 43 Formatting the Memory Stick Duo format 43 Additional Information Caring for your camera 46 About moisture condensation 47 About the internal rechargeable button battery 47 Using the camera abroad 48 Cleaning your camera 48 Troubleshooting 49 Battery power 49 Taking pictures 5...

Page 7: ...ogether one by one The range of units includes a flash unit for capturing scenes at night and backlit scenes a viewer that enlarges your pictures for reviewing a timer remote unit for added versatility using the self timer and remote control conversion lenses for photographing distant objects or taking in wide angle views Camera timer remote unit flash unit Camera timer remote unit The viewer slid...

Page 8: ...ze is S Easy operation using the touch pad You can perform all settings without using any buttons just wih the touch pad page 33 Select the lens according to the subject Wide conversion lens left Use this lens to capture wide expanses such as landscapes page 22 Tele conversion lens right Use this lens to photograph people and landscapes from a distance page 22 Touch the center Touch the left end S...

Page 9: ...opposite direction of the arrow Battery life and the number of pictures that can be taken viewed The chart below shows the approximate number of pictures that can be taken viewed and the approximate battery life when the camera uses a fully charged battery to take or display STD quality S size 640 480 pictures at a temperature of 77 F Actual performance may vary depending on the conditions Number ...

Page 10: ...o supplied as illustrated on the left so that it clicks into place and close the cover To take out the Memory Stick Duo First check that the access lamp orange is off then press in the Memory Stick Duo and let it pop out The access lamp flashes when images are being saved or loaded Do not remove the Memory Stick Duo or battery when the access lamp is flashing doing so may damage image data Getting...

Page 11: ...et the year using the touch pad Slide your finger from left to right over the touch pad to increase the year and from right to left to decrease it When the year you want is displayed touch the center of the touch pad The year increases The year decreases 4 In the same way set the month date hour and minute using the touch pad 5 After you set the minute and the date time display starts flashing tou...

Page 12: ...sed as soon as you release your finger Use the AF frame as a guide when composing your shot The camera automatically adjusts the focus and exposure to the object in the center In some cases Auto Focus may not be able to focus on the subject and the flashing AF frame will disappear If this happens try changing the composition and refocusing on the subject To take a picture with the subject off cent...

Page 13: ...ff and the image that is temporarily stored in the camera s memory is deleted Also if you do not use the camera for more than 3 minutes the camera turns off automatically and the image stored temporarily is deleted You can disable Direct Shutter to prevent unintentional operation such as when the camera is in your bag page 37 Continued on the next page Zooming in To zoom in slide your finger from ...

Page 14: ...the side facing forward Using the self timer Use the timer remote unit supplied to take pictures using the self timer or remote control The timer remote unit is equipped with a terminal for attaching the flash unit or video out unit You can use flash with the self timer or take pictures using the remote control while viewing them on a TV screen Power button Timer remote unit Remote Button Timer bu...

Page 15: ...fore inserting it in the Memory Stick slot of the computer or a Memory Stick reader You can insert the Memory Stick Duo directly in your computer if it has a Memory Stick Duo slot For instructions on playing saving and editing images please refer to your computer s instruction manual or the help of the software you are using Memory Stick Duo Memory Stick Duo adapter Example of image storage This c...

Page 16: ...king the screen display in camera mode Touch the center of the touch pad repeatedly to display the following four screens Remaining battery charge remaining capacity of the Memory Stick Duo Indicates approximate levels Remaining battery charge Remaining capacity of the Memory Stick Duo Camera shake correction exposure scene white balance Indicates the current settings White balance Camera shake co...

Page 17: ...ge 36 for the image quality S size equivalent to 640 480 Image quality Capacity TIFF FINE STD 16 MB 16 99 246 32 MB 32 201 498 64 MB 65 404 1001 128 MB 132 810 2006 M size equivalent 1024 768 Image quality Capacity TIFF FINE STD 16 MB 6 44 70 32 MB 13 89 142 64 MB 26 179 286 128 MB 53 359 574 L size equivalent 1600 1200 Image quality Capacity TIFF FINE STD 16 MB 2 18 31 32 MB 5 38 64 64 MB 11 76 1...

Page 18: ...er for about 2 seconds to display the camera menu in playback mode the playback menu is displayed Touch the touch pad so that you are pressing down on both ends of the indented area Touch both ends again to exit the menu and return to the camera mode or playback mode The menu also disappears when you press the shutter button halfway down Scroll through menu options horizontal direction in the diag...

Page 19: ...s The maximum shutter speed is approximately 2 seconds Use a tripod available commercially to support the camera Changing the image size size You can set the size of the picture to be taken according to its purpose and how it will be used As the image size increases from S to M to L the file size also increases L default setting Equivalent to 1600 1200 size pictures are taken at approximately 2 me...

Page 20: ...e quality is set to TIFF Both flash and camera shake correction are disabled in consecutive shot mode Enabling disabling Direct Shutter d shutter You can disable Direct Shutter so that it will not be set off when the shutter button is pressed unintentionally such as when the camera is in your bag On default setting Enables the Direct Shutter function Off Disables Direct Shutter Adjusting the expos...

Page 21: ...such as in dimly lit restaurants and museums when the subject is out of range for the flash or when you take a close up picture Set the flash to No Flash before selecting the camera shake correction feature If the flash is set to Auto or Forced Flash the flash will override the camera shake correction feature Also the camera shake correction feature does not function if the image quality is set to...

Page 22: ...should always check the images before deleting them Display the playback menu and slide your finger from left to right on the touch pad to display the all delete screen The rest of the procedure is the same as steps 2 5 under To delete one image delete on page 40 Only image files are deleted with all delete Note If you delete images using a computer after you mark images for printing the print set...

Page 23: ...s when you use the buttons or the touch pad and also when you press the shutter button Shutter Only The beep sounds only when you press the shutter button down completely to take a picture This beep sound cannot be turned off Formatting the Memory Stick Duo format Format the Memory Stick Duo if the camera does not recognize it or if pictures cannot be taken even after all images have been deleted ...

Page 24: ...lide your finger from right to left on the touch pad to select cancel and then touch the center of the touch pad for about 2 seconds 6 The access indicator appears while the Memory Stick Duo is being formatted and disappears when formatting is completed Note The supplied Memory Stick Duo and those that are available commercially are pre formatted and can be used right away Menu Options ...

Page 25: ... established by JEITA Japan Electronics and Information Technology Industries Association Playback of images recorded with your camera on other equipment and playback of images recorded or edited with other equipment on your camera are not guaranteed Precaution on copyrights Television programs films video tapes and other materials may be copyrighted Unauthorized recording of such materials may be...

Page 26: ...ry indicator shows sufficient charge but the power switches off during operation The battery indicator may not show the correct level if you use the camera in extremely hot or cold surroundings The battery is exhausted Replace with a charged battery page 14 If dirty wipe the terminals of the battery and camera with a dry cloth The battery runs out quickly The battery discharges more rapidly if use...

Page 27: ...res Symptom Cause Solution The camera does not play back images If the camera is in camera mode switch it to playback mode page 26 The camera may not be able to play back images that were changed to different file names or edited on a computer Symptom Cause Solution You cannot insert the Memory Stick Duo Insert the Memory Stick Duo in the correct direction You cannot record on the Memory Stick Duo...

Page 28: ...is low Replace with a charged battery page 14 The camera system is not functioning normally Turn the camera off and then turn it on again The camera is in power conservation mode Turn the camera off and wait for a while before turning it on again No Memory Stick Duo Insert a Memory Stick Duo in the camera page 16 The camera cannot access the Memory Stick Duo The Memory Stick Duo has an erasure pre...

Page 29: ...and are trademarks of Sony Corporation Memory Stick PRO Duo and are trademarks of Sony Corporation MagicGate and are trademarks of Sony Corporation Protecting data Slide the erasure prevention switch to the LOCK position if the Memory Stick Duo has an erasure prevention switch In this position you cannot delete images page 40 set the print option page 41 or format the Memory Stick Duo page 43 Be c...

Page 30: ...ll images DCF compliant Exif Ver 2 2 TIFF JPEG compliant DPOF compatible Recording media Memory Stick Duo LCD screen LCD panel 1 4 cm 0 55 type TFT drive Total number of dots 180 000 800 225 dots General Power source Lithium ion battery 3 7 V Power consumption during shooting 1 3 W Operating temperature 0 C to 40 C 32 F to 104 F Storage temperature 20 C to 60 C 4 F to 140 F Dimensions 69 1 24 0 16...

Page 31: ...or that converts received light signals into electric signals DCF page 57 DCF stands for Design rule for Camera File system a standard laid down by the Japan Electronics and Information Technology Industries Association JEITA DPOF page 41 DPOF stands for Digital Print Order Format You can mark images and record the information necessary for printing and save it on the recording media with the imag...

Page 32: ...ting images 40 51 Image data compatibility 46 Image quality 29 36 J K JPEG 36 L Lens 12 46 Tele conversion lens 13 22 Wide conversion lens 13 22 Lens hood 20 M N O Memory Stick 54 Memory Stick Duo 16 46 51 Formatting 43 Memory Stick adapter 27 Macro 34 Menu 32 Minimum focal distance 21 mode 36 Moisture condensation 47 P Playback menu 33 40 Playback mode 26 Power 12 20 49 57 Pressing the shutter bu...

Page 33: ......

Reviews: