


000
3. Shooting: Useful Functions
39
the peaking type and peaking frequency using
Peaking (page 62) in the VF menu.
Displaying Zebra
You can turn zebra pattern display On/Off by
pressing the ZEBRA button on the viewfinder
(page 7).
You can turn zebra pattern display On/Off, and
set the zebra pattern type and display level using
Zebra (page 62) in the VF menu.
[Note]
The camcorder measures the image in the viewfinder. In
Cine EI mode, adjust the display level and other parameters
in accordance with the viewfinder monitor LUT (page 61)
setting.
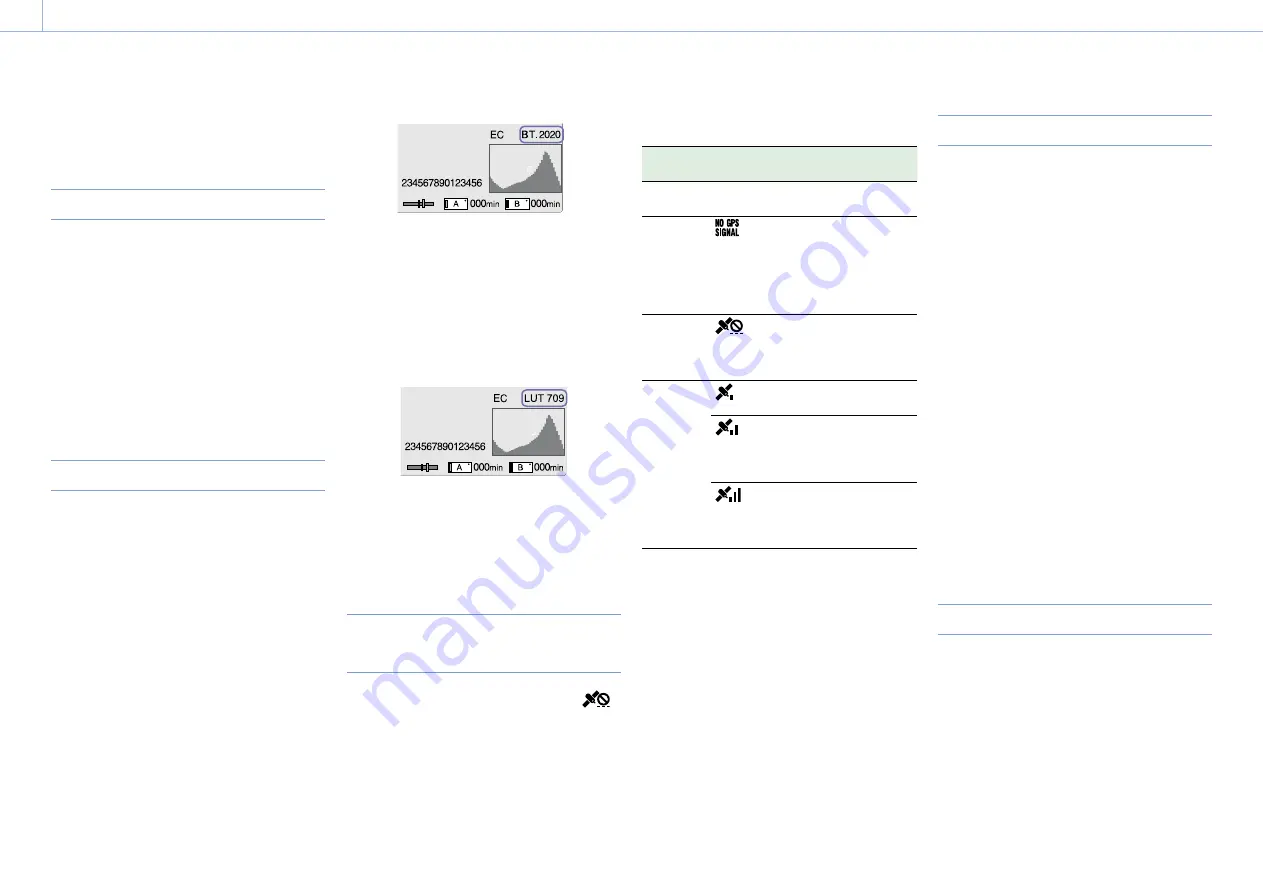
Video Signal Monitor
You can set the type of video signal to display on
the viewfinder screen to waveform, vectorscope,
or histogram using Video Signal Monitor >Setting
(page 64) in the VF menu.
The video signal monitor of the camcorder
measures the video signal in the video output
stage. Accordingly, if the output video is edge
cropped with respect to the recorded video, the
cropped signal component will not be measured.
When this occurs, “EC” is displayed at the top left
of the video signal monitor.
Color space information indicator
When Matrix >Preset Select (page 58) is set
to BT.2020 in Custom mode, the color space of
the input image (based on the video output
resolution, Output Color Space setting, and Source
setting) is displayed in the top right of the video
signal monitor.
Displaying monitor LUT information
When the video output is set to 2K or lower in Cine
EI mode, you can measure the video signal from
either the SDI1 system or SDI2 system using Video
Signal Monitor >Source (page 64) in the VF
menu. The monitor LUT setting (page 61) of the
specified SDI system is displayed at the top right of
the video signal monitor.
[Notes]
ˎ
ˎ
When Display On/Off >Setting (page 63) is set to Off in
the VF menu, the video signal monitor is not displayed.
ˎ
ˎ
When the specified SDI system monitor LUT setting is set
to Off, the Color Space setting (page 69) is displayed at
the top right of the video signal monitor.
Obtaining Location Information
(GPS)
When GPS in the System menu is set to On,
is displayed when the camcorder is seeking GPS
satellites. When positioning is established, location
information is recorded when shooting video.
[Notes]
ˎ
ˎ
The GPS setting in the System menu cannot be set to On
when the handle is not attached, as the GPS receiver is
built into the handle.
ˎ
ˎ
The icon displayed varies, depending on the signal
reception from the GPS satellites.
ˎ
ˎ
While using the GPS function, gripping the handle may
affect the positioning accuracy.
Positioning
status
Display
GPS reception state
Off
No
display
GPS is set to Off or an error
occurred.
Positioning
not
available
Location information could
not be obtained because
GPS signal could not be
received. Move to a
location with a clear view
of the sky.
Searching
for satellites
Searching for GPS
satellites. Several minutes
may be required to acquire
satellites.
Positioning
A weak GPS signal is being
received.
A GPS signal is being
received. Location
information can be
acquired.
A strong GPS signal is
being received. Location
information can be
acquired.
[Tips]
ˎ
ˎ
GPS is set to On by factory default. Location and time
information of video shot when positioning is enabled is
recorded by the camcorder.
ˎ
ˎ
If a positioning icon is not displayed after several minutes,
there may be a problem with signal reception. Start
shooting without location information, or move to an area
with a clear view of the sky. Shooting when a positioning
icon is not displayed means that location information will
not be recorded.
ˎ
ˎ
The GPS signal may not be received when indoors or near
tall structures. Move to a location with a clear view of the
sky.
ˎ
ˎ
The recording of location information may be interrupted,
depending on the strength of the received signal, even if
a positioning icon is displayed.
Shooting in Cine EI Mode
This mode mimics the way a film camera works,
and assumes “developing” occurs in post-
production.
Cine EI mode constraints
ˎ
ˎ
Functions that cannot be adjusted automatically
(tracking)
– White balance
– Gain
– Shutter
– Iris
ˎ
ˎ
Functions that cannot be configured
– ISO sensitivity/gain
– Paint menu settings
– Scene File
– Lens File
Functions available in Cine EI mode only
ˎ
ˎ
Exposure Index
ˎ
ˎ
Monitor LUT
ˎ
ˎ
High/Low Key
ˎ
ˎ
RAW video recording
Recording RAW Video
You can record RAW video to an AXS-R5 (option)
by converting the signal output from the RAW
OUT connector of an XDCA-FS7 (option) attached
to the camcorder using an HXR-IFR5 (option)
(page 27).
1
Set up the external RAW recorder unit
(page 27).
2
Set Base Setting >Shooting Mode in the
System menu to Cine EI.


