background image

34

To verify the computer name and
workgroup

Computer names are displayed on the status
indication window of the Wireless Palette.

1

From the Start menu, click Settings, then click
Control Panel.

The Control Panel window appears.

2

Double-click the System icon.

The System Properties dialog box appears.

3

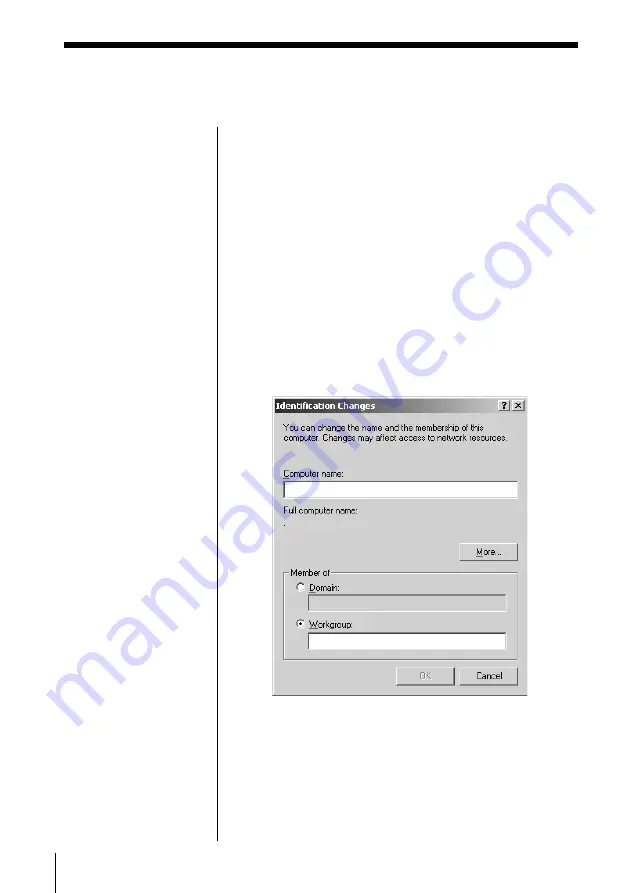
Click the Network Identification tab, then click
Properties.

The Identification Changes dialog box appears.

Summary of Contents for PCWA-C100

Page 1: ...Operating Instructions Wireless LAN PC Card PCWA C100 4 647 085 11 1 2000 Sony Corporation ...

Page 2: ...the use of the software supplied with this product In the event a problem occurs with this software as a result of defective manufacturing SONY will replace it at SONY s option or issue a refund however SONY bears no other responsibility The software provided with this product cannot be used with equipment other than that which is designated for use with Please note that due to continued efforts t...

Page 3: ... network components 29 To specify the IP address 33 To verify the computer name and workgroup 34 To set up sharing on the computer 36 To change Internet connection settings 37 Installing software 40 To modify the installed software 41 To uninstall software 42 Wireless LAN connection Setting up the connection environment 44 To establish communication with the Access Point 44 Verifying communication...

Page 4: ...er referred to as the Access Point With the Access Point you can build a wireless LAN between multiple computers that are equipped with the Wireless LAN PC Card and gain access to the Internet You can achieve direct communication Peer to Peer mode between computers without using the Access Point z Tip A wireless LAN may have up to 16 computers connected Communication through the Access Point Direc...

Page 5: ...switch the Access Point currently in use to another when multiple Access Points are present Basic Access Point Setup Utility Basic Setup Utility You can set up the Access Point for Internet access This dialog driven utility covers basic setups for Internet access Custom Access Point Setup Utility Custom Setup Utility You can make advanced configurations of the Access Point You can specify optional...

Page 6: ...ftware 2 2 Register the Access Point using the Wireless Palette 3 1 Connect the Access Point 1 2 Register the Access Point using the Wireless Palette 3 3 Configure the Access Point using the Basic Setup Utility 4 To communicate with an Access Point previously used in another wireless LAN environment from a computer containing the Wireless LAN PC Card 1 Register the Access Point using the Wireless ...

Page 7: ...ns operating systems below Microsoft Windows 98 Second Edition English version Microsoft Windows 2000 Professional English version Display SVGA 800 x 600 pixels and above supports High Color 16 bit and above Notes Sony does not assure trouble free operation for all computers satisfying these system requirements The Wireless LAN Access Point PCWA A100 is required to gain access to the Internet An I...

Page 8: ...s two on line Help files Wireless Palette Help Custom Access Point Setup Utility Help Opening the Help files Wireless Palette Help From the Start menu click VAIO Wireless LAN Wireless Palette Help Custom Access Point Setup Utility Help From the start menu click VAIO Wireless LAN Custom Access Point Setup Utility Help Selecting a topic from the contents From the Contents list select the desired top...

Page 9: ... search using a Keyword select the Index tab from the Help dialog box The Keyword list appears 2 Enter the keyword you want to apply or scroll the Keyword list 3 Select a topic then click Display Topics related to the Keyword appears ...

Page 10: ...reless LAN PC Card comes with the following items Wireless LAN PC Card 1 PC card case 1 CD ROM Setup disk 1 Operating Instructions 1 END USER LICENSE AGREEMENT 1 Other printed materials Getting started Unpacking ...

Page 11: ...cription on the indicators DATA LINK Description Flashing green Lit green Normal communications Fast Flashing Lit green Peer to Peer mode green Off Lit green The PC card is powered but no communication is taking place Flashing at 10sec intervals The PC card is operating but no connection is established Off The PC card is powered off Indicators 1 2 ...

Page 12: ...t force it in Take the card out and try reinserting To remove the Wireless LAN PC Card 1 Close the software that uses the wireless LAN 2 Stop PC Card Services on the system tray and pr Control Panel 3 Remove the Wireless LAN PC Card following the instructions in your computer s manual Notes If your computer has two PC card slots insert the Wireless LAN PC Card into the top slot Inserting it into t...

Page 13: ...click OK Installing the driver software Notes If your operating system is Windows 2000 you must log onto your system with Administrator privileges If your computer has only one PC card slot and your CD ROM drive must be connected through it copy the Wireless LAN folder from the Sony supplied CD ROM into the hard disk before inserting the Wireless LAN PC Card The following uses C Temp folder as an ...

Page 14: ...n instructions to restart the computer To verify driver installation Windows 98 Second Edition After the computer restarts verify that the Wireless LAN PC Card is working properly 1 From the Start menu click Settings then Control Panel The Control Panel window appears 2 Double click the System icon The System Properties dialog box appears 3 Click the Device Manager tab and check View devices by ty...

Page 15: ... in Installing the driver software Double clicking Network Adapters does not display Sony PCWA C100 Wireless PC Card c Remove the Wireless LAN PC Card then repeat from step 2 in Installing the driver software Double clicking Other devices displays Sony PCWA C100 Wireless PC Card c Click Sony PCWA C100 Wireless PC Card and Remove then repeat from step 2 in Installing the driver software 4 Double cl...

Page 16: ...e 8 Double click the PC Card PCMCIA icon The PC Card PCMCIA Properties dialog box appears 9 Confirm that Sony PCWA C100 Wireless PC Card is displayed under Socket Status 10 Click OK The PC Card PCMCIA Properties dialog box closes 11 Click The Control Panel window closes Windows 2000 Upon completion of driver installation verify that the Wireless LAN PC Card is working properly 1 From the Start men...

Page 17: ... clicking Network Adapters does not display Sony PCWA C100 Wireless PC Card c Remove the Wireless LAN PC Card then repeat from step 2 in Installing the driver software Double clicking Other devices displays Sony PCWA C100 Wireless PC Card c Click Sony PCWA C100 Wireless PC Card and Remove then repeat from step 2 in Installing the driver software 4 Double click Network adapters then double click So...

Page 18: ...ttings Control Panel The Control Panel window appears 2 Double click the Network icon The Network dialog box appears Setting up Windows environment Windows 98 Second Edition Note If the Version Conflict dialog box appears while you are setting up your Windows environment click Yes to continue ...

Page 19: ...g is displayed proceed to To specify the IP address on page 23 If any of these components are missing you must add each component individually For further instructions see below To add TCP IP on this page To add NetBEUI on page 21 To add Client for Microsoft Networks on page 21 To add File and printer sharing for Microsoft Networks on page 22 When you have added all components proceed to To specif...

Page 20: ...t Network Protocol dialog box appears 3 Select Microsoft in the Manufacturers window and select TCP IP in the Network Protocols window 4 Click OK TCP IP Sony PCWA C100 Wireless PC Card appears under The following network components are installed ...

Page 21: ...Sony PCWA C100 Wireless PC Card is added under The following network components are installed To add Client for Microsoft Networks If Client for Microsoft Networks is not displayed in step 3 on page 19 follow the steps below 1 Click Add on the Configuration tab The Select Network Component Type dialog box appears 2 Click Client then click Add The Select Network Client dialog box appears 3 Click Mi...

Page 22: ... others to print to my printer s 3 Click OK File and printer sharing for Microsoft Networks appears under The following network components are installed When you have added all components proceed to the next section To specify the IP address on page 23 Note This setting is required to allow other computers on the same LAN to share files from your computer or the printer connected to your computer ...

Page 23: ...alog box appears If TCP IP is not displayed Go back to the previous section To add TCP IP on page 19 to add TCP IP then come back here to continue 2 Click Obtain an IP address automatically then click OK The Network dialog box reappears Proceed to the next section To verify the computer name and workgroup on page 24 upon completion of this setting ...

Page 24: ... Settings Change dialog box appears 3 Click Yes to restart the computer Proceed to the next section To set up sharing on the computer on page 25 on completion of these instructions Notes Assign a unique name of up to 15 alphanumeric characters to every computer connected to the same LAN The workgroup indicates the name of a group sharing files Assign the same workgroup name for all computers that ...

Page 25: ...appears 3 Click the Sharing tab and click Shared As 4 Click OK C is available for sharing on the wireless LAN If you have accessed to the Internet via the telephone line proceed to the next section To change Internet connection settings on page 26 upon completion of this setting If you have accessed to the Internet via a cable modem xDSL modem or ISDN router proceed to Installing software on page ...

Page 26: ... If your Internet access has been via a telephone line you must change the Internet connection settings Microsoft Internet Explorer 1 Select Settings Control Panel from the Start menu 2 Double click Internet Options 3 Click the Connections tab ...

Page 27: ...l a connection 5 Click LAN Settings The Local Area Network LAN Settings dialog box appears 6 Check Automatically detect settings under Automatic configuration Make sure the check box for Use a Proxy Server is not selected ...

Page 28: ...e above setup proceed to Installing software on page 40 Netscape Communicator 1 Launch Netscape Communicator 2 Click Preferences from the Edit menu 3 Click Advanced 4 Click Proxies then check Direct connection to the Internet 5 Click OK The Preferences dialog box closes 6 Click Reload in the browser window Upon completion of the above setup proceed to Installing software on page 40 ...

Page 29: ...icrosoft Networks If everything is displayed click Close and proceed to To specify the IP address on page 33 If any of these components are missing you must add each component individually For further instructions see below To add Internet Protocol TCP IP on page 30 To add NetBEUI Protocol on page 31 To add Client for Microsoft Networks on page 32 To add File and printer sharing for Microsoft Netw...

Page 30: ...f Internet Protocol TCP IP is not displayed in step 2 on page 29 follow the steps below 1 Click Install from the Local Area Connection Properties dialog box The Select Network Component Type dialog box appears 2 Click Protocol then click Add The Select Network Protocol dialog box appears 3 Click Internet Protocol TCP IP ...

Page 31: ...d in step 2 on page 29 follow the steps below 1 Click Install from the Local Area Connection Properties dialog box The Select Network Component Type dialog box appears 2 Click Protocol then click Add The Select Network Protocol dialog box appears 3 Click NetBEUI Protocol 4 Click OK NetBEUI Protocol is added to the component list ...

Page 32: ... follow the steps below 1 Click Install on the Local Area Connection Properties dialog box The Select Network Component Type dialog box appears 2 Click Service then click Add The Select Network Service dialog box appears 3 Click File and Printer Sharing for Microsoft Networks 4 Click OK File and Printer Sharing for Microsoft Networks is added to the component list When you have added all component...

Page 33: ...erties dialog box appears 2 Click Obtain an IP address automatically then click OK The Local Area Connection Properties dialog box reappears 3 Click OK The Local Area Connection Properties dialog box closes 4 Click The Network and Dial up Connections window closes Proceed to the next section To verify the computer name and workgroup on page 34 upon completion of these instructions ...

Page 34: ...ndow of the Wireless Palette 1 From the Start menu click Settings then click Control Panel The Control Panel window appears 2 Double click the System icon The System Properties dialog box appears 3 Click the Network Identification tab then click Properties The Identification Changes dialog box appears ...

Page 35: ... restart the computer Proceed to the next section To set up sharing on the computer on page 36 upon completion of this setting Notes Assign a unique name of up to 15 alphanumeric characters to every computer connected to the same LAN The workgroup indicates the name of a group sharing files Assign the same workgroup name for all computers that share files Note Restarting the computer takes longer ...

Page 36: ... the Sharing tab and click Share this folder 4 Click OK C is made available for sharing on the wireless LAN If you have accessed to the Internet via the telephone line proceed to the next section To change Internet Connection settings on page 37 upon completion of this setting If you have accessed to the Internet via a cable modem xDSL modem or ISDN router proceed to Installing software on page 40...

Page 37: ... If your Internet access has been via a telephone line you must change the Internet connection settings Microsoft Internet Explorer 1 Select Settings Control Panel from the Start menu 2 Double click Internet Options 3 Click the Connections tab ...

Page 38: ... a connection 5 Click LAN Settings The Local Area Network LAN Settings dialog box appears 6 Check Automatically detect settings under Automatic configuration 7 Click OK The Local Area Network LAN Settings dialog box closes ...

Page 39: ...ng software on page 40 Netscape Communicator 1 Launch Netscape Communicator 2 Click Preferences form the Edit menu 3 Click Advanced 4 Click Proxies then check Direct connection to the Internet 5 Click OK The Preferences dialog box closes 6 Click Reload in the browser window Upon completion of the above setup proceed to Installing software on page 40 ...

Page 40: ...hen installing the driver software on page 13 enter C Temp WirelessLAN SETUP EXE 3 Click OK The Wireless LAN Utility Setup dialog box appears 4 Click Next The License Agreement dialog box appears 5 Read the agreement and click Yes to accept The Choose Destination Location dialog box appears 6 Select the folder where you want to install the software and click Next The Setup Type dialog box appears ...

Page 41: ...click the registration icon to register the products For details on customer registration refer to the supplied Customer Registration for the Wireless LAN Access Point Wireless LAN PC Card Caution To protect your personal data Sony uses SSL an encryption protocol for communication between your browser and the Sony WWW server If you are accessing the Internet from inside of an enterprise LAN you ma...

Page 42: ...ireless LAN from the Start menu and then select software you want to launch To uninstall software Windows 98 Second Edition 1 From the Start menu click Settings then click Control Panel The Control Panel window appears 2 Double click the Add Remove Programs icon The Add Remove Programs Properties dialog box appears 3 Select Wireless LAN Utility from the list of automatically removable software and...

Page 43: ...ears 2 Double click the Add Remove Programs icon The Add Remove Programs dialog box appears 3 Select Wireless LAN Utility from the list of currently installed programs and click Add Remove The Wireless LAN Utility Setup dialog box appears 4 Select Remove then click Next The Confirm File Deletion dialog box appears 5 Click OK Software uninstallation begins and the Maintenance Complete dialog box ap...

Page 44: ...wireless LAN use the Wireless Palette to establish communication with the Access Point Before attempting to establish a wireless LAN environment Check the six digit Access Point ID on the bottom surface of the Access Point Install and connect the Access Point Refer to the Access Point Operation Instructions manual Insert the Wireless LAN PC Card to the computer 1 Double click the on the task tray ...

Page 45: ...Point The factory set Encryption Key are the last five digit of the Access Point ID z Tips If the Access Point is already installed your network administrator may have changed the Encryption Key using the Basic Setup Utility or the Custom Setup Utility Contact your network administrator for instructions If the Encryption Key is specified wireless communications are encrypted for protection against...

Page 46: ... repeat step 3 through step 8 To establish a wireless LAN environment without using the Access Point Peer to Peer mode To establish a wireless LAN environment without using the Access Point follow the steps in this section on only one of the computers on the wireless LAN On the other computers perform the procedure described in the section To establish communications with the Access Point on page ...

Page 47: ...a of the selected Nickname is displayed 7 Click OK The Peer to Peer mode takes effect Notes Check Peer to Peer on only one computer to establish the wireless LAN If other Access Points are present in close proximity and problems occur try another channel Note Enter the same Access Point ID and Encryption Key on all computers on the same wireless LAN Notes It takes some time for the Peer to Peer mo...

Page 48: ...the Access Point indicates the optimum communication When or is displayed no communications are taking place between the Access Point and the computer Check the Access Point configuration For more information refer the Wireless Palette Help 4 Verify the Computer Name The Computer Name is the computer name you have specified on page 24 Windows 98 Second Edition or page 34 Windows 2000 The wireless ...

Page 49: ... you are configuring then click SCAN The Access Point ID is a six digit number on the label attached on the bottom surface of the Access Point If the Access Point ID displayed is different from the one on the label enter the correct ID Note If an error message appears click OK then confirm the following and repeat step 2 The Access Point is powered The correct Access Point ID is displayed The Acce...

Page 50: ... of the Access Point ID Note If you have accidentally selected a wrong access method click BACK and select the correct one Note If you are using the Access Point and are connecting within an existing LAN that already has a DHCP server do not use the Phone Connection or Local Only connection modes Select Cable Modem xDSL or ISDN Router LAN connection modes When the Wireless LAN Access Point is usin...

Page 51: ...not use your telephone line for Internet access using the Access Point If you hear the tone signal when you pick up the receiver even though you must press 0 to place an outgoing call you can use your telephone line for Internet access using the Access Point In these situations enter 0 before the telephone number for Phone Number 1 and Phone Number 2 z Tips Phone Number 2 is the alternate telephon...

Page 52: ...start the computer upon completion of the link test Cable Modem xDSL ISDN Router LAN and Local Only The confirmation dialog appears 1 Make sure you have made correct settings and click NEXT Changes to the Access Point settings are reflected and the Finish screen appears 2 Click LINK TEST The link test between the Access Point and the computer is performed When the confirmation dialog box appears c...

Page 53: ... you are working Once you have verified the network connection using the Wireless Palette you can copy a file from another computer on the LAN 1 Double click the Network Neighborhood icon Windows 98 Second Edition or the My Network Places icon Windows 2000 on the desktop 2 Double click the desired computer The drives enabled for file sharing are displayed 3 Double click the desired drive Files in ...

Page 54: ...cess Point does not automatically disconnect a connection to the Internet when an e mail or browser application is closed on a single computer in order to allow multiple computers to have simultaneous Internet access Thus to disconnect the dial up connection you must follow the above steps The Access Point automatically disconnects the dial up connection if no communication is made within two minu...

Page 55: ... Launch your web browser A home page is displayed The cable modem holds open the connection to the Internet When the computer is connected to the Access Point it is also connected to the Internet Note When the ISDN router is in use the Connect Disconnect function of the Wireless Palette is disabled Notes Check the cable modem s ability to make an Internet connection When the cable modem s is in us...

Page 56: ...Closed cars Magnetized location near a magnets speaker or TV Operation If the Wireless LAN PC Card is moved directly from a cold location to a warm one or if it is placed in a very damp environment moisture may condense on the parts inside The Wireless LAN PC Card may not operate properly should moisture occur Cleaning Clean the casing with a soft cloth lightly moistened with water or a mild deter...

Page 57: ...e PC card adapter Current Peak current at transmission 280 mA peak current at reception 180 mA Connector PC card slot Type II Dimensions approx Approx 118 5 54 mm approx 4 3 4 7 32 2 1 4 inches w h d Antenna height 8 7mm 11 32 inches Mass Approx 55 g approx 2 oz Operating temperature 5 C to 35 C 41 F to 95 F not condensed Environment temperature 20 C to 60 C 4 F to 140 F not condensed Supplied acc...

Page 58: ... Instructions Help files Installation information Software updates The Sony e mail support service answers your questions by electronic mail Just send your question in an e mail message and a customer service representative will reply To send a question to Sony e mail support fill out the e mail form at http www sony com wirelesslansupport The Sony fax back service provides you with answers to com...

Page 59: ...nt computers and Access Points that have the same ID and password may log onto the same wireless LAN for file sharing LAN Local Area Network A network which is accessible only to its members unlike the Internet which is open to an unlimited number of people A LAN may be built for different purposes For example you can build an office LAN that is accessible only to members of the same department or...

Page 60: ...ss LAN PC Card is not properly inserted into your computer See the instructions on page 12 of this manual to insert it properly cCommunication between the Access Point and your computer are not established Check the communication status using the Wireless Palette cThe Access Point is not properly configured Configure the Access Point with the connection mode of your choice using one of the Access ...

Page 61: ...ur computer closer to the Access Point On the dial up connection When using the dial up connection the Internet connection is unintentionally disconnected cThe automatic disconnection feature is enabled If no communication takes place for two minutes the Access Point automatically disconnects the dial up connection by default To change this setting use the Custom Access Point Setup Utility For fur...

Page 62: ...e expiry of ninety 90 days from the original date of purchase After the applicable period you must pay for all labor charges 2 Parts For a period of ninety 90 calendar days from the original date of purchase from SONY or a SONY authorized reseller SONY will supply at no charge new or rebuilt at SONY s option replacement parts in exchange for defective parts Any replacement parts will be warranted ...

Page 63: ...ONY is not liable for any loss or damage to these items This Limited Warranty does not cover any consumable items supplied with this Product cosmetic damages damage or loss to any software programs data or media or damage due to 1 acts of God accident misuse abuse negligence commercial use or modifications of this Product 2 improper operation or maintenance of this Product 3 connection to improper...

Page 64: ...y SONY has established a telephone number for technical support Charges may apply for technical support unless and to the extent that free technical support for a limited period is provided in writing as a feature of your Product Prior to placing you call please have available the model and serial numbers for your Product date of purchase a list of all options installed in your Product and a detai...

Page 65: ...ators 11 Inserting the Wireless LAN PC Card 12 Installing software 40 Installing the driver software 13 Internet Protocol TCP IP 30 ISDN Router LAN 52 L LAN Local Area Network 59 Local Only 52 Index N NetBEUI 21 59 NetBEUI Protocol 31 P Peer to Peer mode 46 Phone Connection 51 Precautions 56 Protocol 59 S Setting up the Access Point 49 Setting up Windows environment 18 29 Specifications 57 T TCP I...

Page 66: ......

Page 67: ......

Page 68: ...Printed in Japan ...

Reviews: