background image

VAIO

® 

Z505 SuperSlim Pro Notebook User Guide

10

To charge the battery pack

1

Connect the AC adapter to the computer. 

2

Insert the battery pack.

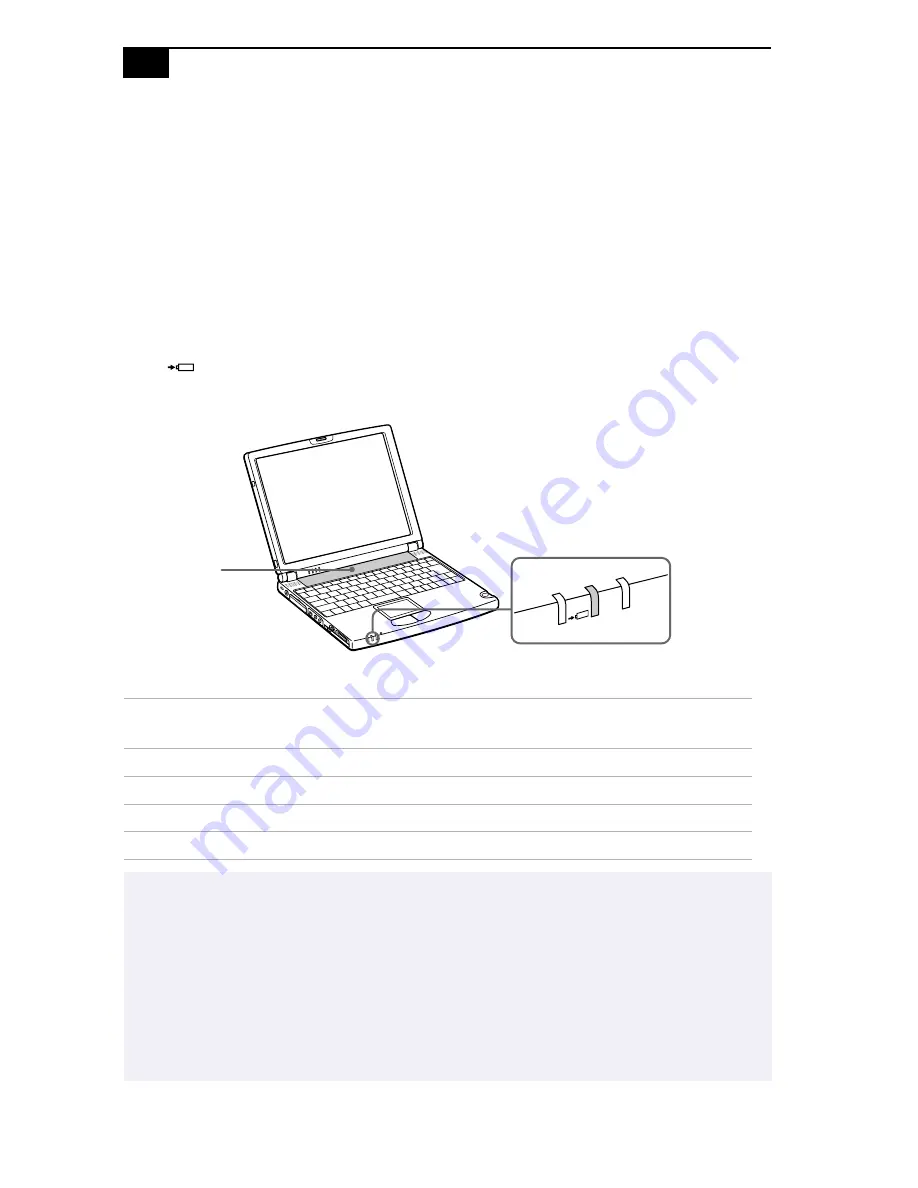
The computer automatically charges the battery (the battery indicator 
light flashes in a double-blink pattern as the battery charges). When the 
battery is 85% full, the battery indicator light turns off. This process takes 
approximately one and one half hours. To charge the battery completely, 
continue charging for an additional hour.

The 

battery indicator light on the front of the computer indicates the


status of the battery pack. 

Battery Indicator 

Light Status

Meaning

On

The computer is using battery power.

Single blink

The battery is running out of power.

Double blink

The battery is charging.

Off

The computer is using AC power.

Both the battery and power indicators blink when the battery is running out of power.

Keep the battery pack in the computer while it is directly connected to AC power. The battery 

pack continues to charge while you are using the computer.

If your battery level falls to less than 10%, you should either attach the AC adapter to 

recharge the battery or shut down your computer and insert a fully charged battery.

You can extend battery life by changing the power management modes in the PowerPanel 

utility. See “Using Power Saving Modes” on page 40.

Battery indicator

Battery pack 

(supplied)

Summary of Contents for PCG-Z505HE, PCG-Z505HS

Page 1: ...VAIO Z505 SuperSlim Pro Notebook User Guide PCG Z505HE PCG Z505HS ...

Page 2: ...the software may not be transported or used outside the United States Software specifications are subject to change without notice and may not necessarily be identical to current retail versions Updates and additions to software may require an additional charge Subscriptions to online service providers may require a fee and credit card information Financial services may require prior arrangements ...

Page 3: ...g telephone lines Avoid using the modem during an electrical storm Do not use the modem or a telephone to report a gas leak in the vicinity of the leak A socket outlet should be as close as possible to the unit and easily accessible Pour prévenir tout risque d incendie ou d électrocution garder cet appareil à l abri de la pluie et de l humidité Pour prévenir tout risque d électrocution ne pas ouvi...

Page 4: ...duct Operation with noncompliant peripherals is likely to result in interference to radio and television reception All cables used to connect peripherals must be shielded and grounded Operation with cables connected to peripherals that are not shielded and grounded may result in interference to radio and television reception FCC Part 68 This equipment complies with Part 68 of the FCC rules On the ...

Page 5: ...rovincial tariffs Contact the state or provincial utility service commission public service commission or corporation commission for information Telephone Consumer Protection Act of 1991 United States The Telephone Consumer Protection Act of 1991 makes it unlawful for any person to use a computer or other electronic device to send any message via a telephone facsimile machine unless such message c...

Page 6: ...nd internal metallic water pipe system if present are connected together This precaution may be particularly important in rural areas CAUTION Users should not attempt to make such connections themselves but should contact the appropriate electrical inspection authority or electrician as appropriate NOTICE The Ringer Equivalence Number REN assigned to each terminal device provides an indication of ...

Page 7: ...ion du service dans certaines situations Les réparations de matériel homologué doivent être coordonnées par un représentant désigné par le fournisseur L entreprise de télécommunications peut demander à l utilisateur de débrancher un appareil à la suite de réparations ou de modifications effectuées par l utilisateur ou à cause de mauvais fonctionnement Pour sa propre protection l utilisateur doit s...

Page 8: ......

Page 9: ...necting a Power Source 8 Using the AC Adapter 8 Using Battery Power 9 Starting Your Computer 12 Shutting Down Your Computer 13 Registering Your Computer 14 Using the Keyboard 15 Combinations and Functions with the Windows Key 17 Indicators 18 Combinations and Functions with the Fn Key 19 VAIO Action Setup 21 The Jog Dial Control 21 Using the Jog Dial Control 23 Software that does not support the J...

Page 10: ...vices 43 Connecting a Phone Line 44 Connecting to the Local Area Network LAN 45 Connecting the i LINK Port Replicator 46 Connecting a Printer 48 Connecting an External Display 49 Connecting the CD Drive 51 Connecting an i LINK device 54 Connecting a Universal Serial Bus USB Device 56 Connecting an External Display 58 Adding Memory 60 To install a memory module 60 To remove a memory module 62 Troub...

Page 11: ...C power Sony audio and video quality High quality MPEG1 video which supports full screen display 12 1 inch Active Matrix LCD screen and enables you to take advantage of today s advanced multimedia applications games and entertainment software Windows 98 Second Edition Your system includes the latest operating system from Microsoft Communications Access popular online services send e mail browse th...

Page 12: ...ifications Read Me First contains Frequently Asked Questions the most up to date information on using your computer and software support information The V AIO Consumer Information Guide contains ergonomic considerations and your computer s limited warranty statement The Microsoft Windows 98 Second Edition Getting Started manual explains how to use the basic features of the Windows operating system...

Page 13: ... 2000 Recovery CDs System Recovery CD s Application Recovery CD s Other Setting up your VAIO Z505 SuperSlim Pro Notebook poster Packet containing special product offers To use these recovery CDs you need to purchase the PCGA CD5 or PCGA CD51 CD ROM drive ...

Page 14: ...4 ...

Page 15: ...pages 19 1 Battery indicator page 18 Speakers pages 19 67 Information indicator pages 10 18 Keyboard page 15 Hard disk drive indicator page 18 Touchpad page 30 Num Lock indicator page 18 Left right button page 30 Caps Lock indicator page 18 Microphone Scroll Lock indicator page 18 1 8 2 9 3 10 4 11 5 12 6 13 7 ...

Page 16: ...tor page 9 DC In connector page 8 mini USB connector i LINK port replicator connector page 46 PC Card slot page 34 S400 i LINK IEEE 1394 page 54 Memory Stick slot page 26 m Microphone connector Memory Stick indicator light i Headphone connector page 50 1 1 6 2 7 3 8 4 9 5 ...

Page 17: ...ower switch USB connector page 56 Infrared port page 38 Ethernet network connector Phone line jack page 44 Air vent The USB connector is disabled when the port replicator is connected Battery release lever page 11 Reset switch Battery lock lever pages 9 11 1 5 2 6 3 7 4 1 3 2 ...

Page 18: ...able battery pack as a power source Using the AC Adapter 1 Plug the cable attached to the AC adapter into the DC In connector on the computer 2 Plug one end of the power cord into the AC adapter 3 Plug the other end of the power cord into an AC outlet Notebook computer DC In AC adapter supplied Power cord supplied ...

Page 19: ... to the AC adapter Before inserting or removing a battery pack close the cover 1 Move the lock lever on the bottom of the computer to the UNLOCK position 2 Align the grooves and tabs on the battery with the tabs and notches on the back of the computer and then slide the battery toward the computer until it clicks into place 3 Slide the lock lever into the LOCK position to secure the battery on the...

Page 20: ...ery Indicator Light Status Meaning On The computer is using battery power Single blink The battery is running out of power Double blink The battery is charging Off The computer is using AC power Both the battery and power indicators blink when the battery is running out of power Keep the battery pack in the computer while it is directly connected to AC power The battery pack continues to charge wh...

Page 21: ...tially discharged battery does not affect battery life The battery indicator light is on while you use the battery pack as a power source When battery life is nearly depleted the battery indicator starts flashing For some software applications and some peripheral devices your computer may not enter System Hibernation mode when the battery life is low To avoid loss of data when using battery power ...

Page 22: ... computer until the green power indicator light turns on 3 If necessary adjust the brightness controls for the LCD display To decrease the brightness press Fn F5 and then the down or left arrow key To increase the brightness press Fn F5 and then the up or right arrow key If you hold the power switch in the On position for more than four seconds the computer turns off LCD lock lever Power switch Po...

Page 23: ...follow these steps to shut down your computer Respond to any prompts warning you to save documents If you are unable to shut down your computer using the steps described above press the Ctrl Alt Delete keys at the same time to restart the computer If you are unable to restart the computer in this way you can slide the power switch forward and hold for four seconds This operation may result in data...

Page 24: ... of your VAIO notebook to Sony for service of your computer If you have not already registered follow these steps to use your notebook computer s online registration service 1 Click the Sony VAIO Registration icon on the VAIO desktop 2 Enter the information requested on the first online registration form Press the Tab key to move from box to box 3 Click the Next button to advance to the next form ...

Page 25: ...eys are devoted to moving the cursor on the screen the four arrow keys which also function as the Home End Page Up and Page Down keys Correction keys The Insert Back Space and Delete keys enable you to make corrections in your documents Function keys The 12 function keys along the top of the keyboard are used to perform designated tasks For example in many applications F1 is the Help key The task ...

Page 26: ...l and press S referred to as Ctrl S The Shift key operates the same way as on a typewriter it is used to produce capital letters or special symbols such as and Windows key The key with the Windows logo displays the Windows Start menu it is the equivalent of clicking the Start button on the task bar See Combinations and Functions with the Windows Key on page 17 Fn key The Fn key is used in combinat...

Page 27: ... and then Files or Folders from the Start menu Ctrl F Displays the Windows Find Computer window where you can locate other computers This is the equivalent of selecting Find and then Computer from the Start menu M Minimizes all displayed windows Shift M Returns all minimized windows to their previous size R Displays the Run window This is the equivalent of selecting Run from the Start menu Fn Inse...

Page 28: ...Hard disk Data is being read from or written to the hard drive Do not enter System Suspend mode or turn off the computer when this indicator light is on The hard drive is not being accessed Num Lock The number keys in the numeric keypad are active The character keys in the keypad area are active Caps Lock The letters appear in uppercase as you type The Shift key lowers the case of typed letters wh...

Page 29: ...Fn F5 and then or To decrease light intensity press Fn F5 and then or Fn F7 Switch to the external display Toggles through the LCD external display connected to the Monitor connector on the port replicator and both LCD and external display Fn F12 System Hibernation Provides for the lowest level of power consumption When you execute this command the state of the system and state of the peripheral d...

Page 30: ...y size in or out when the display is set to less than maximum resolution Fn S System Idle Puts the system into System Idle mode a power management state To return the system to the active state press any key Some functions are not available until Windows launches Combinations Feature Functions ...

Page 31: ...ntrol on the right side of the unit The Jog Dial control enables you to open an application folder or document from a predefined list by rotating and pressing the Jog Dial control In addition when you press the Jog Dial control you can turn on your computer automatically and start the selected application or document and if the document you select is a script file you can execute a complex task su...

Page 32: ...lay a submenu of that item by selecting it and pressing the Jog Dial control button Guide mode The Jog Dial control window is in the guide mode when software is in use and the software window is active Depending on the software you are using you can select items from the displayed list using the Jog Dial control Some Sony software applications have two modes in List View Simple Menu and Full Menu ...

Page 33: ...e Jog Dial control window or the Jog Dial control icon in the task tray Alternatively you can press the Jog Dial control while pressing the Ctrl key on the keyboard to switch to the launcher mode 1 Turn the Jog Dial control to select the item you want then press the Jog Dial control The window switches to the guide mode and shows the Jog Dial s function 2 Turn or press the Jog Dial control to use ...

Page 34: ... window size as described below Some software does not support these functions Action Description Maximize Window Press the Jog Dial control button to maximize the size of the active window Press again to return to normal window size Minimize Window Press the Jog Dial control button to minimize the size of the active window Press again to return to normal window size Finish Window Press the Jog Di...

Page 35: ...en a window such as Screen properties is active Dialog is displayed in the Jog Dial control window You can select an item in the window by rotating the Jog Dial control Also pressing the Jog Dial control is equivalent to pressing Enter ...

Page 36: ... compatible video camera recorders The media slot can accommodate one media at a time To copy images from a digital video camera via Memory Stick media see Connecting an i LINK device on page 54 To copy images from a digital still camera via the Memory Stick media see To connect a digital still camera in the onlline manual Customizing Your VAIO Z505 SuperSlim Pro Notebook Do not insert the media i...

Page 37: ...writing data before removing it If the media is removed prematurely a blue screen with an error message appears prompting you to continue or exit Re insert the media into the slot and press Enter to continue This allows the media to finish reading or writing data To avoid damaging data Do not remove a media or turn off the power while the access light is on Do not use the media in locations that a...

Page 38: ...ile You can also add MPEG1 video files to your Slide Show by following the steps below Note that the order in which digital still photos DSC0xxxx files and video clips MOV0xxxx files appear in your Slide Show is determined by the number xxxx in the file name 1 Insert the media into the card slot 2 Double click the My Computer icon on the desktop 3 Double click the Removable Disk S icon 4 Create a ...

Page 39: ...cation By using your computer a Sony Digital Handycam Camcorder or other camera that supports the i LINK interface the DVgate software preinstalled on your computer and the i LINK interface you can easily create and edit your own home videos For more information on connecting an i LINK device see Connecting an i LINK device on page 54 of this manual ...

Page 40: ...enu of context sensitive choices Drag Slide one finger while pressing the left button Scroll Move your finger along the right edge of the touchpad to scroll vertically Move your finger along the bottom edge to scroll horizontally The scroll function is available only with applications that support a touchpad scroll feature See Mouse Help for information on touchpad features such as clicking both b...

Page 41: ...et mode In this mode the touchpad corresponds with the Smart Pad screen This means that what you write on the touchpad appears on the screen in the corresponding location For example when you write letters on the left corner of the touchpad the letters appear on the left corner of the screen 4 To write move your finger slowly on the touchpad As you write the letters you wrote on the touchpad appea...

Page 42: ...e facing up To insert a diskette 1 Hold the diskette with the label side facing up 2 Gently push the diskette into the drive until it clicks into place You do not need to shut down the computer before connecting or disconnecting the floppy disk drive To use another USB device such as a USB mouse at the same time plug it into the mini USB connector on the left side of the computer by using the supp...

Page 43: ...s off and then press the Eject button to remove the diskette To remove the floppy disk drive Wait until the LED indicator turns off and then unplug the USB cable from the computer To carry the floppy disk drive Fold the floppy disk cable into the compartment on the side of the floppy disk drive Eject button LED indicator ...

Page 44: ... Card Bus ZV Zoomed Video port is not available Some PC cards may require that you disable idle devices when using the PC card You can use Sony Notebook Setup to disable devices See Displaying the Sony Notebook Setup Screen in the online document Customizing Your VAIO Z505 SuperSlim Pro Notebook for details Be sure to use the most recent software driver provided by the PC card manufacturer If an m...

Page 45: ... the card is fixed into the connector The release button comes out Do not force a card into the slot It may damage the connector pins If you have difficulty inserting a card check that you are inserting the card with the correct orientation See the manual that came with your PC card for more information on its use PC card Insert with the arrow facing forward ...

Page 46: ...utton up and press it in towards the computer 4 Gently grasp the card and pull it out 5 Insert the PC card slot protector into the empty slot For some PC cards if you alternate between normal power operation and the System Suspend or System Hibernation power management modes while the card is inserted you may find that a device connected to your system is not recognized Reboot your system to corre...

Page 47: ... the other computer You can also print from a printer attached to either computer See the Smart Connect online help for more information i LINK cables compatible with your VAIO Z505 SuperSlim Pro notebook include cables with the following part numbers VMC IL4415 a 1 5 meter cable with a 4 pin connector at each end VMC IL4615 a 1 5 meter cable with a 4 pin connector at one end and a 6 pin connector...

Page 48: ...are in a direct line To use infrared communication with another computer Align the infrared ports on the two computers so that they are in a direct line Infrared communication capability can be turned on and off By default it is not enabled when your system is shipped To enable infrared use click the Infrared icon in the Windows Control Panel and select the Enable infrared communication checkbox o...

Page 49: ... noise in the transmission Do not cover the infrared ports with your hand or any other objects Avoid direct sunlight fluorescent light or flashing incandescent light near the infrared ports See the manual that came with your digital still camera or other infrared communication device for more information on installation and use The active area of infrared transmission extends about 39 3 8 inches 1...

Page 50: ...ormal state of your computer when it is in use The green power indicator light is on in this mode To save power you can turn off a specific device such as the LCD or the hard disk System Idle Mode This mode is convenient if you do not need to use your computer for a brief period The hard disk and video display enter a low power state and the CPU clock and processor stop The power indicator light i...

Page 51: ...ystem Hibernation mode Press Fn F12 You can also use the PowerPanel utility to enter System Hibernation mode To return to normal mode Turn on the computer by sliding the power switch forward The computer returns to its previous state Time to return to normal mode System Idle requires less time than System Suspend and System Suspend requires less time than System Hibernation Power consumption Syste...

Page 52: ...42 ...

Page 53: ...page 49 Desktop computer or serial device CD ROM drive page 51 i LINK device page 54 Universal Serial Bus USB device page 56 External display page 58 Turn off the computer before connecting peripherals In normal use you should turn on the peripherals before turning on the computer You can connect i LINK devices while the computer is on Connect the AC adapter only after connecting all cables ...

Page 54: ...k clicks into place 3 Plug the other end into the wall jack In order to register your Sony VAIO Z505 SuperSlim Pro notebook register your software online and use Sony Customer Support you must connect to a phone line Also you must register your computer to receive the extended warranty Your computer does not work with party lines cannot be connected to a coin operated telephone and may not work wi...

Page 55: ...o connect to the network please ask your system manager About 100M lamp and Link Act lamp 100M lamp green ON Connected to 100BASE TX type network OFF Connected to 10BASE T type network Link Act lamp umber The light blinks according to network access By the default settings your computer is unable to connect to the network To connect to the network check Ethernet in Sony Notebook Setup Ethernet Ada...

Page 56: ... You can use the PCGA UPR5 i LINK port replicator supplied to connect peripheral devices such as a printer or external display The port replicator has five ports including an i LINK port Printer page 48 USB device page 56 Monitor page 49 Serial i LINK device page 54 1 2 3 4 5 1 4 2 5 3 ...

Page 57: ...tor connector cover on the left side of the computer 3 Plug the port replicator cable into the port replicator connector on the computer To remove the port replicator 1 Turn off the computer 2 Press both sides of the port replicator cable connector and unplug the cable from the computer Port replicator connector cover ...

Page 58: ...the printer into this connector You can connect a Windows 98 compatible USB printer to your computer Use the symbol to locate the USB port on your computer and printer Plug the USB printer cable not supplied into the USB connector You cannot use the optional PCGA PR5 port replicator with your computer When you use the port replicator your computer s mini USB connector does not work Turn off the co...

Page 59: ...ay and the other end into an AC outlet See the manual that came with your printer for more information on installation and use Before using the printer you may need to change the Printer setting in the Sony Notebook Setup software See Displaying the Sony Notebook Setup Screen in the online document Customizing Your VAIO Z505 SuperSlim Pro Notebook See the manual that came with your computer displa...

Page 60: ...y to the monitor connector you can press Fn F7 to toggle the output between the Liquid Crystal Display LCD the external monitor or both devices See Selecting the Display Mode in the online document Customizing Your V AIO Z505 SuperSlim Pro Notebook for more information See the manual that came with your projector for more information on installation and use The optional display adapter PCGA CD5 al...

Page 61: ...he manual that came with your CD drive for more information on use To play an audio CD in the optional PCGA CD5 CD ROM drive with your notebook your computer s settings must be set properly You can check the settings as follows 1 Click the Start button select Settings and click Control Panel 2 Click the Multimedia icon 3 Click the CD tab and make sure the Enable digital CD audio for this CD ROM de...

Page 62: ...ails To insert a CD ROM disc 1 Press the Eject button The disc tray slides out 2 Place the CD ROM disc in the tray with the label side facing up Push the disc onto the hub until the disc clicks into place A protective cover is attached to the lens of the CD ROM drive at the factory Before using the CD ROM drive remove the protective cover Eject button Disc ...

Page 63: ...ray by pushing it gently The BUSY indicator on the CD ROM drive flashes while your computer is reading data from the disc To remove the CD ROM drive Remove the PC card from the computer See Using PC Cards on page 34 for details Busy indicator ...

Page 64: ...e S400 connector on the left side of the computer and the other end into the DV In Out connector on the digital video camera recorder If your digital video camera recorder includes a Memory Stick slot you can copy images from it to your computer via a Memory Stick media Copy images to the Memory Stick media and insert the media into the Memory Stick slot on your computer For details on using Memor...

Page 65: ...to 200 Mbps however the actual transfer rate is the lowest transfer rate of the external device The i LINK features available may vary depending on the software applications you use See the documentation that came with your software for more information See page 37 for a list of i LINK cables compatible with your VAIO Z505 SuperSlim Pro notebook You can connect a digital video camera to the i LINK...

Page 66: ...an connect a USB device such as a USB mouse to your computer To connect a USB device Use the symbol to locate the USB connector on the right side of the computer Plug one end of the USB cable into this port and the other end into the USB mouse to USB mouse mini USB USB connecting cable not supplied ...

Page 67: ...onversion adapter You can use the optional Sony USB mouse PCGA UMS1 with this computer Plug the USB mouse into the USB connector You do not need to turn off your computer For more information connect the mouse double click the Mouse tab in the Control Panel and then click Help in the Mouse Suite tab See the manual that came with your USB device for more information on installation and use to USB C...

Page 68: ...a computer display Use the port replicator connector on the left side of the computer Plug the display adapter not supplied into this connector If necessary plug one end of the display s power cord into the display and the other end into an AC outlet See the manual that came with your computer display for more information on installation and use to Computer display Power cord Display cable not sup...

Page 69: ...nect an external display to your computer you can press Fn F7 to toggle the output between the Liquid Crystal Display LCD the external monitor or both devices See the manual that came with your projector for more information on installation and use See Selecting the Display Mode in the online document Customizing Your VAIO Z505 SuperSlim Pro Notebook for more information Projector Audio cable not ...

Page 70: ...ect the system from its power source and from any telecommunications links networks or modems before you open the system or follow any of the procedures described below Failure to do so may result in personal injury or equipment damage Electrostatic discharge ESD can damage disk drives and other components Perform the procedures described below only at an ESD workstation If such a station is not a...

Page 71: ... cover Slide the keyboard toward the LCD display then lift it away slightly 5 Lift the keyboard from the LCD display side then gently turn it over on the space where the touchpad is Be careful not to detach the cable when lifting the keyboard 6 If you are adding memory to the PCG Z505HS you must remove the existing memory module Follow the instructions in To remove a memory module on page 62 7 Rem...

Page 72: ...ebook Setup screen appears 13 Click the About This Computer tab to view the amount of system memory If the additional memory is not shown repeat steps 1 12 To remove a memory module 1 Follow steps 1 to 5 of To install a memory module 2 Touch a metal object such as the connector panel on the back of your computer to discharge static electricity 3 Remove the memory module 4 Follow steps 8 and 9 of T...

Page 73: ... Confirm that the AC adapter and all cables are connected firmly as described in Connecting Peripheral Devices on page 43 If you plugged the computer into a power strip or UPS make sure the power strip or UPS is turned on and working If you are using an external display check that it is plugged into a power source and turned on Check that the brightness control is adjusted correctly See the manual...

Page 74: ...nd press the F2 key when the Sony logo appears The BIOS setup menu screen appears 4 Press the arrow keys to select the Exit menu 5 Press the arrow keys to select Get Default Values and then press the Enter key The message Load default configuration now appears 6 Check that Yes is selected then press the Enter key 7 Press the arrow keys to select Exit Save Changes and then press the Enter key The m...

Page 75: ... the computer If you cannot restart as described in the preceding step you can restart the computer by pressing Ctrl Alt Delete If the previous step does not work slide the power switch toward the front and hold it for four seconds This turns off the power If your computer locks up while playing a CD ROM stop the CD ROM and restart the computer by pressing Ctrl Alt Delete My software program locks...

Page 76: ...led according to the program s instructions Moisture condensation may have occurred Disconnect the CD ROM drive and disconnect the power to the drive for at least one hour Make sure the CD ROM drive is properly connected See Connecting the CD Drive on page 51 Clean the CD ROM Check the speaker volume When I click an application icon a message appears such as You must insert the application CD into...

Page 77: ... the program is dialing is correct Check that the software you are using is compatible with the notebook computer modem All preinstalled programs are compatible Call the software publisher or Sony Customer Support My modem connection is slow The computer s modem uses K56flexTM technology V 90 Many factors influence modem connection speed including telephone line noise or compatibility with telepho...

Page 78: ...mmand does not work properly follow these steps Restart the computer by pressing Ctrl Alt Delete If this does not work slide the power switch forward and hold it for four seconds Unplug the computer from the AC adapter and remove the battery pack from your computer My PC card is not working Make sure the PC card is compatible with Windows Use the Sony Notebook Setup utility to disable devices you ...

Page 79: ...gives you three options Full Restore without Format restores all the software titles that originally came with your computer without formatting the hard disk Full Restore with Format formats the hard disk drive and then restores all the original software Operating System Only restores the Windows operating system the notebook computer utility programs and the device drivers that shipped with your ...

Page 80: ...etup menu screen appears 3 Press the arrow keys to select the Exit menu 4 Press the arrow keys to select Get Default Values and then press the Enter key The message Load default configuration now appears The optional PCGA CDRW51 CD RW drive or PCGA CD51 CD ROM drive must be connected to the computer to use the System Recovery CD You need to complete the Windows registration process when you use th...

Page 81: ...e the Application Recovery CD s 1 Turn on your computer If your computer is already on close all applications 2 When the Windows desktop appears insert the first Sony Application Recovery CD in the CD ROM drive The Application Recovery utility loads automatically 3 When the Application Recovery menu appears follow the on screen instructions to complete the recovery process You must be in Windows t...

Page 82: ...k drive on your computer has been formatted with two partitions C and D DVgate Motion saves files to the D partition This prevents large video captures from consuming the available space on your C partition To maintain optimum performance of DVgate Motion you should defragment your D partition regularly See the DVgate Motion online help for more information ...

Page 83: ...e II Card Card Bus support Built in Capabilities Microphone Stereo speakers Touchpad Telecommunication Capabilities Data fax send receive Connection Capabilities on Z505 SuperSlim Pro Phone line RJ 11 i LINK port replicator i LINK IEEE 1394 2 USB ports including 1 mini USB port 10Base T 100Base T Ethernet interface Microphone In DC In Headphone Connection Capabilities on i LINK Port Replicator i L...

Page 84: ...tions apply Height measured at the thinnest point Height at the thickest point is 1 15 29 3mm Specifications are subject to change without notice Power Management Energy Star Compliant Advanced Configuration and Power Interface ACPI Battery Lithium ion Dimensions 10 8 w x 0 96 h x 8 9 d 275mm x 24 5mm x 226mm Weight 3 7 lbs 1 70 kg with supplied battery Operating Temperature 41 F to 95 F 5 C to 35...

Page 85: ...ns left 5 right 5 Start Windows 98 13 C cameras digital video recorder 54 canceling commands 16 Caps Lock 5 indicator light 18 CD ROM discs inserting 52 CD ROM drive closing lid 53 connecting 34 51 troubleshooting 66 using 51 charge status indicator light 10 charging battery pack 10 choosing power source 8 coin operated telephones 44 computer lithium ion battery v setting up 5 starting 12 troubles...

Page 86: ...ct button 33 ejecting diskettes 33 Energy Star ii Escape key 15 Ethernet network connector 7 Express Service technical support 14 external devices display 49 58 See also monitor F faxes laws governing v floppy disk drive connecting 32 disconnecting 33 troubleshooting 66 Fn key 16 combination commands 19 function keys 16 H hard drive indicator light 5 18 headphone connector 6 50 I i LINK 6 46 54 IE...

Page 87: ...roubleshooting 67 monitor 46 connecting 49 connector 50 selecting 50 switching among 19 mouse troubleshooting 68 mouse help 30 multiple phone lines 44 N navigation keys 15 network connector See Ethernet network connec tor Num Lock 5 indicator light 18 numeric keypad area 15 O operator keys 16 output devices iv adding 48 P parallel port 46 48 party phone lines 44 PBX 44 PC card inserting 34 release...

Page 88: ... 50 LCD 50 monitor 50 power source 8 Serial connector 46 Shift key 16 Shut Down Windows dialog box 13 Smart Connect 37 Smart Pad 31 speakers built in 5 Start button 13 starting computer 12 startup problems 13 switching display 19 monitor 19 System Hibernation mode 19 41 System Idle mode 20 40 System Recovery CD s 69 System Suspend mode 19 41 T touchpad 5 30 troubleshooting 63 68 startup 13 63 turn...

Reviews: