background image

About

 t

h

e s

o

ft

w

a

re

 on your

 Sony 

not

e

book

Discover VAIO Remote Control

14

N

Discover VAIO Remote Control

VAIO Remote Control is your gateway to the VAIO world. VAIO Remote Control is easy to use and 
incorporates everything you need to start using your VAIO computer. Launch software applications and go 
to Sony websites from here in an instant.

The functionalities of the VAIO Remote Control application can only be used if you have administrator rights on your computer. Other users will be 
able to access the VAIO Remote Control screen, but cannot use it to launch other software applications.

By default, you can find VAIO Remote Control in the 

Start

 menu, after which you can copy it to your desktop for easy access.

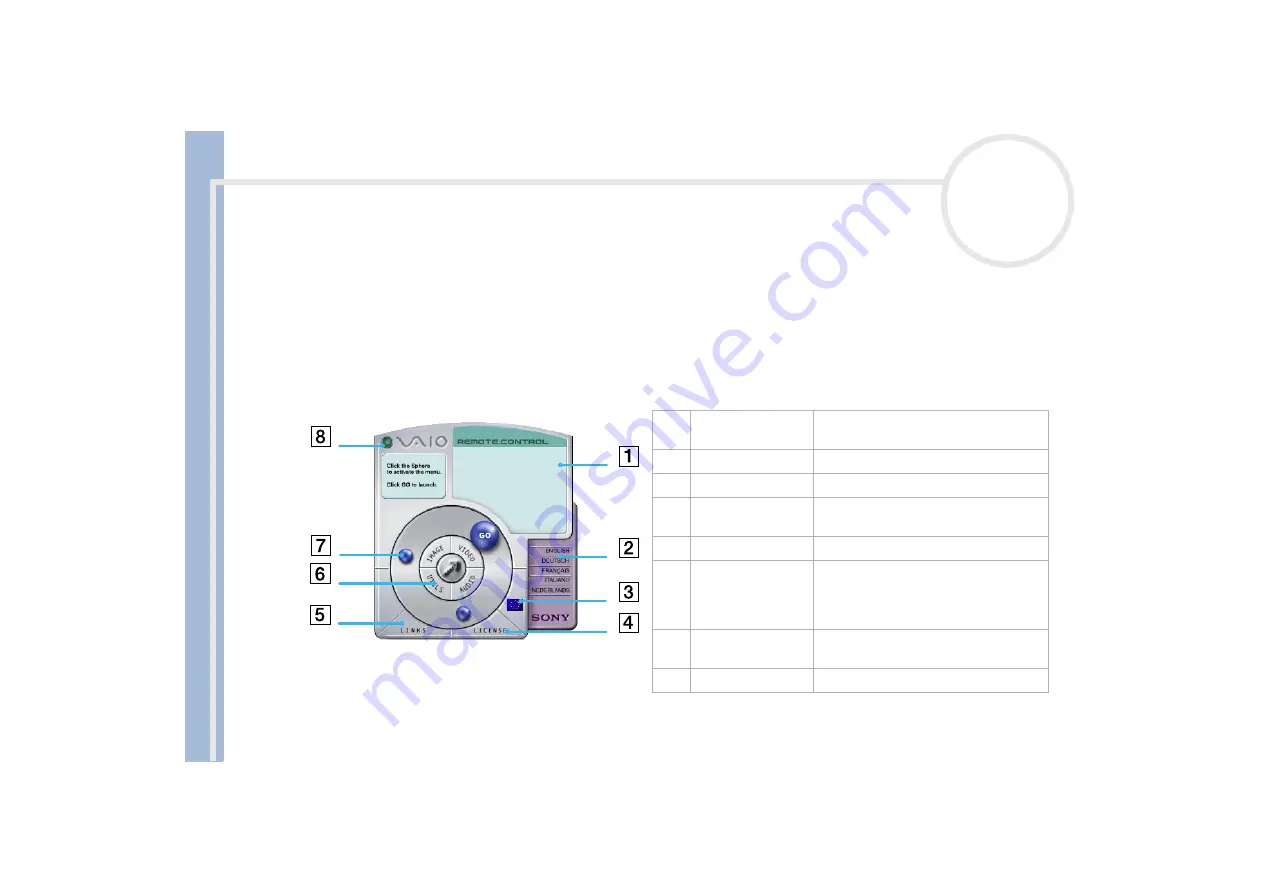
Overview


 You will need to configure your Internet connection to access the websites.

1

Info Box

Contains a brief description of an item 
when you move the cursor over it.

2

Language options

Click to select your preferred language.

3

Language display

Click to display/hide the language list.

4

License

Click here to view the End User License 
Agreement in 13 languages.

5

Links

Reveals the links to useful Sony websites.

6

Central Remote 
Control buttons

Click an application area to reveal the 
software items. You can access Utilities, 
Video, Audio and Image software from 
here.

7

Steering wheel

The spheres in this area represent the 
applications and useful links.

8

Close

Closes the Remote Control window.

Summary of Contents for PCG-FX502

Page 1: ...N About the software on your Sony notebook P C G F X 5 0 3 ...

Page 2: ...ware specifications are subject to change without notice and may not necessarily be identical to current retail versions Updates and additions to software may require an additional charge Subscriptions to online service providers may require a fee and credit card information Financial services may require prior arrangements with participating financial institutions 2001 Sony Corporation All rights...

Page 3: ...ons The SONY SOFTWARE contains copyrighted material and other proprietary material In order to protect them and except as permitted by applicable law you may not decompile reverse engineer or disassemble the SONY SOFTWARE in whole or in part Except for the transfer of the SONY SOFTWARE together with the SONY HARDWARE and prior agreement of the recipient to be bound by the terms and conditions of t...

Page 4: ...r this limited warranty please refer to the Customer Service Guide on how to contact VAIO Link ENERGY STAR As an ENERGY STAR Partner Sony has determined that this product meets the ENERGY STAR guidelines for energy efficiency The International ENERGY STAR Office Equipment Program is an international program that promotes energy saving through the use of computers and their office equipment The pro...

Page 5: ...vieShaker Smart Capture Sony Notebook Setup UI Design Selector SonicStage VAIO Action Setup VisualFlow VAIO and the VAIO logo are trademarks of Sony Corporation All Windows logos are registered trademarks of Microsoft Corporation All other trademarks are trademarks of their respective owners Specifications are subject to change without notice ...

Page 6: ...e i LINK to connect your digital video camera and the computer operates as an editing desk that can capture preview cut and assemble your selection and save the sequences in AVI and MPEG1 formats DVgate Still displays digital video images sent from a digital video cassette recorder or a digital video camera recorder and saves them as graphic files on your hard drive ImageStation Sony Electronics S...

Page 7: ... movie PictureGear Sony Electronics Create your own environment with the Digital Image Library photos backgrounds wallpapers slide shows etc PictureGear is your assistant for creating and implementing personal screen savers panoramas combined images You can even animate your preferred gif files with Gif Animation Tools create labels for all media with PictureGear Label Maker or play back movies in...

Page 8: ...orama will be created in PictureGear using the individual snapshots made in Smart Capture SonicStage Sony Electronics SonicStage uses the copyright protection technology of OpenMG developed by Sony Corporation and designed to allow recording and playback of digital music data on a personal computer Once the data is encrypted and recorded onto the hard disk SonicStage technology allows it to be pla...

Page 9: ...ion Setup helps you manage application settings that control hardware events on your computer For instance this software enables you to start your favorite software with the PPK buttons programmable power keys It manages the settings for the internal timer i LINK interface and Memory Stick VisualFlow Sony Electronics VisualFlow allows you to browse interactively through the contents of your Memory...

Page 10: ... software shipped with your computer and the bundled device drivers if they are corrupted or accidentally erased Reinstalling an individual device driver may correct a problem you are experiencing with your computer without you having to recover the entire system You can only use the Recovery CD ROMs on the Sony notebook you purchased and not on any other Sony PC or other manufacturer s PC ...

Page 11: ... most often up front and center to access them more quickly For questions and technical assistance go online to http support microsoft com directory Internet Explorer 6 0 Microsoft Corporation Internet Explorer is the Microsoft Internet browser allowing you to surf the World Wide Web The Setup Wizard configures your computer to connect automatically to your service provider A full e mail package e...

Page 12: ...itches multiple photos into a single panoramic picture It enables you to create eye catching large format panoramas with point and click simplicity You can also view your panoramas from different perspectives For further information see the website at http www arcsoft com products software en panoramamaker2000 html Symantec Norton AntiVirus Symantec The Norton AntiVirus software is available on yo...

Page 13: ...RealNetworks RealPlayer RealPlayer is the RealNetworks video and audio player which lets you access 2 500 radio stations featuring music news and sports For further information see the website at http www real com RealNetworks RealJukebox RealJukebox is your personal music management system RealJukebox lets you build manage and play your digital music library on your personal computer For further ...

Page 14: ...VD is a simple to use DVD player WinDVD combines all the features you would expect to find on a standard consumer DVD player in addition to some very advanced functionalities such as full VCD 2 0 support full precision video decoding a choice of user interfaces and video display options You can play DVD movies interactive DVD titles MPEG video content Video and audio CDs WinDVD automatically deter...

Page 15: ...you can find VAIO Remote Control in the Start menu after which you can copy it to your desktop for easy access Overview You will need to configure your Internet connection to access the websites 1 Info Box Contains a brief description of an item when you move the cursor over it 2 Language options Click to select your preferred language 3 Language display Click to display hide the language list 4 L...

Page 16: ...or over the application you want to use or the link you want to see The info box displays a description of the item 2 Click the sphere to start the launch sequence The sphere moves closer to the info box and the word GO appears 3 Click GO to launch For software applications the program is launched in full screen For links Internet Explorer is opened and the Sony website is launched ...

Page 17: ...apture still images proceed as follows 1 Connect an i LINK compatible device to your notebook 2 Launch Smart Capture from the Start menu in All Programs Smart Capture Smart Capture The Finder window appears displaying the image of the subject 3 Adjust the focus on the subject 4 Click the Capture button in the Smart Capture window The Still Viewer window appears with the image you shot in the Still...

Page 18: ...You can create a panorama picture by using PictureGear 2 5SE or higher You can capture still images and video clips from a digital video camera using Smart Capture Sending still images via e mail To send still images via e mail proceed as follows 1 Click the Start button on the Windows taskbar 2 Point to All Programs and click Smart Capture 3 Click Still Viewer 4 Select the still image you want to...

Page 19: ...o clip you can shoot up to 60 seconds according to the settings you chose in the Recording options section 6 Click the Capture button when finished The Movie Player window appears it contains the captured video clip 7 Click to playback the images Click to pause to stop playback 8 To end Smart Capture click You can shoot video clips in the following formats Non compressed Video 160 x 120 24 bits ma...

Page 20: ...end video clips via e mail proceed as follows 1 Click the Start button on the Windows taskbar 2 Point to All Programs and then Smart Capture 3 Click Movie Player 4 Click Mail The Compression Settings window appears 5 Choose the compression rate by moving the slider 6 Click Start Compression When compression is completed a window message asks you if you want to attach the file to your e mail 7 Acce...

Page 21: ...Phone and Modem Options matches the country you are dialing from To configure your modem proceed as follows 1 Click Start and then again Control Panel 2 Click Switch to Classic View on the left side and double click Phone and Modem Options The Phone and Modem Options dialog box appears 3 Make sure the Dialing Rules tab is selected 4 Click the New button if you wish to configure your modem or the E...

Page 22: ...ly installed driver and then install the driver located under C Drivers Modem or the one located on your Application CD ROM in the Drivers Modem folder then the Country Selector will be available To update the driver proceed as follows 1 Click the Start button and open Control Panel The Control Panel window appears 2 Click the Printers and Other Hardware icon The Printers and Other Hardware window...

Page 23: ...le click the My Location option in the Locations text box The Edit Location dialog box appears 5 Choose you country from the Country Region drop down list 6 Enter your area code in the Area Code text box 7 Complete the other settings 8 Click the Apply button and then click OK The Edit Location dialog box closes 9 In the Phone and Modem Options window click the Apply button 10 Click the OK button T...

Page 24: ...uble click UI Design Selector Click Switch to Classic View on the left side if you do not immediately see the icon The UI Design Selector dialog box appears 3 Click on or and select the design you like 4 Click Apply The UI Design Selector window design changes to give you a preview of the design you chose for the Sony software 5 To try another design click on or 6 Click OK once you are satisfied w...

Page 25: ...l number and BIOS version Printer Selects printer port mode settings Initial Setting Selects the drive and device order you wish to use for loading the operating system You can specify the hard drive as well as other drives inserted into your computer You can change the volume of the sounds while the operating system is loading Touchpad When you connect an optional mouse to your computer you can d...

Page 26: ...n Setup VAIO Action Setup The VAIO Action Setup dialog box appears 2 Click on the icon representing the key combination you want to use to launch automatically your application The Select Application screen appears 3 Select the application you need by using the browse options to the left 4 Click Next 5 Confirm the name and path of the selected application 6 Click Next 7 Select the configuration na...

Page 27: ... PowerPanel When you start the computer the PowerPanel icon appears in the system tray by default If the computer is running on AC power you see PowerPanel s Performance icon If it is running on battery power you see PowerPanel s Battery Life icon To see the CPU state and the current power profile simply point to the icon To select a power profile right click the icon To change profiles proceed as...

Page 28: ...ife and good performance It reduces the brightness of the display and puts the system into Standby mode after a specified time period Maximum Performance Provides the best system performance while still conserving power AC Power The power management state when AC power is in use PowerPanel automatically loads the AC profile unless you disable this feature Power Management Off Turns off all power m...

Page 29: ...dby to optimize power management for your system Communications Extends battery life by initiating a quick display time out You can also establish settings for LCD Video Standby Hard Disk Standby and Standby to optimize power management for your system Games Disables the display and the Hard Disk timer Camera Optimizes performance and power requirements for camera usage DVD Optimizes performance a...

Page 30: ...uch as LCD brightness or hard disk activity To select automatic profiles proceed as follows 1 Right click the PowerPanel icon or in the system tray 2 Select Profiles 3 Select Automatic Profile Selection Displaying detailed battery information You can display detailed information of your computer s battery To display battery information proceed as follows 1 Double click the PowerPanel icon or in th...

Page 31: ... icon appears when you use your notebook with the AC adapter when the CPU operates at high speed Battery Life This icon appears when you use your notebook with a battery when the CPU operates at low speed For more detailed information on what you can do with PowerPanel refer to the Help files of PowerPanel fully charged the icon is completely blue with an AC power plug charging the icon is blue wi...

Page 32: ...ation window or a toolbar from one display to the other This configuration of a single desktop distributed across separate displays is referred to as a virtual desktop Your monitor or TV hardware may not support the dual display function Certain software may not be compatible with Dual Display settings Make sure that your computer does not enter Standby or Hibernate mode while you are using Dual D...

Page 33: ... follows 1 Click the Start button on the Windows taskbar 2 Click Control Panel 3 Click Appearance and Themes 4 Click the Display icon 5 Click the Settings tab 6 Click the display marked 2 7 Select the Extend my Windows desktop onto this monitor check box 8 Click Apply and then OK Your monitor or TV hardware may not support the dual display function ...

Page 34: ...ution for each display proceed as follows 1 Click the Start button on the Windows taskbar 2 Click Control Panel 3 Click Appearance and Themes 4 Click the Display icon 5 Click the Settings tab The Display Properties dialog box appears 6 Click the display you wish to change 1 or 2 7 Select an option from the Color quality list when you want to change colors 8 Use the slider in the Screen resolution ...

Page 35: ...the monitor icons to match the physical arrangement of your monitors The two monitors icons must be connected to create a virtual desktop 7 Click Apply and then OK Deactivating the dual display setting To deactivate the Dual Display function proceed as follows 1 Click the Start button on the Windows taskbar 2 Click Control Panel 3 Click Appearance and Themes 4 Double click the Display icon 5 Click...

Page 36: ...it Performing a system recovery Use this option only when your system is seriously damaged e g if Windows does not work any longer or your PC behaves abnormally etc The system recovery will completely reinstall the originally configured system on your C drive Your D drive data will not be deleted if you choose to keep the same partition settings If you decide to modify the size of your partitions ...

Page 37: ... a standard system recovery proceed as follows 1 Take the system recovery CD ROM 2 Turn on your computer using AC power only and insert the system recovery CD ROM in the CD ROM drive 3 Shut down your computer Start Turn Off Computer Turn Off 4 Wait ten seconds 5 Turn your computer back on 6 On the first screen that appears press S Standard The system recovery CD screen appears asking you if you ar...

Page 38: ...recover the system without changing partitions proceed as follows 1 Press C to keep your current partitions This is the recommended option if you do not need to modify the partition sizes and if you want to restore your C drive while keeping the data on your D drive untouched 2 Press G to proceed with the system recovery 3 Follow the instructions on the screen 4 When the recovery process is finish...

Page 39: ... created and the notebook reboots 5 Press G to proceed with the system recovery 6 Follow the instructions on the screen 7 When the recovery process is finished remove the system recovery CD ROM from the drive 8 Press any key to restart your notebook Please note that this option will delete all existing data both on the C and D drives before starting the recovery Aborting the recovery process The r...

Page 40: ...r computer using AC power only and wait until Windows has booted up 3 Insert the product recovery CD ROM into the DVD ROM drive 4 Open the drive through My Computer and click the Apps directory 5 Open the directory that corresponds to the application you want to recover 6 Double click the Setup program 7 Follow the instructions in the Installer You must run the last product recovery CD ROM from Wi...

Page 41: ...roceed as follows 1 First check whether the driver you want to reinstall is on the last product recovery CD ROM Only device drivers that are not delivered with Windows can be found in the Drivers folder 2 Check all underlying sub directories for the appropriate driver 3 Next launch the Add Hardware Wizard click Start Control Panel and then double click Add Hardware to install the appropriate devic...

Page 42: ...tions like DVgate To optimize data storage use the C drive to install new applications and save all your documents and files to the D drive Moreover doing so will prevent the loss of your data in the case you need to perform a system recovery Do not try to add delete or resize partitions unless you really need to Changing partition settings might delete all your files on the hard disk If you need ...

Reviews: