background image

SONY MZ-B3 (E) 3-798-610-22(1)

Various ways of recording

17

4

Press 

(

.

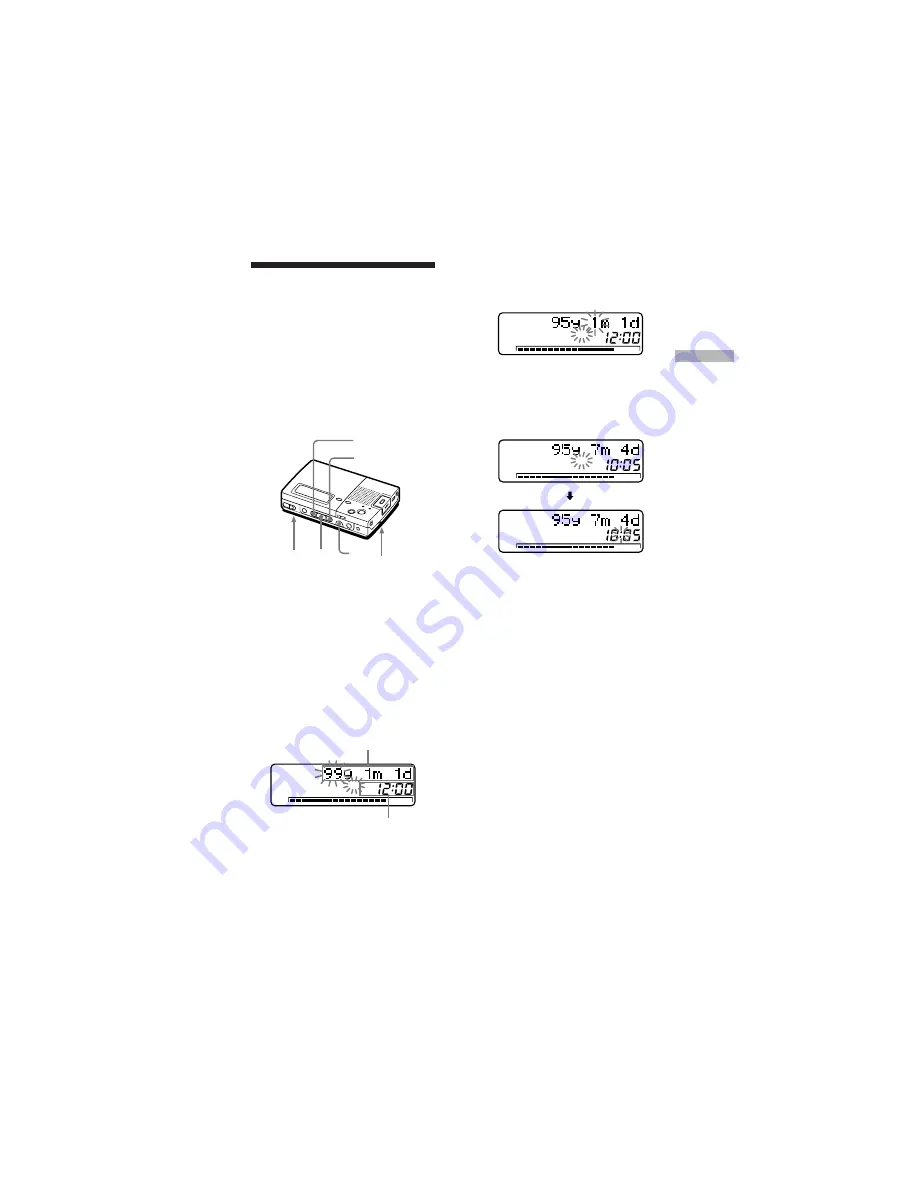
The year is set and the digit of the
month flashes.

5

Repeat steps 3 and 4 to enter the
current month, date, hour, and
minute.
When you press 

(

 to set the

minute, the clock starts operating.

If you make a mistake while setting
the clock

Press 

p

, and set the clock again from step

2.  You can skip a step by pressing 

(

.

On the clock display

To display the current time
When the recorder is not operating or
while recording, press DISPLAY
repeatedly until the current time
appears in the display.  The time
indication disappears after 10 seconds.

To display the time in the 24-hour system
While setting the clock, press DISPLAY.
To display the time in the 12-hour
system, press DISPLAY again.

DATE

PM

DATE

PM

Continue to next page 

m

DATE AM

=

+

CLOCK SET
(on the
bottom)

(

p

Battery
compartment
(on the
bottom)

Setting the clock to
stamp the recorded
time

To stamp the date and time on the MD
when you record, you first need to set
the clock.  When you use the recorder
for the first time or after a long period
of disuse, charge the built-in battery
for the clock after setting the clock
(page 18).

1

Connect the power source.
Install three size AA (LR6)
batteries.

2

Press CLOCK SET on the bottom
of the recorder.
Use a pointed object.
The digits of the year flash.

3

Enter the current year by pressing

=

 or 

+

.

To change the digits rapidly, keep
pressing 

=

 or 

+

.

Year, month, and date

Current time

DATE AM

Summary of Contents for MZ-B3 - MD Walkman MiniDisc Recorder

Page 1: ...SONY MZ B3 E 3 798 610 22 1 3 798 610 22 1 MZ B3 1995 by Sony Corporation Portable MiniDisc Recorder Operating instructions ...

Page 2: ...y Caution The use of optical instruments with this product will increase eye hazard Information For Customers in the USA This equipment has been tested and found to comply with the limits for a Class B digital device pursuant to Part 15 of the FCC rules These limits are designed to provide reasonable protection against harmful interference in a residential installation This equipment generates use...

Page 3: ...e sound The recorder s memory makes precise starting of recording possible With this function you can dictate easily Fast playback function You can reduce the listening time You can play an MD either 1 6 or 2 2 times as fast as the normal playback speed Two kinds of track marks You can record two different kinds of track marks regular track marks and special track marks You can locate the special ...

Page 4: ...itor the sound being recorded 15 To know the recording condition 15 To protect a recorded MD 15 To know the remaining time etc 16 Setting the clock to stamp the recorded time 17 Various ways of playback 19 Listening at a fast speed 19 Playing tracks repeatedly 19 Tips on playback 20 To know the time and track name 20 To lock the controls Hold function 21 Listening with other equipment 22 Editing r...

Page 5: ...ces 27 Using on house current 27 Using on a lithium ion rechargeable battery 27 Additional information 29 Precautions 29 Troubleshooting 32 System limitations 34 Error messages 35 Specifications 37 What is the MD 38 Looking at the controls 40 ...

Page 6: ...the lid down to close bottom Recording an MD right away Record an MD through the built in microphone The recorded sound is monaural and you can record for up to 148 minutes on a 74 minute MD or up to 120 minutes on a 60 minute MD Install three alkaline batteries Insert a recordable MD 1 2 Three size AA LR6 alkaline batteries ...

Page 7: ...le recording Record an MD 3 Press P Press P again to resume recording END SEARCH then press rREC or to find point to start recording and press p to stop Then press rREC p and open the lid Elapsed time of the track being recorded Track number REC MONO Position indicator shows the current location on the MD Sound source Microphone Press rREC REC and MONO appear in the display and recording starts fr...

Page 8: ... close bottom Playing an MD right away Play an MD you recorded on or a premastered MD You can hear the playback sound in monaural through the built in speaker For stereo sound play an MD recorded in stereo and use stereo headphones not supplied Install three alkaline batteries Insert an MD 1 2 Three size AA LR6 alkaline batteries ...

Page 9: ...ce keep pressing keep pressing p and open the lid To go backward or forward quickly without listening press P and keep pressing or Once you open the lid the point to start play will change to the beginning of the first track Elapsed time of the track being played Track number or track name To listen in stereo sound Connect stereo headphones not supplied to the 2 jack If the play does not start Mak...

Page 10: ...ting Digital VOR function You can dictate easily using the digital VOR Voice Operated Recording function You do not have to press any buttons to suspend recording while dictating 1 Insert a recordable MD and start recording To record see Recording an MD right away page 6 2 Press VOR ON OFF The VOR indicator lights up 3 Speak into the microphone Hold the recorder and keep it close to your mouth aro...

Page 11: ... recorded If you connect a monaural microphone and set MONO STEREO to STEREO only the left channel sound of the source will be recorded The MDs recorded in monaural sound can be played back only with an MD player recorder that has the monaural playing function Stereo microphone to MIC PLUG IN POWER MONO monaural STEREO Recording in stereo with an external microphone You can record in stereo sound ...

Page 12: ...REO to MONO The recording time will be double the normal To record from a monaural player Connect the RK G135 RK G64 etc not supplied to the earphone jack of the source equipment and set MONO STEREO to MONO Notes If you connect a monaural equipment and set MONO STEREO to STEREO only the left channel sound of the source will be recorded The MDs recorded in monaural sound can be played back only wit...

Page 13: ... connect it to the TRACK MARK REC PAUSE jack Speaker A n B n A n C While recording press TRACK MARK on the recorder or the remote controller A track mark is added and the track number will increase by one The record indicator flashes and MARK ON appears in the display To add track marks after recording See Track marking a recording page 23 To erase track marks See Erasing a track mark page 24 To f...

Page 14: ...n add special track marks only while recording To erase special track marks See Erasing a track mark page 24 To find special track marks while playing While pressing VOR ON OFF press or slightly The special track mark indication TT appears following the track number Each time you press you can find the previous special track mark Each time you press you can find the succeeding track mark Tips on t...

Page 15: ...he record indicator flashes according to the recording condition To protect a recorded MD To record protect an MD slide open the tab at the side of the MD In this position the MD cannot be recorded To record again slide the tab back so the tab is visible Rear of an MD Record protect Tab Recording condition While recording Recording standby Recording with less than 3 minutes recording time availabl...

Page 16: ... number Track number Remaining time for recording Current date Current time Appears only when the clock is set Track number Track number Remaining time of the recording Current date Current time A disc name appears only with MDs that have been electronically labeled Appears only when the clock is set REC MONO REC MONO REC REMAIN REC MONO DATE AM Elapsed time of the track being recorded Elapsed tim...

Page 17: ...e time in the 24 hour system While setting the clock press DISPLAY To display the time in the 12 hour system press DISPLAY again DATE PM DATE PM Continue to next page m DATE AM CLOCK SET on the bottom p Battery compartment on the bottom Setting the clock to stamp the recorded time To stamp the date and time on the MD when you record you first need to set the clock When you use the recorder for the...

Page 18: ...stalled for about 2 hours to charge the built in battery for the clock You can use the recorder while charging Once charged the built in battery should last about a month without connecting to any of the power sources The recorder will automatically charge the built in battery while connected to dry batteries AC power or a rechargeable battery ...

Page 19: ...ress FAST PLAY again To suspend fast playback Press P To find track marks Press or during fast playback To switch to normal playback Press To return to fast playback press FAST PLAY Playing tracks repeatedly You can play tracks repeatedly in three ways all repeat single repeat and shuffle repeat Press PLAY MODE while the recorder is playing an MD Each time you press PLAY MODE the play mode indicat...

Page 20: ...u press DISPLAY the display changes as shown on the next page Display window DISPLAY Play mode indication Track number or track name Appears only with MDs that have been electronically labeled none normal play A whole disc all the tracks is played once f all repeat A whole disc all the tracks is played repeatedly f1 single repeat A single track is played repeatedly fSHUF shuffle repeat All the tra...

Page 21: ...er or name Elapsed time of the track being played Track number or name Remaining time of the current track Remaining number of tracks Recorded date Recorded time Appears only with MDs that have been electronically labeled The indications show the date and time when you started recording or added the track mark If you record without setting the clock or play an MD that has no recorded date y m d an...

Page 22: ...stem or record on a cassette tape etc Stereo tape recorder portable MD recorder etc to MIC RK G134 not supplied to 2 headphones Adjust the volume around 6 Stereo system cassette corder etc to LINE IN 2 phono plugs R red L white RK G129 not supplied to 2 headphones Adjust the volume around 6 Stereo mini plug To listen with a monaural player Connect the RK G135 line cable not supplied to the MIC jac...

Page 23: ...starts writing the new data to the MD Do not move or jog the recorder while Toc Edit is flashing in the display You cannot add track marks on an MD that is record protected Before adding track marks close the tab on the side of the MD Various ways of playback Editing recorded tracks 4 1 2 3 4 1 2 3 4 5 Track numbers increase Track marking zEditing recorded tracks You can edit your recordings by ad...

Page 24: ... Before erasing track marks close the tab on the side of the MD Erase a track mark 1 2 3 4 1 2 3 4 Erasing a track mark You can erase a track mark to combine the tracks before and after the track mark You can erase regular track marks and special track marks in the same way The track numbers will change as follows 1 While the recorder is playing an MD press P to pause 2 Find the track mark you wan...

Page 25: ...de of the MD p stop play Erasing a track Note that once a recording has been erased you cannot retrieve it Check the track number before erasing 1 Play the track you want to erase 2 Press ERASE while playing the track Erase OK and PushErase appear in the display alternately and the recorder plays the selected track repeatedly To cancel erasing press p 3 Check the track number in the display and pr...

Page 26: ...ntents of the disc 2 Press p to stop 3 While pressing ERASE press rREC AllErase and PushErase appear in the display alternately To cancel erasing press p 4 Press ERASE again Toc Edit flashes in the display When erasing finishes BLANKDISC appears Notes Do not move or jog the recorder while Toc Edit is flashing in the display You cannot erase recordings on an MD that is record protected Before erasi...

Page 27: ...45HG AC power adaptor not supplied Editing recorded tracks Power sources Using on a lithium ion rechargeable battery Before using the LIP 12 lithium ion rechargeable battery not supplied for the first time charge it with the ACP MZ60A battery charger not supplied 1 Attach the battery case supplied 2 Insert the charged battery LIP 12 not supplied into the battery case Note You cannot charge the bat...

Page 28: ...e rechargeable battery capacity becomes half the normal life replace it with a new one Notes on dry batteries Incorrect battery usage may lead to leakage of battery fluid or bursting batteries To prevent such accidents observe the following precautions Install the and poles of the batteries correctly Do not install new and used batteries or different kinds of batteries together Do not try to recha...

Page 29: ...ion While carrying the recorder Keep personal credit cards using magnetic coding or spring wound watches etc away from the recorder to prevent possible damage from the magnet used for the speaker On the headphones Road safety Do not use headphones while driving cycling or operating any motorized vehicle It may create a traffic hazard and is illegal in many areas It can also be potentially dangerou...

Page 30: ...noise The recorder gives out mechanical noise while operating which is caused by the power saving system of the recorder and it is not a trouble Notes on recording Mechanical shock or vibration Do not subject the recorder to strong mechanical shock or continuous vibration while recording The sound may be skipped or recording may stop After you stop recording Toc Edit flashes while the data of the ...

Page 31: ... Additional information 31 Do not remove the black sheet unless you are disposing of this product or it may not work properly If you have any questions or problems concerning your recorder please consult your nearest Sony dealer ...

Page 32: ...sources may not be securely connected b Disconnect the audio sources once and connect them again pages 12 22 While operating the recorder received a mechanical shock too much static abnormal power voltage caused by lightning etc b Restart the operation as follows 1 Disconnect all the power sources 2 Leave the recorder for about 30 seconds 3 Connect the power source Volume is too low b Adjust the v...

Page 33: ...ttery for a clock is weak b Connect the power source to charge the built in battery After charging set the clock again Note that the clock normally loses about 2 minutes per month page 18 The time indication flashes b Set the clock again page 17 When a lot of short tracks are recorded on a disc the total recording time may be shorter than the maximum recording capacity You recorded over a previous...

Page 34: ...the total recorded time More than 254 tracks cannot be recorded on the disc To continue recording erase unnecessary tracks Repeating recording and erasing may cause fragmentation and scattering of data Although those scattered data can be read each fragment is counted as a track In this case the number of tracks may reach 254 and further recording is not possible To continue recording erase unnece...

Page 35: ...recorder cannot combine This is caused by system limitation The recorder cannot read the disc it s scratched or dirty b Reinsert or replace the disc There is no more space on the disc less than 24 seconds available in monaural b Replace the disc Power supply is too high The recommended AC power adaptor is not used b Use the recommended AC power adaptor The recorder is locked b Slide HOLD against t...

Page 36: ...e recorder to cool down There is no more space for new data when you are editing the MD b Erase unneccessary track numbers or tracks page 24 or 25 You tried to record or edit on a track that is protected from erasing b Record or edit on other tracks Error message TEMP OVER TR FULL TRprotect ...

Page 37: ... response 20 to 20 000 Hz 3 dB Wow and Flutter Below measurable limit Inputs Microphone stereo mini jack minimum input level 0 44 mV Remote controller mini mini jack Outputs Headphones stereo mini jack maximum output level 5 mW 5 mW load impedance 16 ohm Power output DC operation Speaker 220 mW at 10 harmonic distortion General Power requirements Three size AA LR6 alkaline batteries not supplied S...

Page 38: ...responds exactly to the audio signals generated by the connected source The north and south polarities equate to digital 1 and 0 The demagnetized MD adopts the polarity of the magnetic field resulting in a recorded MD Optional accessories AC E45HG AC power adaptor LIP 12 Lithium ion rechargeable battery ACP MZ60A AC Power adaptor Battery charger ECM 909A ECM 727P ECM 717 Stereo microphones ECM T14...

Page 39: ...AC extracts and encodes only those frequency components actually audible to the human ear Quick Random Access Like CDs MDs offer instantaneous random access to the beginning of any music track Premastered MDs are recorded with location addresses corresponding to each music selection Recordable MDs are manufactured with a User TOC Area to contain the order of the music The TOC system is similar to ...

Page 40: ...the bottom 17 8 FAST PLAY button 19 9 search AMS button 7 9 0 play button 9 search AMS button 7 9 p stop button 7 9 HOLD switch 21 TRACK MARK button 13 24 Record indicator 15 ERASE button 25 26 Speaker 9 PLAY MODE button 19 ª 2 headphones jack 9 22 º VOL volume control 9 Microphone 7 Battery compartment on the bottom 6 8 MIC PLUG IN POWER jack 11 12 MONO monaural STEREO switch 11 12 VOR indicator ...

Page 41: ...hts up along with the date and time the MD was recorded When only DATE lights up the current date and time are displayed 0 AM PM indication 17 Lights up along with the time indication in the 12 hour system Time display 16 17 21 Shows the recorded time current time elapsed time of the track or MD being recorded or played Position indicator 7 9 Shows the current location on the MD The point under re...

Page 42: ... 610 22 1 42 Remote controller 1 TRACK MARK button 13 14 Used to add track marks while recording Adds a regular track mark when pressed once Adds a special track mark when pressed twice Carrying case 2 P pause button 7 9 ...

Page 43: ...SONY MZ B3 E 3 798 610 22 1 Additional information 43 ...

Page 44: ...SONY MZ B3 E 3 798 610 22 1 Sony Corporation Printed in Japan ...

Reviews: