background image

16

Adjusting the volume

You can adjust the volume of the wired
headphones (optional) and the connected
equipment with the supplied card remote
commander.

Press 

(VOL)

 (+) or 

(VOL)

 (–) on the card

remote commander.

Connecting the wired headphones
(optional)

For the  wired headphones, there are two
output jacks (mini phono plug) on the
connection box XA-115.  To adjust the volume
of the wired headphones, press 

(VOL)

 (+)  or

(VOL)

 (–) on the card remote commander.

Using the supplied cordless
headphones MDR-IF0140.

See “Use of Headphones” (page 17).

Notes

• The volume of the cordless headphones cannot

be adjusted with the supplied card remote
commander. Use the volume control on the
cordless headphones.

• For your safety, do not use the headphones while

driving your car.

• Do not leave the headphones in a place subject

to direct sunlight, or in a high temperature.

• If the cordless headphones are used while

exposed to direct sunlight, sensitivity of the
infrared receptor may deteriorate, and inferior
quality sound may result.

Summary of Contents for MV7101DS - Mobile DVD Dream System

Page 1: ... manual Owner s Record The model and serial numbers are located on the bottom of the unit Record these numbers in the space provided below Refer to these numbers whenever you call upon your Sony dealer regarding this product Model No MV 7101DS Serial No 3 255 990 11 1 Operating Instructions Mobile Video System ...

Page 2: ...an those specified herein may result in hazardous radiation exposure This is located on the drive unit s internal chassis To prevent fire or shock hazard do not expose the unit to rain or moisture This symbol is intended to alert the user to the presence of uninsulated dangerous voltage within the product s enclosure that may be of sufficient magnitude to constitute a risk of electric shock to per...

Page 3: ...e aspect ratio of screen TV DISPLAY 25 Displaying the multi angle notice ANGLE MARK 26 Displaying captions for viewers with hearing difficulties CAPTIONS 26 Setting the screen saver SCR SAVER 27 Selecting the speaker mode SPEAKER SETUP 27 Selecting the audio output mode AUDIO OUT 28 Selecting the compression setting for the sound DYNAMIC 28 Selecting the TV color system COLOR SYSTEM 29 Selecting t...

Page 4: ...C 113 F subject to direct sunlight near heat sources such as heaters exposed to rain or moisture exposed to excessive dust or dirt subject to excessive vibration subject to heat Keep all products away from nearby hot vehicle components that heat up over time such as hoses high current wires and braking systems components Make sure to leave enough room for ventilation on openings and slots to prote...

Page 5: ...ndicates an Audio CD function Indicates the function of a CD containing MP3 file Moisture condensation On a rainy day or in a very damp area moisture condensation may occur inside the lenses Should this occur the player will not operate properly In such a case remove the disc and wait for about an hour until the moisture has evaporated To maintain high sound quality Be careful not to splash juice ...

Page 6: ...e player lights up 3 Press INPUT on the monitor repeatedly to select VIDEO 4 Each time you press INPUT the indication changes in the following sequence VIDEO 1 c VIDEO 2 c VIDEO 3 c VIDEO 4 c VIDEO 1 When connecting optional products be sure to select the proper input mode For details refer to the connection diagram in the supplied installation connection manual 4 Open the front panel of the playe...

Page 7: ...eases to 4 times the speed with no sound 4 A disc other than a DVD returns to normal playback when a track MP3 file finishes Notes Depending on the recording method used on the disc it may take a minute or more before playing Depending on the condition of the disc it may not play back page 38 If you play a high bit rate MP3 file such as 320 kbps sound may be intermittent Returning the display moni...

Page 8: ...screen mode switches between on and off 5 REVERSE button To switch images upside down 6 INPUT button 6 13 To select the input source 7 POWER button 6 12 13 To turn on off the player and the monitor REVERSE 180 c c Warning when installing in a car without an ACC accessory position on the ignition key switch To turn off the player and the monitor after you set the power select switch to B the settin...

Page 9: ...dio output audio language qh SETUP buttons 25 To enter or quit the setup menu qj u play pause button qk x stop button ql MONITOR POWER on off button To turn on off the player and the monitor w INPUT button To select the input source wa VOL buttons 16 To turn up or down the volume For the monitor XVM R70 These buttons also work for optional Sony monitors other than XVM R75 and XVM H6 The correspond...

Page 10: ... stop button 6 Disc slot 7 Z eject button Available to eject a disc from the player even when the player is turned off 8 RESET button 9 next button q previous button Cautions The player doesn t turn on when the monitor is turned off To turn on the player press POWER on the monitor or MONITOR POWER on the card remote commander The player turns on in conjunction with the monitor If the player does n...

Page 11: ...n Battery Do not charge the dry battery Do not carry the dry battery together with coins or other metallic objects It can generate heat if the positive and negative terminals of the battery are accidentally come into contact with metallic objects When you are not going to use the headphones for a long time remove the battery to avoid damage from battery leakage or corrosion OPE N O N O F F P O W E...

Page 12: ...turning the display monitor to its enclosure Close the display monitor until it clicks The monitor turns off automatically Notes Be careful not to catch your finger in the display monitor when closing Do not put any foreign objects between the LCD panel and the enclosure when closing POWER OPEN 30 180 120 Adjusting the tilt and swivel The display monitor can be adjusted within the angles shown Tip...

Page 13: ...or to turn on the player and the monitor 2 Press INPUT repeatedly to select VIDEO 4 Each time you press INPUT the indication changes in the following sequence VIDEO 1 c VIDEO 2 c VIDEO 3 c VIDEO 4 c VIDEO 1 When connecting optional products be sure to select the proper input mode For details refer to the connection diagram of installation connection manual 3 Press M or m to select PAL or NTSC colo...

Page 14: ...ust to the desired setting When Picture is selected Press m to decrease the contrast Press M to increase the contrast When Brightness is selected Press m to darken the picture Press M to brighten the contrast When Color is selected Press m to decrease color intensity Press M to increase color intensity When Hue 1 is selected Press m to decrease the saturation Press M to increase the saturation 1 H...

Page 15: ...om or Widezoom can be set as the screen mode Normal An image with an aspect ratio of 4 to 3 regular image Full An image with an aspect ratio of 4 to 3 enlarged to the left and right edges of the screen Video Adjust Reset or MENU PressVv Blue Back On or MENU PressVv Mode Zoom or MENU PressVv Normal Normal Full Full Zoom An image with an aspect ratio of 4 to 3 enlarged to the left and right edges of...

Page 16: ...VOL or VOL on the card remote commander Using the supplied cordless headphones MDR IF0140 See Use of Headphones page 17 Notes The volume of the cordless headphones cannot be adjusted with the supplied card remote commander Use the volume control on the cordless headphones For your safety do not use the headphones while driving your car Do not leave the headphones in a place subject to direct sunli...

Page 17: ...ands when adjusting the volume the attenuate function will be activated and volume cannot be adjusted To adjust the volume move nearer toward the transmitter of the monitor or orient the infrared emitters on the left housing towards the transmitter of the monitor Sound is automatically attenuated if noise increases Attenuate function If the infrared rays are obstructed or the headphones are used o...

Page 18: ...een appears 2 Press the number buttons to enter the desired chapter title track number 3 Press ENTER Note You cannot set 0 Resume playback 1 During playback press x to stop The player memorizes the point where playback is stopped DVD Video CD Audio CD PRESS PLAY TO CONTINUE flashes on the screen 2 Press u to start playback When resume playback is activated playback starts from the point where play...

Page 19: ...e the display panel until it clicks MP3 file playback with the menu display If you have set SMART NAV to WITH MENU page 33 and play a CD containing MP3 files the menu display for folder names and MP3 file names will appear You can easily search the desired MP3 file with the SMART NAV menu display 1 Insert a CD containing MP3 files in this player The SMART NAV menu display appears 2 Press the numbe...

Page 20: ...tedly to select OFF ENTER SEARCH POWER DISPLAY CLEAR SETUP AUDIO ANGLE SUBTITLE MENU TOP MENU INPUT MONITOR POWER 1 2 3 4 5 6 7 8 9 0 VOL DISPLAY TITLE 01 01 CHAPTER 02 05 00 24 50 Dolby D TITLE REMAIN 01 25 41 Dolby D CHAPTER ELAPSED 00 01 48 Dolby D CHAPTER REMAIN 00 03 26 Dolby D OFF Video CD when PBC is set to OFF CD 1 Press DISPLAY while the running time is displayed 2 Each time you press DIS...

Page 21: ...AUDIO ANGLE SUBTITLE MENU TOP MENU INPUT MONITOR POWER 1 2 3 4 5 6 7 8 9 0 VOL TOP MENU MENU ENTER M m Changing the subtitle language Some DVDs have recorded subtitles in one or more languages You can turn the subtitles on or off or change the subtitle language on such DVDs Press SUBTITLE during playback The subtitle language is displayed at the upper left Example a subtitle language display Each ...

Page 22: ...7 8 9 0 VOL AUDIO AUDIO 1 2 Dolby D 5 1 ENGLISH Changing the audio language Some DVDs have multiple audio languages you can choose from During playback press AUDIO repeatedly to select the desired audio language The current audio language is displayed at the upper left Example an audio language display The format of the sound source Dolby D DTS or LPCM may appear When the display for the language ...

Page 23: ...layback of a DVD having multiple alternative angles recorded press ANGLE when a notice appears The number of the currently selected angle is displayed at the upper right 2 Press ANGLE repeatedly to select your favorite angle number while the angle number is displayed Each time you press ANGLE the angle number switches Notes You can switch the angle only if multiple angles are recorded on the DVD T...

Page 24: ... desired item press to go to the previous next page Button functions vary or may not work depending on the Video CD Notes To display the PBC menu during playback of a Video CD press TOP MENU repeatedly to select PBC ON then press u During playback of a Video CD with PBC ON press the number buttons or to change the item The PBC menu is not displayed but the item you selected starts to play During p...

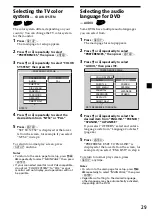
Page 25: ...etails read the operating instructions supplied with your monitor 1 Press SETUP The main page for setup appears PREFERENCES is only available when playback is stopped 2 Press M or m repeatedly to select GENERAL SETUP then press ENTER 3 Press M or m repeatedly to select TV DISPLAY then press 4 Press M or m repeatedly to select the desired item from 4 3 PS 4 3 LB or 16 9 WIDE 5 Press ENTER SET TO WI...

Page 26: ...F TV DISPLAY ANGLE MARK CAPTIONS SCR SAVER MAIN PAGE Displaying captions for viewers with hearing difficulties CAPTIONS Captions are the words displayed on the monitor that describe the audio or sound portion of a DVD Captions allow viewers with hearing difficulties to follow the dialog and the action of a scene simultaneously This function is only available when a DVD containing captions is playe...

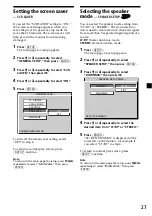
Page 27: ...AKER SETUP You can select the speaker mode setting from LT RT or STEREO The downmix func tion is used to create stereo 2 channel signals from more than 5 separated digital signals of a source LT RT theater downmix mode STEREO stereo downmix mode 1 Press SETUP The main page for setup appears 2 Press M or m repeatedly to select SPEAKER SETUP then press ENTER 3 Press M or m repeatedly to select DOWNM...

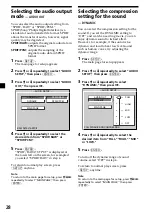
Page 28: ...up press M m repeatedly to select MAIN PAGE then press ENTER AUDIO SETUP RAW DATA VIA SPDIF SPDIF RAW SPDIF PCM AUDIO OUT DYNAMIC MAIN PAGE Selecting the compression setting for the sound DYNAMIC You can select the compression setting for the sound If you set the DYNAMIC setting to OFF and watch an exciting movie you can enjoy dynamic sound to its best effect However for example if the sound is to...

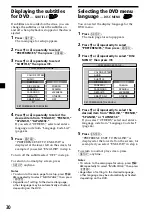
Page 29: ...O SUBTITLE DISC MENU PARENTAL PASSWORD DEFAULTS SMART NAVI Selecting the audio language for DVD AUDIO Some DVDs have multiple audio languages you can select from 1 Press SETUP The main page for setup appears 2 Press M or m repeatedly to select PREFERENCES then press ENTER 3 Press M or m repeatedly to select AUDIO then press 4 Press M or m repeatedly to select the desired item from ENGLISH FRENCH S...

Page 30: ... on the DVD Selecting the DVD menu language DISC MENU You can select the display language for the DVD menu 1 Press SETUP The main page for setup appears 2 Press M or m repeatedly to select PREFERENCES then press ENTER 3 Press M or m repeatedly to select DISC MENU then press 4 Press M or m repeatedly to select the desired item from ENGLISH FRENCH SPANISH or JAPANESE If you select OTHERS select and ...

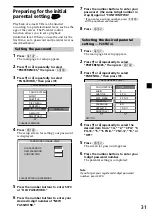
Page 31: ...page for setup appears 2 Press M or m repeatedly to select PREFERENCES then press ENTER 3 Press M or m repeatedly to select PARENTAL then press 4 Press M or m repeatedly to select the desired item from 1 G 2 3 PG 4 PG 13 5 6 PG R 7 NC 17 8 or OFF 5 Press ENTER The screen for password appears 6 Press the number buttons to enter your 4 digit password number The parental setting is completed Note If ...

Page 32: ...u forget your registered 4 digit password number press 5370 Refer to the following table Parental levels of the table are on the MPAA Motion Picture Association of America rating system If you set this player to level 4 for example DVDs with levels 5 6 and 7 cannot be played This Unit MPAA Rating System OFF 8 7 NC 17 No one 17 and under admitted 6 R Restricted 5 4 PG 13 Parents strongly cautioned ...

Page 33: ... MENU and play a CD containing MP3 files the menu display for folder names and MP3 file names appear You can easily search the desired MP3 file with the SMART NAV menu display 1 Press SETUP The main page for setup appears 2 Press M or m repeatedly to select PREFERENCES then press ENTER 3 Press M or m repeatedly to select SMART NAV then press 4 Press to select WITH MENU 5 Press ENTER WITH MENU is d...

Page 34: ...battery of the card remote commander When the battery becomes weak the range of the card remote commander becomes shorter Replace the battery with a new CR2025 lithium battery Use of any other battery may present a risk of fire or explosion x Notes on lithium battery Keep the lithium battery out of the reach of children Should the battery be swallowed immediately consult a doctor Wipe the battery ...

Page 35: ...in a location subject to direct sunlight heat or moisture It is recommended to use the headphones at a temperature of between 5 C and 35 C 41 F and 95 F Do not drop hit or otherwise subject headphones to strong shocks of any kind This could damage the product Notes on headphones preventing hearing damage Avoid using headphones at high volume Hearing experts advise against continuous loud and exten...

Page 36: ...vision Corporation and other rights owners Use of this copyright protection technology must be authorized by Macrovision Corporation and is intended for home and other limited viewing uses only unless otherwise authorized by Macrovision Corporation Reverse engineering or disassembly is prohibited MODEL NO DVD PLAYER DC 12 NTSC X Region code About discs the player can play This player can play 12 c...

Page 37: ...cture Title The longest section of a picture or music feature on a DVD e g a movie for video software or an album for audio software etc Chapter Sections of a picture or a music feature that are smaller than titles A title is composed of several chapters Each chapter is assigned a chapter number enabling you to locate the chapter you want Depending on the disc chapters may not be recorded Track Se...

Page 38: ...ctions may result from using such discs Inability to eject a disc due to a label or sticker peeling off and jamming the eject mechanism Inability to read audio data correctly e g playback skipping or no playback due to heat shrinking of a sticker or label causing a disc to warp Discs with non standard shapes e g heart square star cannot be played on this unit Attempting to do so may damage the uni...

Page 39: ...e most common international standard for the logical format of files and folders on a CD ROM There are several specification levels In Level 1 file names must be in the 8 3 format no more than 8 characters in the name no more than 3 characters in the extension MP3 and in capital letters Folder names can be no longer than 8 characters There can be no more than 8 nested folder levels Level 2 specifi...

Page 40: ...ctions 1 set Optional equipment Monitor XVM R70 XVM H65 Design and specifications are subject to change without notice Overhead Monitor XVM R70 Monitor System Liquid crystal color display Display Manual flipdown panel Drive system TFT LCD active matrix system Picture size 7 inches wide screen 16 9 154 87 mm 176 mm 6 1 8 3 1 2 in 7 in w h d Picture segment 336 960 w 1440 h 234 dots Power requiremen...

Page 41: ...luding battery Design and specifications are subject to change without notice Connection box XA 115 A V Output Output Impedance less than 220 Ω less than 100 pF Output Level 0 dBs 3 dB 0 775 V rms Vol Max Video 75 Ω 1Vp p A V Input 3 Input Impedance more than 10 K Ω less than 1000 pF Input Level 1 3 dBs 0 0 3 dB 0 775 V rms Video 75 Ω 1 Vp p DC output 7 5 V max 2 A Dimensions 150 42 80 mm 6 11 16 ...

Page 42: ...ector No power is being supplied to the unit Check the connection If everything is in order check the fuse The car does not have an ACC position t press POWER on the monitor The power is continuously supplied to the unit The car does not have an ACC position t Press and hold POWER on the monitor Disc playback A disc cannot be loaded Another disc is already loaded The disc is forcibly inserted upsi...

Page 43: ...1 22 Depending on the Video CD the PBC menu display automatically appears on the monitor during playback t Select the desired menu page 24 Playback stops automatically The disc may contain an auto pause signal While playing such a disc this player stops playback at the signal You cannot perform certain functions such as Stop or Search Playback With some discs you cannot activate these functions Th...

Page 44: ...ared ray communication and does not mean that there is a problem with the unit itself Check that there is no object between the transmitter and the headphones Check that the infrared sensors are not covered with your hands or hair If you use the headphones by a window where the sunlight is too strong draw the curtains blinds to shut out the direct sunlight or use the headphones away from the sunli...

Page 45: ...OWER OFF OVERHEAT The player may be overheated t Allow the unit to cool off then press POWER on the monitor again WRONG REGION The region code of the DVD currently in the player does not conform to the player t Make sure the region code of the DVD and the player page 36 The operation cannot be done ...

Page 46: ...8 Thai 1067 Tibetan 1253 Icelandic 1403 Afan Oromo 1529 Tigrinya 1070 Breton 1254 Italian 1408 Oriya 1531 Turkmen 1079 Catalan 1257 Hebrew 1417 Punjabi 1532 Tagalog 1093 Corsican 1261 Japanese 1428 Polish 1534 Setswana 1097 Czech 1269 Yiddish 1435 Pashto Pushto 1535 Tonga 1103 Welsh 1283 Javanese 1436 Portuguese 1538 Turkish 1105 Danish 1287 Georgian 1463 Quechua 1539 Tsonga 1109 German 1297 Kazak...

Page 47: ...47 ...

Page 48: ...Sony Corporation Printed in Korea ...

Reviews: