background image

6

US

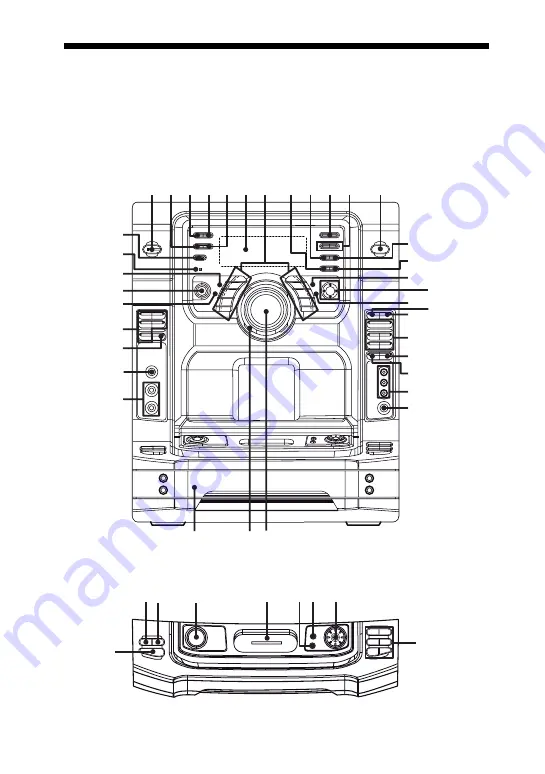
Guide to parts and controls

This manual mainly explains operations using the buttons on the unit, but the same 
operations can also be performed using the buttons on the remote having the same or 
similar names.

Unit


Front view


Top view

1234567 89 q; qa

qs

qd

qf

qg

qh

qj

qk

ql

w;

wa

ws

wd

wf

wg

wh

wj

wk

wl

e;

ea

es

ed

ef

eg

eh

HS

s

s

PLAY
MODE

r;

el

ek

ej

rg

ra rs rd

rf

Summary of Contents for Muteki LBT-ZX99I

Page 1: ... 2009 Sony Corporation 4 128 304 11 2 Mini HI FI Component System Operating Instructions LBT ZX99i LBT ZX66i ...

Page 2: ...und pressure from earphones and headphones can cause hearing loss The unit is not disconnected from the AC power source mains as long as it is connected to the wall socket even if the unit itself has been turned off CAUTION The use of optical instruments with this product will increase eye hazard For customer in the United States Owner s Record The model and serial numbers are located on the rear ...

Page 3: ...t use this apparatus near water 6 Clean only with dry cloth 7 Do not block any ventilation openings Install in accordance with the manufacturer s instructions 8 Do not install near any heat sources such as radiators heat registers stoves or other apparatus including amplifiers that produce heat 9 Do not defeat the safety purpose of the polarized or grounding type plug A polarized plug has two blad...

Page 4: ...may not be playable by this product Note on Multi Session disc When you play back Multi Session discs with different formats for each session the format of the first session is recognized as the disc type Tracks in the second and subsequent sessions are played back if they are the same formats as the first session MPEG Layer 3 audio coding technology and patents licensed from Fraunhofer IIS and Th...

Page 5: ...peaker setting 25 LBT ZX99i only Enhancing the video game sound 25 Game Sync Mixing video game sound with other sound source 26 Game Mixing Changing the display 26 Viewing information in the display 28 Creating your own program 29 Program Play Presetting radio stations 30 Creating your own sound effect 31 Singing along 32 Using the timer 32 Troubleshooting 34 Messages 37 Precautions 38 Specificati...

Page 6: ...uttons on the unit but the same operations can also be performed using the buttons on the remote having the same or similar names Unit Front view Top view 1234567 89q qa qs qd qf qg qh qj qk ql w wa ws wd wf wg wh wj wk wl e ea es ed ef eg eh HS s s PLAY MODE r el ek ej rg rarsrd rf ...

Page 7: ... monaural or stereo reception J TUNER BAND page 19 Press to select AM or FM band K TUNING pages 19 30 Press to tune in a radio station L Unit FUNCTION pages 14 17 22 29 Remote FUNCTION pages 17 19 22 29 Press to select a function M TUNING MODE pages 19 31 37 Press to select the tuning mode N TUNER MEMORY page 30 Press to preset a radio station O TOOL MENU page 21 Press to return to previous menu o...

Page 8: ...17 35 37 wk MIC 1 MIC 2 jack pages 32 34 39 Connect an optional microphone wl MIC LEVEL pages 32 34 Turn to adjust the microphone volume e PLAY MODE pages 18 36 37 Press to select the play mode of CD function ea DISC 1 5 pages 17 29 Press to select a disc Press to switch to CD function from other function es USER EQ page 31 Press to select the preset user equalizer ed X GROOVE page 22 Press to rei...

Page 9: ...35 Press to open or close the disc tray rh EQ pages 22 31 Press to select a preset sound effect rj CLEAR page 30 Press to delete the last step from the program list rk Operation buttons on remote tuning pages 19 30 Press to tune in a radio station pages 17 29 Press to select a folder of MP3 files go backward go forward pages 17 21 Press to select a track m M rewind fast forward pages 17 21 Press t...

Page 10: ...99i only Lights up according to the speaker system setting I Indicates the selected play mode for CD function pages 18 28 J Indicators for the disc tray page 17 lights up when the disc is selected lights up when there is a disc on the disc tray 1 2 3 4 and 5 light up when the system is turned on K Lights up when the surround effect is activated page 22 L Lights up when the X GROOVE effect is activ...

Page 11: ...EAKER A terminals LBT ZX66i only Connect the speaker cords to the SPEAKER terminals Getting Started C D F E B H A 2 4 5 3 1 6 GAME INPUT PHONES VIDEO AUDIO L R G 1 To AM loop antenna 2 To FM lead antenna 3 To front speaker right 4 To front speaker left 5 To surround speaker right 6 To surround speaker left LBT ZX99i only Front panel Rear panel FRONT SPEAKER A R L SPEAKER SURROUND SPEAKER B R L Whi...

Page 12: ...s away from the speaker cords and the power cord to avoid picking up noise C CD DIGITAL OUT jack Use a digital optical cable square not supplied to connect the digital input of the optional MD deck to this jack You can then record digital audio from this system Note There is no digital audio output from this jack during playback of MP3 files D VIDEO OUT jack Use a video cable not supplied to conne...

Page 13: ...ystem turns on and the demonstration automatically ends Insert the iPod Dock Adapter not supplied into the iPod connector before use Use a Dock Adapter supplied with your iPod Otherwise a compatible Dock Adapter will need to be purchased separately from Apple Inc To remove the iPod Dock Adapter pull it up with your fingernail or a flat object using the slot inside the adapter Slide and remove the ...

Page 14: ... OPEN CLOSE to open the disc tray and remove the disc If there are more than one disc in the disc tray press DISC SKIP to remove the discs 4 Press Z OPEN CLOSE again to close the disc tray Wait until CD No Disc appears in the display 5 Hold down DISC SKIP and then press 1 until STANDBY appears in the display Then MECHA LOCK appears in the display 6 Unplug the AC power cord Note Before carrying the...

Page 15: ...T ZX99i only There are two ways to place the front speakers and the surround speakers Example 1 Place the surround speakers on the top of the front speakers as shown below Example 2 Place the speakers at an equal distance from your listening position as shown below LBT ZX66i only Place the front speakers at an angle of 45 degrees from your listening position 45 C A B D E A B E C D 45 E B A ...

Page 16: ...inute indication flashes in the display 5 Press V or v repeatedly to set the minute 6 Press ENTER or on the remote The clock starts functioning Note The clock settings are canceled when you disconnect the power cord or if a power failure occurs To display the clock when the system is off Press DISPLAY repeatedly until the clock is displayed The clock is displayed for a few seconds except when iPod...

Page 17: ...ner circle of the tray To Do this Select a track or file Press or repeatedly during playback Select a folder on an MP3 disc Press repeatedly Find a point in a track or file1 Pressand holddown m or M during playback and release it at the point you want to resume playback Use button on the remote for this operation while playing an MP3 file Playback all the tracks or files on the disc s or in the fo...

Page 18: ...for the next MP3 file to start playback MP3 files are played back in the order that they are recorded onto the disc You are recommended not to save other types of files or unnecessary folders on a disc that has MP3 files The system can only play back MP3 files with the extension mp3 Attempting to play back non MP3 format files that have the extension mp3 may result in noise or malfunction A folder...

Page 19: ...UNING or on the remote Scanning stops automatically when a station is tuned in and TUNED lights up in the display When a FM stereo program is tuned in ST lights up in the display Note If TUNED does not light up and scanning does not stop see To improve tuner reception below 4 Turn VOLUME or press VOLUME on the remote to adjust the volume To stop automatic scanning Press ENTER or on the remote To i...

Page 20: ... improve Playing the iPod You can listen to audio contents stored in the iPod on this system 1 Press iPod 2 Place the iPod 3 Press NX or N on the remote to start playback 4 Turn VOLUME or press VOLUME on the remote to adjust the volume Notes When you connect an iPod to the unit the iPod is automatically turned on if the system is turned on When placing or removing the iPod handle the iPod in the s...

Page 21: ...system as a battery charger for the iPod when the system is on or off The charging begins when the iPod is placed on the iPod connector The charging status appears in the iPod screen and when the system is off the display of the unit change to clock For details refer to the operating instructions of your iPod To stop charging the iPod Remove the iPod If you stop charging the iPod when the system i...

Page 22: ...nal components Connect to Cord used not supplied Turntable PHONO IN L R jacks Audio analog cord Computer PC IN L R jacks Audio analog cord Video game player GAMEINPUT VIDEO jack Video cord GAMEINPUT AUDIO L R jacks Audio analog cord To Do this Reinforce the bass and create a more powerful sound Press X GROOVE repeatedly to select X GROOVE ON Select the surround effect Press SURROUND repeatedly to ...

Page 23: ...nd SOUND FLASH for flashing effect To enjoy the X ROUND mode place your front and surround speakers at an equal distance from your listening position see Example 2 of Positioning the speakers for LBT ZX99i only on page 15 X ROUND 1 Press X ROUND ON OFF repeatedly until the X ROUND ON OFF button lights up The last selected X ROUND mode appears in the display 2 Press MODE repeatedly to select the X ...

Page 24: ...ND mode is automatically changed to X ROUND OFF and you cannot change this setting SOUND FLASH With the flash function you can flash the sound output The sound cuts off periodically Hold down SOUND FLASH during playback The flashing effect is activated To cancel the flashing effect Release SOUND FLASH To change the flash speed Hold down SOUND FLASH and turn the JOG clockwise or counterclockwise to...

Page 25: ...ones are connected to the PHONES jack the speaker system setting is automatically changed to SPEAKERS A B and you cannot change this setting Enhancing the video game sound Game Sync You need to connect a video game player see Hooking up the system on page 11 Press GAME The GAME function and the GAME preset effect is selected automatically Tips If you press GAME while the system is turned off the s...

Page 26: ...is changed Changing the display You can select the power illuminator as you want Press ILLUMINATION repeatedly to select the power illuminator you want when the system is turned on Each time you press the button the power illuminator changes cyclically as follows PATTERN 1 t PATTERN 2 t PATTERN 3 t PATTERN 4 t PATTERN OFF When X ROUND mode is selected LBT ZX99i only Each time you press the button ...

Page 27: ...splay mode Demonstration1 The display changes and the indicators flash even when the system is turned off No display Power Saving Mode 1 2 The display is turned off to conserve power The timer and clock continue to operate Clock The clock is displayed The clock display automatically turns to Power Save Mode after a few seconds However the display returns to clock display when you connect an iPod 3...

Page 28: ...playback is stopped during Program Play and there is a program Each time you press the button the display changes cyclically as follows The last file number of the program and the total playing time9 t Total number of programmed files for 8 seconds 10 t Disc title11 t Clock display12 for 8 seconds t Effect status for 8 seconds 1 appears while an MP3 file is played back 2 appears in the following c...

Page 29: ...ogram To program a track Press or repeatedly until the track number you want appears in the display To program an audio file Press repeatedly until the folder you want appears in the display then press or repeatedly until the file number you want appears in the display 5 Press ENTER or on the remote The track s or file s is are programmed The program step number appears followed by total playing t...

Page 30: ...ecting the corresponding preset number 1 Tune in the station you want see Listening to the radio page 19 2 Press TUNER MEMORY A preset number flashes in the display The stations are stored from preset number 1 3 Press TUNING or on the remote repeatedly to select the preset number you want If another station is already assigned to the selected preset number the station is replaced by the new statio...

Page 31: ...hen store the user equalizer in the memory Before adjustment select the preset effect you want for your basic sound 1 Press AMP MENU repeatedly to select EQ EDIT 2 Press B or b repeatedly to select a frequency band then press V or v repeatedly to adjust the level 3 Press ENTER to save the user equalizer setting USER EQ appears on the display The user equalizer setting is saved To call up the user ...

Page 32: ... The system offers two timer functions You can set the system to turn off after a certain time so that you can fall asleep to music Press SLEEP repeatedly The minute display turn off time changes cyclically as follows SLEEP AUTO t SLEEP 90min t SLEEP 80min t t SLEEP 10min t SLEEP OFF The system automatically turns off in 100 minutes or after the current disc finishes playing Tip To check the remai...

Page 33: ...erations Notes If you use the Play Timer and the Sleep Timer at the same time the Sleep Timer has priority The Play Timer will not be activated if the system is turned on or if STANDBY flashes in the display The Play Timer setting remains as long as the setting is not canceled manually Be sure that the iPod is not playing when using the Play Timer The system turns on 30 seconds before the preset t...

Page 34: ...ck page 16 A power failure has occurred Set the clock page 16 and timer settings page 32 again There is no sound Turn VOLUME clockwise or press VOLUME repeatedly on the remote The headphones are connected to the PHONES jack Check the speaker connections page 11 Check the speaker system setting page 25 There is no microphone sound Turn VOLUME clockwise or press VOLUME repeatedly on the remote or tu...

Page 35: ...nd lacks bass Check that the speaker s and terminals are connected correctly Disc player The disc tray does not open and LOCKED appears in the display Consult your nearest Sony dealer or local authorized Sony service facility The disc tray does not close Load the disc correctly Always close the disc tray by pressing Z OPEN CLOSE Do not forcibly push the disc tray to close it as this may cause a ma...

Page 36: ...not version 1 or version 2 The character code that can be displayed by this system are as follows Upper cases A to Z Lower cases a to z Numbers 0 to 9 Symbols _ Other characters may not be displayed correctly iPod There is no sound Make sure the iPod is connected securely Make sure the iPod is playing music Adjust the volume Depending on the contents of the iPod it may take time to start playback ...

Page 37: ...back in 3 Press 1 to turn on the system 4 Press M iPod TUNING MODE and 1 at the same time COLD RESET appears in the display The system is reset to the factory settings You need to readjust all the settings you made such as the preset stations clock and timer Messages One of the following messages may appear or flash in the display during operation No Disc There is no disc on the disc tray or you h...

Page 38: ...fied personnel before operating it again One blade of the plug is wider than other for the purpose of safety and will fit to the wall outlet only one way If you are unable to insert the plug fully into the outlet contact your dealer The AC power cord can be changed only by a qualified service facility On placement Do not place the system in an inclined position or in locations that are extremely h...

Page 39: ...e measured at AC 120 V 60 Hz Front speaker Power output rated 280 W at 6 Ω 1 kHz 10 THD RMS output power reference 210 W 2 6 Ω at 1 kHz 10 THD Inputs PHONO IN L R Sensitivity 3 mV impedance 47 kilohms MIC 1 MIC 2 Sensitivity 1 mV impedance 10 kilohms GAME INPUT AUDIO L R Sensitivity 250 mV impedance 47 kilohms GAME INPUT VIDEO 1 Vp p 75 Ω PC IN L R Sensitivity 250 mV impedance 47 kilohms Outputs P...

Page 40: ... 500 mA MAX Speakers For LBT ZX99i Front Surround speaker SS ZX99i Speaker system 2 way Bass reflex Speaker unit Woofer 220 mm 8 3 4 inches cone type Tweeter 50 mm 2 inch cone type 2 Rated impedance 6 ohms Dimensions w h d Approx 308 365 480 mm 12 1 4 14 3 8 19 inches Mass Approx 8 7 kg 19 lb 3 oz net per speaker For LBT ZX66i Front speaker SS ZX66i Speaker system 3 way BUILT IN SW Bass reflex Spe...

Page 41: ... HCD ZX99i 19 0 kg 41 lb 15 oz HCD ZX66i 14 6 kg 32 lb 4 oz Supplied accessories Remote Commander 1 R6 size AA batteries 2 AM loop antenna 1 FM lead antenna 1 Speaker pads LBT ZX99i only 16 LBT ZX66i only 8 Speaker cords LBT ZX99i only grey 10 m 39 3 8 ft 2 white 3 m 11 7 8 ft 2 LBT ZX66i only 3 m 11 7 8 ft 2 Design and specifications are subject to change without notice Standby power consumption ...

Page 42: ... this unit Use a Dock Adapter supplied with your iPod Otherwise a compatible Dock Adapter will need to be purchased separately from Apple Inc This product has been designed specifically to work with iPod and has been certified to meet Apple performance standards This unit is not compatible with iPhone iPod touch 1st generation iPod nano 3rd generation video iPod classic iPod nano 2nd generation al...

Page 43: ... Game Sync 25 H Handling discs 38 Hooking up the system 11 I iPod Playing 20 Using 13 M MP3 BOOSTER 23 Multi Session 4 N Non playable disc 38 Normal Play 18 P Play mode 18 Playable disc 38 Power Saving Mode 27 Preset effect 22 Presetting radio station 30 Program Play 29 R Radio station 19 Remote 7 Repeat Play 17 S Shuffle Play 18 SOUND FLASH 24 T Timer Play Timer 32 Sleep Timer 32 U User equalizer...

Page 44: ...Sony Corporation Printed in Malaysia 2 ...

Reviews:

Related manuals for Muteki LBT-ZX99I