background image

23

MHS-PM1

4-135-530-

11

(1)

J:\ichihashi\works\cx20300\PDF\4135530111MHSPM1\050BAS.fm

master:Right

Ba
si

c Ope

ra

tio

ns

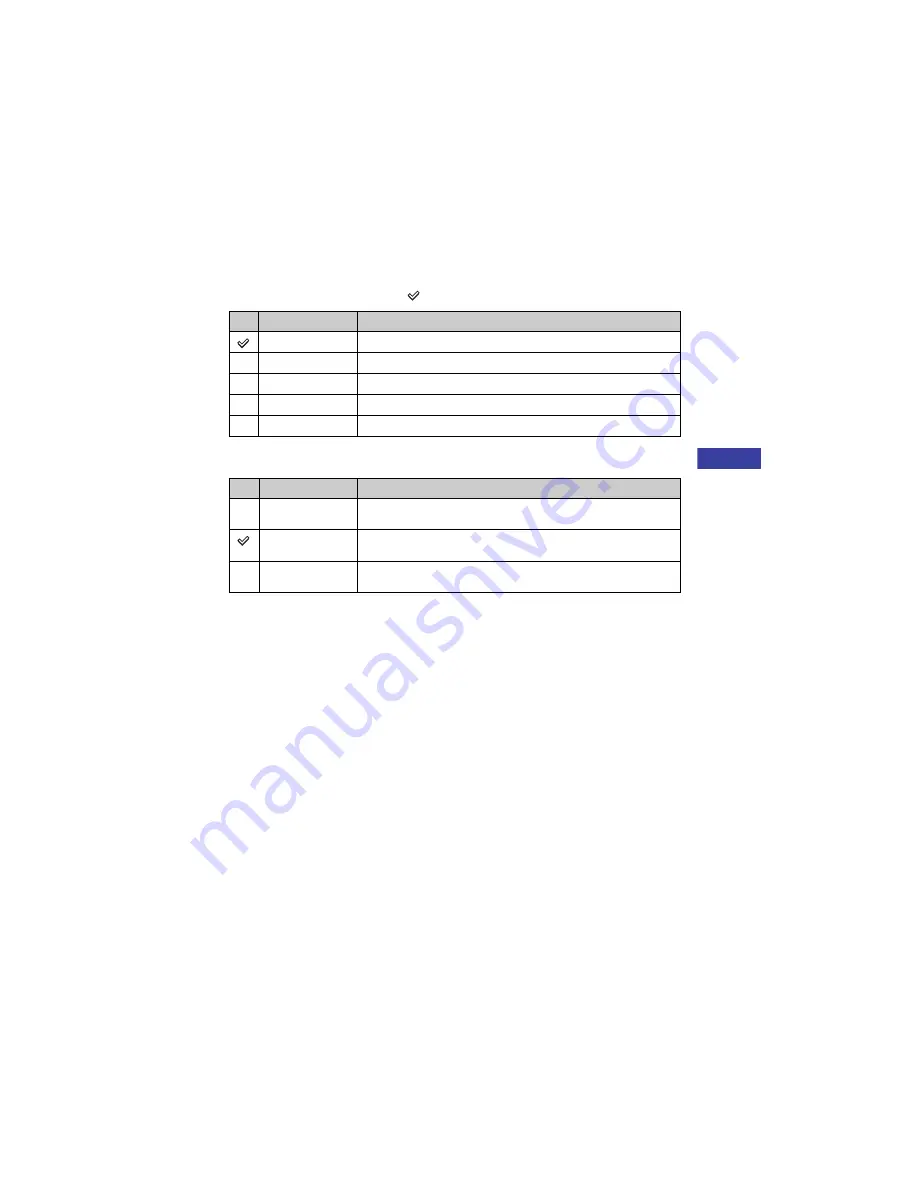
Selecting the image size according to use

The default settings are marked with 

.

* Images are recorded in 3:2 aspect ratio, same as photograph printing paper or postcards, etc.

*

1

 Shoot the subject in a bright place because the image is recorded darkened.

*

2

 The range you can shoot is narrowed.

*

3

 The anti-blur function does not work.

• The movies shot with this camera will be recorded in MPEG-4 AVC/H.264 Main Profile, approximately 

30 frames per second, Progressive, AAC LC, “MP4 format”.
– MPEG: Movie Picture Experts Group
– AVC: Advanced Video Codec

• The larger the image size, the higher the image quality.

Image size

Guidelines

5M (2592

×

1944)

For prints up to A4 (8

×

10")

3:2* (2592

×

1728)

Shoot in 3:2 aspect ratio

3M (2048

×

1536)

For prints up to 10

×

15 cm (4

×

6") or 13

×

18 cm (5

×

7")

2M (1632

×

1224)

For prints up to 10

×

15 cm (4

×

6")

VGA (640

×

480)

Shoot at a small image size for e-mail attachment

Movie image size

Usage guidelines

1080 30P

*

1

*

2

*

3

Shoot HD (high definition) quality movies in sizes suited for display on 
computer or high definition TV

720 30P

Shoot HD (high definition) quality movies in sizes suited for display on 
computer

VGA 30P

*

2

Shoot SD (standard definition) quality movies in sizes suited for 
uploading on websites

Summary of Contents for MHS PM1 - Webbie HD Camcorder

Page 1: ...aster Right 2009 Sony Corporation 4 135 530 11 1 Mobile HD Snap Camera Handbook MHS PM1 Table of contents Getting started Basic Operations Using functions for shooting Using functions for viewing Customizing the settings Viewing images on a TV Troubleshooting Others Index VCLICK GB ...

Page 2: ...tor Notes on the battery Charge the battery before using the camera for the first time The battery can be charged even if it is not completely discharged Also even if the battery is not fully charged you can use the partially charged capacity of the battery as is If you do not intend to use the camera for a long time use up the existing charge and store the camera in a cool dry place This is to ma...

Page 3: ... and or bright points white red blue or green in color that constantly appear on the LCD screen These points are normal in the manufacturing process and do not affect the recording in any way Exposing the LCD screen or the lens to direct sunlight for long periods may cause malfunctions Be careful when placing the camera near a window or outdoors Images may trail across on the LCD screen in a cold ...

Page 4: ...0111MHSPM1 020NOTE fm master Left About this Handbook The photographs used as examples of pictures in this Handbook are reproduced images and are not actual images shot using this camera Design and specifications of recording media and other accessories are subject to change without notice ...

Page 5: ...w to handle the camera When carrying the camera rotate the lens portion back as illustrated Be careful not to block the lens with your finger when shooting Do not hold the camera by only holding the battery Memory Stick Duo media cover jack cover or lens See page 15 for how to attach the wrist strap ...

Page 6: ... Inserting the battery pack Memory Stick PRO Duo media sold separately 18 3 Turning the camera on setting the clock 20 Changing the language settings 21 Selecting the image size according to use 22 Shooting images 26 Viewing images 31 Deleting images 33 Select images to upload on a website Sharemark 35 Using the menu items 37 Menu items 38 Shooting menu 39 Camera Selecting a shooting mode Setup Se...

Page 7: ...es of images Rotate Rotating a still image Divide Cutting movies Setup Changing Setup items Using Setup items 48 Camera 49 Memory Stick Tool 50 Internal Memory Tool 52 Format Setup 1 53 Setup 2 54 Viewing images on a TV 58 Using functions for viewing Customizing the settings Viewing images on a TV Function Guide Auto Review Flicker Cancel Format Create REC Folder Change REC Folder Copy 1 LCD Backl...

Page 8: ...300 PDF 4135530111MHSPM1 010COVTOC fm master Left Table of contents Troubleshooting 61 Warning indicators and messages 66 To use your camera abroad Power sources 68 On the Memory Stick media 69 On the battery 71 Index 72 Troubleshooting Others Index ...

Page 9: ... Hook for wrist strap 15 G Speaker H Jack cover I LCD screen 28 J Zoom lever For shooting Zoom W T 30 For viewing Playback zoom Index 32 K PHOTO button 26 L Play button 26 31 35 M Multi selector Menu on v V b B 37 Menu off DISP 28 30 N ON OFF Power button 20 O Power lamp P MENU button 37 Q Image Size Delete button 22 33 R MOVIE button 26 S Sharemark button 35 T Tripod receptacle bottom Use a tripo...

Page 10: ...10 Identifying parts MHS PM1 4 135 530 11 1 J ichihashi works cx20300 PDF 4135530111MHSPM1 030INT fm master Left ws Memory Stick Duo media slot wd Battery slot wf Access lamp 19 ...

Page 11: ...f operation In shooting standby When recording movies A B P Display Indication Battery remaining 17 Shooting mode 26 When switching to the shooting mode appears for approximately two seconds Zoom scaling 30 Shooting mode Scene Selection 39 E Low battery warning 66 Display Indication Image size 23 Still image shooting mode 26 400 Remaining number of recordable images 24 Menu Guide menu 37 Pressing ...

Page 12: ...proximate and differ from what you actually see Display Indication Recording folder 50 This does not appear when using internal memory Recording Media Histogram 28 Display Indication Self timer 30 Image size 23 00 28 25 Remaining recordable time 24 2000 Shutter speed F3 6 Aperture value Movie shooting mode 26 Display Indication Movie recording 00 00 05 Recording time 24 ...

Page 13: ...B Display Indication Battery remaining 17 Image size 23 Playback Stop Slide Show fast forward 31 43 Fast forward Rewind 00 00 00 Counter VOL Volume 31 Zoom scaling 32 E Low battery warning 66 Display Indication Playback bar 101_0012 Folder file number 50 2009 1 1 9 30 AM Recorded date time of the playback image BACK NEXT Select images VOLUME Adjust volume Menu Guide menu 37 DPOF ...

Page 14: ...r 40 This does not appear when using internal memory Playback folder 40 This does not appear when using internal memory 12 12 Image number Number of images recorded in selected folder Playback Media Shooting mode Recording folders 50 Sharemark 35 Print order DPOF mark 42 Protect 40 Histogram 28 appears when histogram display is disabled Display Indication White balance 2000 Shutter speed F3 6 Aper...

Page 15: ... 1 Power cord mains lead 1 not supplied in the USA and Canada Rechargeable battery pack NP BK1 1 Component A V cable 1 A V connecting cable 1 USB cable 1 Wrist strap 1 CD ROM 1 PMB Picture Motion Browser including PMB Guide Mobile HD Snap Camera Handbook PDF Instruction Manual 1 Attach the strap and place your hand through the loop to prevent the camera from damage by being dropped etc Hook ...

Page 16: ...t clicks 2 Connect the battery charger to the wall outlet wall socket The CHARGE lamp lights up and charging starts When the CHARGE lamp turns off charging is finished Normal charge Also the CHARGE lamp may turn off when the temperature is outside of the recommended operating temperature 10 to 30 C as the charger is on standby CHARGE lamp Plug CHARGE lamp Power cord mains lead For customers in the...

Page 17: ...ery charger immediately shut off the power by disconnecting the plug from the wall outlet wall socket When charging is finished disconnect the power cord mains lead from the wall outlet wall socket To check the remaining battery time Rotate the lens portion or press ON OFF button to turn on and check the remaining battery on the LCD screen It takes about one minute until the correct battery remain...

Page 18: ...in until it clicks 3 Close the battery Memory Stick Duo media cover When there is no Memory Stick PRO Duo media inserted The camera records plays back images using the internal memory approx 12 MB Battery Memory Stick Duo media cover 1 2 3 With the terminal side facing the LCD screen insert the Memory Stick Duo media until it clicks into place Align the v mark of the battery slot with the v mark o...

Page 19: ...ory Stick PRO Duo media sold separately To remove Memory Stick PRO Duo media Open the battery Memory Stick Duo media cover Never remove Memory Stick PRO Duo media when the access lamp is lit This may cause damage to data in the Memory Stick PRO Duo media Make sure that the access lamp is not lit then push the Memory Stick PRO Duo media in once ...

Page 20: ...a To turn off the power rotate it back You can also turn the power on by pressing ON OFF button The lens rotates within the range of 0 to 270 degrees 2 Set the clock with the multi selector 1 Select the date display format with v V then press the multi selector 2 Select each item with b B and set the numeric value with v V 3 Select OK with B then press the multi selector 1 LCD screen 1 ON OFF butt...

Page 21: ...ate and time Press MENU and select Clock Set in Setup 2 page 57 When you turn on the power If the camera is running on battery power and you do not operate the camera for about five minutes the camera turns off automatically to prevent wearing down the battery Auto power off function Changing the language settings You can change the on screen displays to show messages in a specified language To se...

Page 22: ...yback mode press Play button to switch to shooting mode appears for approximately two seconds 2 Press Image Size button 3 Select Photo Size or Movie Size with the multi selector tilt to b B then select the desired image size with v V Recommended use and number of remaining shots are displayed on the upper part of the LCD screen 4 Press Image Size to complete the setting Photo size Movie size Play ...

Page 23: ... second Progressive AAC LC MP4 format MPEG Movie Picture Experts Group AVC Advanced Video Codec The larger the image size the higher the image quality Image size Guidelines 5M 2592 1944 For prints up to A4 8 10 3 2 2592 1728 Shoot in 3 2 aspect ratio 3M 2048 1536 For prints up to 10 15 cm 4 6 or 13 18 cm 5 7 2M 1632 1224 For prints up to 10 15 cm 4 6 VGA 640 480 Shoot at a small image size for e m...

Page 24: ...r approximately 25 minutes Units hour minute second The number in is the minimum recording time All numbers are measured when using Memory Stick PRO Duo media made by Sony Corporation The recordable time for movies varies depending on the recording conditions subject conditions and the type of Memory Stick media Number of still images and recording time of movies Capacity Size Quality Internal mem...

Page 25: ...indicator flashes and after a while the recording will automatically stop Your camera uses the VBR Variable Bit Rate format to automatically adjust image quality to suit the recording scene This technology causes fluctuations in the recording time of the Memory Stick PRO Duo media Movies containing quickly moving and complex images are recorded at a higher bit rate and this reduces the overall rec...

Page 26: ...eft Shooting images 1 Rotate the lens portion to turn the power on You can also turn the power on by pressing ON OFF 2 Confirm the composition Zoom lever Power lamp ON OFF button MOVIE button PHOTO button MENU button Play button Multi selector Position the subject in the center of the screen ...

Page 27: ...ngle of view switches to the aspect ratio 4 3 or 3 2 according to the shooting size of the still image Black bands appear on the top and bottom of the image in the following situations When the image size is either 1080 30P or 720 30P When the aspect ratio is 3 2 You cannot shoot still images while shooting movies When shooting still images the angle of view will change from that in shooting stand...

Page 28: ...decrease faster under such condition The LCD screen will not display while the camera is connected to a TV The histogram does not appear in the following situations While shooting When the menu is displayed When recording movies During playback When the menu is displayed In index mode When you are using playback zoom When you are rotating still images During playback of movies A large difference i...

Page 29: ... images z About the histogram A histogram is a graph showing the brightness of an image Tilt to v DISP repeatedly to display the histogram inside the screen The graph display indicates a bright image when skewed to the right side and a dark image when skewed to the left side Bright Dark A B A Number of pixels B Brightness ...

Page 30: ... self timer If you press PHOTO countdown timer is displayed and after rapid beep sounds are heard the camera will shoot To cancel tilt to V again Recording in mirror mode Rotate the lens portion to the same direction the LCD screen is facing A mirror image of the subject appears on the LCD screen but the image will be normal when recorded The same image as those recorded appears on the LCD screen ...

Page 31: ...isplayed Movie Press the multi selector to pause and playback a movie Tilt to B to fast forward b to rewind Press the multi selector to return to normal playback Tilt to V to display the volume control screen then adjust the volume with b B When shooting movies of fast moving subjects such as a sport scene the movie may not be played back smoothly When the playback of the first movie ends the play...

Page 32: ...image playback zoom Slide the zoom lever toward T while displaying a still image To undo the zoom slide the zoom lever toward W Adjust the position v V b B Cancel playback zoom Press the multi selector To return to the index screen Slide the zoom lever toward Index while displaying a still image or pausing the playback of a movie ...

Page 33: ...mages you want to delete with v V b B then press the multi selector to display the Delete indicator on the selected image 4 Press Delete 5 Select OK with B then press the multi selector To delete all the images in the folder select All In This Folder with v V in step 2 instead of Select then press the multi selector To cancel a selection Select the image you have previously selected for deletion t...

Page 34: ...shi works cx20300 PDF 4135530111MHSPM1 050BAS fm master Left To delete images while a single image is displayed 1 Press Delete 2 Select Delete with v then press the multi selector To cancel the deletion Select Exit with V then press the multi selector ...

Page 35: ...ay indicator on the selected image 4 Press Sharemark 5 Select OK with B then press the multi selector The Sharemark indicator turns white To select all the images in the folder select All In This Folder with v V in step 2 instead of Select then press the multi selector The file size of movies shot at HD high definition is large and therefore it may take time to upload Movies shot at VGA 30P is rec...

Page 36: ...ving Sharemarks To remove the Sharemark from an image select the image to remove the Sharemark and take the same steps as when marking a Sharemark on an image By using the software PMB Portable embedded in the camera you can easily upload images marked with Sharemarks For details see Help in the PMB Portable When connecting to the network service the page will be redirected by the server of Sony t...

Page 37: ...during shooting and playback mode Different items will become visible depending on the selected mode 2 Select the desired menu item with the multi selector tilt to b B In shooting mode is indicated You cannot set an item with the indicator in gray In playback mode press the multi selector after setting an item 3 Select a setting with v V 4 Press MENU to turn off the menu Multi selector MENU button...

Page 38: ...u items vary depending on the operating conditions The shooting menu is available only in the shooting mode and the viewing menu is available only in the playback mode Only the available items are displayed on the screen Menu for shooting page 39 Camera Setup Menu for viewing page 40 Folder Protect Slide Rotate Divide Setup ...

Page 39: ... scene conditions 1 The shutter speed becomes slower so using a tripod is recommended 2 The image may appear rough depending on the subject The Flicker Cancel function does not work when Low Light mode or Sports mode is selected in the Scene Selection mode Select the settings for the shooting function See page 48 Camera Selecting a shooting mode Scene Selection Backlight Shoots strongly backlight ...

Page 40: ... change the folder or create a new one To create a new folder t Create REC Folder page 50 To change the folder for recording images t Change REC Folder page 51 When multiple folders are created in the Memory Stick PRO Duo media and the first or last image in the folder is displayed the following indicators appear Moves to the previous folder Moves to the next folder Moves to either the previous or...

Page 41: ... press the multi selector To protect images in single image mode 1 Display the image you want to protect 2 Press MENU to display the menu 3 Select Protect with b B then press the multi selector The image is protected and the indicator appears on the image 4 To protect other images select the desired image with b B then press the multi selector To cancel the protection In index mode 1 Select the im...

Page 42: ...ages with DPOF marks can be printed at photo shops or with printers which supports the DPOF standard You cannot mark movies Marking in index mode 1 Press Play button to set the camera to playback mode 2 Press MENU to display the menu 3 Select DPOF with the multi selector tilt to b B then press the multi selector 4 Select Select with v V then press the multi selector 5 Select the image you want to ...

Page 43: ...t All In This Folder in step 4 of Marking in index mode then press the multi selector Select Off then press the multi selector 1 Select the images you want to start slide show with the multi selector tilt to v V b B then press the multi selector 2 Press MENU to display the menu 3 Select Slide Show with the multi selector tilt to b B then press the multi selector 4 Select Start with b B then press ...

Page 44: ...ith b B then press the multi selector 5 Select then rotate the image with b B 6 Select OK with v V then press the multi selector You cannot rotate protected images or movies You may not be able to rotate images shot with other cameras Interval 3 sec Sets the slide show interval 5 sec 10 sec 30 sec 1 min Repeat On Plays back images in a continuous loop Off After all the images have been played back...

Page 45: ... you attach movies to your e mail messages Note that the original movie is deleted and that number is skipped Also note that you cannot restore files once you cut them Example Cutting a movie numbered 101_0002 This section describes an example of dividing a movie numbered 101_0002 and deleting it in the following file configuration 1 Cutting scene A Divide 101_0002 is divided into 101_0004 and 101...

Page 46: ... Press the multi selector to stop playback 4 Press MENU to display the menu 5 Select Divide with b B then press the multi selector 6 Select OK with v then press the multi selector The playback of the movie starts 7 Press the multi selector When you want to adjust the cutting point select c C with b B frame rewind forward If you want to change the cutting point select Cancel and press the multi sel...

Page 47: ...e 37 The cut movies are assigned new numbers then recorded as the newest files in the selected recording folder You cannot cut the following kinds of images Still images Movies not long enough to cut shorter than about two seconds Protected movies page 40 You cannot cut the movies when the capacity of recording media is insufficient See page 48 Setup Changing Setup items ...

Page 48: ... Setup 3 Tilt to v V b B to select the item you want to set The frame of the selected item turns orange 4 Tilt to B to enter the setting To turn off the Setup screen press MENU To return to the menu from the Setup screen tilt to b repeatedly To cancel the setting change Select Cancel if it appears then press the multi selector If it does not appear select the previous setting again This setting is...

Page 49: ...ption of functions is displayed Displays the recorded image on the screen for approximately two seconds immediately after shooting a still image Curbs the flicker generated by fluorescent by using the electro shutter Function Guide On Displays the function guide Off Does not display the function guide Auto Review On Use the Auto Review Off Does not use Auto Review Flicker Cancel On Use the Flicker...

Page 50: ... in Memory Stick PRO Duo media for recording images 1 Select Create REC Folder with the multi selector tilt to v V b B then tilt to B 2 Select OK with v then press the multi selector The folder creation screen appears 3 Select OK with v then press the multi selector A new folder is created with a number incremented one higher than the largest number and the folder becomes the current recording fol...

Page 51: ...lt to v V b B then tilt to B 3 Select OK with v then press the multi selector The message All data in internal memory will be copied appears 4 Select OK with v then press the multi selector Copying starts To cancel the copying Select Cancel in step 4 then press the multi selector Charge the battery sufficiently Copying image files when the remaining battery amount is low can cause data transfer fa...

Page 52: ...the internal memory Note that formatting irrevocably erases all data in the internal memory including even protected images 1 Select Format with the multi selector tilt to v V b B then tilt to B 2 Select OK with v then press the multi selector The message All data in internal memory will be erased appears 3 Select OK with v then press the multi selector The format is completed To cancel the format...

Page 53: ...nu items warnings and messages Initializes the setting to the default setting Even if you execute this function the images stored in the internal memory are retained 1 Select Initialize with the multi selector tilt to v V b B then tilt to B 2 Select OK with v then press the multi selector The message Initialize all settings appears 3 Select OK with v then press the multi selector The settings are ...

Page 54: ...le File Number Series Assigns numbers to files in sequence even if the recording folder or the Memory Stick PRO Duo media is changed When the replaced Memory Stick PRO Duo media contains a file with a number higher than the last assigned number a number one higher than the largest number is assigned Reset Starts from 0001 each time the folder is changed When the recording folder contains a file a ...

Page 55: ...point it was stopped To delete the USB connection Perform the procedures listed below beforehand when Disconnecting the USB cable Removing Memory Stick PRO Duo media Inserting Memory Stick PRO Duo media into the camera after copying images from the internal memory Turning off the camera 1 Double click on the tasktray 2 Click USB Mass Storage Device t Stop 3 Confirm the device on the confirmation w...

Page 56: ...folder B Folder containing movie data recorded using your camera When not creating any folder there is only the 101ANV01 folder The data in the internal memory are stored on the Removable Disk H drive You cannot record play back any images to the MISC folder Image files are named as follows ssss stands for any number within the range from 0001 to 9999 Still image files DSC0ssss JPG Movie files MAH...

Page 57: ...f the country or region where the camera is used Sets the date and time 1 Select Clock Set with the multi selector tilt to v V b B then tilt to B 2 Select OK with v then press the multi selector 3 Select the date display format with v V then press the multi selector 4 Select each item with b B and set the numeric value with v V 5 Select OK with B then press the multi selector To cancel the clock s...

Page 58: ... HD high definition image quality are played back with HD high definition image quality Images recorded with SD standard definition image quality are played back with SD standard definition image quality Connecting to a high definition TV If you connect only component video plugs audio signals are not output Connect the white and red plugs to output audio signals The output settings switches autom...

Page 59: ...your TV or VCR On TV color systems If you want to view images on a TV screen you need a TV with a video input jack and the A V connecting cable The color system of the TV must match that of your camera Check the following lists for the TV color system of the country or region where the camera is used NTSC system Bahama Islands Bolivia Canada Central America Chile Colombia Ecuador Jamaica Japan Kor...

Page 60: ...TV MHS PM1 4 135 530 11 1 J ichihashi works cx20300 PDF 4135530111MHSPM1 090TV fm master Left PAL M system Brazil PAL N system Argentina Paraguay Uruguay SECAM system Bulgaria France Guiana Iran Iraq Monaco Russia Ukraine etc ...

Page 61: ...rove the condition However Sony dealer will neither copy nor save your data 1 Check the items on pages 62 to 65 2 Turn the power off and turn it on again after about one minute 3 Consult your Sony dealer or local authorized Sony service facility Battery and power 62 Shooting still images movies 62 Viewing images 63 Deleting Editing images 64 Memory Stick PRO Duo media 64 Internal memory 65 Others ...

Page 62: ...ed Charge the battery Your camera cannot record images Check the free capacity of the internal memory or Memory Stick PRO Duo media If it is full do one of the following Delete unnecessary images page 33 Change the Memory Stick PRO Duo media Continuous shooting is possible for approximately 25 minutes Press Play button and set the camera to shooting mode to shoot a still image or a movie The LCD s...

Page 63: ...ear and remain on the screen This is not a malfunction These dots are not recorded page 3 Cannot shoot images in succession The internal memory or Memory Stick PRO Duo media is full Delete unnecessary images page 33 The battery level is low Your camera cannot playback images Press Play button to change to the playback mode page 31 The folder file name has been changed on your computer When an imag...

Page 64: ...ding images across the entire screen full pixel display However this may cause slight trimming of the top bottom right and left edges of images when played back on a TV which is not compatible with full pixel display When connecting to TV with A V connecting cable the image is displayed with black space on the upper and lower sides This happens when viewing an image recorded at HD high definition ...

Page 65: ... capacity Cannot copy the data on the Memory Stick PRO Duo media or the computer to the internal memory Data on Memory Stick PRO Duo media or a computer cannot be copied to the internal memory The lens gets fogged Moisture condensation has occurred Turn off the camera and leave it for about an hour before using it The camera becomes warm when you use it for a long time This is not a malfunction Th...

Page 66: ...uo media cannot be used in your camera page 69 Cannot access Memory Stick Access denied You are using a Memory Stick PRO Duo media with the access controlled Format error Format the media again page 50 No memory space Delete unnecessary images or files page 33 Read only memory Your camera cannot record or delete images on this Memory Stick PRO Duo media No file in this folder No images have been r...

Page 67: ...ize over You are playing back an image with size that cannot be played back on your camera Invalid operation You are trying to playback a file that is not compatible with the camera You have selected a function that is not available for movies Turn the power off and on again A problem with the lens caused an error Unsupported data The data is unsupported by the camera and cannot be played back ...

Page 68: ...t Others To use your camera abroad Power sources You can use your camera and the BC CSK BC CSKA battery charger supplied in any country or region where the power supply is within 100 V to 240 V AC 50 Hz 60 Hz Do not use an electronic transformer travel converter as this may cause a malfunction ...

Page 69: ...n your camera while your camera is reading or writing image files on the Memory Stick PRO Duo media while the access lamp is lit or flashing If you use the Memory Stick PRO Duo media near magnets or magnetic fields It is recommended you make a back up of important data on the hard disk of a computer Be careful not to apply excessive force when writing on a memo area on Memory Stick PRO Duo media D...

Page 70: ...ro media with this camera you need a Duo sized M2 Adaptor Insert the Memory Stick Micro media into the Duo sized M2 Adaptor then insert the adaptor into the Memory Stick Duo media slot If you insert Memory Stick Micro media into this camera without using a Duo sized M2 Adaptor you might not be able to remove it from the camera Do not leave the Memory Stick Micro media within the reach of small chi...

Page 71: ...etc to warm it up before using How to store the camera If the camera is not to be used for a long time to maintain its function fully charge the internal battery and use it up at least once a year then store the camera in a dry cool place To use the battery up leave your camera in slide show page 43 playback mode until the power goes off On battery life The battery life is limited Battery capacity...

Page 72: ...efinition TV 58 Histogram 28 Holding the camera 26 How to handle the camera 5 I Identifying parts 9 Image size 22 Index screen 31 Indicator 11 Initialize 53 Internal Memory Tool 52 L Landscape mode 39 Language 53 LCD Backlight 53 Low Light mode 39 M Mass Storage 54 Memory Stick PRO Duo media 69 Memory Stick Tool 50 Menu Items 38 Shooting 39 Viewing 40 Mirror mode 30 N NTSC 57 P PAL 57 Playback zoo...

Page 73: ...73 MHS PM1 4 135 530 11 1 J ichihashi works cx20300 PDF 4135530111MHSPM1 010COVIX fm master Right Index Index W Warning indicators and messages 66 Web camera 54 Wide TV 59 Z Zoom 30 ...

Page 74: ...LICENSE IS AVAILABLE FROM MPEG LA L L C 250 STEELE STREET SUITE 300 DENVER COLORADO 80206 THIS PRODUCT IS LICENSED UNDER THE AVC PATENT PORTFOLIO LICENSE FOR THE PERSONAL AND NON COMMERCIAL USE OF A CONSUMER TO i ENCODE VIDEO IN COMPLIANCE WITH THE AVC STANDARD AVC VIDEO AND OR ii DECODE AVC VIDEO THAT WAS ENCODED BY A CONSUMER ENGAGED IN A PERSONAL AND NON COMMERCIAL ACTIVITY AND OR WAS OBTAINED ...

Page 75: ...4 135 530 11 1 J ichihashi works cx20300 PDF 4135530111MHSPM1 120BCO fm master Right Additional information on this product and answers to frequently asked questions can be found at our Customer Support Website ...

Reviews: