background image

20

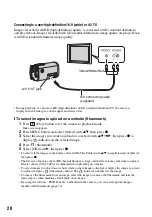
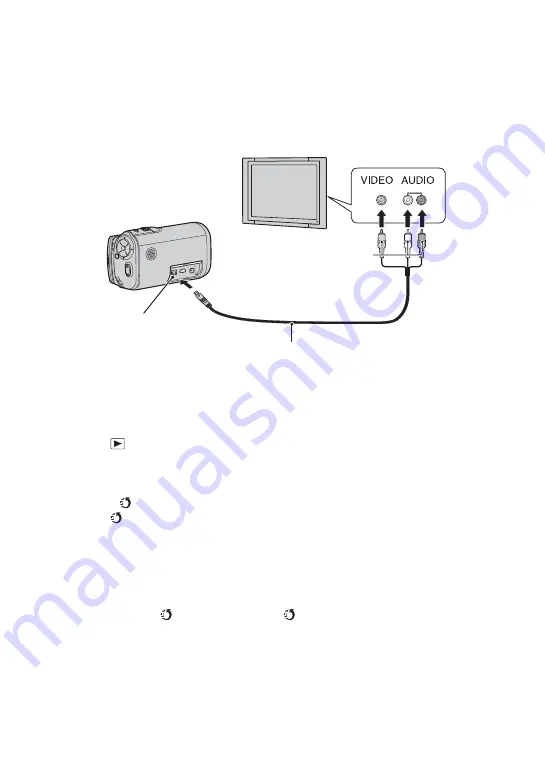
Connecting to a non-high-definition 16:9 (wide) or 4:3 TV

Images recorded with HD (high definition) quality is converted to SD (standard definition) 
and played back. Images recorded with SD (standard definition) image quality are played back 
with SD (standard definition) image quality.

[

To select images to upload on a website (Sharemark)

1

Press 

 (Play) button to set the camera to playback mode.

Index screen appears.

2

Press MENU button and select [Select] with 

v

/

V

, then press 

z

.

3

Select the images you want to upload on a website with 

v

/

V

/

b

/

B

, then press 

z

 to 

display 

 indicator on the selected image.

4

Press  

(Sharemark).

5

Select [OK] with 

B

, then press 

z

.

• To select all the images in the folder, select [All In This Folder] with 

v

/

V

 in step 

2

 instead of [Select], 

then press 

z

.

• The file size of movies shot at HD (high definition) is large and therefore it may take time to upload. 

Movies shot at [VGA 30P] is recommended for uploading on websites.

• To select images to upload on a website while a single image is displayed, display the image you want 

to upload and press 

 (Sharemark) button. The 

 indicator is marked to the image.  

• To remove the Sharemark from an image, select the image to remove the Sharemark and take the 

same steps as when marking a Sharemark on an image.

• By using the software “PMB Portable” embedded in the camera, you can easily upload images 

marked with Sharemarks (page 24).

A/V connecting cable 
(supplied)

A/V OUT jack

Yellow/White/Red

• During playback of a movie at HD (high definition) on SD (standard definition) TV, the movie is 

displayed with black space on the upper and lower sides.

Summary of Contents for MHS CM1 - Webbie HD Camcorder

Page 1: ...a Instruction Manual Before operating the unit please read this manual thoroughly and retain it for future reference MHS CM1 CM3 For details on the advanced operations please access Mobile HD Snap Camera Handbook contained on the supplied CD ROM via a computer ...

Page 2: ... AC ADAPTOR Connect the AC Adaptor to an easily accessible wall outlet wall socket close by Even if the CHG lamp is not lit the AC Adaptor is not disconnected from the AC power source mains as long as it is connected to the wall outlet wall socket If some trouble occurs while using the AC Adaptor immediately shut off the power by disconnecting the plug from the wall outlet wall socket A moulded pl...

Page 3: ...xperienced radio TV technician for help The supplied interface cable must be used with the equipment in order to comply with the limits for a digital device pursuant to Subpart B of Part 15 of FCC Rules Notice for the customers in the countries applying EU Directives The manufacturer of this product is Sony Corporation 1 7 1 Konan Minato ku Tokyo 108 0075 Japan The Authorized Representative for EM...

Page 4: ...ve natural resources In case of products that for safety performance or data integrity reasons require a permanent connection with an incorporated battery this battery should be replaced by qualified service staff only To ensure that the battery will be treated properly hand over the product at end of life to the applicable collection point for the recycling of electrical and electronic equipment ...

Page 5: ...points and or bright points white red blue or green in color that constantly appear on the LCD screen These points are normal in the manufacturing process and do not affect the recording in any way Do not hold the camera by only holding the LCD panel Note on disposal transfer When using software embedded in the camera personal information such as IDs and mail addresses may be saved on the internal...

Page 6: ... other materials may be copyrighted Unauthorized recording of such materials may be contrary to the provisions of the copyright laws No compensation for contents of the recording The contents of the recording cannot be compensated for if recording or playback is not possible due to a malfunction of your camera or recording media etc ...

Page 7: ...or shooting 16 Viewing Editing images 18 Changing the settings Menu Setup 21 Menu items 21 Enjoying your computer 22 Viewing Mobile HD Snap Camera Handbook PDF 22 What you can do with a Windows computer 22 Using your Macintosh computer 26 Indicators on the screen 27 Battery life and memory capacity 29 Battery life and the available recording and playback time 29 Number of still images and recordin...

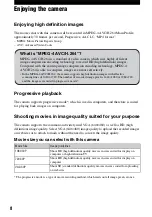
Page 8: ...amera The progressive mode is a type of movie recording method which reads out all image pixels at once What is MPEG 4 AVC H 264 MPEG 4 AVC H 264 is a standard of video camera which uses highly efficient image compression encoding technology to record HD high definition images Compared with the existing image compression encoding technology MPEG 4 AVC H 264 is able to compress images even more eff...

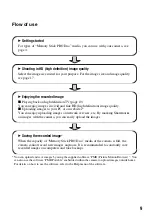
Page 9: ... image size suited for your purpose For the image size and image quality see page 17 B Enjoying the recorded image x Playing back on high definition TV page 19 You can enjoy images in vivid and fine HD high definition image quality x Uploading images to your PC or on websites You can enjoy uploading images on network services etc By marking Sharemarks on images with the camera you can easily uploa...

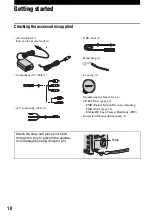
Page 10: ...cable 1 USB cable 1 Hand strap 1 Lens cap 1 Mounted on the lens at factory CD ROM 1 page 22 PMB Picture Motion Browser including PMB Guide page 24 Mobile HD Snap Camera Handbook PDF Instruction Manual this manual 1 Attach the strap and place your hand through the loop to prevent the camera from damage by being dropped etc Hook ...

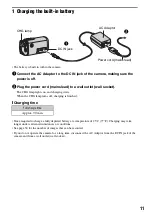
Page 11: ...mp turns off charging is finished Charging time Time required to charge a fully depleted battery at a temperature of 25 C 77 F Charging may take longer under certain circumstances or conditions See page 30 for the number of images that can be recorded If you do not operate the camera for a long time disconnect the AC Adaptor from the DC IN jack of the camera and from a wall outlet wall socket Full...

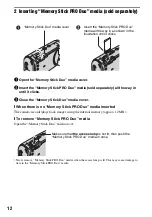
Page 12: ...records plays back images using the internal memory approx 12 MB To remove Memory Stick PRO Duo media Open the Memory Stick Duo media cover Never remove Memory Stick PRO Duo media when the access lamp is lit This may cause damage to data in the Memory Stick PRO Duo media Insert the Memory Stick PRO Duo media all the way in as shown in the illustration until it clicks Memory Stick Duo media cover M...

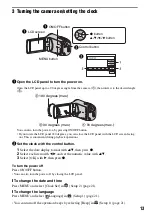
Page 13: ...utton 1 Select the date display format with v V then press z 2 Select each item with b B and set the numeric value with v V 3 Select OK with B then press z To turn the power off Press ON OFF button You can also turn the power off by closing the LCD panel To change the date and time Press MENU and select Clock Set in Setup 2 page 21 To change the language Press MENU and select Language in Setup 1 p...

Page 14: ...nd is heard and the z AE AF lock indicator green lights on the lower center little toward the left side of the screen The angle of view switches to the aspect ratio 4 3 or 3 2 according to the shooting size of the still image Macro button Zoom lever Self timer button LIGHT button Power lamp ON OFF button DISP button MOVIE button PHOTO button MENU button Play button z button v V b B button Control ...

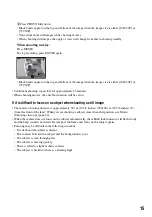
Page 15: ...s difficult to focus on a subject when shooting a still image The shortest shooting distance is approximately 50 cm 19 3 4 inches W 100 cm 39 3 8 inches T from the front of the lens When you are shooting a subject closer than that position use Macro Shooting close up page 16 When the camera does not focus on the subject automatically the AE AF lock indicator will flash slowly and the beep sound is...

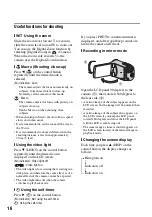
Page 16: ...d icon is displayed on the LCD screen No indicator Video light off Video light on The video light is for assisting the recording in a dark place and therefore the same effect as of a normal flash of the camera cannot be expected The video light turns off when the camera switches to playback mode Using the self timer Press B on the control button No indicator Not using the self timer Using the self...

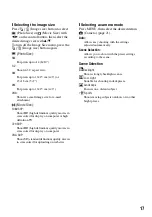
Page 17: ...ies in sizes suited for display on computer or high definition TV 720 30P Shoot HD high definition quality movies in sizes suited for display on computer VGA 30P Shoot SD standard definition quality movies in sizes suited for uploading on websites Selecting a camera mode Press MENU then select the desired item in Camera page 21 Auto Allows easy shooting with the settings adjusted automatically Sce...

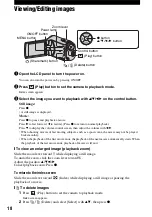
Page 18: ...played back smoothly When the playback of the first movie ends the playback of the next movie automatically starts When the playback of the last movie ends playback of movies will end To view an enlarged image playback zoom Slide the zoom lever toward T while displaying a still image To undo the zoom slide the zoom lever toward W Adjust the position v V b B Cancel playback zoom Press z To return t...

Page 19: ...n varies depending on the type of TV or input jacks the camera is connected to Connecting to a high definition TV Images recorded with HD high definition image quality are played back with HD high definition image quality Images recorded with SD standard definition image quality are played back with SD standard definition image quality If you connect only component video plugs audio signals are no...

Page 20: ...ct All In This Folder with v V in step 2 instead of Select then press z The file size of movies shot at HD high definition is large and therefore it may take time to upload Movies shot at VGA 30P is recommended for uploading on websites To select images to upload on a website while a single image is displayed display the image you want to upload and press Sharemark button The indicator is marked t...

Page 21: ...lable menu items vary depending on the camera mode The shooting menu is available only in the shooting mode and the viewing menu is available only in the playback mode For details on the menu items see Mobile HD Snap Camera Handbook PDF Menu for shooting Menu for viewing Setup items Camera Memory Stick Tool Internal Memory Tool Setup 1 Setup 2 z button v V b B button MENU button Control button Cam...

Page 22: ...pdf to view the handbook What you can do with a Windows computer Take either of the following ways to connect the camera with a Windows computer and enjoy the functions When using various functions By using the software PMB Picture Motion Browser in the supplied CD ROM you can enjoy the following operations Importing images taken with your camera to a computer Viewing imported images on a computer...

Page 23: ...e other open or background applications currently running may limit product performance Installing PMB You can install PMB using the following procedure Log on as Administrator 1 Turn on your computer and insert the CD ROM supplied into the CD ROM drive The installation menu screen appears If it does not appear double click Computer in Windows XP My Computer t SONYPICTUTIL The AutoPlay screen may ...

Page 24: ...lose the AutoPlay Wizard for any unnecessary drives If the desired AutoPlay Wizard does not appear click Computer in Windows XP My Computer t PMBPORTABLE then double click PMB_P exe 2 Click PMB Portable in Windows XP PMB Portable t OK The Language Selection screen appears 3 Select the desired language then click OK The Region Selection screen appears 4 Select the appropriate Area and Country Regio...

Page 25: ...ommended USB cable connection To assure the proper functioning of your camera connect your camera to a computer as below Connect the USB jack of the camera and a computer using the USB cable Do not connect anything to other USB ports of a computer When connecting to a computer with a USB keyboard and USB mouse connected as standard equipment connect the camera to another USB port using the USB cab...

Page 26: ...m the suspend or sleep mode communication between your camera and your computer may not recover at the same time Copying and viewing images on a computer 1 Prepare the camera and a Macintosh computer then connect the supplied USB cable 2 Copy image files to the Macintosh computer 1 Double click the newly recognized icon t DCIM still images or MP_ROOT movies t the folder where the images you want t...

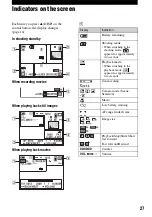
Page 27: ... A Display Indication Battery remaining Shooting mode When switching to the shooting mode appears for approximately two seconds Playback mode When switching to the playback mode appears for approximately two seconds Zoom scaling Camera mode Scene Selection Macro E Low battery warning AF range finder frame Image size Playback Stop Slide Show fast forward Fast forward Rewind 00 00 00 Counter VOL Vol...

Page 28: ...er This does not appear when using internal memory Recording Playback Media Histogram appears when histogram display is disabled Change folder This does not appear when using internal memory Playback folder This does not appear when using internal memory 12 12 Image number Number of images recorded in selected folder Recording mode Sharemark DPOF Print order DPOF mark Protect Display Indication Se...

Page 29: ...ra has been turned on and off many times The zoom is used frequently LCD Backlight is set to Bright The battery power is low Approximate recording playback time min 1 Shooting movies continuously with an image size of 720 30P 2 Typical recording time shows the time when you repeat recording start stop turning the power on off and zooming To check the remaining battery time Press ON OFF button to t...

Page 30: ...of which is used for data management The approximate recording time of movies in the default setting The table below shows the approximate maximum recording times These are the total times for all movie files Continuous shooting is possible for approximately 25 minutes Units hour minute second All numbers measured when using Memory Stick PRO Duo media made by Sony Corporation The recordable time f...

Page 31: ...face it back to the camera side page 13 The power turns off suddenly If you do not operate the camera for about five minutes while the power is on the camera turns off automatically to prevent wearing down the battery Turn on the camera again page 13 The battery remaining indicator is incorrect This phenomenon occurs when you use the camera in an extremely hot or cold location The displayed batter...

Page 32: ...the computer then connect the computer and your camera again in an orderly manner page 25 Make sure the media check tool of the computer activates For details on the media check tool see PMB Guide page 24 Install PMB page 23 Cannot use the Web Camera The camera and a computer are connected with USB cable before the USB driver is installed Follow the steps below to uninstall the driver not recogniz...

Page 33: ...nding on the computer you are using 3Click Open double click USB Driver and then double click setup exe b Notes The computer may not operate properly when you delete devices other than USB Composite Device USB Audio Device or USB Device Press MENU and select Setup t Setup 2 t USB Connect t Web Camera then press z page 21 The Web Camera function is not available for PMB 2 ...

Page 34: ...eaning the camera surface Clean the camera surface with a soft cloth slightly moistened with water then wipe the surface with a dry cloth Do not use the following or they may damage the finish or the casing Chemical products such as thinner benzine alcohol disposable cloths insect repellent sunscreen or insecticide etc Do not touch the camera with the above on your hand Do not leave the camera in ...

Page 35: ...otrusions Mass Approx 210 g 7 oz including strap etc Microphone Monaural Speaker Monaural Exif Print Compatible PRINT Image Matching III Compatible AC DL960 AC Adaptor Power requirements AC 100 V to 240 V 50 Hz 60 Hz Output voltage DC 9 6 V See the lavel on the AC Adaptor for other specifications Operating temperature 0 to 40 C 32 to 104 F Storage temperature 20 to 60 C 4 to 140 F Dimensions Appro...

Page 36: ......

Page 37: ......

Page 38: ......

Page 39: ......

Page 40: ...ted on 70 or more recycled paper using VOC Volatile Organic Compound free vegetable oil based ink Additional information on this product and answers to frequently asked questions can be found at our Customer Support Website ...

Reviews: