Sony MHC-VX888, Operating Instructions Manual
The Sony MHC-VX888 Operating Instructions Manual is a comprehensive guide for maximizing the potential of your audio system. This manual provides step-by-step instructions to help you set up and operate the device effectively. Download the free manual from our website for a hassle-free experience with your Sony MHC-VX888.
Share
Download


Reviews:
No comments
Related manuals for MHC-VX888

SL2
Brand: Safeline Pages: 20
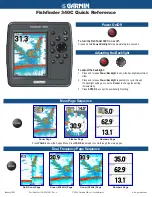
Fishfinder 340C
Brand: Garmin Pages: 2

Omni Pro II
Brand: HAI Pages: 2

PORT12VHF-BT
Brand: Ibiza Pages: 24

i3HUDDLE
Brand: i3-TECHNOLOGIES Pages: 19

IG-02
Brand: ICM Controls Pages: 2

Gemini GEM-X255
Brand: NAPCO Pages: 40

XP-400
Brand: NAPCO Pages: 16

Freedom F-64
Brand: NAPCO Pages: 6

QVI-LVTX-1CH-V7
Brand: Qdis Pages: 19

QC40198
Brand: Q-See Pages: 141

T2000 Series
Brand: Tait Pages: 3

R7ML-TS4
Brand: M-system Pages: 10

SANARG 300AP
Brand: SanRex Pages: 98

Air-Cooled Automatics ACAPTS-1.0
Brand: Bernard Pages: 4

RKD-3799BT
Brand: Oxygen Pages: 15

RAZOR CUT 40 AIR
Brand: Unimig Pages: 28

PRECISION TIG 185
Brand: Lincoln Electric Pages: 104


