background image

Dis

p

la

y

25

GB


You can check the playing time and remaining 
time of the current track or that of the disc. 
When a disc with MP3 audio tracks is loaded, 
you can also check the information recorded on 
disc, such as the titles.

Checking the remaining time 
and titles

Press DISPLAY during Normal Play.

Each time you press the button, the display 
changes cyclically as follows:
Current track number and elapsed playing time  

Current track number and remaining time

1)


t

 Remaining time of the disc

2)


t

 Track title 

and artist name (disc with MP3 audio tracks

3)


only) 


t

 Album name (disc with MP3 audio 

tracks

3)

 only)


t

 Clock display (for eight 

seconds) 

t

 Effect status

1)

“– –.– –” appears when playing back MP3 audio 
tracks.

2)

“– –.– –” appears in ALL DISCS, SHUFFLE or 
Program Play mode or when playing back MP3 
audio tracks.

3)

When you play back a track with an ID3 tag ver. 1 or 
ver. 2, the ID3 tag information appears. The ID3 tag 
displays the track title, album name and artist name 
information.

Checking the total playing 
time and titles

Press DISPLAY in stop mode.

Each time you press the button, the display 
changes cyclically as follows:

x

 Normal Play mode

TOC display

1)

 or total album number of the 

disc

2)

 or total track number of the current 

album

2)


t

 Album name

2)

 or volume label

2)


t


Clock display (for eight seconds) 

t

 Effect 

status

1)

TOC = Table of Contents; displays current disc 
number, total number of tracks on the disc, and total 
playing time of the disc.

2)

For discs with MP3 audio tracks, album names or 
volume label may not be displayed depending on the 
play mode.

x

 Program Play mode

The last track number of the program and the 
total playing time 

t

 Total track number of the 

program (for five seconds) 

t

 Volume label* 

t

  Clock display (for eight seconds) 

t

 Effect 

status

* For discs with MP3 audio tracks

Notes

• The total playing time is not displayed for a disc with 

MP3 audio tracks.

• ID3 tag applies to version 1 and version 2.

• If the MP3 audio track you play back has an ID3 tag, 

the ID3 tag information is displayed.

• In the following cases, elapsed playing time and 

remaining time of the track may not be displayed 
accurately.

– when an MP3 audio track of VBR (variable bit 

rate) is played.

– when fast forward or fast reverse is performed.

• For Russian model, MP3 and ID3 tag information 

can be displayed in Russian characters. However, 
depending on the encoding/writing software or 
recording device, the characters may not be correctly 
displayed.

Viewing information 
about the disc in the 
display

Summary of Contents for MHC-GX555 - Mini Hi Fi Component System

Page 1: ...d The model and serial numbers are located on the rear of the unit Record the serial number in the space provided below Refer to them whenever you call upon your Sony dealer regarding this product Model No ______________ Serial No ______________ MHC GX555 GX355 GX255 MHC RG575S RG475S RG470 RG270 RG170 ...

Page 2: ...accordance with the instructions may cause harmful interference to radio communications However there is no guarantee that interference will not occur in a particular installation If this equipment does cause harmful interference to radio or television reception which can be determined by turning the equipment off and on the user is encouraged to try to correct the interference by one or more of t...

Page 3: ...d Adjustment Adjusting the sound 19 Using the sub woofer 19 MHC GX555 RG575S RG475S only Selecting the sound effect 19 Adjusting the graphic equalizer and storing 20 Selecting the surround effect 20 Singing along Karaoke 21 Latin American model only Timer Falling asleep to music 22 Sleep Timer Waking up to music 22 Play Timer Timer recording radio programs 23 Rec Timer Display Turning off the disp...

Page 4: ... format no more than eight characters in the name no more than three characters in the extension MP3 and in capital letters Folder names can be no longer than eight characters There can be no more than eight nested folder levels Level 2 specifications allow file names and folder names up to 31 characters long Each folder can have up to 8 trees For Joliet in the expansion format file and folder nam...

Page 5: ...which data can be added non finalized disc Music discs encoded with copyright protection technologies This product is designed to playback discs that conform to the Compact Disc CD standard Recently various music discs encoded with copyright protection technologies are marketed by some record companies Please be aware that among those discs there are some that do not conform to the CD standard and...

Page 6: ...the SPEAKER terminals as shown below 2 Connect the sub woofer MHC GX555 RG575S RG475S only Connect the speaker cords to the SUBWOOFER OUT terminal as shown below Getting Started Hooking up the system AM loop antenna Front speaker right Front speaker left FM lead antenna MHC GX555 RG575S RG475S only Sub woofer R L Black Stripe Red Solid 3 Insert only the stripped portion Red Black Black Stripe Red ...

Page 7: ... from this system Note Mexican model is designed to play back only CD Gs recorded in the NTSC color system If you play a CD G recorded in other color system the pictures may not be displayed correctly 5 For models with a voltage selector set VOLTAGE SELECTOR to the local power line voltage Refer to the print on your system s VOLTAGE SELECTOR for available settings Saudi Arabian model 120 127 V Ext...

Page 8: ...for about six months When the remote no longer operates the system replace both batteries with new ones Attaching the speaker pads Attach the supplied speaker pads to the bottom of the speakers to stabilize the speakers and prevent them from slipping Front speaker Left 4 Right 4 Sub woofer 4 MHC GX555 RG575S RG475S only When carrying this system Perform the following procedure to protect the CD me...

Page 9: ...oofer away from the center of the room or eliminate the cause of the standing wave by placing a bookshelf against the wall etc Use buttons on the remote for the operation 1 Press 1 to turn on the system 2 Press CLOCK TIMER SET 3 Press or repeatedly to set the hour 4 Press ENTER 5 Press or repeatedly to set the minute 6 Press ENTER The clock starts working To adjust the clock 1 Press CLOCK TIMER SE...

Page 10: ...isc tray closed with your finger as this may cause malfunction This system lets you play audio CDs CD Gs and discs with MP3 audio tracks CD Gs CD Graphics can only be played on Mexican model You can enjoy the video images recorded on CD Gs by connecting the system to a TV see step 4 of Hooking up the system page 6 Example When a disc is loaded 1 Press CD or FUNCTION repeatedly to switch the functi...

Page 11: ...um on the disc you have selected in random order When playing a non MP3 disc Album Shuffle Play performs the same operation as 1DISC SHUF Play PGM Program Play The tracks on the disc in the order you want them to be played see Creating your own program on page 13 To Do this Stop play Press x Pause Press X Press again to resume play Select a track Press or repeatedly or turn l L on the unit Select ...

Page 12: ... an MP3 audio track is skipped Maximum number of albums 150 including root folder Maximum number of MP3 audio tracks 255 The maximum number of MP3 audio tracks and albums that can be contained on a single disc is 300 Playback is possible up to 8 levels MP3 audio tracks are played back in the order that they are recorded on the disc Depending on the encoding writing software recording device or the...

Page 13: ...ess ENTER The track is programmed The program step number appears followed by the total playing time 6 Program additional tracks 7 Press N Program Play starts Other operations Tips The program you made remains after Program Play finishes To play the same program again press CD or FUNCTION repeatedly to switch the function to CD then press N However the program is cleared when you open the disc tra...

Page 14: ...eset number appears 6 Press or or turn TUNING on the unit repeatedly to select the desired preset number 7 Press ENTER 8 Repeat steps 2 through 7 to store other stations Manual tuning preset You can manually tune in and store the radio frequency of the desired stations 1 Press TUNER BAND or FUNCTION repeatedly to switch the function to TUNER 2 Press TUNER BAND repeatedly to select FM or AM 3 Press...

Page 15: ...f by CD power manage function CD power is factory set to on Use buttons on the unit for the operation 1 Press CD to switch the function to CD 2 Press 1 to turn off the system 3 After STANDBY stops flashing press 1 while holding x CD POWER OFF appears To set CD power on Repeat the procedure above and CD POWER ON appears Notes When CD POWER OFF is selected disc access time is increased You cannot ch...

Page 16: ... record the radio programs use manual recording page 18 What is the Radio Data System Radio Data System RDS is a broadcasting service that allows radio stations to send additional information along with the regular program signal RDS is available only on FM stations Note RDS may not work properly if the station you are tuned in is not transmitting the RDS signal properly or if the signal is weak N...

Page 17: ...rrent or the next track AMS To go forward Press or turn l L on the unit clockwise during playback TAPE A or TAPE B 1 appears To go back Press or turn l L on the unit counterclockwise during playback TAPE A or TAPE B 1 appears AMS Automatic Music Sensor Notes The AMS function may not operate correctly under the following circumstances When the unrecorded space between songs is less than 4 seconds l...

Page 18: ...u can record just the portions you like from a CD tape or radio program on a tape You can also record from connected components see Hooking up optional components on page 27 Use buttons on the unit for the operation 1 Load a recordable tape into deck B then press TAPE A B repeatedly to select deck B 2 Press one of the following buttons to select the desired source to record CD To record from this ...

Page 19: ...ts up Note Make sure to turn off the SUBWOOFER ON OFF indicator when the sub woofer is not connected to the system Tip You can use VOLUME or VOLUME control on the unit to adjust the volume of the sub woofer linked to the front speakers Selecting the effect from the music menu Press EQ or PRESET EQ on the unit repeatedly to select the preset you desire The preset name appears in the display See the...
Page 20: ...rs 3 Press P FILE repeatedly to select P FILE 1 3 you want to store the equalizer setting 4 Press ENTER COMPLETE appears This setting is automatically stored as the personal file you selected in step 3 Other operations Press SURROUND on the unit Each time you press the button the display changes as follows SURROUND ON SURR Y SURROUND OFF off Adjusting the graphic equalizer and storing To Press Cal...
Page 21: ...ress the function button of the source you want to record e g CD When you want to record from TAPE A press TAPE A B repeatedly until TAPE A is selected 3 Press REC PAUSE START Deck B stands by for recording REC flashes 4 Press REC PAUSE START and then start singing speaking or playing the desired source Recording starts To stop recording Press x Note Microphone does not function while the tape dec...

Page 22: ...ee Creating your own program on page 13 Tape Load a tape with the side you want to play facing forward Tuner Tune in the preset radio station see Listening to the radio on page 15 2 Press VOLUME to adjust the volume 3 Press CLOCK TIMER SET 4 Press or repeatedly to select PLAY SET then press ENTER ON appears and the hour indication flashes 5 Set the time to start playing Press or repeatedly to set ...

Page 23: ...ration 1 Tune in the preset radio station see Listening to a preset station on page 15 2 Press CLOCK TIMER SET 3 Press or repeatedly to select REC SET then press ENTER ON appears and the hour indication flashes 4 Set the time to start recording Press or repeatedly to set the hour then press ENTER The minute indication flashes Press or repeatedly to set the minute then press ENTER 5 Set the time to...

Page 24: ...r Saving Mode Press DISPLAY while the system is off Each time you press the button the display switches cyclically as follows Demonstration display t Clock display t No display Power Saving Mode The clock is displayed only if you set the clock Note You cannot perform the following operations in Power Saving Mode setting the clock changing the AM tuning interval except for European Russian and Saud...
Page 25: ...display1 or total album number of the disc2 or total track number of the current album2 t Album name2 or volume label2 t Clock display for eight seconds t Effect status 1 TOC Table of Contents displays current disc number total number of tracks on the disc and total playing time of the disc 2 For discs with MP3 audio tracks album names or volume label may not be displayed depending on the play mod...

Page 26: ...RG270 RG170 ILLUM ON y ILLUM OFF Press DISPLAY while listening to the radio Each time you press the button the display changes cyclically as follows Station name1 t Preset number2 and frequency t Clock display for eight seconds t Effect status 1 European model only 2 Preset number is displayed only if you preset radio stations page 14 Changing the Power illuminator Viewing the tuner information in...
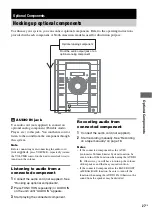
Page 27: ...supplied See Hooking up optional components 2 Press FUNCTION repeatedly or AUDIO IN on the unit until AUDIO IN appears 3 Start playing the connected component Recording audio from connected component 1 Connect the audio cord not supplied 2 Start recording manually See Recording on a tape manually on page 18 Notes If the connected component has the AVLS Automatic Volume Limiter System function be s...

Page 28: ...omes from one channel or unbalanced left and right volume Place the speakers as symmetrically as possible Connect the supplied speakers Sound lacks bass Check that the speaker s and jacks are connected correctly There is severe hum or noise Move the system away from the source of noise Connect the system to a different wall outlet Install a noise filter commercially available to the power cord The...

Page 29: ...NTSC color system Make sure your TV color system is NTSC Press CD or FUNCTION repeatedly to switch the function to CD Play does not start Open the disc tray and check whether a disc is loaded Wipe the disc clean page 33 Replace the disc Place the disc that this system can play page 4 Place the disc correctly Place the disc in the tray with the label side up Remove the disc and wipe away the moistu...

Page 30: ...nnot be received in stereo Press FM MODE repeatedly until STEREO appears Tape deck The tape does not record or play or there is a decrease in sound level The heads are dirty Clean them page 33 The record playback heads are magnetized Demagnetize them page 33 The tape does not erase completely The record playback heads are magnetized Demagnetize them page 33 There is excessive wow or flutter or the...

Page 31: ...em is reading information of the disc Some buttons are not available STEP FULL You tried to program 26 or more tracks steps Tuner COMPLETE The preset operation ended normally Tape NO TAB You cannot record the tape because the tab has been removed from the cassette NO TAPE There is no tape in the tape deck Timer PUSH SELECT You tried to set the clock or timer during timer operation SET CLOCK You tr...

Page 32: ... for Mexican model This speaker system is not magnetically shielded and the picture on TV sets may become magnetically distorted In such a case turn off the power of the TV set once and after 15 to 30 minutes turn it on again If there seems to be no improvement locate the speaker system further away from the TV set Mexican model only In case color irregularity is observed on nearby a TV screen Wit...

Page 33: ...s Cleaning the cabinet Clean the cabinet panel and controls with a soft cloth slightly moistened with mild detergent solution Do not use any type of abrasive pad scouring powder or solvent such as thinner benzine or alcohol To save a tape permanently To prevent a tape from being accidentally recorded over break off the cassette tab from side A or B as illustrated If you later want to reuse the tap...

Page 34: ...150 150 watts 6 ohms at 1 kHz 10 THD Total harmonic distortion less than 0 07 6 ohms at 1 kHz 80 W Canadian model MHC GX255 Continuous RMS power output reference 65 65 watts 6 ohms at 1 kHz 10 THD Total harmonic distortion less than 0 07 6 ohms at 1 kHz 40 W European and Russian models MHC RG475S Front speaker DIN power output rated 110 110 watts 6 ohms at 1 kHz DIN Continuous RMS power output ref...

Page 35: ...ut reference 160 160 watts 6 ohms at 1 kHz 10 THD MHC RG270 The following measured at AC 120 127 220 240 V 50 60 Hz DIN power output rated 100 100 watts 6 ohms at 1 kHz DIN Continuous RMS power output reference 125 125 watts 6 ohms at 1 kHz 10 THD MHC RG170 The following measured at AC 120 127 220 240 V 50 60 Hz DIN power output rated 50 50 watts 6 ohms at 1 kHz DIN Continuous RMS power output ref...

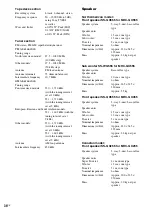
Page 36: ...ate frequency 450 kHz Speaker North American model Front speaker SS GX555 for MHC GX555 Speaker system 3 way 3 unit bass reflex type Speaker units Woofer 13 cm cone type Sub woofer 13 cm cone type Tweeter 5 cm cone type Nominal impedance 6 ohms Dimensions w h d Approx 230 345 235 mm Mass Approx 3 8 kg net per speaker Sub woofer SS WG555 for MHC GX555 Speaker system Bass reflex type Speaker units W...

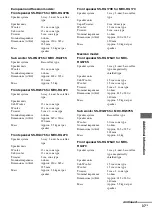
Page 37: ...ance 6 ohms Dimensions w h d Approx 230 345 235 mm Mass Approx 3 8 kg net per speaker Front speaker SS RG170E for MHC RG170 Speaker system 3 way 3 unit bass reflex type Speaker units Super Tweeter 2 cm dome type Woofer 13 cm cone type Tweeter 5 cm cone type Nominal impedance 6 ohms Dimensions w h d Approx 200 325 230 mm Mass Approx 3 0 kg net per speaker Mexican model Front speaker SS RG575AV for ...

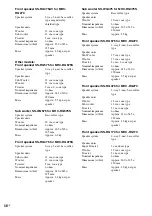
Page 38: ...pe Tweeter 5 cm cone type Nominal impedance 6 ohms Dimensions w h d Approx 230 345 235 mm Mass Approx 3 8 kg net per speaker Sub woofer SS WG475 for MHC RG475S Speaker system Bass reflex type Speaker units Woofer 20 cm cone type Nominal impedance 6 ohms Dimensions w h d Approx 265 325 330 mm Mass Approx 5 5 kg Front speaker SS RG575 for MHC RG470 Speaker system 3 way 4 unit bass reflex type Speake...

Page 39: ...the Power Saving Mode Mexican model MHC RG575S 300 watts MHC RG470 170 watts MHC RG270 210 watts Other models MHC RG575S 300 watts MHC RG475S 300 watts MHC RG470 170 watts MHC RG270 210 watts MHC RG170 125 watts Dimensions w h d excl speakers Approx 280 325 430 mm Mass excl speakers North American model MHC GX555 Approx 10 5 kg MHC GX355 Approx 10 0 kg Canadian model MHC GX555 Approx 10 5 kg MHC G...

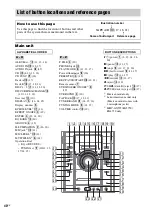
Page 40: ...UND 4 20 TAPE A B e 17 18 21 TUNER BAND ea 14 15 18 TUNING MODE 8 14 15 VOLUME control ql 19 1 power 1 8 15 24 28 30 X pause qs 11 17 x stop qs 11 17 21 30 M fast forward qs 11 17 N play qs 11 17 m rewind qs 11 17 Z eject qf 10 PUSH Z deck B eject qh 17 Z PUSH deck A eject wh 17 1 Mexican model only 2 Latin American model only Mexican model comes with 2 microphone jacks 3 MHC GX555 RG575S RG475S o...

Page 41: ... qf 19 FM MODE 4 16 FUNCTION 6 10 13 14 15 17 27 PLAY MODE w 11 13 17 REPEAT 4 12 SLEEP ws 22 TAPE qj TUNER BAND 5 14 15 TUNER MEMORY ql 14 TUNING MODE w 14 15 VOLUME qs 19 22 1 power 1 8 23 m M rewind fast forward 7 11 17 N play 8 11 17 X pause 8 11 17 x stop 8 11 17 tuning qh 14 go back go forward qh 9 11 17 ALPHABETICAL ORDER A E F Z BUTTON DESCRIPTIONS 4 5 6 7 8 9 q ws 1 qd qg qf wa w ql qk qj...

Page 42: ......

Page 43: ......

Page 44: ...Sony Corporation Printed in China ...

Reviews: