background image

T

une

r

15

GB

You can preset up to 20 FM stations and 10 AM 
stations. You can then tune in any of those 
stations simply by selecting the corresponding 
preset number.

Automatic tuning preset

You can automatically tune in all of the stations 
that can be received in your area and then store 
the radio frequency of the desired stations.

1

Press TUNER BAND (or FUNCTION 
repeatedly) to switch the function to 
tuner.

2

Press TUNER BAND repeatedly to 
select “FM” or “AM”.

3

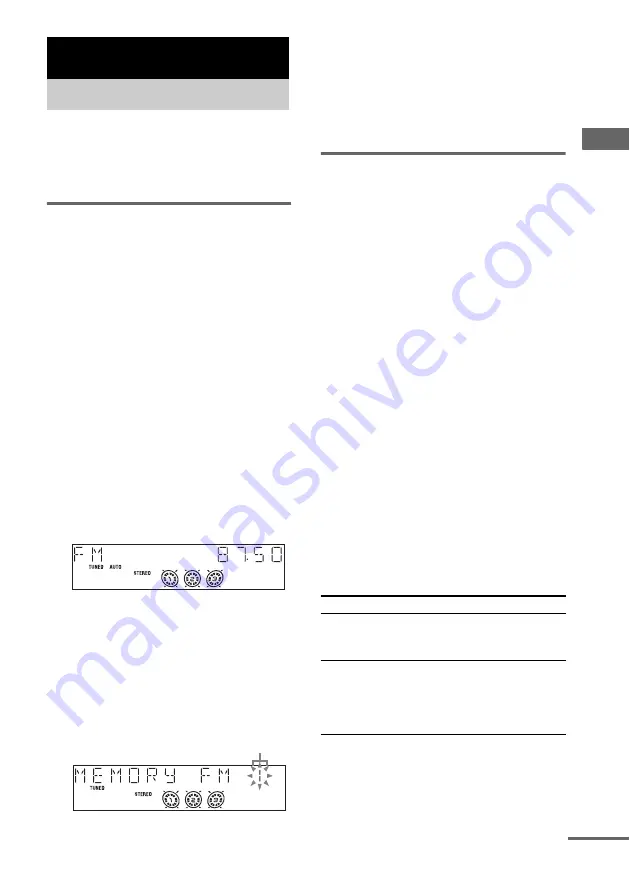
Press TUNING MODE repeatedly until 
“AUTO” appears in the display.

4

Press – or + (or TUNING – or + on the 
unit).

The frequency changes as the system scans 
for a station. Scanning stops automatically 
when a station is tuned in. At that time, 
“TUNED” and “STEREO” (for an FM 
stereo program) appear.

If “TUNED” does not appear and the 
scanning does not stop

Set the frequency of the desired radio 
station as described in steps 3 through 8 of 
“Manual tuning preset” (page 15).

5

Press TUNER MEMORY.

A preset number appears. 

6

Press – or + (or TUNING – or + on the 
unit) repeatedly to select the desired 
preset number.

7

Press ENTER.

8

Repeat steps 2 through 7 to store other 
stations.

Manual tuning preset

You can manually tune in and store the radio 
frequency of the desired stations.

1

Press TUNER BAND (or FUNCTION 
repeatedly) to switch the function to 
tuner.

2

Press TUNER BAND repeatedly to 
select “FM” or “AM”.

3

Press TUNING MODE repeatedly until 
“AUTO” and “PRESET” disappear from 
the display.

4

Press – or + (or TUNING – or + on the 
unit) repeatedly to tune in the desired 
station.

5

Press TUNER MEMORY.

A preset number appears.

6

Press – or + (or TUNING – or + on the 
unit) repeatedly to select the desired 
preset number.

7

Press ENTER.

8

Repeat steps 2 through 7 to store other 
stations.

Other operations

Tuner

Presetting radio stations

Preset number

To

Do this

Tune in a station 
with a weak signal

Follow the procedure described 
in “Manual tuning preset” 
(page 15)
.

Set another station 
to the existing 
preset number

Start over from step 2. After 
step 5, press – or + (or TUNING 
– or + on the unit) repeatedly to 
select the preset number you 
want to store the other station.

continued

Summary of Contents for MHC-GX450 - Mini Hi Fi Stereo System

Page 1: ...erial numbers are located on the rear of the unit Record the serial number in the space provided below Refer to them whenever you call upon your Sony dealer regarding this product Model No ______________ Serial No ______________ MHC GX750 GX450 GX250 MHC RG555 RG551S RG444S RG441 RG333 RG222 RG221 RG121 RG100 MHC RX550 ...

Page 2: ...adio frequency energy and if not installed and used in accordance with the instructions may cause harmful interference to radio communications However there is no guarantee that interference will not occur in a particular installation If this equipment does cause harmful interference to radio or television reception which can be determined by turning the equipment off and on the user is encouraged...

Page 3: ... brouillage radioeléctrique reçu même si ce brouillage est susceptible de compromettre le fonctionnement du dispositif NOTICE FOR THE CUSTOMERS IN THE U S A AND CANADA MHC GX750 only Replace the AC power adaptor with model AC GSX100 only if replacement is necessary Except for European model ENERGY STAR is a U S registered mark As an ENERGY STAR partner Sony Corporation has determined that this pro...

Page 4: ...0 GX450 RG551S RG444S RX550 only Selecting the sound effect 22 Adjusting the graphic equalizer and storing 22 Selecting the surround effect 23 Enhancing video game sound 23 Game Sync Mixing video game sound with other sound source 23 Game Mixing Singing along 24 MHC RG555 only Timer Falling asleep to music 25 Sleep Timer Waking up to music 25 Play Timer Timer recording radio programs 26 Rec Timer ...

Page 5: ...haracters in the name no more than three characters in the extension MP3 and in capital letters Folder names can be no longer than eight characters There can be no more than eight nested folder levels Level 2 specifications allow file names and folder names up to 31 characters long Each folder can have up to 8 trees For Joliet in the expansion format file and folder names can have up to 64 charact...

Page 6: ...wing discs take a longer time to start playback a disc recorded with complicated tree structure a disc recorded in Multi Session a disc to which data can be added non finalized disc Music discs encoded with copyright protection technologies This product is designed to playback discs that conform to the Compact Disc CD standard Recently various music discs encoded with copyright protection technolo...

Page 7: ...o the SPEAKER terminals as shown below 2 Connect the sub woofer MHC GX750 GX450 RG551S RG444S RX550 only Connect the speaker cords to the SUB WOOFER OUT jack and CONTROL jack as shown below Getting Started Hooking up the system AM loop antenna Front speaker right Front speaker left FM lead antenna MHC GX750 GX450 RG551S RG444S RX550 only Sub woofer R L Black Stripe Red Solid 3 Insert only the stri...

Page 8: ...matically ends If the plug does not fit the wall socket detach the supplied plug adaptor only for models equipped with an adaptor Inserting two R6 size AA batteries into the remote Note If you do not use the remote for a long period of time remove the batteries to avoid possible damage from battery leakage and corrosion Tip With normal use the batteries should last for about six months When the re...

Page 9: ...ertically keeping it a few centimeters away from the wall If the sub woofer is placed in the center of a room the bass could be extremely weakened This is due to the influence of the standing wave of the room If this happens move the sub woofer away from the center of the room or eliminate the cause of the standing wave by placing a bookshelf against the wall etc When carrying this system Perform ...

Page 10: ... to set the minute 6 Press ENTER The clock starts working To adjust the clock 1 Press CLOCK TIMER SET 2 Press or repeatedly to select CLOCK SET then press ENTER 3 Do the same procedures as step 3 to 6 above Notes The clock settings are canceled when you disconnect the power cord or if a power failure occurs You cannot set the clock in Power Saving Mode page 27 Setting the clock ...

Page 11: ... as this may cause malfunction Do not forcibly press the disc tray closed with your finger as this may cause malfunction This system lets you play audio CDs and discs with MP3 audio tracks MP3 audio tracks cannot be played on MHC GX250 MHC RG121 and MHC RG100 Example When a disc is loaded 1 Press CD or FUNCTION repeatedly to switch the function to CD CD MP3 Play Loading a disc Playing a disc Norma...

Page 12: ...dom order ALBM SHUF Shuffle Play The MP3 audio tracks in the album on the disc you have selected in random order When playing a non MP3 disc Album Shuffle Play performs the same operation as 1DISC SHUF Play PGM Program Play The tracks on the disc in the order you want them to be played see Creating your own program on page 14 To Do this Stop play Press x Pause Press X Press again to resume play Se...

Page 13: ...ximum number of MP3 audio tracks and albums that can be contained on a single disc is 255 Playback is possible up to 8 levels MP3 audio tracks are played back in the order that they are recorded on the disc Depending on the encoding writing software recording device or the recording media used at the time an MP3 audio track is recorded you may encounter such problems as disabled playback sound int...

Page 14: ...The track is programmed The program step number appears followed by the total playing time 6 Program additional tracks 7 Press N Program Play starts Other operations Tips The program you made remains after Program Play finishes To play the same program again press CD or FUNCTION repeatedly to switch the function to CD then press N However the program is cleared when you open the disc tray appears ...

Page 15: ...reset number appears 6 Press or or TUNING or on the unit repeatedly to select the desired preset number 7 Press ENTER 8 Repeat steps 2 through 7 to store other stations Manual tuning preset You can manually tune in and store the radio frequency of the desired stations 1 Press TUNER BAND or FUNCTION repeatedly to switch the function to tuner 2 Press TUNER BAND repeatedly to select FM or AM 3 Press ...

Page 16: ...tained for about a day even if you disconnect the power cord or if a power failure occurs To improve broadcast reception adjust the supplied antennas or connect a commercially available external antenna You can listen to a radio station either by selecting a preset station or by manually tuning in the station Listening to a preset station Preset Tuning Preset radio stations in the tuner s memory f...

Page 17: ...dio Data System Radio Data System RDS is a broadcasting service that allows radio stations to send additional information along with the regular program signal RDS is available only on FM stations Note RDS may not work properly if the station you are tuned in is not transmitting the RDS signal properly or if the signal is weak Not all FM stations provide RDS service nor do they provide the same ty...

Page 18: ... N or hH on the unit The tape starts playing Press the button again to play the reverse side 1 The tape deck stops automatically after repeating the sequence five times 2 Relay Play always follows this cyclic sequence up to five times then stops Deck A front side t Deck A reverse side t Deck B front side t Deck B reverse side For other models 1 Load a tape To play both decks in succession press PL...

Page 19: ... a tape You can use TYPE I normal tape The recording level is adjusted automatically Use buttons on the unit for the operation 1 Load a recordable tape into deck B then press TAPE A B repeatedly to select deck B 2 MHC RG555 only Press PLAY MODE repeatedly to select g to record on one side Select j or RELAY to record on both sides When you want to record from the reverse side press hH twice or unti...

Page 20: ... A B repeatedly to select deck B 2 MHC RG555 only Press PLAY MODE repeatedly to select g to record on one side Select j or RELAY to record on both sides When you want to record from the reverse side press hH twice or until the TAPE B reverse side indicator lights up Then press x 3 Press one of the following buttons to select the desired source to record CD To record from this system s CD player TA...

Page 21: ...werful sound Press GROOVE on the unit Each time you press the button the display changes cyclically as follows GROOVE ON t GROOVE OFF The volume switches to power mode the equalizer curve changes and GROOVE lights up You can use the sound of the sub woofer to suit the sound source Press SUB WOOFER ON OFF on the sub woofer The indicator lights up while the sub woofer turns on Press the button again...

Page 22: ...1 Press EQ BAND repeatedly to select a frequency band then turn EQ to adjust the level 2 Press and hold P FILE A personal file number appears 3 Press P FILE repeatedly to select P FILE 1 3 you want to store the equalizer setting 4 Press ENTER COMPLETE appears This setting is automatically stored as the personal file you selected in step 3 Other operations Selecting the sound effect EQ Effect ROCK ...

Page 23: ...E MIXING Each time you press the button the level of the game sound changes cyclically as follows MIXING LOW t MIXING MID t MIXING HIGH t MIXING OFF Notes If you start recording while Game Mixing is activated Game Mixing is canceled To record the mixed sound press GAME MIXING after step 4 of Recording on a tape manually on page 20 and then press REC PAUSE START to start the recording The game soun...

Page 24: ...ord on one side Select j or RELAY to record on both sides 3 Press the function button of the source you want to record e g CD When you want to record from TAPE A press TAPE A B repeatedly until TAPE A is selected 4 Press REC PAUSE START Deck B stands by for recording REC flashes 5 Press REC PAUSE START and then start singing speaking or playing the desired source Recording starts To stop recording...

Page 25: ... Creating your own program on page 14 Tape Load a tape with the side you want to play facing forward Tuner Tune in the preset radio station see Listening to the radio on page 16 2 Press VOLUME to adjust the volume 3 Press CLOCK TIMER SET 4 Press or repeatedly to select PLAY SET then press ENTER ON appears and the hour indication flashes 5 Set the time to start playing Press or repeatedly to set th...

Page 26: ... radio station see Listening to a preset station on page 16 2 Press CLOCK TIMER SET 3 Press or repeatedly to select REC SET then press ENTER ON appears and the hour indication flashes 4 Set the time to start recording Press or repeatedly to set the hour then press ENTER The minute indication flashes Press or repeatedly to set the minute then press ENTER 5 Set the time to stop recording following t...

Page 27: ...PLAY while the system is off Each time you press the button the display switches cyclically as follows Demonstration display t Clock display t No display Power Saving Mode The clock is displayed only if you set the clock Note You cannot perform the following operations in Power Saving Mode setting the clock changing the AM tuning interval except for European Russian and Saudi Arabian models and Au...

Page 28: ...ng on the play mode x When a CD MP3 is in Program Play mode The last track number of the program and the total playing time t Total track number of the program for five seconds t Volume label t Clock display for eight seconds t Effect status For discs with MP3 audio tracks Checking the station name TUNER Press DISPLAY while listening to the radio Each time you press the button the display changes ...

Page 29: ...eo game machine to these jacks You can then output audio through this system C VIDEO OUT jack Use a video cable not supplied to connect the video input of TV to this jack D VIDEO MD IN jacks MHC RG555 only Use audio cords not supplied to connect the audio output of the optional component such as VCR or MD deck to these jacks You can then output audio through this system Optional Components Hooking...

Page 30: ...This switches the VIDEO function to MD Once you enable the MD function just press VIDEO MD Notes If you cannot select MD when you press VIDEO MD press 1 while holding down VIDEO MD when the system is on VIDEO will be switched to MD To return to VIDEO do the same procedure When you connect a VIDEO CD deck set to MD Hooking up the transmitter 1 Set the transmitter by the following procedures Select ...

Page 31: ...tem picking up some interference However the distance may be reduced according to the surroundings and environment If the system picks up some noise while using it within the above mentioned distance reduce the distance between the transmitter unit and the main unit or select another channel Notes When you use the main unit inside the effective areas of the transmitter the transmitter can be place...

Page 32: ...then press WIRELESS on the unit again To finish using WIRELESS function Press any function button to select different function and quit WIRELESS Notes You may not hear the beginning of the sound from the main unit until the transmitter starts sending the RF signals after detecting an audio signal If the transmitter is connected to the headphones jack of the source component set the volume of that ...

Page 33: ...nd comes from one channel or unbalanced left and right volume Place the speakers as symmetrically as possible Connect the supplied speakers Sound lacks bass Check that the speaker s and jacks are connected correctly There is severe hum or noise Move the system away from the source of noise Connect the system to a different wall outlet Install a noise filter commercially available to the power cord...

Page 34: ...page 37 Replace the disc Place the disc that this system can play page 5 Place the disc correctly Place the disc in the tray with the label side up Remove the disc and wipe away the moisture on the disc then leave the system turned on for a few hours until the moisture evaporates Press N to start play The sound skips Wipe the disc clean page 37 Replace the disc Try moving the system to a place wit...

Page 35: ...tter MHC GX750 only There is no sound Check the connection of the optional component Check that the optional component is turned on Turn up the volume on the connected optional component if the transmitter is connected to the headphones jack Change the radio frequency using the CHANNEL selector on the transmitter then press WIRELESS on the unit again If you connect the transmitter to the analog ou...

Page 36: ...P3 audio tracks etc OVER You have reached the end of the disc while pressing M during playback or pause PUSH STOP You pressed PLAY MODE during playback READING The system is reading information of the disc Some buttons are not available STEP FULL You tried to program 26 or more tracks steps Tape NO TAB You cannot record the tape because the tab has been removed from the cassette NO TAPE There is n...

Page 37: ...gnetically distorted In such a case turn off the power of the TV set once and after 15 to 30 minutes turn it on again If there seems to be no improvement locate the speaker system further away from the TV set On operation If the system is brought directly from a cold to a warm location or is placed in a very damp room moisture may condense on the lens inside the CD player Should this occur the sys...

Page 38: ...rts that have contact with the tape after every 20 to 30 hours of use with a separately sold demagnetizing cassette For details refer to the instructions of the demagnetizing cassette Main unit Amplifier section AUDIO POWER SPECIFICATIONS MHC GX750 GX450 GX250 RX550 USA models only MHC GX750 RX550 POWER OUTPUT AND TOTAL HARMONIC DISTORTION With 6 ohm loads both channels driven from 120 10 000 Hz r...

Page 39: ...Hz 10 THD Music power output reference 250 250 watts 6 ohms at 1 kHz 10 THD MHC RG222 RG121 DIN power output rated 50 50 watts 6 ohms at 1 kHz DIN Continuous RMS power output reference 65 65 watts 6 ohms at 1 kHz 10 THD Music power output reference 130 130 watts 6 ohms at 1 kHz 10 THD MHC RG100 DIN power output rated 15 15 watts 6 ohms at 1 kHz DIN Continuous RMS power output reference 20 20 watts...

Page 40: ...ystem Laser Semiconductor laser λ 770 810 nm Emission duration continuous Frequency response 2 Hz 20 kHz 0 5 dB Signal to noise ratio More than 90 dB Dynamic range More than 90 dB Tape deck section Recording system 4 track 2 channel stereo Frequency response 50 13 000 Hz 3 dB using Sony TYPE I cassettes Wow and flutter 0 15 W Peak IEC 0 1 W RMS NAB 0 2 W Peak DIN Tuner section FM stereo FM AM supe...

Page 41: ...dance 6 ohms Dimensions w h d Approx 267 327 365 mm Mass Approx 5 7 kg European and Russian models Front speaker SS RG444 for MHC RG444S RG222 Speaker system 3 way 3 unit bass reflex type Speaker units Woofer 13 cm cone type Sub woofer 13 cm cone type Tweeter 5 cm cone type Nominal impedance 6 ohms Dimensions w h d Approx 242 327 235 mm Mass Approx 3 7 kg net per speaker Sub woofer SS WG450 for MH...

Page 42: ... Approx 267 327 365 mm Mass Approx 5 7 kg Front speaker SS RG121 for MHC RG121 Speaker system 3 way 3 unit bass reflex type Speaker units Super Tweeter 2 cm dome type Woofer 13 cm cone type Tweeter 5 cm cone type Nominal impedance 6 ohms Dimensions w h d Approx 202 327 230 mm Mass Approx 3 0 kg net per speaker Transmitter TMR HT1 for MHC GX750 Carrier frequency 913 6 914 4 MHz Channel CHANNEL 1 91...

Page 43: ...HCD GX750 Approx 10 5 kg HCD GX450 Approx 10 0 kg HCD GX250 Approx 10 0 kg HCD RX550 Approx 10 5 kg European Russian and Australian models HCD RG444 Approx 10 0 kg HCD RG333 Approx 10 0 kg HCD RG222 Approx 8 5 kg HCD RG121 Approx 8 5 kg HCD RG100 Approx 8 0 kg Other models HCD RG555 Approx 10 0 kg HCD RG551 Approx 10 5 kg HCD RG444 Approx 10 5 kg HCD RG441 Approx 10 0 kg HCD RG222 Approx 10 0 kg H...

Page 44: ...E wl 15 16 35 TUNING qh 15 16 TUNING wg 15 16 VIDEO MD3 ea 20 30 VOLUME control w 21 WIRELESS4 ea 32 1 power 1 8 16 27 30 33 35 X pause wg 12 19 Z eject qf 11 PUSH Z deck B eject qg 18 x stop wg 12 19 24 35 M fast forward qh 12 19 H or hH3 play qh 12 18 19 m rewind wg 12 19 Z PUSH deck A eject e 18 1 MHC GX750 GX450 RG555 RG551S RG444S RG441 RG333 RG222 RG221 RX550 only 2 MHC GX750 GX450 RG555 RG5...

Page 45: ...Additional Information 45GB Sub woofer MHC GX750 GX450 RG551S RG444S RX550 only Indicator 1 SUB WOOFER ON OFF 2 21 ALPHABETICAL ORDER 1 2 continued ...

Page 46: ...PLAY MODE w 12 14 18 REPEAT 4 13 SLEEP ws 25 TAPE qj TUNER BAND 5 15 16 TUNER MEMORY ql 15 TUNING MODE w 15 16 VOLUME qs 21 25 1 power 1 8 26 m M rewind fast forward 7 12 19 tuning qh 15 go back go forward qh 10 12 19 N play 8 12 18 X pause 8 12 19 x stop 8 12 19 MHC GX750 GX450 RG555 RG551S RG444S RG441 RG333 RG222 RG221 RX550 only ALPHABETICAL ORDER A E F Z BUTTON DESCRIPTIONS 4 5 6 7 8 9 q ws 1...

Page 47: ......

Page 48: ...Sony Corporation Printed in China ...

Reviews: