background image

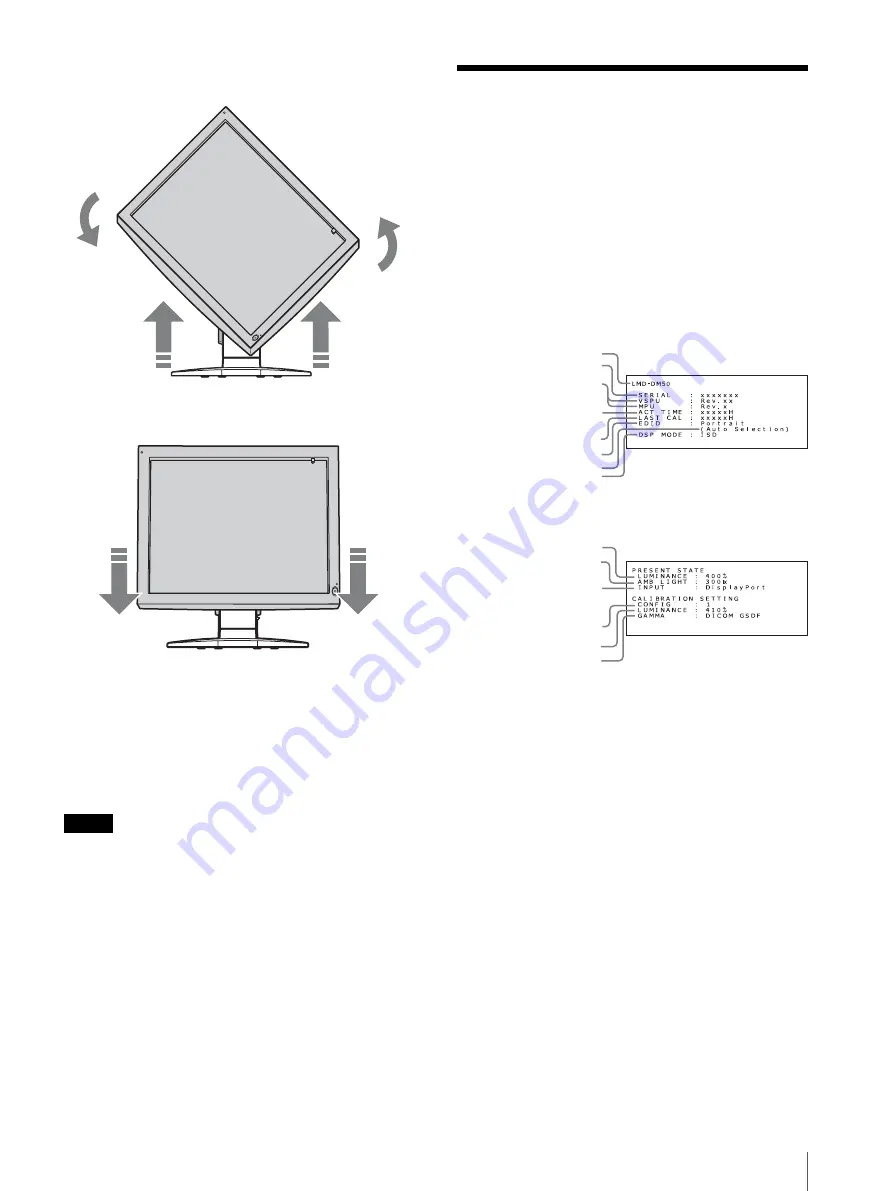
Displaying the Information Screen

19


4

Rotate the LCD panel 90°.

5

Lower the LCD panel to the desired height.

6

Lock the tilt stand.

For details how to lock the tilt stand, see page 15.

7

After switching the LCD panel orientation, restart 
the computer and reset the resolution for the display 
orientation.

Notes

• Be careful not to pinch your fingers when turning the 

LCD panel or adjusting its height.

• Turning the LCD panel with cables connected could 

damage the cables and cause fire or electric shock. 
Disconnect the power cable and other connected 
cables before turning the LCD panel.

Displaying the 
Information Screen

Press the + or – button on the rear panel of the unit so 
that the information screen appears.
Pressing either button repeatedly changes the display as 
follows: Information 

t

 present operating state 

t


display off.
The information screen automatically turns off after 
about 15 seconds.

Information

Present operating state

Model name

Serial number

Maintenance information

Total operating hours

Operating hours since the 
last calibration

EDID state

EDID setting

Display mode setting

Current luminance

Ambient light

Current input source

Configuration number

Luminance setting

Gamma setting

Summary of Contents for LMDDM20

Page 1: ...LCD Display 4 421 015 11 1 2012 Sony Corporation Instructions for Use Before operating the unit please read this manual thoroughly and retain it for future reference LMD DM50 LMD DM30 LMD DM20 ...

Page 2: ...io or television reception which can be determined by turning the equipment off and on the user is encouraged to try to correct the interference by one or more of the following measures Reorient or relocate the receiving antenna Increase the separation between the equipment and receiver Connect the equipment into an outlet on a circuit different from that to which the receiver is connected Consult...

Page 3: ...it and the susceptible equipment into different branch circuit Consult your dealer According to standard EN60601 1 2 and CISPR11 Class B Group 1 Caution When you dispose of the unit or accessories you must obey the laws in the relative area or country and the regulations in the relative hospital For the customers in the USA Lamp in this product contains mercury Disposal of these materials may be r...

Page 4: ...ion in which it will be used Guidance and manufacturer s declaration electromagnetic emissions The LMD DM50 DM30 DM20 is intended for use in the electromagnetic environment specified below The customer or the user of the LMD DM50 DM30 DM20 should assure that it is used in such an environment Emission test Compliance Electromagnetic environment guidance RF emissions CISPR 11 Group 1 The LMD DM50 DM...

Page 5: ... mode 2 kV common mode 1 kV differential mode 2 kV common mode Mains power quality should be that of a typical commercial or hospital environment Voltage dips short interruptions and voltage variations on power supply input lines IEC 61000 4 11 5 UT 95 dip in UT for 0 5 cycle 40 UT 60 dip in UT for 5 cycles 70 UT 30 dip in UT for 25 cycles 5 UT 95 dip in UT for 5 sec 5 UT 95 dip in UT for 0 5 cycl...

Page 6: ...transmitters as determined by an electromagnetic site survey a should be less than the compliance level in each frequency range b Interference may occur in the vicinity of equipment marked with following symbol NOTE 1 At 80 MHz and 800 MHz the higher frequency range applies NOTE 2 These guidelines may not apply in all situations Electromagnetic propagation is affected by absorption and reflection ...

Page 7: ...ransmitter W Separation distance according to frequency of transmitter m 150 kHz to 80 MHz d 1 2 P 80 MHz to 800 MHz d 1 2 P 800 MHz to 2 5 GHz d 2 3 P 0 01 0 12 0 12 0 23 0 1 0 38 0 38 0 73 1 1 2 1 2 2 3 10 3 8 3 8 7 3 100 12 12 23 For transmitters rated a maximum output power not listed above the recommended separation distance d in meters m can be estimated using the equation applicable to the ...

Page 8: ...ls 13 Front Panel 13 Rear Panel 14 Adjusting the Stand Height 15 Removing the Connector Cover 16 Connecting the Cables 16 Routing the Cables 17 Adjusting the LCD Panel Angle 18 Switching the LCD Panel Orientation 18 Displaying the Information Screen 19 Changing the Display Setting 20 Fixing the Display Orientation 20 Switching the Display Mode 21 Switching the Input Source 22 Switching Configurati...

Page 9: ...may be stuck either always off black always on or flashing In addition over a long period of use because of the physical characteristics of the liquid crystal display such stuck pixels may appear spontaneously This is not a malfunction Do not leave the LCD screen facing the sun as it can damage the LCD screen Take care when you place the unit by a window Do not push or scratch the LCD screen Do no...

Page 10: ...ilter The surface is very delicate Do not rub or hit with hard objects Disposal of the Unit Do not dispose of the unit with general waste Do not include the unit with household waste The fluorescent tube includes mercury Dispose of the unit in accordance with the regulations of your local sanitation authority Recommendation to Use More Than One Unit As problems can occasionally occur with the unit...

Page 11: ...l link DVI input port With a dual link connection the unit provides twice the display refresh rate as single link resulting in a fast smooth and detailed display of motion pictures and still images Note With the LMD DM50 DM30 use the supplied DVI dual link cable below left figure DVI cable connector male When using a single link DVI cable resolution loss scan line gaps may occur In this case chang...

Page 12: ...graphics card supporting the resolutions below LMD DM50 2048 2560 LMD DM30 1536 2048 LMD DM20 1200 1600 Interchangeable stand The tilt stand is interchangeable with arm stands featuring a mount plate with 4 holes at 100 mm 100 mm 4 inches 4 inches according to your needs and preferences page 29 Automatic detection of LCD panel orientation by gravitation sensor A built in gravitation sensor provide...

Page 13: ...us c LCD luminance sensor Monitors the LCD luminance d Ambient light sensor Monitors the ambient light in the unit location LED Power Unit status Off OFF Power off Off ON Normal luminance stabilized Green ON Luminance stabilizer on Blinking green and amber alternately ON Calibrating Amber ON Standby Blinking amber ON Advanced power save mode Blinking amber twice ON Error detected Turn off the unit...

Page 14: ...e units connect the UP port d of each connected unit page 25 d UP USB upstream port When using the optional calibration kit connect this port to the computer Connect the supplied USB cable between this UP port and the computer s USB port page 25 e DIGITAL DVI input connector Connect the supplied DVI cable page 16 f DisplayPort connector Connect a commercially available DisplayPort cable page 16 g ...

Page 15: ... 5 Flip the tool down towards LOCK to lock Note For your safety make sure the tilt stand is locked after adjusting the stand height 6 Push the tool back in the storage hole in the tilt stand until it clicks into place The tool will be secured by a hook inside the tilt stand Notes Keep the tool in the storage hole so as not to lose it The orientation of the tool must be correct Check the orientatio...

Page 16: ...playPort cable between the unit s DisplayPort connector and the computer s DisplayPort connector Note The recommended cable length is 2 m 6 6 feet or less If you use a long cable the display may become unstable and flicker 3 Connect the supplied power cable between the AC IN socket and the wall outlet 4 Turn on the unit and the computer Note When using the optional calibration kit connect the supp...

Page 17: ...he tilt stand 2 Secure the cables along the groove at the rear of the tilt stand and put the cable cover back in place Follow steps 3 and 4 to attach the cable cover 3 Hook the cable cover with two hooks located at the bottom of the tilt stand 1 4 Fit on the hook located on the top of the cable cover and attach the cable cover 2 Hook Cable cover Tilt stand Hook Cable cover Tilt stand Hook ...

Page 18: ... the LCD panel with both hands and adjust the angle slowly Switching the LCD Panel Orientation The LCD panel is locked in portrait orientation when packed at the factory Follow the instructions below to switch the LCD panel orientation 1 Unlock the tilt stand For details how to unlock the tilt stand see page 15 2 Tilt the LCD panel upward 3 Lift the LCD panel to the top 70 70 17 3 ...

Page 19: ... Disconnect the power cable and other connected cables before turning the LCD panel Displaying the Information Screen Press the or button on the rear panel of the unit so that the information screen appears Pressing either button repeatedly changes the display as follows Information t present operating state t display off The information screen automatically turns off after about 15 seconds Inform...

Page 20: ...ction Follow the instructions below to switch the EDID setting Switching EDID settings 1 Press either the or button on the rear panel once The information screen appears 2 Press and hold the and buttons simultaneously for more than 2 seconds The SWITCHING EDID screen appears 3 Press either the or button to move the B cursor and select an EDID setting 4 Press the and button simultaneously for more ...

Page 21: ...ions below to switch the display mode 1 Press either the or button on the rear panel once The information screen appears 2 Press and hold the or buttons simultaneously for more than 2 seconds The SWITCHING EDID screen appears 3 Press the 1 standby switch on the front panel of the unit The SWITCHING DISPLAY MODE screen appears Pressing the 1 standby switch repeatedly switches between the SWITCHING ...

Page 22: ...e SWITCHING INPUT SOURCE screen appears 3 Press either the or button to move the B cursor and select an input source 4 Press and hold the and buttons simultaneously for more than 2 seconds The information present operating state screen appears Example when DVI is selected Notes The configuration cannot be switched simply by moving the B cursor In order to apply the change press and hold the and bu...

Page 23: ...he rear panel The information or present operating state screen appears Pressing either button repeatedly changes the display as follows Information t present operating state t display off The information screen automatically turns off after about 15 seconds 2 With the above screen displayed press and hold the and buttons simultaneously for more than 2 seconds The SWITCHING INPUT SOURCE screen app...

Page 24: ... Normal power can be temporarily restored for menu operations by the following method Displaying the menu screen 1 In the standby mode the LED indicator of the 1 standby switch is lit in amber press and hold the or buttons on the rear panel simultaneously for more than 2 seconds The LED indicator lights up in green and the information screen appears You can change the following settings from the m...

Page 25: ... between the unit and computer and turn on the computer page 16 2 Connect the supplied USB cable between the unit s UP USB upstream port and the computer s or another USB hub s USB down USB downstream port The USB function is automatically set up Connecting the supplied USB cable also enables the following To calibrate the unit An optional calibration kit is required To calibrate multiple units in...

Page 26: ...port and the computer s USB down USB downstream port Note Up to five units can be connected in a daisy chain Connector Pin Assignment DIGITAL DVI 24 pin female connector NC for LMD DM20 Computer 1st unit 2nd 3rd 4th 5th 6th Pin number Functions 1 TMDS Data 2 2 TMDS Data 2 3 TMDS Data 2 4 Shield 4 TMDS Data 4 5 TMDS Data 4 6 DDC Clock 7 DDC Data 8 NC 9 TMDS Data 1 10 TMDS Data 1 11 TMDS Data 1 3 Sh...

Page 27: ... 8 GND 9 ML_Lane 1 p 10 ML_Lane 0 n 11 GND 12 ML_Lane 0 p 13 CONFIG1 14 CONFIG2 15 AUX CH p 16 GND 17 AUX CH n 18 Hot Plug Detect 19 Return 20 DP_PWR Pin number Functions 1 VCC 2 DATA 3 DATA 4 GND 1 2 19 20 1 4 2 3 Pin number Functions 1 VCC 2 DATA 3 DATA 4 GND LMD DM50 LMD DM30 LMD DM20 VGA to XGA regardless Normal mode pixel pixel 2048 2560 2560 2048 1536 2048 2048 1536 1200 1600 1600 1200 ISD m...

Page 28: ...lay resolution for a given input signal may not be appropriate for the specifications of the unit Refer to the computer instruction manual and adjust resolution When you turn off the unit while using the DisplayPort input the display becomes unstable Data is sent by the DisplayPort while the computer is running Do not turn off the unit while receiving a DisplayPort signal Do not turn off the unit ...

Page 29: ...hickness Sony is not liable for any damage or injury resulting from changing stands How to attach an arm stand 1 Place a soft cloth or cushioning material over a stable even surface 2 Put the LCD panel face down on the cushioning material 3 Remove the 4 screws using a cross head screwdriver then detach the tilt stand 4 Attach the arm stand to the LCD panel reversing the procedure above Do not try ...

Page 30: ... 3 8 inches LMD DM30 423 9 318 0 mm 16 3 4 12 5 8 inches LMD DM20 432 0 324 0 mm 17 1 8 12 7 8 inches Resolution H V LMD DM50 Landscape 2560 2048 pixels QSXGA Portrait 2048 2560 pixels LMD DM30 Landscape 2048 1536 pixels QXGA Portrait 1536 2048 pixels LMD DM20 Landscape 1600 1200 pixels UXGA Portrait 1200 1600 pixels Aspect LMD DM50 Landscape 5 4 Portrait 4 5 LMD DM30 DM20 Landscape 4 3 Portrait 3...

Page 31: ...ales Companies Guide 1 Optional accessories Calibration Kit LMD KT10 Display Network Manager LMD SN10 Medical Specifications Protection against electric shock Class I Protection against harmful ingress of water Ordinary Degree of safety in the presence of a flammable anesthetic mixture with air or with oxygen or nitrous oxide Not suitable for use in the presence of a flammable anesthetic mixture w...

Page 32: ... portrait Side portrait Front landscape Side landscape LMD DM30 DM20 Front portrait Side portrait 390 15 3 8 522 2 20 5 8 583 7 23 220 8 3 4 474 5 18 3 4 479 9 19 541 4 21 3 8 103 5 4 1 8 30 7 1 1 4 367 14 1 2 521 9 20 5 8 583 4 23 220 8 3 4 ...

Page 33: ...Dimensions 33 Front landscape Side landscape Unit mm inches 474 18 3 4 468 4 18 1 2 529 9 20 7 8 95 5 3 7 8 38 7 1 9 16 ...

Page 34: ...Sony Corporation ...

Reviews: