background image

20

Recording from a
tape

— High-speed Dubbing

You can use TYPE I (normal) or TYPE II
(CrO

2

) tapes. The recording level is

automatically adjusted.

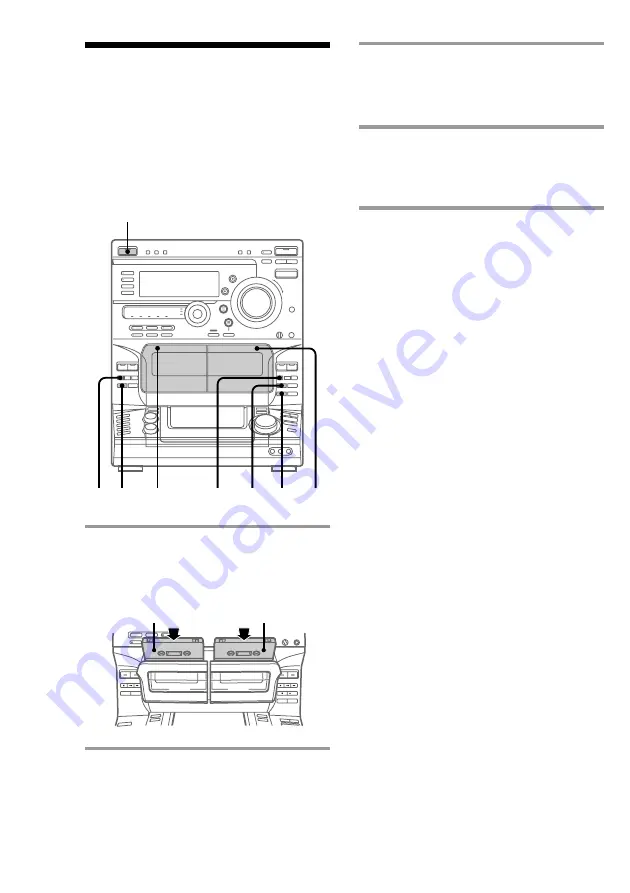
1

Press PUSH 

6

 and insert a recorded

tape in deck A and a blank tape in
deck B.

2

Press H SPEED DUB.

Deck B stands by for recording.

1

1

2

3

4

p

With the side you want to
play/record on facing forward

1

/

u

(Power)

p

3

Press DIRECTION repeatedly until

A

 appears to record on one side or

ß

 (or RELAY) to record on both

sides.

4

Press 

P

.

Dubbing starts.
When dubbing ends, decks A and B
automatically stop.

To stop dubbing

Press 

p

 on deck A or B.

Tips

• When you record on both sides, be sure to start

from the front side. If you start from the reverse
side, recording stops at the end of the reverse side.

• You don’t have to set DOLBY NR, since the tape in

deck B is automatically recorded in the same state
as the tape in deck A.

Notes

• If you set DIRECTION to 

ß

, when the tapes you

use have different lengths, the tape in each deck
reverses independently. If you select RELAY, the
tapes in both decks reverse together.

• You cannot record the surround effect.

Summary of Contents for LBT-DR7AV

Page 1: ...serial numbers are located on the rear panel Record the serial number in the space provided below Refer to them whenever you call upon your Sony dealer regarding this product Model No Serial No 3 865 551 13 1 Compact Hi Fi Stereo System LBT DR8AV LBT DR7AV LBT W900AV LBT XB800AV ...

Page 2: ...it different from that to which the receiver is connected Consult the dealer or an experienced radio TV technician for help CAUTION You are cautioned that any changes or modifications not expressly approved in this manual could void your authority to operate this equipment NOTICE FOR THE CUSTOMERS IN CANADA CAUTION TO PREVENT ELECTRIC SHOCK DO NOT USE THIS POLARIZED AC PLUG WITH AN EXTENSION CORD ...

Page 3: ...aying CDs without interruption 25 The Tape Deck Recording on a tape manually 26 Recording CDs by specifying the track order 27 DJ Effects Looping part of a CD 29 Flashing part of a CD 29 Sound Adjustment Adjusting the sound 30 Selecting the audio emphasis 31 Adjusting the audio emphasis 32 Making a personal audio emphasis file 34 Enjoying Dolby Pro Logic Surround sound 35 Other Features Using the ...

Page 4: ...Follow steps 1 through 5 to hook up your system using the supplied cords and accessories The above illustration is of the LBT DR7AV Left front speaker Right front speaker AM loop antenna FM antenna Center speaker Right rear speaker Left rear speaker ...

Page 5: ...peaker cords to the SURROUND SPEAKER CENTER jacks 3 Connecting the rear speakers Connect the speaker cords to the SURROUND SPEAKER REAR jacks Black Stripe Red Solid Black Stripe Red Solid Black Stripe Red Solid CENTER REAR L R CENTER REAR L R continued Notes If PUSH POWER appears in the display when you turn on the system press 1 u to turn off the system and check the speaker connections Keep the ...

Page 6: ...your system has a VOLTAGE SELECTOR on the rear panel set it to the position of your local power line voltage 4 Connect the power cord to a wall outlet The demonstration appears in the display If the supplied adapter on the plug does not fit your wall outlet detach it from the plug only for models equipped with an adapter 5 Deactivate the demonstration mode by pressing DISPLAY for LBT W900AV XB800A...

Page 7: ...eakers Before you connect them determine the best location for your speakers 1 Place the front speakers at an angle of 45 degrees from your listening position Step 2 Setting up the speakers Front speaker L Front speaker R Rear speaker R Rear speaker L Front speaker L Front speaker R Rear speaker L Rear speaker R Center speaker Center speaker 45 2 Place the center speaker so it is placed at about t...

Page 8: ...EVEL and REAR LEVEL on the remote to adjust the volume levels The volume levels from each speaker should be the same 4 Press T TONE when you are done adjusting The test tone is turned off Tip If you turn VOLUME or press VOL on the remote all the speaker volumes change Note The test tone feature works only for Dolby Pro Logic Surround sound Adjusting the speaker volume To enjoy Dolby Pro Logic Surr...

Page 9: ...stration purposes 3 5 1 2 4 1 Press t CLOCK SET The hour indication flashes 2 Press TUNING to set the hour 3 Press ENTER NEXT The minutes indication flashes 4 Press TUNING to set the minutes 5 Press ENTER NEXT The clock starts Tip If you make a mistake start over from step 1 Notes You cannot set the time in Power Saving mode see page 11 The clock setting is canceled when you disconnect the power c...

Page 10: ...another station on an existing preset number Start over from step 1 After step 4 press TUNING to select the preset number on which you want to store the station You can add a new preset number after the last preset number n Step 4 Presetting radio stations You can preset the following number of stations 2 band model 20 for FM and 10 for AM 3 band model 20 for FM 10 for AM and 5 for UKV The bands y...

Page 11: ... to select the preset number you want to erase Select ALL ERASE to erase all preset numbers 3 Press ENTER NEXT When you erase a preset number all the following preset numbers shift up and reduce by one To change the AM tuning interval Except for the European and the Middle Eastern models The AM tuning interval is factory preset to 9 kHz 10 kHz in some areas To change the AM tuning interval to 10 k...

Page 12: ...ng mode and the demo mode The 1 u indicator and timer indicator when the timer is set light up even in the Power Saving mode The timer works in the Power Saving mode Notes You cannot set the time in the Power Saving mode One Touch Play function does not work in the Power Saving mode Saving power in standby mode continued ...

Page 13: ...r more CDs on the tray The disc tray rotates so you can insert other CDs 3 Close the front cover 4 Press one of the DISC 1 DISC 5 buttons Playback starts If you press P or CD on the remote playback starts from the CD in the playing position AMS VOL 1 3 4 CD VOLUME P With the label side up When you play a CD single place it on the inner circle of the tray Disc number in the playing position Track n...

Page 14: ...e playback or CD on the remote During playback or pause turn the jog dial clockwise to go forward or counterclockwise to go backward and release it when you reach the desired track Or press AMS to go forward or AMS to go backward on the remote Press and hold or 0 during playback and release at the desired point Press one of the DISC 1 DISC 5 buttons or DISC SKIP Press PLAY MODE repeatedly until 1 ...

Page 15: ...n one side or ß or RELAY to record on both sides 7 Press P Recording starts To stop recording Press p on deck B or on the CD player Tips When you want to record on the reverse side press ª after pressing CD SYNC in step 5 so the indicator on the ª button for the reverse side lights up green When you record on both sides be sure to start from the front side If you start from the reverse side record...

Page 16: ... preset radio stations Press TUNING MODE repeatedly in step 2 until MANUAL appears then press TUNING to tune in the desired station Tips Pressing TUNER BAND while the system power is off automatically turns on the system and tunes in the last received station One Touch Play One Touch Play is not available in Power Saving mode You can switch from another source to the radio by pressing TUNER BAND A...

Page 17: ...y until the desired band appears in the display 2 Press TUNING MODE repeatedly until PRESET appears in the display 3 Press TUNING to tune in the desired preset station 4 Press PUSH 6 and insert a blank tape into deck B 5 Press r REC Deck B stands by for recording and the indicator on the button for the front side lights up green 6 Press DIRECTION repeatedly until A appears to record on one side or...

Page 18: ... frequency signals press DOLBY NR before step 7 so DOLBY NR B appears in the display To record with the surround effect press DSP so SUR appears in the display The equalizer settings will not be recorded To improve broadcast reception move the supplied antennas Playing a tape You can play any type of tape TYPE I normal TYPE II CrO2 or TYPE IV metal The deck automatically detects the tape type You ...

Page 19: ...ing circumstances When the unrecorded space between songs is less than 4 seconds long If completely different information is recorded on the left and right channels When there are continuous sections of extremely low level or low frequency sound like those of a baritone sax When the system is placed near a TV In this case we recommend moving the system farther away from the TV or turning off the T...

Page 20: ...record on both sides 4 Press P Dubbing starts When dubbing ends decks A and B automatically stop To stop dubbing Press p on deck A or B Tips When you record on both sides be sure to start from the front side If you start from the reverse side recording stops at the end of the reverse side You don t have to set DOLBY NR since the tape in deck B is automatically recorded in the same state as the tap...

Page 21: ...0 tracks information about the track numbers over 20 does not appear Notes The display may not show all the characters depending on the disc This player can only display the disc titles track titles and artist names from CD TEXT discs Other information cannot be displayed If a title or name has more than 12 characters the first 12 characters will light up after the title or name scrolls by in the ...

Page 22: ...laying CD tracks in random order Shuffle Play You can play all the tracks on one or all CDs in random order 1 Press FUNCTION repeatedly until CD appears in the display 2 Press PLAY MODE repeatedly until ALL DISCS SHUFFLE or 1 DISC SHUFFLE appears in the display ALL DISCS SHUFFLE shuffles the tracks on all the CDs in the player 1 DISC SHUFFLE shuffles the tracks on the CD in the playing position 3 ...

Page 23: ...FFLE 1 DISC SHUFFLE or PROGRAM disappears from the display The tracks continue playing in their original order To select the desired CD Press one of the DISC 1 DISC 5 buttons during 1 Disc Shuffle Play Tips You can start Shuffle Play during Normal Play by pressing PLAY MODE repeatedly until ALL DISCS SHUFFLE or 1 DISC SHUFFLE appears in the display To skip a track turn the jog dial clockwise or pr...

Page 24: ...repeatedly until PROGRAM ALL DISCS SHUFFLE or 1 DISC SHUFFLE disappears from the display To Check the program Clear the last selected track Clear a specific track Add a track to the program Clear the entire program Tips The program you created remains in the CD player s memory even after it has been played Press P to play the same program again If appears instead of the total playing time while pr...

Page 25: ...an play CDs without pausing between tracks 1 3 2 1 Press FUNCTION repeatedly until CD appears in the display 2 Press NON STOP so the indicator on this button lights up 3 Press P To cancel Non Stop Play Press NON STOP so the indicator on this button goes off ...

Page 26: ...e lights up green 4 Press DIRECTION repeatedly until A appears to record on one side or ß or RELAY to record on both sides Recording on a tape manually The Tape Deck 2 ª 1 3 4 5 p DOLBY NR 5 Press P Recording starts 6 Start playing the source to be recorded To Press Stop recording p on deck B Pause recording P Tips When you want to record on the reverse side press ª after pressing r REC in step 3 ...

Page 27: ...ION repeatedly until CD appears in the display 4 Press PLAY MODE repeatedly until PROGRAM appears in the display 5 Press DISC SKIP or D SKIP on the remote to select a CD 6 Turn the jog dial until the desired track appears in the display 7 Press PLAY MODE once The track is programmed First STEP and the programmed playing order appear then the total playing time appears 3 12 2 11 13 5 4 7 6 1 p CHEC...

Page 28: ...recording Press p on deck B or on the CD player To check the order Press CHECK on the remote repeatedly After the last track CHECK END appears To cancel Program Edit Press PLAY MODE repeatedly until PROGRAM ALL DISCS SHUFFLE or 1 DISC SHUFFLE disappears from the display Selecting the tape length automatically Tape Select Edit You can check the most suitable tape length for recording a CD Note that...

Page 29: ...ent loop lengths With the Flash function you can flash the CD sound during playback This lets you create original recordings Press and hold FLASH during playback at the point you want to start the Flash function and release to resume normal playback To adjust the flash length Turn the jog dial while holding FLASH or press FILE SELECT V v while holding FLASH on the remote to select different flash ...

Page 30: ...evel Notes The super woofer mode changes to MUSIC in the SYNC BASS Synchronized Bass mode If you press MODE in the SYNC BASS mode this mode is canceled and the super woofer mode changes to MOVIE You can change the super woofer level to LOW or HIGH in the SYNC BASS mode However if you change the level to SUPER WOOFER FLAT the SYNC BASS mode is canceled To listen through the headphones Connect the h...

Page 31: ...me appears in the display When using the remote press FILE SELECT V v repeatedly until the desired audio emphasis name appears continued To cancel the audio emphasis Press EFFECT or FILE SELECT ON OFF on the remote repeatedly so the indicator on the EFFECT button goes off Music menu options SUR appears if you select an audio emphasis with a surround effect Press To select V v MENU 1 MENU 2 B b ROC...

Page 32: ...izer function Press SYNC EQ again so the indicator goes off The Synchronized Equalizer function is canceled also when you cancel the audio emphasis you reselect the audio emphasis from the music menu you activate the surround effect you adjust the graphic equalizer you sing along KARAOKE Notes The Synchronized Equalizer function does not work in KARAOKE mode P FILE MEMORY does not work in this mod...

Page 33: ...nd Menu lets you select the sound characteristics according to the sound you are listening to Press DSP until the desired DSP mode appears in the display Each time you press this button the menu changes as follows OFF Deactivates the DSP mode SURROUND Reproduces stereo sources in surround sound HALL Reproduces the acoustics of a concert hall THEATER Reproduces the acoustics of a movie theater ENHA...

Page 34: ...the graphic equalizer and or surround effect see Adjusting the audio emphasis on page 32 2 Press P FILE MEMORY A personal file number appears in the display 3 Press B b to select the file number P FILE where you want to store the sound effect 4 Press ENTER The adjusted sound effects are stored under the selected file number Any settings previously stored at this memory location are erased and repl...

Page 35: ... lights up 2 Play a program source To turn off the Dolby Pro Logic Surround sound Press PRO LOGIC so the indicator above the PRO LOGIC button goes off Notes You cannot use the Dolby Pro Logic Surround sound and Surround Menu functions at the same time When you record the sound turn off the Dolby Pro Logic Surround sound The audio emphasis setting will be canceled when you turn on the Dolby Pro Log...

Page 36: ...dcasts Select a station from the FM band When you tune in a station that provides RDS services the station name appears in the display To check the RDS information Each time you press DISPLAY the display changes as follows n Station name Frequency Program type Clock display Effect P FILE name or EFFECT ON OFF If an RDS broadcast is not received the station name and the program type may not appear ...

Page 37: ...grams ROCK Rock music programs EASY MUSIC Easy listening middle of the road music L CLASSICAL Classical music such as instrumental vocal and choral works S CLASSICAL Performances of major orchestras chamber music opera etc OTHER MUSIC Music such as rhythm and blues and reggae WEATHER Weather information FINANCE Stock market reports and trading etc CHILDREN Programs for the young SOCIAL Programs ab...

Page 38: ...3 2 4 1 Turn MIC LEVEL to MIN to turn down the microphone level 2 Connect an optional microphone to the MIX MIC DOCUMENTARY Investigative features ALARM TEST Test signal for emergency broadcasts ALARM ALARM Emergency broadcasts Note NO PTY appears when the program you selected is not currently being broadcasted Using the Radio Data System RDS continued ...

Page 39: ... tape 4 Start playing the music and adjust the volume 5 Turn MIC LEVEL to adjust the microphone volume When you are done Turn MIC LEVEL to MIN and disconnect the microphone from MIX MIC then press KARAOKE PON MPX repeatedly until h disappears from the display Note With some songs vocals may not be canceled when you select KARAOKE PON 1 Prepare the microphone and the karaoke effect Then insert a bl...

Page 40: ...l sound may be reduced as well as the singer s voice when the source sound was recorded monaurally The singer s voice may not be reduced when only a few instruments are playing a duet is being sung the source has strong echoes or chorus the singer s voice deviates from the center the voice on the source is singing high soprano or tenor notes Press SLEEP Each time you press this button the minutes ...

Page 41: ... the volume 3 4 5 6 7 8 DAILY 2 9 3 Press t CLOCK SET SET appears and DAILY flashes in the display 4 Press TUNING to select DAILY then press ENTER NEXT ON appears and the hour indication flashes in the display 5 Set the time to start playback Press TUNING to set the hour then press ENTER NEXT The minutes indication flashes Press TUNING to set the minutes then press ENTER NEXT The hour indication f...

Page 42: ...ess ENTER NEXT ON appears and the hour indication flashes in the display To check the setting 1 Press DAILY 2 TIMER OFF appears in the display 3 Press DAILY again To cancel the timer operation 1 Press DAILY 2 TIMER OFF appears in the display Notes The system turns on 15 seconds before the preset time You cannot set the timer if the timer on and off times are the same When you set the Sleep Timer t...

Page 43: ...el is set to the minimum To check the setting 1 Press REC 2 TIMER OFF appears in the display 3 Press REC again To change the setting start over from step 1 on the previous page To cancel the timer operation 1 Press REC 2 TIMER OFF appears in the display Notes The system turns on 15 seconds before the preset time If the system is on at the preset time the Timer recording will not be made You cannot...

Page 44: ...put of the turntable Optional AV components Connecting an MD deck for analog recording Be sure to match the color of the plugs and the connectors To listen to the sound of the connected MD deck press FUNCTION repeatedly until MD appears Refer to the instructions included with your MD deck for details Note Using the turntable at high volume may cause distortion or howling This is often caused by th...

Page 45: ...or the VIDEO2 INPUT jack on the front panel You can also connect a DVD player to the DVD INPUT jacks on the rear panel LBT DR8AV W900AV only Connecting a TV To see the picture from the connected components connect the input jack of your TV to the VIDEO OUT jack with the video connecting cable not supplied To the input jack of the TV continued When using a TV Turn on the TV and select the video inp...

Page 46: ...ng on the TV you may not be able to control your TV or to use some buttons above You can Turn on or off the TV Select the input source for the TV Adjust the volume of the TV Change the channel of the TV To the audio output of the VCR To the video output of the VCR You can control Sony TVs using the buttons below TV 1 u TV CH TV VOL TV VIDEO Connecting a VCR Be sure to match the color of the plugs ...

Page 47: ...r output of the DVD player DVD 5 1CH When your DVD player has stereo analog outputs Be sure to match the color of the plugs and the connectors Connect the LINE OUT audio output jack of your DVD player to the FRONT jacks of DVD INPUT with the audio connecting cable To listen to the sound from the connected DVD player press DVD 5 1CH repeatedly so the indicator above the button goes off At this mome...

Page 48: ... To prevent a gas explosion do not connect the ground wire to a gas pipe For European models Insulated wire not supplied AM FM 75 AM COAXIAL FM 75 Connecting outdoor antennas 75 ohm coaxial cable not supplied Except for European models For European models IEC standard socket not supplied AM FM 75 AM COAXIAL FM 75 Connect an outdoor antenna to improve the reception Refer to the instructions of each...

Page 49: ...rm location or is placed in a very damp room moisture may condense on the lens inside the CD player Should this occur the system will not operate properly Remove the CD and leave the system turned on for about an hour until the moisture evaporates When you move the system take out any discs If you have any questions or problems concerning your stereo system please consult your nearest Sony dealer ...

Page 50: ...e connected Insert only the stripped portion of the speaker cord into the SPEAKER jack Inserting the vinyl portion of the speaker cord will interfere with the speaker connection The volume level is automatically set to the minimum during the Timer recording Before placing a cassette in the tape deck Take up any slack in the tape Otherwise the tape may get entangled inside the tape deck and become ...

Page 51: ... Demagnetize them see page 50 There is no microphone sound Turn VOLUME or MIC LEVEL to adjust the microphone volume Make sure the microphone is connected to the MIX MIC jack correctly There is severe hum or noise A TV or VCR is placed too close to the stereo system Move the stereo system away from the TV or VCR 0 00 for European and Brazilian models or 12 00AM for other models flashes in the displ...

Page 52: ...DIN Continuous RMS power output Reference 120 120 watts 8 ohms at 1 kHz 10 THD Music power output Reference 200 200 watts 8 ohms at 1 kHz 10 THD The tape does not erase completely The record playback heads are magnetized Demagnetize them see page 50 There is excessive wow or flutter or the sound drops out The capstans or pinch rollers are dirty Clean them see page 50 Noise increases or the high fr...

Page 53: ...N power output Rated 30 watts 8 ohms at 1 kHz DIN Continuous RMS power output Reference 40 watts 8 ohms at 1 kHz 10 THD Rear Speaker DIN power output Rated 15 15 watts 16 ohms at 1 kHz DIN Continuous RMS power output Reference 20 20 watts 16 ohms at 1 kHz 10 THD Inputs PHONO IN phono jacks sensitivity 3 mV impedance 47 kilohms MIX MIC phone jack sensitivity 1 mV impedance 10 kilohms VIDEO1 IN phon...

Page 54: ...nced Intermediate frequency 10 7 MHz AM tuner section Tuning range North American model 530 1 710 kHz with the tuning interval set at 10 kHz 531 1 710 kHz with the tuning interval set at 9 kHz European model 531 1 602 kHz with the tuning interval set at 9 kHz Middle Eastern model 531 1 602 kHz with the tuning interval set at 9 kHz Other models 531 1 602 kHz with the tuning interval set at 9 kHz 53...

Page 55: ...nsions w h d Approx 180 130 170 mm 7 1 8 5 1 8 6 3 4 in Mass Approx 1 5 kg 3 lb 5 oz General Power requirements North American model 120 V AC 60 Hz European model 230 V AC 50 60 Hz Mexican model 120 V AC 50 60 Hz Australian model 230 240 V AC 50 60 Hz Other models 120 V 220 V or 230 240 V AC 50 60 Hz Adjustable with voltage selector Power consumption LBT DR8AV 260 watts LBT DR7AV 205 watts LBT W90...

Page 56: ...ually 26 selecting tape length automatically 28 timer recording 42 Repeat Play 22 Resetting the system 52 S Saving power 11 Saving recordings 49 Setting the time 9 Shuffle Play 22 Sleep Timer 40 Sound adjustment 30 Speakers 5 7 Surround effect 33 Surround menu 33 SYNC BASS 30 SYNC EQ 31 T U V W X Y Z Tape Select Edit 28 Test tone 8 Timer falling asleep to music 40 timer recording 42 waking up to m...

Reviews: