– 9 –
KV
-XF29M35/XF29M63/XF29M93
RM-954
5
Using Your New TV
Using Y
our New TV
AUTO
PROGR
1
ONE-PUSH AUTOMATIC PROGRAMMING
ONE-PUSH AUTOMATIC PROGRAMMING
AUTO PROGRAM
TV SYS:AUTO
VHF LOW
PR:01
PROGR
Notes
• If you connect a monaural VCR, connect the yellow plug to
(the yellow
jack) and the black plug to -L (MONO) (the white jack).
• If you connect a VCR to the
˘
(antenna) terminal, preset the signal
output from the VCR to the program number 0 on the TV.
• If both
(S video input) and
…
1 (video input) at the rear of your TV
are input at the same time, the
(S video input) is automatically
selected. To view
…
1 (video input), disconnect the S video cable.
• When no signal is input to the connected video equipment, the TV screen
becomes blue.
Step 2
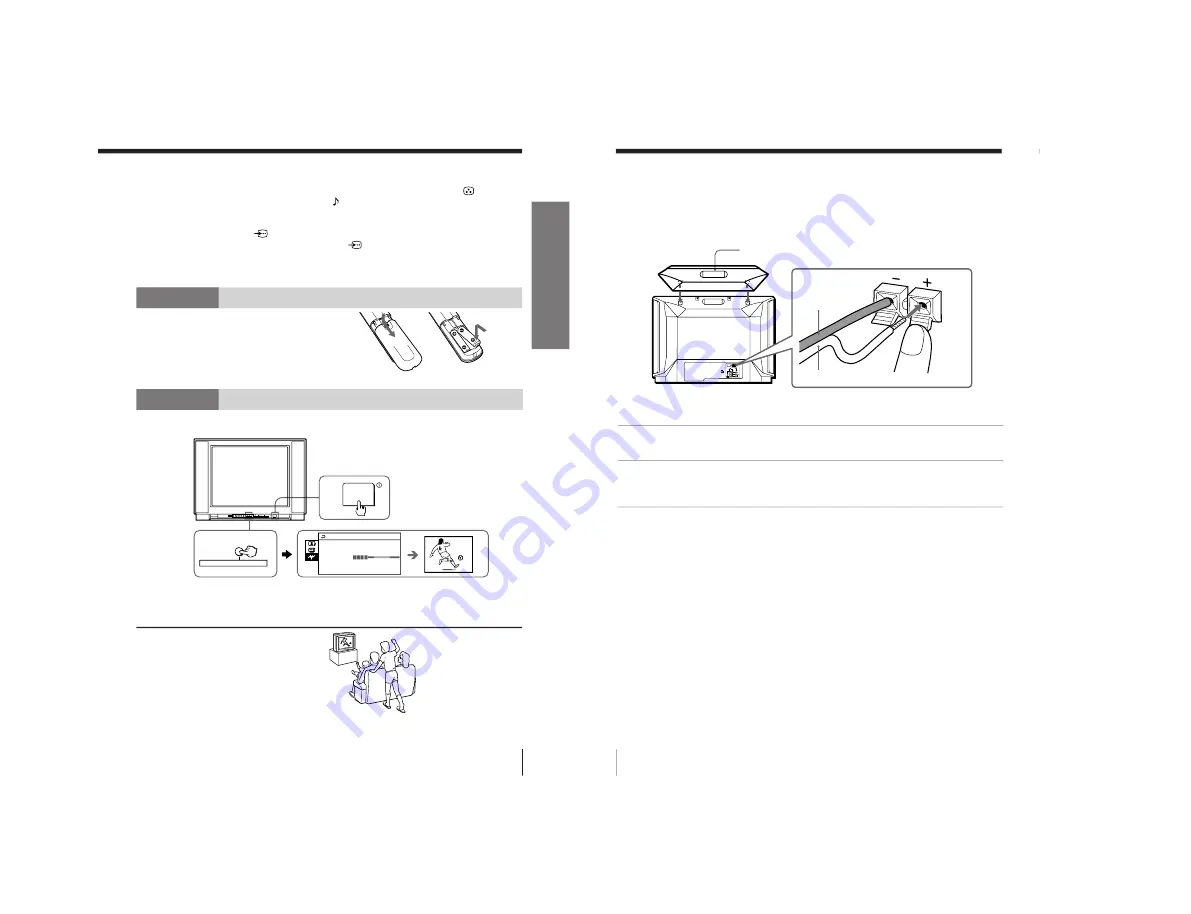
Insert the batteries
into the remote
Note
• Do not use old batteries nor use different types of batteries together.
Step 3
Preset the channels automatically
Tips
• If you want to stop the automatic channel presetting, press MENU twice.
• If your TV has preset an unwanted channel or cannot preset a particular
channel, then preset your TV manually (see page 26 and 27).
Now You Are Ready. . .
To preset the channels manually, see
page 26 and 27.
1
2
Front of TV
6
Using Your New TV
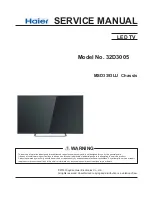
Connecting the 3D WOOFER
WOOFER
(8 )
3D WOOFER
Black wire
Red wire
1
2
1
Attach the 3D WOOFER into the footholds on the top of your TV.
2
Connect the wires to the 3D WOOFER (8
Ω
) terminals at the rear of your TV.
The red wire should be connected to the
‘
red terminal and the black wire
to the
’
black terminal.
Notes
• Connect only the supplied 3D WOOFER; otherwise your TV may
malfunction.
• Unplug your TV from the wall outlet when connecting the 3D WOOFER.
• To prevent a malfunction caused by a short circuit of the terminals, make
sure that none of the 3D WOOFER wire strands stick out, making contact
with the neighbouring speaker terminal.
You can enjoy high quality sound by connecting the 3D WOOFER.
Rear of TV


