background image

21

GB

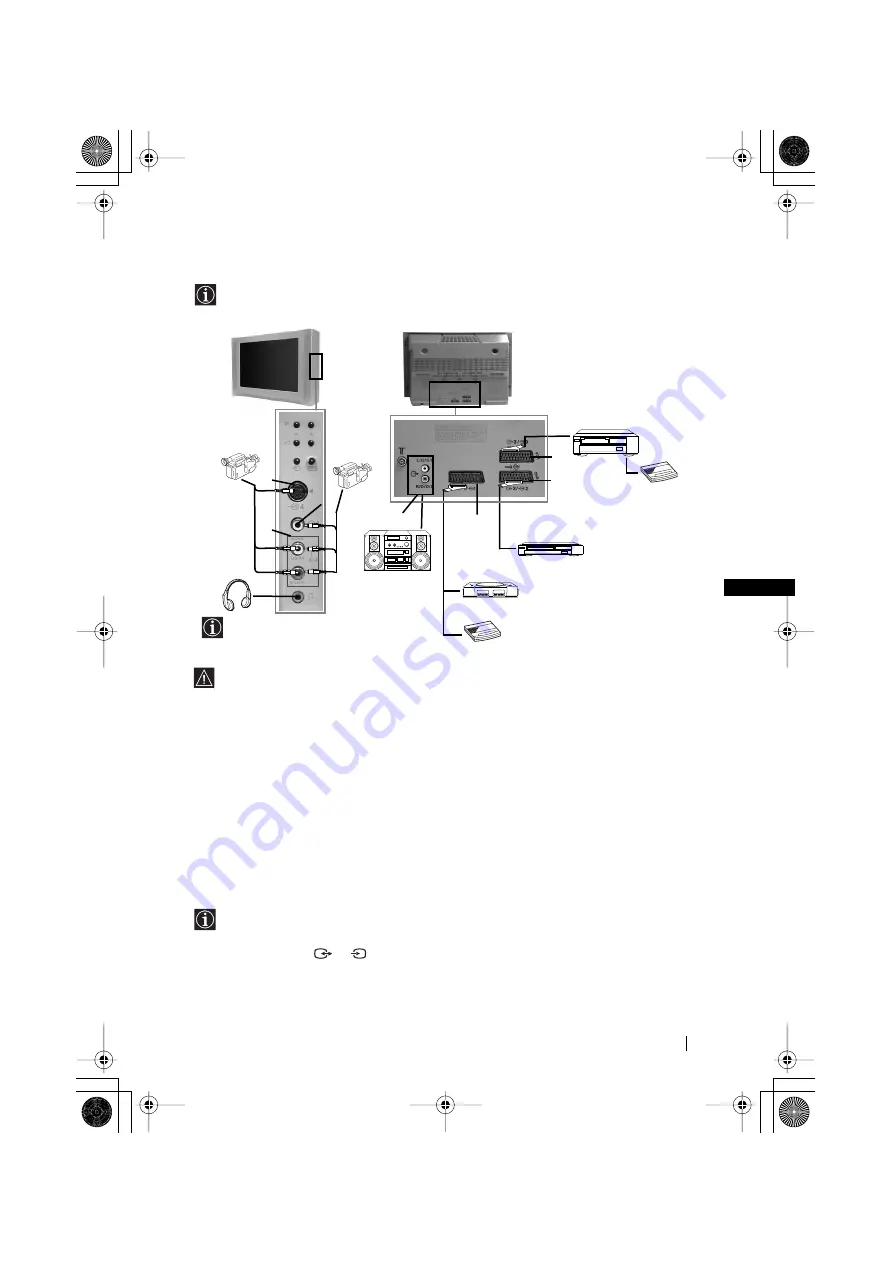
Connecting Optional Equipment

Using the following instructions you can connect a wide range of optional equipment to


your TV set. (Connecting cables are not supplied).

• To avoid picture distortion, do not connect external equipment to connectors 

A

 and 

B


at the same time.

• Do not connect a Decoder to the Scart 

F

.

• Games that use a “GUN” attachment to point at the screen do not work correctly due to 

100Hz technology used in this television.

Connecting a VCR:

To connect a VCR, please refer to the section “Connecting the aerial and VCR” of this instruction 
manual. We recommend you connect your VCR using a scart lead. If you do not have a scart 
lead, tune in the VCR test signal to the TV programme number “0” by using the “Manual 

Programme Preset” option. (for details of how to manually programme these presets, see page 

16, step a).
Refer to your VCR instruction manual to find out how to find the output channel of your VCR.

Connecting a VCR that supports Smartlink:

Smartlink is a direct link between the TV set and the VCR. For more information on 
Smartlink, please refer to the instruction manual of your VCR.
If you use a VCR that supports Smartlink, please connect the VCR to the TV using a Scart 
lead to the Scart 

3

/

3


G

.

S

Additional Information

continued...

1

2

“PlayStation”

*

Decoder

VCR

VCR

Decoder

Hi-fi

DVD

*

 “PlayStation” 

is a product of Sony 

Computer Entertainment, Inc.

*


“PlayStation

” is a trademark of Sony 

Computer Entertainment, Inc.

8mm/Hi8/

DVC

camcorder

S VHS/Hi8

DVC

camcorder

B

E

C

A

F

D

When you connect the headphones, 
the TV speakers will automatically 
be muted.

G

03GBKV28FX66U.fm  Page 21  Wednesday, January 15, 2003  5:44 PM

Summary of Contents for KV-28FX66U

Page 1: ...R FD Trinitron Colour Television KV 28FX66U 2002 by Sony Corporation Instruction Manual GB 4 088 479 13 1 01CoverKV28FX66U fm Page 1 Wednesday January 15 2003 5 49 PM ...

Page 2: ...nce with the following instructions The wires in this mains lead are coloured in accordance with the following code Blue Neutral Brown Live As the colours of the wires in the mains lead of this apparatus may not correspond with the coloured markings identifying the terminals in your plug proceed as follows The wire which is coloured blue must be connected to the terminal which is marked with the l...

Page 3: ...t 10 Sound Adjustment 11 Sleep Timer 12 Auto Format 12 AV3 Output 13 PIP Input 13 PIP Position 14 Language 14 Auto Tuning 14 Programme Sorting 15 Programme Labels 15 AV Preset 15 Manual Programme Preset 16 Picture Rotation 17 RGB Centring 17 Remote Control ID 17 Teletext 18 NexTView 19 Additional Information Connecting Optional Equipment 21 Using Optional Equipment 22 Remote Control Configuration ...

Page 4: ...wer lead as this could result in damage We recommend you wind any excess lead around the holders provided on the rear of the TV Place the TV on a secure stable stand Do not allow children to climb on to it Do not place the TV on its side or face up Do not cover the ventilation openings of the TV with items such as curtains or newspapers etc Safety Information Never push objects of any kind into th...

Page 5: ...s refer to chapter Auto Format on page 12 8 This button only works in Teletext mode 9 Selecting Teletext Press this button to switch on teletext º Joystick a If Media Selector is switched to TV When MENU is switched on use these buttons to operate the menu system For details refer to Introducing and Using the Menu System on page 10 When MENU is switched off press OK to show a channel overview Then...

Page 6: ...mote control beeps for 30 seconds to enable you to find it easily To stop beeping press any button on the remote control Programme Up or Down Buttons Selects TV channels Selecting Input source Audio Input jacks Volume control buttons Auto Start Up Button Headphones jack Video Input jack S video Input jack Press on the mark Standby indicator On Off switch or Scart lead is optional For more details ...

Page 7: ...t Up Button on the TV set First Time Operation 1Connect the TV plug to the mains socket 220 240V AC 50Hz The first time that the TV set is connected it is usually turned on If the TV is off press the on off button on the TV set to turn on the TV The first time you switch on the TV a Language menu displays automatically on the TV screen 2Press the or button on the remote control to select the langu...

Page 8: ...omatically search and store all available broadcast channels for you This procedure could take some minutes Please be patient and do not press any buttons otherwise automatic tuning will not be completed In some countries the TV Broadcaster installs the channels automatically ACI system In this case the TV Broadcaster sends a menu in which you can select your city by pressing the or button and OK ...

Page 9: ...the programme number with the channel TV Broadcast you wish to rearrange then press the button 2 Press the or button to select the new programme number position for your selected channel TV Broadcast then press OK 3 Repeat steps b 1 and b 2 if you wish to change the order of the other channels 8Press the MENU button to remove the menu from the screen Programme Sorting Programme 01 TVE2 41 TVE 02 T...

Page 10: ... store the new adjustment Level 1 Level 2 Level 3 Function Picture Adjustment Select Enter Menu Picture Mode Contrast Brightness Colour Sharpness Reset Noise Reduction Personal AUTO Picture Adjustment Select Enter Picture Mode Contrast Brightness Colour Sharpness Reset Noise Reduction Personal AUTO This menu also allows you to customise the picture mode based on the programme you are watching Pict...

Page 11: ...able A for channel 1 B for channel 2 Auto Volume Off volume level changes according to the broadcast signal On volume level of the channels will stay the same independent of the broadcast signal e g in the case of advertisements TV Speakers On to listen to the TV from the set speakers Off to listen to the TV from an external amplifier connected to the audio outputs on the rear of the TV set If you...

Page 12: ... one of the following formats Smart Imitation of wide screen effect for 4 3 broadcast 4 3 Conventional 4 3 picture size full picture information 14 9 Compromise between 4 3 and 16 9 picture size Zoom Widescreen format for letterbox movies Wide For 16 9 broadcast Full picture information In Smart Zoom and 14 9 modes parts of the top and bottom of the screen are cut off Press or to adjust the positi...

Page 13: ...en To do this after selecting the option press Then press repeatedly or to select the desired source AV1 AV2 AV3 AV4 or TV Finally press OK to store S S S Menu System Level 1 Level 2 Level 3 Function continued Picture Adjustment Select Enter Menu Picture Mode Contrast Brightness Colour Sharpness Reset Noise Reduction Personal AUTO Features Sleep Timer Auto Format AV3 Output PIP Input PIP Position ...

Page 14: ...lect Enter Features Sleep Timer Auto Format AV3 Output PIP Input PIP Position Off On AUTO AV1 Picture Adjustment Select Enter Menu Picture Mode Contrast Brightness Colour Sharpness Reset Noise Reduction Personal AUTO Set Up Auto Tuning Programme Sorting Select NexTView AV Preset Manual Set Up Select Enter Menu Set Up Auto Tuning Programme Sorting Select NexTView AV Preset Manual Set Up Select Ente...

Page 15: ... and finally press OK to store Level 1 Level 2 Level 3 Function Picture Adjustment Select Enter Menu Picture Mode Contrast Brightness Colour Sharpness Reset Noise Reduction Personal AUTO Set Up Auto Tuning Programme Sorting Select NexTView AV Preset Manual Set Up Select Enter Menu Set Up Auto Tuning Programme Sorting Select NexTView AV Preset Manual Set Up Select Enter Menu Set Up Language Auto Tu...

Page 16: ...ion Normally the automatic fine tuning AFT will give the best possible picture however you can manually fine tune the TV to obtain a better picture reception in case the picture is distorted To do this while watching the channel TV Broadcast you wish to fine tune select the AFT option and press Next press or to adjust the fine tuning between 15 and 15 Finally press OK twice to store d Skip any unw...

Page 17: ... Reduction Personal AUTO Enter Detail Set Up Select Picture Rotation RGB Centring Remote Control ID 0 0 5 Set Up Auto Tuning Programme Sorting Select NexTView AV Preset Manual Set Up Select Enter Menu Set Up Auto Tuning Programme Sorting Select NexTView AV Preset Manual Set Up Select Enter Menu Set Up Select Enter Menu Language Auto Tuning Programme Sorting Programme Labels AV Preset Manual Progra...

Page 18: ...ss it again to conceal the information To select a sub page A teletext page may consist of several sub pages In this case the page number that appears on the upper left corner will change from white to green and one or more arrows will appear next to the page number Repeatedly press the or buttons on the remote control to watch the desired sub page To Switch Off Teletext Press Fastext Fastext serv...

Page 19: ...he remote control to watch the Overview interface see fig 2 As soon as you enter the NexTView service the of NexTView data available will be shown in the bottom left corner of the screen Once you have entered the service the of data will not increase 3 To navigate through NexTView moving right or left press or moving upwards or downwards press or to confirm a selection press OK 4 To switch NexTVie...

Page 20: ... more than 8 broadcast channels you can select 8 of them to create your personal list After you have created your personal list the default list can be restored To restore it select Auto by pressing button on the remote control remind list Shows you the list with all the programmes maximum 5 programmes that you have selected to be reminded about Record This function only works if you have connecte...

Page 21: ...sing the Manual Programme Preset option for details of how to manually programme these presets see page 16 step a Refer to your VCR instruction manual to find out how to find the output channel of your VCR Connecting a VCR that supports Smartlink Smartlink is a direct link between the TV set and the VCR For more information on Smartlink please refer to the instruction manual of your VCR If you use...

Page 22: ...bol Input Signals 1 Audio video input signal through the Scart connector E 1 RGB input signal through the Scart connector E This symbol appears only if an RGB source has been connected 2 Audio video input signal through the Scart connector F 2 RGB input signal through the Scart connector F This symbol appears only if an RGB source has been connected 3 Audio video input signal through the Scart con...

Page 23: ...ns do not work please check that you entered the correct code set or try the next code listed against the brand Your brand codes may be lost if weak batteries are not replaced within a few minutes To reset your brand of DVD or VCR please repeat the above steps A small label is added inside the battery door to allow you to record your brand codes Not all brands are covered and not all models of eve...

Page 24: ...25 W Standby Power Consumption 0 3 W Dimensions w x h x d approx 797 x 519 x 523 mm Weight approx 49 Kg Remote Control Locator coverage up to 10 m in open field The optimum distance is up to approximately 10 meters without interference However the distance may vary according to the surroundings and environment Even within the signal reception area there are some spots dead spot where the RF signal...

Page 25: ...e Adjustment menu and select Reset to return to the factory settings Check that the optional equipment is on and press the button repeatedly on the remote control until the correct input symbol is displayed on the screen Press the button on the remote control Check that TV Speakers is On in the Sound Adjustment menu Check that headphones are not connected Using the menu system select the Picture A...

Page 26: ...icture reception Using the menu system select the Noise Reduction option in the Picture Adjustment menu and select Auto to re duce the noise in the picture Using the menu system assign an ID number to your remote control See Remote Control ID on page 17 Replace the batteries of the remote control and re assign an ID number to your remote control See Remote Control ID on page 17 Check that the Medi...

Page 27: ...ain transmitters are listed Information regarding the regional sub relay channel numbers can be obtained by contacting The BBC Engineering Information Dept Telephone Number 020 7852 5040 Additional Information 03GBKV28FX66U fm Page 27 Wednesday January 15 2003 5 44 PM ...

Page 28: ...This instruction manual is made from 100 recycled paper Halogen free flame retardant used in cabinets http www sony net Printed in UK 04B cover fm Page 2 Wednesday January 15 2003 5 44 PM ...

Reviews: