background image

10

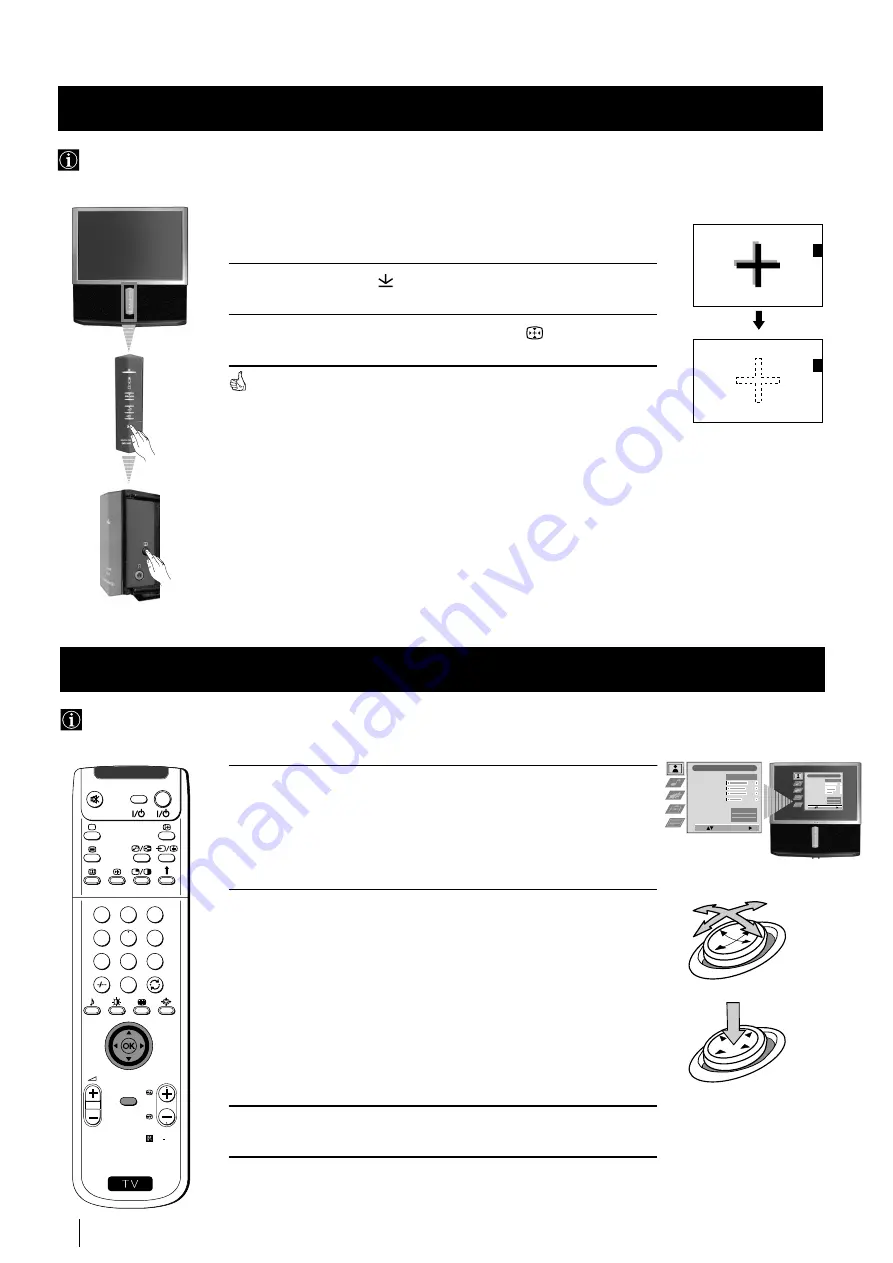
Kwrmwzw, yexil ve mavi renk hatlarwnwn 
otomatik aynw noktada birlexme ayarw

1

TV’nin ön kwsmwndaki


ixarete basarak ön kumanda panelini açwnwz.

Ön kwswm baqlantwlarwnwn saq tarafwnda bulunan


tuxuna baswnwz.

Böylece hemen hemen 10 saniye sürecek olan otomatik aynw noktada 
birlexme ixlemi baxlar. Beyaz artw ixareti ekrandan kaybolduqunda, 
retroprojektor çalwxmaya hazwr demektir.

Notlar:

Otomatik aynw noktada birlexme ayarwnwn etkisiz olduqu zamanlar:

Giris sinyali yok.

Girix sinyali yetersiz.

Ekran direk olarak güçlü bir spot wxwqw veya günex wxwqw alwyor.

TeleteÍt ixlemde

NeÍTV’i ixlemde

TV’nin ilk kez çalwxtwrwlmasw  - Menü sistemi

Yerdeki mwknatwslaxmadan dolayw, görüntü belirsiz ve renklerde birbirine karwxma gözlenebilinir. Bu durumda devamwnda size 

sunduqumuz ixlemleri takip ediniz.

Renklerin üst üste konum ayarw (Aynw noktada birlexme)

1

Wlk menü basamaqwnw ekranda görüntülemek için 

MENU

 tuxuna 

baswnwz.

2

Menü veya istenilen seçimi deqixtirmek için joystiqi 

4


veya


$

doqru 

bastwrwn.

Menüye ve yapwlan terçihi girmek için joystiqi


z


bastwrwn.

Menüdeki bir önceki terçihe dönmek için joystiqi


Z


bastwrwn.

Seçilen obsiyonun ayarlarwnw deqixtirmek için


$

/

4

/

Z


veya


z


bastwrwn.

Seçimi hafwzaya almak ve teyit etmek için 

OK

 tuxuna baswn.

3

Tekrar normal televizyon ekranwna dönmek için 

MENU

 tuxuna baswn.

Bu retroprojektor deqixik operasyonlara rehberlik için ekranda bir menü sistemi kullanwr. Menülerde yer deqixtirmek için bu

uzaktan kumanda düqmelerine baswnwz.

Menü sisteminin ekranda tanwtwmw

S

RM 892

PROGR

MENU

1

4

7

2

5

8

0

3

6

9

VIDEO

TV

OK


Joystik:


$

/

4

/

Z


veya


z


bastwrwn.

OK

 tuxuna baswn. 

Joystick:

Resim Ayarlarw

Resim Modu
  Kontrast
  Parlaklwk
  Renk
  Keskinlik
     Normal
Sanal Zeka
Gürültü Tarama
Dijital Modu

Açk

Açk

DRC 50

Seç:

Menüde Gir:

Kixisel

Resim Ayarlarw

Resim Modu
  Kontrast
  Parlaklwk
  Renk
  Keskinlik
     Normal
Sanal Zeka
Gürültü Tarama
Dijital Modu

Açk

Açk

DRC 50

Seç:

Menüde Gir:

Kixisel

TV’nin ilk kez çalwxtwrwlmasw - Menü sistemi

Summary of Contents for KP-48PS1

Page 1: ...ojection TV Instruction Manual KP 61PS1 KP 61PS2 KP 53PS1 KP 48PS1 KP 48PS2 2001 by Sony Corporation GB Mode d emploi FR Bedienungsanleitung DE Manuale d Istruzioni IT Gebruiksaanwijzing NL Οδηγίες Χρήσης GR Kullanwm Kwlavuzu TR ...

Page 2: ...nd an appropriate plug fitted in accordance with the following instructions The wires in this mains lead are coloured in accordance with the following code Blue Neutral Brown Live As the colours of the wires in the mains lead of this apparatus may not correspond with the coloured markings identifying the terminals in your plug proceed as follows The wire which is coloured blue must be connected to...

Page 3: ...rial and VCR 7 First Time Operation Switching on the projection TV and Automatically Tuning 8 Adjusting colour Registration Convergence 10 Menu System Introducing the Menu System 10 On Screen display Menus Guide 11 Using the Menu System Adjusting the Picture 12 Adjusting the Sound 13 Using the Features menu 15 Manually Tuning the TV 16 Labelling a channel 17 Skipping programme positions 18 Using t...

Page 4: ...ed to mechanical vibrations To prevent fire keep inflammable objects or naked lights eg candles away from the TV Clean the TV with a soft lightly dampened cloth Do not use benzine thinner or any other chemicals to clean the TV Do not scratch the TV screen As a safety precaution unplug the TV before cleaning it Pull out the power lead by the plug Do not pull on the power lead itself Take care not t...

Page 5: ... 8 0 3 6 9 VIDEO TV Two batteries R6 type On Off Switch Standby indicator Volume control buttons Selecting input source S Video Input jack Video Input jack Audio Input jacks Auto Convergence button Headphone jack left side connectors right side connectors Press on the mark on the front of the projection TV to reveal the front connectors Programme up or down buttons selects TV channels Overview s ...

Page 6: ...oadcast VCR operation For more details please refer to the section Remote Control of other Sony Equipment To Temporarily Switch Off projection TV Press to temporarily switch off TV the standby indicator on projection TV lights up Press again to switch on TV from standby mode To save energy we recommend switching off completely when TV is not in use After 15 30 minutes without a signal and without ...

Page 7: ...ial and VCR or OUT IN VCR The Scart lead is optional If you use this optional connection it can improve picture and sound quality when using a VCR If you do not use a SCART lead after automatically tuning the projection TV refer to the Manually Tuning the TV section of this instruction manual to tune in the projection TV to the output of your VCR Also refer to your VCR instruction manual to find o...

Page 8: ...V Broadcasts stored in a given channel sequence starting from programme position 1 If you are operating the projection TV in the UK we reccommend you not to select Off Otherwise the On Screen clock will not show the correct UK time 4 The Auto Tuning menu appears on the screen in the selected language then press the OK button on the remote control to select YES 5 A new menu appears automatically on...

Page 9: ...lected channel TV Broadcast then press OK The selected channel now moves to its new programme position and the other channels move accordingly 3 Repeat steps b1 and b2 if you wish to change the order of the other channels 7 Press the MENU button to exit and return to the normal TV screen Your projection TV is now ready for use First Time Operation Programme Sorting Select Prog Confirm PROG CH LABE...

Page 10: ...ss the MENU button to switch the first level menu on 2 To higlight the desired menu or option push the joystick to 4 or To enter to the selected menu or option push to z To return to the last menu or option push to Z To alter settings of your selected option push to 4 Z or z To confirm and store your selection press OK 3 Press the MENU button to remove the menu from the screen Your projection TV u...

Page 11: ...07 C08 C09 C11 C12 C13 C14 C15 C16 TV 5 PRO 7 EU SP SWF RTL SAT MDR DDI DSF RTL 2 KAB 1 Manual Set Up Select Enter Language Country Manual Programme Preset Further Programme Preset RGB Set Up Personal ID Demo Manual Set Up Select Enter Language Country Manual Programme Preset Further Programme Preset RGB Set Up Personal ID Demo Manual Set Up Select Enter Language Country Manual Programme Preset Fu...

Page 12: ...selected Only avalaible for NTSC colour signal e g USA video tapes 4 Push the joystick to 4 Z or z to alter the selected item then press the OK button to store the new adjustment 5 Repeat steps 3 and 4 to alter the other items 6 Press the MENU button to exit and return to the normal TV screen Changing the Picture Mode Quickly You can quickly change the Picture Mode without entering the Picture Con...

Page 13: ...ereo broadcast Mono 4 Stereo For a bilingual broadcast Mono for mono channel if available A for channel 1 4 B for channel 2 Headphones l Volume Z Less z More l Dual Sound For a stereo broadcast Mono 4 Stereo For a bilingual broadcast Mono for mono channel if available A for channel 1 B for channel 2 4 PAP only when PAP is switched on Can only be permanently stored if Personal Equaliser Mode is sel...

Page 14: ... TV screen Changing Sound Mode Quickly You can quickly change Sound mode without entering the Sound Control menu screen 1 Press the button on the remote control repeatedly to directly access and select your desired sound mode Personal Vocal Jazz Rock Pop or Flat 2 Press the OK button to remove the display from the screen Equaliser Mode Personal Vocal Jazz Rock Pop Flat S RM 892 PROGR MENU 1 4 7 2 ...

Page 15: ...set 4 Centre In sound from external amplifier Sleep Timer 4 Off 10 min 20 min 90 min One minute before the projection TV switches into standby mode the time remaining is displayed on the screen automatically When watching the TV press the button on the remote control to display the time remaining To return to normal operation from standby mode press the TV button on the remote control Parental loc...

Page 16: ...TV Broadcast channel or the channel of the VCR signal Then press the OK button to store or press to continue searching the desired channel c For external input sources EXT push to to select the input source where you have connected your equipment AV1 AV2 AV3 or AV4 Then press the OK button to store 9 Repeat steps 4 to 8 a b or c if you wish to store more channels 10 Press the MENU button to exit a...

Page 17: ...er or a blank then push to z to confirm this character Select the other four characters in the same way 8 After selecting all the characters press the OK button 9 Repeat steps 5 to 8 if you wish to label other channels 10 Press the MENU button to exit and return to the normal TV screen When you select a named channel the name appears for a few seconds on the screen Picture Adjustment Select Enter ...

Page 18: ... System You can programme this projection TV to skip any unwanted programme numbers when they are selected with the PROGR buttons To cancel this function afterwards proceed in the same way as described below by selecting Off instead of On in step 6 Skipping Programme positions S RM 892 PROGR MENU 1 4 7 2 5 8 0 3 6 9 VIDEO TV Picture Adjustment Select Enter Menu Picture Mode Contrast Brightness Col...

Page 19: ...n Repeat steps 5 and 6b to adjust the volume level of the other channels c AFT Push the joystick to or 4 to fine tune the channel frequency over a range of 15 to 15 then press the OK button Repeat steps 5 and 6c if you wish to fine tune other channels d DECODER Push the joystick to or 4 to select AV1 for a decoder connected to the Scart 1 or AV2 for a decoder connected to the Scart 2 q 2 SMARTLINK...

Page 20: ...n the code you entered above will be displayed You will not be able to select and change this option Menu System You can programme this projection TV with a personal code using up to eleven characters letters and numbers Then using this fuction it will be possible to identify your projection TV if it was ever stolen This code can only be input once Make sure to write it down in this instruction ma...

Page 21: ...tion and shows most of the available picture functions Note Press the button on the remote control to stop the Demo mode and return to the normal TV screen Picture Adjustment Select Enter Menu Picture Mode Contrast Brightness Colour Sharpness Reset AI Noise Detection Digital Mode Personal On On DRC 50 Set Up Auto Tuning Programme Sorting Select NexTView AV Preset Manual Set Up Select Start Auto Tu...

Page 22: ...en Menu System When connecting an RGB source such as a DVD player to the Scart connector 1 you may need to readjust the geometry of the picture Adjusting the picture geometry for an RGB source S RM 892 PROGR MENU 1 4 7 2 5 8 0 3 6 9 VIDEO TV Picture Adjustment Select Enter Menu Picture Mode Contrast Brightness Colour Sharpness Reset AI Noise Detection Digital Mode Personal On On DRC 50 Set Up Auto...

Page 23: ... Select the other four characters in the same way 6 After selecting all the characters press the OK button 7 Repeat steps 4 to 6 if you wish to label other input sources 8 Press the MENU button to exit and return to the normal TV screen Whenever the equipment with the labeled input is selected for use the name appears for a few seconds on the screen S RM 892 PROGR MENU 1 4 7 2 5 8 0 3 6 9 VIDEO TV...

Page 24: ...elect a video source 2 To change the source of the right screen With PAP switched on press the button on the remote control When the symbol appears at the bottom of the right screen press the number buttons to select a TV channel or press to select a video source Swapping screens With PAP switched on press the button on the remote control to swap the two screens Zooming the screens With PAP switch...

Page 25: ...e is displayed showing the number of subpages Select the sub page by pressing 4 or To freeze a Teletext page Press the button to freeze the page Press again to cancel the freeze Revealing the index page Press the button to reveal the index page normally page 100 Fastext only available if the TV station broadcasts Fastext signals When the colour coded menu appears at the bottom of a teletext page p...

Page 26: ...can call up a time coded page such as an alarm page at a time specified by you After you have displayed the Time Page sub menu 1 Press the numbered buttons on the remote control to enter the three digits of the desired page 2 Press the numbered buttons again to enter the four digits of the desired time 3 Press the OK button to store the desired time The time is displayed in the top left corner of ...

Page 27: ...e Long Info menu if the broadcast is running at some future time Using the Individual Setting menu You can make a personal list of the types of programmes you wish to view on the programme guide 1 Push the joystick 4 or to select the icon then push to z to display the Individual Setting menu 2 Push the joystick 4 or to select your chosen item on the screen then press the OK button to confirm your ...

Page 28: ...lect VPS PDC then press the OK button repeatedly to select On or Off With this setting on you have the guaranteed recording of the whole broadcast should there be a change in the TV programme This only works if the selected channel broadcasts a VPS PDC signal Speed Push the joystick to to select Speed then press the OK button repeatedly to select between SP for standardplay or LP for longplay With...

Page 29: ...V tuner Video audio from selected source Video audio displayed on TV screen monitor out No outputs Audio signal No output No output No output Audio signal to headphones To avoid picture distortion Do not connect equipment to F and G connectors at the same time Optional Connections Using the following instructions you can connect a wide range of optional equipment to your projection TV Connecting O...

Page 30: ...d set the option Speaker to Centre in Remember that the maximum input level of this input is 30 W Be careful never to over this limit For mono equipment Connect the phono plug to the L G S I socket on the front of the TV and select the 4 input signal using the instructions on this page below Select and View the Input Signal In order to get the input signal of a connected equipment onto the TV scre...

Page 31: ...e Preset in the Manual Set Up menu and select DECODER AV2 to each coded channel For more details please refer to the section Using the Further Programme Preset function of this instruction manual For more information on Smartlink please refer to the Instruction Manual of your VCR Smartlink Using the buttons underneath the cover of the remote control you can control other Sony equipment 1 Open the ...

Page 32: ...ng Area Horizontal viewing area Optimum viewing position Vertical viewing area Optimum viewing position 20º 20º 60º 60º Additional Information KP 61PS1 KP 61PS2 minimum distance 2 7 m KP 53PS1 minimum distance 2 4 m KP 48PS1 KP 48PS2 minimum distance 2 2 m KP 61PS1 KP 61PS2 minimum distance 2 7 m KP 48PS1 KP 48PS2 minimum distance 2 2 m KP 53PS1 minimum distance 2 4 m ...

Page 33: ... audio video input S video input audio video output monitor out Front Terminals AV4 inputs q S video input 4 pin DIN video input phono jack audio inputs phono jacks Headphones jack minijack stereo Sound output 2 x 30 W music power 2 x 15 W RMS Centre SP input 30 W RMS using as the centre speaker Power consumption 225 W Standby Power consumption 0 7 W Dimensions w x h x d KP 61PS1 KP 61PS2 Approx 1...

Page 34: ...e front of the projection TV Using the MENU system select the Picture Adjustment menu Adjust the brightness contrast and colour balance levels Press the button repeatedly on the remote control until the RGB symbol 1 is displayed on the screen Press the button on the remote control Check that Main speaker is selected in the Features menu Using the MENU system select the Picture Adjustment menu Adju...

Page 35: ...7 18 Tacolneston 62 55 59 65 52 Midlands West 19 Ridge Hill 22 28 25 32 20 Sutton Coldfield 46 40 43 50 21 The Wrekin 26 33 23 29 Midlands East 22 Waltham 58 64 61 54 Northern Ireland 23 Brougher Mountain 22 28 25 32 24 Divis 31 27 24 21 25 Limavady 55 62 59 65 North 26 Belmont 22 28 25 32 56 27 Emley Moor 44 51 47 41 37 North West 28 Winter Hill 55 62 59 65 48 North East 29 Bilsdale West Moor 33 ...

Page 36: ...ion du rétroprojecteur et mémorisation automatique 8 Réglage de l alignement des couleurs Convergence 10 Système des Menus Introduction au Système des Menus sur écran 10 Guide rapide de déplacement à travers les menus 11 Utilisation du Système des Menus Contrôle de l image 12 Contrôle du son 13 Utilisation du menu Caractéristiques 15 Mémorisation manuelle des chaînes 16 Donner un nom à une chaîne ...

Page 37: ...z le téléviseur par la fiche d alimentation Ne tirez pas sur le cordon Prenez garde de ne pas placer des objets lourds sur le cordon d alimentation afin de ne pas l endommager Nous vous recommandons de ne pas enrouler de cordon trop long autour des supports à l arrière du téléviseur Installez le téléviseur sur un meuble stable Ne permettez pas aux enfants de monter dessus Ne placez pas le télévise...

Page 38: ...ndicateur de mise en veille standby Touches de réglage du volume Touche de sélection de la source d entrée Touche de Convergence Automatique Prise Casque connecteurs côté gauche connecteurs côté droit Touches de sélection des chaînes Appuyez sur la marque de la partie frontale du rétroprojecteur pour voir les connecteurs frontaux Prise S vidéo Prise vidéo Prises audio Description générale Présenta...

Page 39: ...télévision toutes les touches de couleur sont aussi utilisées pour les opérations du télétexte Pour tout renseignement complémentaire consultez le chapitre Télétexte de ce mode d emploi Description générale Eteindre temporairement le rétroprojecteur Appuyez sur cette touche pour éteindre temporairement le rétroprojecteur le voyant de mise en veille s éclairera Appuyez à nouveau pour allumer le rét...

Page 40: ... option Si vous l utilisez cette connexion optionnelle peut améliorer la qualité de l image et du son lorsque vous utilisez le magnétoscope Si vous n utilisez pas le connecteur Péritel après avoir mémorisé automatiquement les chaînes sur le rétroprojecteur vous devrez mémoriser manuellement le canal du signal vidéo Pour ce faire consultez le chapitre Mémorisation manuelle des chaînes Consultez aus...

Page 41: ...tomatique des chaînes le menu peut disparaître de l écran momentanément Ceci est normal et n entrave en rien la mémorisation automatique des chaînes Sélectionnez Non au lieu d un pays si vous ne désirez pas que les chaînes émetteurs TV soient mémorisés dans un ordre déterminé en usine qui commence par le numéro de chaîne 1 4 Le menu de mémorisation automatique apparaît sur l écran dans la langue q...

Page 42: ...changer de place et orientez le ensuite vers z 2 Orientez le sélecteur vers ou 4 pour sélectionner le nouveau numéro de chaîne sous lequel vous désirez mémoriser la chaîne émetteur TV sélectionné et appuyez ensuite sur OK Le canal sélectionné passe à son nouveau numéro de chaîne et les autres changent automatiquement 3 Reprenez à b1 et b2 si vous désirez réorganiser d autres chaînes de télévision ...

Page 43: ...uyez sur la touche MENU pour présenter le premier niveau de menu sur écran 2 Pour obtenir le menu ou l option désiré orientez le sélecteur vers 4 ou Pour entrer dans le menu ou l option sélectionné orientez le vers z Pour revenir au menu ou à l option précédente orientez le vers Z Pour modifier les réglages de l option sélectionnée orientez le vers 4 Z ou z Pour confirmer et mémoriser votre sélect...

Page 44: ...C05 C07 C08 C09 C11 C12 C13 C14 C15 C16 TV 5 PRO 7 EU SP SWF RTL SAT MDR DDI DSF RTL 2 KAB 1 Mise en service Choisir Entrer Langue Pays Mémorisation manuelle Présélection suite Réglage RVB Code secret Démonstration Mise en service Choisir Entrer Langue Pays Mémorisation manuelle Présélection suite Réglage RVB Code secret Démonstration Mise en service Choisir Entrer Langue Pays Mémorisation manuell...

Page 45: ...t Personnel dans Réglage de l image Uniquement disponible sur le système couleur NTSC par ex Bandes vidéo américaines 4 Orientez sur le sélecteur vers 4 Z z pour modifier le réglage du paramètre sélectionné et appuyez ensuite sur la touche OK pour entrer ce nouveau réglage en mémoire 5 Reprenez à 3 et 4 pour modifier d autres réglages 6 Appuyez sur la touche MENU pour revenir à l image télévisée C...

Page 46: ... publicitaires Son stéréo Emissions en stéréo Mono 4 Stéréo Emissions bilingues Mono pour le canal mono s il est disponible A pour le canal 1 4 B pour le canal 2 Casque l Volume Z Moins z Plus l Son stéréo Emissions en stéréo Mono 4 Stéréo Emissions bilingues Mono pour le canal mono s il est disponible A pour le canal 1 B pour le canal 2 4 PAP uniquement lorsque PAP est activé Ne peut être entré e...

Page 47: ...ée Changement rapide du réglage du son Le réglage du son peut être rapidement modifié sans devoir passer par le menu de Contrôle du son 1 Appuyez à plusieurs reprises sur la touche de la télécommande pour accéder directement à Personnel Vocal Jazz Rock Pop ou Sans eff et sélectionnez le réglage du son que vous désirez 2 Appuyez sur la touche OK pour revenir à l image télévisée S RM 892 PROGR MENU ...

Page 48: ... l image télévisée Caractéristiques Effet Opération Haut parleur Principal son du rétroprojecteur 4 Central son d un amplificateur externe Temporisation 4 Non 10 min 20 min 90 min Une minute avant que le rétroprojecteur ne passe en mode veille standby le temps restant sera automatiquement affiché sur l écran Pendant que vous regardez la télévision appuyez sur la touche pour voir le temps qui reste...

Page 49: ...ant ou le canal du signal vidéo Si ce n est pas celui que vous désirez entrer en mémoire orientez le sélecteur vers pour chercher un autre canal Lorsque vous trouverez le canal que vous désirez entrer en mémoire appuyez sur OK Pendant la mémorisation manuelle des chaînes par la fonction recherche RECH le menu peut disparaître de l écran momentanément Ceci est normal et n entrave en rien la mémoris...

Page 50: ...rs ou 4 pour sélectionner une lettre un numéro ou un espace en blanc et orientez le ensuite vers z pour confirmer ce caractère Sélectionnez les quatre autres caractères de la même façon 8 Lorsque vous aurez sélectionné tous les caractères appuyez sur la touche OK 9 Reprenez de 5 à 8 si vous désirez étiqueter d autres canaux 10 Appuyez sur la touche MENU pour revenir à l image télévisée Lorsque vou...

Page 51: ...pendant ce canal peut être sélectionné en faisant le numéro de la chaîne correspondante sur les touches numériques Système des Menus Vous pouvez programmer ce rétroprojecteur pour qu il ignore les numéros de chaînes que vous ne désirez pas utiliser lorsque la sélection sera effectuée au moyen des touches PROGR Si vous désirez plus tard récupérer le nº des chaînes omises procédez comme indiqué ci d...

Page 52: ...ensuite sur la touche OK Reprenez les étapes 5 et 6 b pour régler l intensité du volume d autres canaux c AFT Orientez le sélecteur vers ou 4 pour régler le niveau de la fréquence du canal entre 15 et 15 et appuyez ensuite sur la touche OK Reprenez les étapes 5 et 6 c pour réaliser le réglage fin d autres canaux d DECODEUR Orientez le sélecteur vers ou 4 pour sélectionner AV1 pour un décodeur conn...

Page 53: ...ouche MENU pour revenir à l image télévisée Lorsque vous entrerez dans le menu Réglage chaînes manuel dans l option Code secret le code que vous aurez introduit apparaîtra toujours et vous ne pourrez jamais plus entrer dans cette option Système des Menus Vous pouvez donner au rétroprojecteur un code de sécurité de onze caractères maximum lettres ou chiffres Ceci en facilitera la récupération en ca...

Page 54: ...mmence à s inscrire une séquence présentant la majorité des fonctions dont dispose le rétroprojecteur Nota Appuyez sur la touche de la télécommande pour arrêter la démonstration et revenir à l image télévisée Contrôle de l image Sélection Entrer Menu Réglagedel image Contraste Luminosité Couleurs Netteté Raz AI Détecteur de bruit Mode Digital Personnel Oui Oui DRC 50 Réglage Mémorisation auto Ordr...

Page 55: ... sur la touche MENU pour revenir à l image télévisée Système des Menus En connectant une source de signaux RVB telle qu un lecteur de DVD au connecteur Péritel 1 il se peut qu il soit nécessaire de régler le centrage de l image Réglage de centrage de l image pour une source RVB 1 Contrôle de l image Sélection Entrer Menu Réglagedel image Contraste Luminosité Couleurs Netteté Raz AI Détecteur de br...

Page 56: ...z les quatre autres caractères de la même façon 6 Lorsque vous avez sélectionné tous les caractères appuyez sur la touche OK 7 Reprenez les étapes de 4 à 6 si vous désirez étiqueter d autres signaux d entrée 8 Appuyez sur la touche MENU pour revenir à l image télévisée Chaque fois que vous sélectionnez l équipement du signal d entrée auquel vous avez donné un nom ce nom s inscrira sur l écran pend...

Page 57: ...ande pour sélectionner un canal de télévision ou appuyez sur la touche pour sélectionner une entrée vidéo 2 Pour modifier l image de l écran droit Lorsque vous vous trouvez en mode PAP appuyez sur la touche de la télécommande Lorsque le symbole apparaîtra en bas de l écran droit appuyez sur les touches numériques pour sélectionner un canal de télévision ou appuyez sur la touche pour sélectionner u...

Page 58: ...Une page de télétexte peut comporter à son tour plusieurs pages secondaires En ce cas au bout de quelques secondes une information s inscrit dans la partie inférieure de l écran et précise le nombre de pages secondaires que comporte cette page Orientez le sélecteur vers 4 ou pour sélectionner la page secondaire qui vous intéresse Arrêt sur une page Télétexte Appuyez sur la touche pour figer une pa...

Page 59: ...vez consulter une page codée par temps comme par ex une Page Temps à une heure précise Après avoir sélectionné cette option et que le menu secondaire Page Temps se soit inscrit sur l écran 1 Appuyez sur les touches numériques de la télécommande pour introduire les trois chiffres de la page recherchée 2 Appuyez à nouveau sur les touches numériques pour introduire les quatre chiffres de l heure rech...

Page 60: ...ide Electronique de Programmes EPG de Sony 2 Orientez le sélecteur vers 4 Z ou z pour déplacer le curseur sur l écran 3 Appuyez sur la touche OK pour confirmer la sélection a Si vous appuyez sur OK dans les colonnes de la date de l heure ou des icônes sujets la liste des programmes changera selon la sélection faite b Si vous appuyez sur OK dans la liste des programmes vous verrez directement le ca...

Page 61: ...étoscope 3 Pour régler le magnétoscope VPS PDC Orientez le sélecteur vers Z ou z pour sélectionner VPS PDC et appuyez ensuite plusieurs fois sur la touche OK pour sélectionner Oui ou Non Ce réglage garantit que toute l émission sera enregistrée même s il y a des changements de programme il ne fonctionne que si le canal sélectionné émet un signal VPS PDC Vitesse Orientez le sélecteur vers pour séle...

Page 62: ... G Signal vidéo H Signal audio I Pas d entrée Partie arrière du rétroprojecteur Partie avant du rétroprojecteur Signaux de sortie disponibles Vidéo audio du tuner du rétroprojecteur Vidéo audio de la source sélectionnée Vidéo audio qui apparaissent sur l écran sortie de moniteur Pas de sortie Signal audio Pas de sortie Pas de sortie Pas de sortie Signal audio pour le casque Eviter des distorsions ...

Page 63: ...lez vous que la puissance maximale à l entrée de ce connecteur est de 30 W Assurez vous que cette limite n est pas dépassée Connexion d équipements Mono Connectez le câble audio au connecteur L G S I situé sur la partie avant du rétroprojecteur et sélectionnez le signal d entrée 4 en suivant les instructions ci dessous mentionnées Sélection et visualisation du signal d entrée Pour pouvoir obtenir ...

Page 64: ...roprojecteur se mettra automatiquement en marche Si un décodeur est connecté à un magnétoscope disposant de Smartlink sélectionnez le menu de Présélection suite sur Mémorisation manuelle et sélectionnez DECODEUR sur la position AV2 pour chaque canal codé Pour toute information complémentaire consultez le chapitre Utilisation de la fonction Présélection suite Si vous recherchez des informations com...

Page 65: ...m de vision Angle de vision horizontal position conseillée pour l utilisateur Angle de vision vertical position conseillée pour l utilisateur 20º 20º 60º 60º KP 61PS1 KP 61PS2 distance minimum 2 7 m KP 53PS1 distance minimum 2 4 m KP 48PS1 KP 48PS2 distance minimum 2 2 m Informations complémentaires KP 61PS1 KP 61PS2 distance minimum 2 7 m KP 48PS1 KP 48PS2 distance minimum 2 2 m KP 53PS1 distance...

Page 66: ... S vidéo sortie audio vidéo sortie moniteur Connecteurs frontaux Entrées AV4 q entrée S vidéo DIN de 4 broches entrée vidéo connecteur RCA entrées audio connecteurs RCA prise pour casque mini prise stéréo Sortie son 2 x 30 W puissance musicale 2 x 15 W RMS Connecteur d entrée du haut parleur central 30 W RMS s il est employé comme haut parleur central Consommation d énergie 225 W Consommation d én...

Page 67: ...nus sélectionnez Contrôle de l image et réglez les niveaux de contraste couleur et luminosité Appuyez plusieurs fois sur la touche de la télécommande jusqu à ce que le symbole 1 s inscrive sur l écran Appuyez sur la touche de la télécommande Par le Système des Menus vérifiez que dans le menu Caractéristiques Haut parleur se trouve bien sur Principal Par le Système des Menus sélectionnez Contrôle d...

Page 68: ... 26 06 25 CAEN Brullemail 48 51 54 04 CAEN Mont Pincon CHU 22 25 28 09 38 60 26 CANNES Vallarius 63 27 CARCASSONE Pic de Nore 64 58 61 03V 28 CHAMBERY Mont du Chat 29 58 23 08 29 CHAMONIX Aiguille du Midi 25 28 22 30 CHAMPAGNOLLE Le Bulay 58 61 64 31 CHARTES Montlandon 55 50 63 09 47 32 CHAUMONT Chalindray 52 49 55 33 CHERBOURG Olgosville 65 59 62 06 ou 08 35 34 CLERMONT FERRAND Puy de Côme ROYAT ...

Page 69: ...Crète Blandine 64 58 61 96 QUIMPER 29 37 31 06 97 REIMS Charleville 29 23 26 36 98 REIMS Hutvillers 43 46 40 09 63 99 RENNES Saint Pern 39 45 42 07 34 31 100 ROUEN Grande Couronne 23 33 26 07 59 62 101 SAINT ETTIENNE Croix de Guizay 35 30 33 38 65 62 102 SAINT ETTIENNE Pilat 46 40 43 10 103 SAINT FLOUR Vabres 52 49 55 104 SAINT GINGOLPH Montpélerin 39 41 63 105 SAINT MALO 53V 45 42 07 106 SAINT MA...

Page 70: ...37 FR Informations complémentaires Les principaux émetteurs français Répartition Européenne des normes et standards Informations complémentaires ...

Page 71: ...ntenne und des Videogerätes 7 Erstmalige Inbetriebnahme Einschalten des Rückprojektions Fernsehers und automatische Feinabstimmung 8 Einstellen der Überlagerung von Farben Konvergenz 10 Das Menü System Einführung in das Menü System auf dem Bildschirm 10 Schnell Führer um sich innerhalb der Menüs zu bewegen 11 Anwendung des Menü Systems Einstellen des Bildes 12 Einstellen des Tons 13 Verwenden des ...

Page 72: ...eigen können Legen Sie das Gerät nicht auf die Seite oder den Bildschirm Bedecken Sie nicht die Lüftungsöffnungen des Fernsehgerätes mit Gegenständen wie Vorhängen Zeitungen usw Aus Umweltschutz und Sicherheitsgründen empfiehlt es sich das Fernsehgerät nicht im Bereitschaftsmodus zu lassen wenn es nicht benutzt wird Schalten Sie es am Netzschalter aus Betreiben Sie das Fernsehgerät ausschließlich ...

Page 73: ...o Eingangsbuchse Cinch Buchse Videoeingang Cinch Buchse Audioeingang Stecker linke Seite Buchsen der rechten Seite Drücken Sie auf die Taste der Markierung an der vorderen Seite des Rückprojektions Fernsehers um die vorderen Buchsen zu zeigen Tasten der um darauffolgende oder vorangehende Programm Kanäle auszuwählen mit ihnen wählen Sie Fernsehsender aus Allgemeine Beschreibung Überprüfen des mitg...

Page 74: ...eitere Einzelheiten lesen Sie das Kapitel Fernbedienung weiterer Sony Anlagen Kurzzeitiges Ausschalten des Fernsehgerätes Drücken Sie diese Taste um das Fernsehgerät vorübergehend auszuschalten die Standby Anzeige leuchtet auf Drücken Sie die Taste nochmals um das Fernsehgerät ausgehend vom Bereitschaftsmodus Standby wieder einzuschalten Um Energie zu sparen wird empfohlen das Fernsehgerät komplet...

Page 75: ...N Die Euro Buchse ist frei wählbar Wenn Sie die frei wählbare Buchse benutzen kann sich die Bild und Tonqualität verbessern bei Verwendung des Videogerätes Wenn Sie die Euro Buchse nicht benutzen müssen Sie nach der automatischen Feinabstimmung des Rückprojektions Fernsehers manuell den Kanal des Videosignals feinabstimmen Lesen Sie hierzu das Kapitel Manuelle Abstimmung des Fernsehgerätes Lesen S...

Page 76: ...den Rückprojektions Fernseher benutzen wollen und anschließend drücken Sie die Taste OK um die Auswahl zu bestätigen Wählen Sie Aus anstatt eines Landes wenn Sie nicht wünschen dass die Kanäle Fernsehsender in einer vorher bestimmten Reihenfolge gespeichert werden die mit der Programm Position Nummer 1 beginnt 4 Das Menü der automatischen Feinabstimmung erscheint auf dem Bildschirm in der ausgewäh...

Page 77: ...ummer auszuwählen unter der Sie den ausgewählten Kanal Fernsehsender speichern wollen und anschließend drücken Sie OK Der ausgewählte Kanal wechselt auf seine neue Programm Stellung und die übrigen Kanäle folgen dementsprechend 3 Wiederholen Sie die Schritte b1 und b2 wenn Sie andere Fernsehkanäle neu ordnen wollen 7 Drücken Sie die Taste MENU um zum normalen Fernsehbild zurückzukehren Der Rückpro...

Page 78: ...die Taste MENU um das erste Menü Niveau auf dem Bildschirm zu zeigen 2 Gehen Sie mit dem Joystick auf 4 oder um das gewünschte Menü oder Option hervorzuheben Um das Menü oder die gewählte Option zu verwenden gehen Sie auf z Um zum vorangehenden Menü oder zur vorherigen Option zurückzukehren gehen Sie auf Z Um die Einstellungen der gewählten Option zu ändern gehen Sie auf 4 Z oder z Um Ihre Auswahl...

Page 79: ...e Demo Modus Wählen Bestätigen Manuelle Einstellungen Sprache Land Manuell Abspeichern Zusatzfunktionen RGB Einstellung Sicherheitscode Demo Modus Wählen Bestätigen Manuelle Einstellungen Sprache Land Manuell Abspeichern Zusatzfunktionen RGB Einstellung Sicherheitscode Demo Modus Wählen Bestätigen Manuelle Einstellungen Sprache Land Manuell Abspeichern Zusatzfunktionen RGB Einstellung Sicherheitsc...

Page 80: ...ild Modus Nur für das Farbsystem NTSC z B amerikanische Videobänder verfügbar 4 Gehen Sie mit dem Joystick auf 4 Z z um die Einstellung des ausgewählten Elements zu ändern und anschließend drücken Sie die Taste OK um die neue Einstellung zu speichern 5 Wiederholen Sie die Schritte 3 und 4 um andere Einstellungen umzuändern 6 Drücken Sie die Taste MENU um zum normalen Fernseh Bildschirm zurückzukeh...

Page 81: ...m Sendesignal aufrechterhalten z B bei Werbesendungen Zweiton Bei Stereosendungen Mono 4 Stereo Für zweisprachige Sendungen Mono für Mono Kanal falls verfügbar A für den Kanal 1 4 B für den Kanal 2 Kopfhörer l Lautstärke Z Weniger z Mehr l Zweiton Bei Stereosendungen Mono 4 Stereo Für zweisprachige Sendungen Mono für Mono Kanal falls verfügbar A für den Kanal 1 B für den Kanal 2 4 PAP nur wenn PAP...

Page 82: ...en Fernsehbild zurückzukehren Schneller Wechsel des Ton Modus Der Ton Modus kann schnell geändert werden ohne dass Sie das Menü Ton Einstellungen aufrufen müssen 1 Drücken Sie die Taste der Fernbedienung mehrmals um direkten Zugang zu haben zum Auswählen des gewünschten Ton Modus Anwender Vocal Jazz Rock Pop oder Linear 2 Drücken Sie OK um zum normalen Fernsehbildschirm zurückzukehren S RM 892 PRO...

Page 83: ...ie Taste OK zum Speichern 5 Drücken Sie die Taste MENU um zum normalen Fernsehbildschirm zurückzukehren Sonderfunktionen Wirkung Vorgang Lautsprecher Haupt LS Ton des Rückprojektions Fernsehers 4 Center LS Ton vom externen Verstärker Timer 4 Aus 10 min 20 min 90 min Eine Minute bevor der Rückprojektions Fernseher zum Bereitschaftsbetrieb Standby übergeht erscheint die verbleibende Restzeit automat...

Page 84: ...arauffolgenden Fernsehsender Kanal oder den Kanal des Videosignals suchen Wenn Sie diesen nicht speichern wollen gehen Sie mit dem Joystick auf um einen anderen Kanal zu suchen Wenn Sie den Kanal den Sie speichern wollen gefunden haben drücken Sie OK c Für externe Eingangsquellen EXT gehen Sie mit dem Joystick auf um die Eingangsquelle auszuwählen an der Sie die Anlage AV1 AV2 AV3 oder AV4 angesch...

Page 85: ...tick auf oder 4 um einen Buchstaben eine Zahl oder ein Leerzeichen auszuwählen und danach gehen Sie auf z um dieses Zeichen zu bestätigen Wählen Sie die restlichen vier Zeichen auf die selbe Weise aus 8 Nachdem Sie alle Zeichen ausgewählt haben drücken Sie die Taste OK 9 Wiederholen Sie die Schritte 5 bis 8 wenn Sie andere Kanäle benennen wollen 10 Drücken Sie die Taste MENU um zum normalen Fernse...

Page 86: ...wählt werden indem mit Hilfe der Nummerntasten die entsprechende Programm Nummer gedrückt wird Menü System Es ist möglich diesen Rückprojektions Fernseher so zu programmieren dass er die nicht gewünschten Programm Nummern überspringt wenn das Auswählen mit den Tasten PROGR erfolgt Wenn Sie zu einem späteren Zeitpunkt die übersprungene Programm Nummer wiederbekommen wollen gehen Sie wiederum so vor...

Page 87: ...end drücken Sie die Taste OK Wiederholen Sie die Schritte 5 und 6 b um die Lautstärke weitere Kanäle einzustellen c AFT Gehen Sie mit dem Joystick auf oder 4 um das Niveau der Kanalfrequenz zwischen 15 und 15 einzustellen und anschließend drücken Sie die Taste OK Wiederholen Sie die Schritte 5 und 6 c um die Feinabstimmung weiterer Kanäle vorzunehmen d DEKODER Gehen sie mit dem Joystick auf oder 4...

Page 88: ...Fernsehbildschirm zurückzukehren Wenn Sie das Menü Manuelle Einstellungen aufrufen bei der Option Sicherheitscode wird immer der Code erscheinen den Sie eingegeben haben und Sie können diese Option nie mehr einblenden Menü System Sie können dem Rückprojektions Fernseher einen Sicherheitscode mit höchstens 11 Zeichen Buchstaben oder Nummern zuordnen Das hilft bei der Wiedererlangung im Falle eines ...

Page 89: ... beginnt eine Reihenfolge mit der Mehrzahl der Funktionen zu erscheinen die der Rückprojektions Fernseher besitzt Anmerkung Drücken Sie die Taste der Fernbedienung um die Demonstration zu stoppen und um zum normalen Fernsehbildschirm zurückzukehren S RM 892 PROGR MENU 1 4 7 2 5 8 0 3 6 9 VIDEO TV Bild Einstellungen Wählen Menü Bestätigen Bild Modus Kontrast Helligkeit Farbe Bildschärfe Normwerte A...

Page 90: ...Taste MENU um zum normalen Fernsehbildschirm zurückzukehren Menü System Wenn eine RGB Quelle wie en DVD Laufwerk digitales Wiedergabegerät von Videoplatten an die Eurobuchse 1 angeschlossen wird ist es u U notwendig die Bildgeometrie einzustellen Einstellen der Bildposition für eine RGB Quelle Bild Einstellungen Wählen Menü Bestätigen Bild Modus Kontrast Helligkeit Farbe Bildschärfe Normwerte AI d...

Page 91: ...Zeichen zu bestätigen Wählen Sie die übrigen vier Zeichen auf die selbe Weise aus 6 Wenn Sie alle Zeichen ausgewählt haben drücken Sie OK 7 Wiederholen Sie die Schritte 4 bis 6 wenn Sie andere Eingangssignale benennen wollen 8 Drücken Sie die Taste MENU um zum normalen Fernsehbildschirm zurückzukehren Immer wenn Sie das Zusatzgerät auswählen dem Sie für das Eingangs Signal einen Namen zugeordnet h...

Page 92: ...ienung um einen Fernsehkanal auszuwählen oder wählen Sie die Taste um einen Videoeingang auszuwählen 2 Zum Wechseln des rechten Bildschirms Wenn Sie sich im PAP Modus befinden drücken Sie die Taste der Fernbedienung Wenn das Symbol unten rechts auf dem Bildschirm erscheint drücken Sie die Nummerntasten um einen Fernsehkanal auszuwählen oder drücken Sie die Taste um einen Videoeingang auszuwählen A...

Page 93: ...Auswählen einer Seitenaufteilung Eine Videotext Seite kann ihrerseits wiederum aus mehreren Aufteilungen bestehen In diesen Fällen erscheint nach einigen Sekunden eine Informationslinie am unteren Teil des Bildschirms mit der Anzahl der Seitenaufteilungen die diese Seite enthält Gehen Sie mit dem Joystick auf 4 oder um die Seitenaufteilung auszuwählen Zurückhaltung einer Seite Drücken Sie die Tast...

Page 94: ...rschlüsselte Seite konsultieren wie z B eine Alarmseite zu einer gewissen Zeit nach Auswählen dieser Option und nach dem Erscheinen des Untermenüs der Alarmseite auf dem Bildschirm 1 Drücken Sie die Nummerntasten der Fernbedienung um die drei Ziffern der gewünschten Seite einzugeben 2 Wiederholen Sie die Betätigung der Nummerntasten um die vier Ziffern der gewünschten Zeit einzugeben 3 Drücken Sie...

Page 95: ...ung stattfindet oder es wird das Menü Warteliste Sendungen erscheinen wenn die Sendung später erfolgt Persönliche Programm Auswahl Sie können eine persönliche Liste mit allen Programmtypen erstellen die ihnen gefallen 1 Gehen Sie mit dem Joystick auf 4 oder um die Ikone auszuwählen und anschließend gehen Sie auf z um das Menü Individuelle Auswahl aufzurufen 2 Gehen Sie mit dem Joystick auf 4 oder ...

Page 96: ... Konfiguration des Videogeräts gehen Sie wie folgt vor VPS PDC Gehen Sie mit dem Joystick auf Z oder z um VPS PDC auszuwählen und anschließend drücken Sie mehrmals die Taste OK um Ein oder Aus auszuwählen Durch diese Einstellung wird die Aufzeichnung der gesamten Sendung garantiert auch wenn die Programmierung geändert wird dies funktioniert nur wenn des ausgewählte Kanal ein VPS PDC Signal sendet...

Page 97: ...mmers Video Ton der ausgewählten Quelle Video Ton sichtbar auf dem Bildschirm Monitor Ausgang Ohne Ausgänge Audio Signal Ohne Ausgang Ohne Ausgang Ohne Ausgang Audio Signal für die Kopfhörer Um Bildstörungen zu vermeiden Schließen Sie an die Buchsen F und G nicht gleichzeitig Zusatzgeräte an Frei wählbare Anschlüsse Es ist möglich eine weitreichende Palette von freiwählbaren Zusatzgeräten an den R...

Page 98: ... Weitere Information hierzu finden Sie im Kapitel Verwendung des Menüs Sonderfunktionen und wählen Sie Center LS in der Option Lautsprecher Vergessen Sie nicht dass die höchste Eingangsleistung dieser Buchse 30 Watt beträgt Stellen Sie sicher dass dieser Grenzwert nicht überschritten wird Anschluss von Mono Geräten Schließen Sie das Audio Kabel an die Buchse L G S I an der Vorderseite des Rückproj...

Page 99: ...as Menü Zusatzfunktionen in Manuell Abspeichern und wählen Sie DEKODER Dekoder in der Stellung AV2 für jeden verschlüsselten Kanal Wenn Sie weitere Information benötigen konsultieren Sie das Kapitel Verwenden der Funktion Zusatzfunktionen Ausführliche Informationen über Smartlink finden Sie in der Bedienungsanleitung Ihres Videorecorders Smartlink Mit den Tasten die sich unter der Abdeckung der Fe...

Page 100: ...en können Optimaler Sichtwinkel Waagerechter Sichtwinkel empfohlene Position für den Benutzer Senkrechter Sichtwinkel empfohlenePositionfür den Benutzer 20º 20º 60º 60º KP 61PS1 KP 61PS2 Minimum Abstand 2 7 m KP 48PS1 KP 48PS2 Minimum Abstand 2 2 m KP 53PS1 Minimum Abstand 2 4 m KP 61PS1 KP 61PS2 Minimum Abstand 2 7 m KP 53PS1 Minimum Abstand 2 4 m KP 48PS1 KP 48PS2 Minimum Abstand 2 2 m Zusätzlic...

Page 101: ...gang Anschlüsse an der Vorderseite Eingänge AV4 q Video S Eingang 4 polig DIN Video Eingang RCA Buchse Audio Eingang RCA Buchse Kopfhörer Buchse Stereo Minibuchse Ton Ausgabe 2 x 30 W Musikleistung 2 x 15 W RMS Eingang Hauptlautsprecher 30 W RMS wenn angewendet als Hauptlautsprecher Leistungsaufnahme 225 W Leistungsaufnahme im Modus Bereitschaftsbetrieb Standby 0 7 W Abmessungen breit x hoch x tie...

Page 102: ...tellungen auswählen und Kontrast Farbe und Helligkeit neu einstellen Drücken Sie mehrmals die Taste der Fernbedienung bis das Symbol 1 auf dem Bildschirm erscheint Drücken Sie mehrmals die Taste der Fernbedienung Überprüfen Sie mittels des Menü Systems dass im Menü Sonderfunktionen Lautsprecher in Haupt LS ausgewählt ist Wählen Sie mittels des Menü Systems Bildeinstellungen aus und stellen Sie das...

Page 103: ...35 DE Die geforderte Stückprüfung hat ergeben daß die gemessene Ortsdosis Leistung unter dem in Prüfungsschein Nr 6 22 S 1217 der PTB genannten Wert von 0 2 µSv h liegt ...

Page 104: ...e sintonizzazione automatica 8 Regolazione della sovrapposizione dei colori Convergenza 10 Menu Introduzione al sistema dei menu su schermo 10 Guida rapida per spostarsi attraverso i menù 11 Uso del sistema dei menù Regolazione Immagine 12 Regolazione Audio 13 Uso del menù Caratteristiche 15 Sintonizzazione manuale della TV 16 Assegnazione di un nome ad un canale 17 Omissione di posizioni di progr...

Page 105: ...urarsi di non posizionare oggetti pesanti sulla presa di corrente perché ciò potrebbe danneggiarla E consigliabile avvolgere il cavo di alimentazione in eccesso utilizzando i supporti presenti sul retro del TV Posizionare il televisore su di un mobile solido e stabile Fare attenzione che non ci si possano arrampicare dei bambini Non appoggiare il televisore sul lato o a faccia in giu Non coprire l...

Page 106: ...e della fonte di entrata Presa di entrata S Video Presa di entrata video Prese di entrata audio connettori lato sinistro connettori lato destro Eserciti una pressione sul segno della parte frontale dell apparecchio per vedere i connettori frontali Pulsanti di selezione di programmi seguente o precedente selezionano emittenti di televisive Descrizione generale Verifica degli accessori forniti Descr...

Page 107: ...consulti il capitolo Telecomando di altri apparecchi Sony Oltre alle funzioni di televisione tutti i pulsanti colorati vengono utilizzati anche per le operazioni di televideo Per maggiori informazioni consulti il capitolo su Televideo di questo manuale di istruzioni Spegnere temporaneamente il retroproiettore Lo prema per spegnere temporaneamente il televisore l indicatore di modalità di attesa si...

Page 108: ... AV è opzionale Se lo utilizza questo collegamento opzionale può migliorare la qualità di immagine e suono quando si utilizza il videoregistratore Se non utilizza il Connettore Euro AV dopo aver sintonizzato automaticamente l apparecchio dovrà sintonizzare manualmente il canale del segnale del videoregistratore Per realizzare questa operazione consulti il capitolo Sintonizzazione manuale della TV ...

Page 109: ...to prema il pulsante OK per confermare la selezione Selezioni No al posto di un paese se non desidera che i canali emittenti televisive vengano memorizzati in un ordine predeterminato che inizia dalla posizione di programma numero 1 4 Il menù di sintonizzazione automatica appare sullo schermo nella lingua selezionata Prema il pulsante OK per selezionare Si 5 Un nuovo menù appare automaticamente su...

Page 110: ...a nel quale desidera memorizzare il canale emittente televisiva selezionato e in seguito prema OK Il canale selezionato cambia nella sua nuova posizione di programma e gli altri canali cambiano di conseguenza 3 Ripeta i passi b1 e b2 se desidera riordinare altri canali 7 Prema il pulsante MENU per tornare allo schermo normale del televisore L apparecchio è pronto per entrare in funzione S RM 892 P...

Page 111: ...r mostrare il primo livello di menù sullo schermo 2 Per mettere in risalto il menù o opzione desiderati prema il joystick verso 4 o Per entrare nel menù o opzione selezionati prema verso z Per tornare al menù o opzione precedente prema verso Z Per modificare le regolazioni dell opzione selezionata prema 4 Z o z Per confermare e memorizzare la sua selezione prema OK 3 Prema il pulsante MENU per tor...

Page 112: ...C03 C05 C07 C08 C09 C11 C12 C13 C14 C15 C16 TV 5 PRO 7 EU SP SWF RTL SAT MDR DDI DSF RTL 2 KAB 1 Impostazione manuale Seleziona Invio Lingua Nazione Programmazione manuale Preselezione Continuaz Regolazione RGB Codice Person Dimostarzione Impostazione manuale Seleziona Invio Lingua Nazione Programmazione manuale Preselezione Continuaz Regolazione RGB Codice Person Dimostarzione Impostazione manual...

Page 113: ...a di Colore NTSC per esempio videocassette statunitensi 4 Prema il joystick verso 4 Z o z per modificare la regolazione dell elemento selezionato e in seguito prema il pulsante OK per memorizzare la nuova regolazione 5 Ripeta i passi 3 e 4 per modificare altre regolazioni 6 Prema il pulsante MENU per tornare allo schermo normale del televisore Cambio rapido della Modalità Immagine La modalità Imma...

Page 114: ...r trasmissioni stereo Mono 4 Stereo Per trasmissioni in due lingue Mono per canale mono se è disponibile A per il canale 1 4 B per il canale 2 Cuffia l Volume Z Meno z Più l Doppio Audio Per trasmissioni in stereo Mono 4 Stereo Per trasmissioni in due lingue Mono per canale mono se è disponibile A per il canale 1 B per il canale 2 4 PAP solo se PAP è attivato Si può solo memorizzare in forma perma...

Page 115: ...levisore Cambio rapido della modalità del suono La modalità del suono si può cambiare rapidamente senza dovere accedere al menù di Regolazione Audio 1 Prema ripetutamente il pulsante del telecomando per accedere direttamente e selezionare la modalità del suono desiderata Personale Vocal Jazz Rock Pop o Lineare 2 Prema OK per tornare allo schermo normale del televisore S RM 892 PROGR MENU 1 4 7 2 5...

Page 116: ... pulsante MENU per tornare allo schermo normale del televisore Caratteristiche Effetto Operazione Diffusore Principale suono dell apparecchio 4 Centrale suono di un amplificatore esterno Timer Spegnimento4 No 10 min 20 min 90 min Un minuto prima che l apparecchio entri nella modalità di disinserimento temporaneo standby il tempo restante apparirà automaticamente sullo schermo Mentre vede la televi...

Page 117: ...mincerà a cercare automaticamente il seguente canale di emittente televisiva o il canale del segnale del videoregistratore Se questo non è ciò che desidera memorizzare prema il joystick verso per cercare un altro canale Quando troverà il canale che desidera memorizzare prema su OK c Per fonti di entrata esterne EXT prema il joystick verso per selezionare la fonte di entrata dove ha collegato l app...

Page 118: ... una lettera un numero o uno spazio in bianco e in seguito prema verso z per confermare il carattere prescelto Selezioni gli altri quattro caratteri seguendo lo stesso procedimento 8 Dopo aver selezionato tutti i caratteri prema OK 9 Ripeta i punti da 5 a 8 se desidera assegnare un nome agli altri canali 10 Prema il pulsante MENU per tornare allo schermo normale del televisore Quando viene selezio...

Page 119: ...nato premendo il numero di programma corrispondente attraverso i pulsanti numerici Menu È possibile programmare questo apparecchio affinché ometta i numeri di programma che non desidera quando si selezionano con i pulsanti PROGR Se più avanti desidera recuperare il nº del programma omesso sarà necessario procedere di nuovo così come indicato in seguito ma selezionando No al posto di Si nel passo n...

Page 120: ... del canale tra 7 e 7 e in seguito prema OK Ripeta i passi 5 e 6 b per regolare il livello di volume di altri canali c AFT Prema il joystick verso o 4 per regolare il livello della frequenza del canale tra 15 e 15 e in seguito prema OK Ripeta i passi 5 e 6 c per realizzare la sintonizzazione fine di altri canali d DECODER Prema il joystick verso o 4 per selezionare AV1 per un decoder collegato al ...

Page 121: ...le nell opzione Codice Person apparirà sempre il codice che ha introdotto e non sarà mai più possibile entrare di nuovo in questa opzione Menu Questa funzione consente di assegnare un codice di sicurezza al televisore per facilitarne il riconoscimento in caso di furto e ritrovamento Questo codice potrà essere introdotto una volta sola Si assicuri di averlo annotato per esempio in questo manuale de...

Page 122: ...a maggior parte delle funzioni di cui dispone l apparecchio Nota Prema il pulsante del telecomando per arrestare la Dimostrazione e tornare allo schermo normale del televisore S RM 892 PROGR MENU 1 4 7 2 5 8 0 3 6 9 VIDEO TV Regolazione Immagine Seleziona Entra Menu ModalitàImmagine Contrasto Luminosità Colore Nitidezza Ripristino Intell Artif Riduzione rumore Modalità Digitale Personale Si Si DRC...

Page 123: ...lega una fonte di segnale RGB come un DVD riproduttore digitale di videodischi al Connettore Euro AV 1 è possibile che si renda necessario regolare la geometria dell immagine Regolazione della geometria dell immagine per una sorgente RGB Regolazione Immagine Seleziona Entra Menu ModalitàImmagine Contrasto Luminosità Colore Nitidezza Ripristino Intell Artif Riduzione rumore Modalità Digitale Person...

Page 124: ...uattro caratteri seguendo lo stesso procedimento 6 Quando avrà selezionato tutti i caratteri prema OK 7 Ripeta i passi dal 4 al 6 se desidera etichettare altri segnali di entrata 8 Prema il pulsante MENU per tornare allo schermo normale del televisore Quando viene selezionato l apparecchio al quale è stato assegnato un nome per il segnale di entrata il suddetto nome apparirà durante alcuni secondi...

Page 125: ...el telecomando per selezionare un canale o prema il pulsante per selezionare una entrata video 2 Per cambiare l immagine dello schermo di destra All interno della modalità PAP prema il pulsante del telecomando Quando il simbolo appare nella parte inferiore dello schermo di destra prema i pulsanti numerici per selezionare un canale del televisore o prema il pulsante per selezionare una entrata vide...

Page 126: ...opagina Una pagina di televideo può essere formata a su volta da varie sottopagine In questi casi dopo alcuni secondi appare una linea informativa nella parte inferiore dello schermo con il numero di sottopagine che contiene la pagina in questione Prema il joystick verso 4 o per selezionare la sottopagina Blocco temporaneo di una pagina Prema il pulsante per mantenere sullo schermo una pagina ed e...

Page 127: ...ibile richiamare una pagina con codifica oraria ad esempio una pagina di avviso ad un orario prestabilito Quando si seleziona questa opzione appare il sottomenu di ora pagina sullo schermo 1 Prema i pulsanti numerici del telecomando per introdurre le tre cifre della pagina desiderata 2 Prema di nuovo i pulsanti numerici per introdurre le quattro cifre dell ora desiderata 3 Prema OK per memorizzare...

Page 128: ...issioni in programma se la trasmissione verrà effettuata più tardi Utilizzo del menu Impostazioni Personali È possibile effettuare una selezione personalizzata dei programmi preferiti 1 Prema il joystick verso 4 o per selezionare l icona e in seguito prema verso z per entrare nel menù Impostazioni Personali 2 Prema il joystick verso 4 o per selezionare la sua opzione sullo schermo e in seguito pre...

Page 129: ... per selezionare VPS PDC e in seguito prema ripetutamente su OK per selezionare Si o No Con questa regolazione viene garantita la registrazione di tutta la trasmissione anche se vi sono dei cambi di programmazione funziona solo se il canale selezionato emette un segnale VPS PDC Velocità Prema il joystick verso per selezionare Velocità e in seguito prema ripetutamente su OK per selezionare SP durat...

Page 130: ...nizzatore TV Video audio della fonte selezionata Video audio che si visualizzano sullo schermo uscita monitor Senza uscite Segnale audio Senza uscita Senza uscita Senza uscita Segnale audio per la cuffia Per evitare distorsioni dell immagine Non colleghi apparecchi ai connettori F e G simultaneamente Collegamenti opzionali È possibile collegare al retroproiettore una vasta gamma di apparecchi opzi...

Page 131: ...iche e selezioni Centrale nell ambito dell opzione Diffusore Ricordi che la potenza massima d entrata di questo connettore è di 30W Si assicuri di non oltrepassare questo limite Collegamento di apparecchi Mono Colleghi il cavo audio al connettore L G S I situato nella parte anteriore dell retroproiettore e selezioni il segnale di entrata 4 seguendo le istruzioni indicate più avanti Selezione e vis...

Page 132: ... disponga di Smartlink selezioni il menù di Preselezione Continuaz in Programmazione manuale e selezioni DECODER nella posizione AV2 per ogni canale criptato Per maggiori informazioni consulti il capitolo Uso della funzione di Preselezione Continuaz Se ha bisogno di maggiori informazioni su Smartlink consulti il manuale delle istruzioni del suo apparecchio videoregistratore Smartlink Con i pulsant...

Page 133: ...ea per una visione ottimale Angolo di visione orizzontale posizione raccomandata per l utente Angolo di visione verticale posizione raccomandata per l utente 20º 20º 60º 60º KP 61PS1 KP 61PS2 distanza minima 2 7 m KP 48PS1 KP 48PS2 distanza minima 2 2 m KP 53PS1 distanza minima 2 4 m KP 61PS1 KP 61PS2 distanza minima 2 7 m KP 53PS1 distanza minima 2 4 m KP 48PS1 KP 48PS2 distanza minima 2 2 m Info...

Page 134: ...21 pin norma CENELEC comprese entrate audio video entrate S Video uscita audio video uscita monitor Terminali Frontali Entrate AV4 q entrata S Video DIN da 4 pin entrata video connettore RCA entrate audio connettori RCA presa per cuffia minipresa stereo Uscita Audio 2 x 30 W potenza musicale 2 x 15 W RMS Entrata diffusore centrale 30 W RMS se si utilizza come diffusore centrale Consumo di energia ...

Page 135: ...sso Mediante il sistema di menù selezioni Regolazione Immagine e regoli di nuovo i livelli di Contrasto Colore e Luminosità Prema varie volte il pulsante del telecomando fino a che il simbolo appaia sullo schermo Prema il pulsante del telecomando Mediante il sistema di menù verifichi che nel menù Caratteristiche sia selezionato Diffusore in Principale Mediante il sistema di menù selezioni Regolazi...

Page 136: ...rizioni alle frequenze sono quelle indicata nel paragrafo 3 dell allegato A al D M 26 06 85 e nel paragrafo 3 dell allegato 1 al D M 27 08 87 e precisamente BANDE DI FREQUENZA 1 Bande di frequenza Low VHF E2 C Freq da 48 25 a 82 25 MHz Compreso Canale C S01 S2 Freq da 69 25 a 112 25 MHz S3 S10 Freq da 119 25 a 168 25 MHz High VHF E5 E12 Freq da 175 25 a 224 25 MHz S11 S20 Freq da 231 25 a 294 25 M...

Page 137: ...dsbediening plaatsen 7 De antenne en de videorecorder aansluiten 7 Ingebruikname De projectie TV aanzetten en automatisch afstemmen 8 De kleurdekking instellen Convergentie 10 Menusysteem Inleiding van het menusysteem in beeld 10 Gids om zich snel door de menu s te verplaatsen 11 Het menusysteem gebruiken Het beeld instellen 12 Het geluid instellen 13 Het menu Kenmerk gebruiken 15 De TV handmatig ...

Page 138: ...gaat verplaatsen Voorkom hierbij ongelijke oppervlakken snelle bewegingen of overmatige geweld Mocht het toestel gevallen of beschadigd zijn laat het toestel dan nakijken door deskundigen Aanvullende veiligheidsrichtlijnen Wanneer u de projectie TV rechtstreeks van een koude naar een warme plek verplaatst of er doet zich een plotselinge temperatuursverandering voor in het vertrek kunnen de beelden...

Page 139: ...e ingangsbron S video ingang Video ingang Audio ingang Knop Autom convergentie Ingang voor de koptelefoons aansluitingen aan de linkerkant aansluitingen aan de rechterkant Druk op het symbool aan de voorzijde van de projectie TV om voorste aansluitingen te kunnen zien Keuzetoetsen voor het volgende of voorgaande kanaal om TV zender te kiezen Overzicht Controleren van de meegeleverde accessoires Ov...

Page 140: ...lleen bij teletekst De videorecorder bedienen Raadpleeg voor nadere inlichtingen het hoofdstuk Afstandsbediening van andere Sony apparatuur De TV tijdelijk uitzetten Indrukken om de TV tijdelijk uit te zetten de standby indicatie gaat branden Nogmaals indrukken om de TV vanuit de standby stand aan te zetten Om energie te besparen raden wij u aan de TV volledig uit te schakelen wanneer zij niet geb...

Page 141: ...an deze optionele aansluiting de beeld en geluidkwaliteit van de videorecorder verbeteren Indien u de Euroconnector niet gebruikt moet u na de automatische programmering van de projectie TV het kanaal voor het videosignaal handmatig afstemmen Raadpleeg daarvoor het hoofdstuk De TV handmatig afstemmen Raadpleeg eveneens de bedieningsinstructies van uw videorecorder om erachter te komen hoe u het ka...

Page 142: ...igen Kies Uit in plaats van een land indien u niet wilt dat de kanalen TV zenders in een vooraf vastgelegde volgorde die met programmapositie nr 1 begint worden opgeslagen 4 Het menu Automatisch Programmeren verschijnt in de gekozen taal in beeld Druk op OK om Ja te kiezen 5 Automatisch verschijnt een nieuw menu in beeld dat u vraagt te controleren of de antenne aangesloten is Ga na of de antenne ...

Page 143: ...grammanummer waarop u het kanaal TV zender wilt opslaan en druk vervolgens op OK Het gekozen kanaal verandert van plaats en de overige kanalen schuiven op 3 Herhaal de stappen b1 en b2 indien u de overige TV zenders opnieuw wilt ordenen 7 Druk op de knop MENU om terug te keren naar het gewone TV scherm De projectie TV is klaar voor gebruik S RM 892 PROGR MENU 1 4 7 2 5 8 0 3 6 9 VIDEO TV Programma...

Page 144: ...au weer te geven 2 Duw de joystick naar 4 of naar om het gewenste menu of de gewenste functie weer te geven Duw deze naar z om in het gekozen menu of in de gekozen optie te komen Duw deze naar Z om naar het voorgaande menu of de voorgaande optie terug te keren Duw deze naar 4 Z of naar z om de instellingen van de gekozen functie te wijzigen Druk op OK om uw keuze te bevestigen en op te slaan 3 Dru...

Page 145: ...1 2 3 4 5 6 7 8 9 10 11 C03 C05 C07 C08 C09 C11 C12 C13 C14 C15 C16 TV 5 PRO 7 EU SP SWF RTL SAT MDR DDI DSF RTL 2 KAB 1 Handmatig Configureren Kies Enter Taal Land Handmatig programmeren Overige zenderinstell RGB instelling Persoonlijke ID Demo Handmatig Configureren Kies Enter Taal Land Handmatig programmeren Overige zenderinstell RGB instelling Persoonlijke ID Demo Handmatig Configureren Kies E...

Page 146: ...kiest in Beeldinstellingen Alleen beschikbaar voor het NTSC kleursysteem bijv voor Amerikaanse videobanden 4 Duw de joystick naar 4 Z z om de instelling van het gekozen element te wijzigen en druk vervolgens op OK om de nieuwe instelling op te slaan 5 Herhaal de stappen 3 en 4 om de overige instellingen te wijzigen 6 Druk op de MENU toets om naar het gewone TV beeld terug te keren Snel wisselen va...

Page 147: ...Mono 4 Stereo Voor tweetalige uitzendingen Mono voor het monokanaal indien beschikbaar A voor kanaal 1 4 B voor kanaal 2 Koptelefoon l Volume Z Minder z Meer l 2 kan geluid Voor stereo uitzendingen Mono 4 Stereo Voor tweetalige uitzendingen Mono voor het monokanaal indien beschikbaar A voor kanaal 1 B voor kanaal 2 4 PAP alleen als de functie PAP geactiveerd is Kan alleen blijvend worden opgeslage...

Page 148: ...beeld terug te keren Snel wisselen van geluidinstellingen De geluidinstellingen kunnen snel gewisseld worden zonder het menu Geluidinstellingen 1 Druk herhaaldelijk op de toets op de afstandsbediening om rechtstreeks toegang te hebben en kies de gewenste geluidinstelling Voorkeur Vocal Jazz Rock Pop of Vlak 2 Druk op OK om weer naar het gewone TV scherm terug te keren S RM 892 PROGR MENU 1 4 7 2 5...

Page 149: ...one TV beeld terug te keren Kenmerk Effect Handeling Luidspreker Hoofd geluid van projectie TV 4 Midden geluid via een externe versterker Sleep timer 4 Uit 10 min 20 min 90 min Eén minuut voordat de projectie TV in de standby stand springt komt de resterende tijd automatisch in beeld Druk terwijl u TV kijkt op de toets om de resterende tijd tot de automatische uitschakeling weer te geven Druk om v...

Page 150: ...V begint automatisch het volgende kanaal voor een TV zender of een videosignaal te zoeken Duw indien u deze niet op wilt slaan de joystick naar om een ander kanaal te zoeken Druk wanneer u het kanaal vindt dat u op wilt slaan op OK c Duw voor externe ingangsbronnen EXT de joystick naar om de ingangsbron waarop u de installatie heeft aangesloten AV1 AV2 AV3 of AV4 te kiezen Druk vervolgens op OK om...

Page 151: ...n of een spatie te kiezen en duw de joystick vervolgens naar z om dit karakterteken te bevestigen Kies nog vier karaktertekens op dezelfde wijze 8 Druk wanneer u alle karaktertekens gekozen hebt op OK 9 Herhaal de stappen 5 tot en met 8 als u nog andere zenders wilt benoemen 10 Druk op de MENU toets om naar het gewone TV beeld terug te keren Na het kiezen van een benoemde TV zender verschijnt de n...

Page 152: ...og steeds kiezen door op de desbetreffende cijfertoetsen te drukken Menusysteem U kunt deze projectietelevisie programmeren om ongewenste programmanummers over te slaan als u de programma s kiest met de PROGR toetsen Wanneer u na verloop van tijd de overgeslagen programmanummers weer in de reeks wilt opnemen ga dan op de onderstaande wijze te werk maar kies Uit in plaats van Aan in stap 6 Programm...

Page 153: ... van het kanaal tussen 7 en 7 af te stellen en druk vervolgens op OK herhaal de stappen 5 en 6 b om het volumeniveau van de overige kanalen af te stemmen c AFT Duw de joystick naar of naar 4 om de zenderfrequentie tussen 15 en 15 in te stellen en druk vervolgens op OK Herhaal de stappen 5 en 6 c om de fijnafstemming voor de overige kanalen uit te voeren d DECODER Duw de joystick naar of naar 4 om ...

Page 154: ...ug te keren Wanneer u naar de optie Persoonlijke ID in het menu Handmatig configureren gaat verschijnt altijd de ingevoerde code en u kunt nooit meer in deze optie komen Menusysteem U kunt een veiligheidscode aan de projectie TV toekennen van ten hoogste elf karaktertekens cijfers en letters Zo is het gemakkelijker de TV terug te krijgen na ontvreemding Deze code kan maar één keer ingevoerd worden...

Page 155: ...t merendeel van de functies die de projectie TV bezit Opmerking Druk op de toets van de afstandsbediening om de demonstratie stop te zetten en terug te keren naar het gewone TV scherm S RM 892 PROGR MENU 1 4 7 2 5 8 0 3 6 9 VIDEO TV Beeldinstellingen Kies Voer menu in Beeldinstellingen Contrast Helderheid Kleur Beeldscherpte Herstellen AI Ruis detectie Digitale stand Voorkeur Aan Aan DRC 50 Instel...

Page 156: ...terug te keren Menusysteem Wanneer een RGB signalenbron zoals een DVD digitale beeldplatenspeler op de Euroconnector 1 wordt aangesloten kan het nodig zijn de beeldgeometrie bij te stellen De beeldgeometrie voor een RGB bron instellen S RM 892 PROGR MENU 1 4 7 2 5 8 0 3 6 9 VIDEO TV Beeldinstellingen Kies Voer menu in Beeldinstellingen Contrast Helderheid Kleur Beeldscherpte Herstellen AI Ruis det...

Page 157: ...e bevestigen Kies de overige vier karaktertekens op dezelfde wijze 6 Druk op OK wanneer u alle karaktertekens gekozen hebt 7 Herhaal de stappen 4 tot en met 6 als u nog meer ingangsignalen wilt benoemen 8 Druk op de MENU toets om naar het gewone TV beeld terug te keren Telkens als u apparatuur met een ingangssignaal dat u een naam hebt gegeven kiest verschijnt deze naam gedurende enkele seconden i...

Page 158: ...op de toets om een video ingang te kiezen 2 Om het beeld van het rechterscherm te veranderen Druk terwijl u in de PAP modus staat op de toets op de afstandsbediening Druk wanneer het symbool onderaan in het rechter beeld verschijnt op de cijfertoetsen om een TV zender te kiezen of druk op de toets om een video ingang te kiezen Verwisseling van de beelden Druk terwijl u in de PAP modus staat op de ...

Page 159: ...eidene subpagina s bestaan Wanneer dat het geval is komt na enige seconden een regel onder op uw beeldscherm die u bericht hoeveel subpagina s deze pagina heeft Duw de joystick naar 4 of naar om de subpagina te kiezen Een pagina vasthouden Druk op de toets om een pagina vast te houden en te voorkomen dat automatisch andere pagina s in beeld komen Druk nogmaals op deze toets om de vergrendeling ong...

Page 160: ...adplegen zoals bijv een alarmpagina op een bepaalde tijd Na het kiezen van deze optie en nadat het submenu Tijdcode pagina op het beeldscherm gekomen is 1 Druk op de cijfertoetsen op de afstandsbediening om de drie cijfers van de gewenste pagina in te voeren 2 Druk nu nogmaals op de cijfertoetsen om de vier cijfers van het gewenste tijdstip in te voeren 3 Druk op OK om het gestelde tijdstip op te ...

Page 161: ... geeft weer of de uitzending nog moet plaatsvinden Persoonlijke voorkeuren aangeven U kunt een persoonlijke lijst met uw favoriete soorten programma s samenstellen 1 Duw de joystick naar 4 of naar om het pictogram te kiezen en vervolgens naar z om in het menu Persoonlijke instelling te komen 2 Duw de joystick naar 4 of naar om uw optie op het scherm te kiezen en druk vervolgens op OK om deze keuze...

Page 162: ...deorecorder te configureren VPS PDC Duw de joystick naar Z of naar z om VPS PDC te kiezen en druk vervolgens herhaaldelijk op OK om Aan of Uit te kiezen Dankzij deze instelling bent u zeker van de opname van alle uitzendingen ook al zijn er programmawijzigingen werkt alleen als het gekozen kanaal een VPS PDC afgeeft Snelheid Duw de joystick naar om Snelheid te kiezen en druk vervolgens herhaaldeli...

Page 163: ...ideo audio van de gekozen bron Smartlink Video audio die op beeldscherm weergegeven worden uitgang monitor Geen uitgangen Audiosignaal Geen uitgangen Geen uitgangen Geen uitgangen Audiosignaal voor koptelefoon Om beeldvervormin g te voorkomen Sluit niet tegelijkertijd apparatuur op de connectoren F en G aan Extra aansluitingen U kunt een grote verscheidenheid aan extra apparatuur op uw projectie T...

Page 164: ... luidspreker Raadpleeg daarvoor het hoofdstuk Het menu Kenmerk gebruiken en kies Midden i in de optie Luidspreker Vergeet niet dat het maximale ingangsvermogen van deze connector 30 W is Overschrijd deze grens niet Mono apparatuur aansluiten Sluit een audiokabel op de L G S I connector aan de voorkant van de projectie TV aan en kies het ingangssignaal 4 door de onderstaande aanwijzingen op te volg...

Page 165: ...derinstell in handmatig programmeren en kies DECODER in de positie AV2 voor elk kanaal Raadpleeg voor nadere informatie het hoofdstuk De functie Overige Zenderinstell gebruiken Raadpleeg als u meer informatie over Smartlink nodig hebt de bedieningsinstructies van uw videorecorder Smartlink Met de toetsen onder het paneel van de afstandsbediening kunt u ander e Sony apparatuur bedienen 1 Open het p...

Page 166: ...n Optimale gezichtshoek Horizontale gezichtshoek aanbevolen positie van de kijker Verticale gezichtshoek aanbevolen positie van de kijker 20º 20º 60º 60º KP 61PS1 KP 61PS2 minimum afstand 2 7 m KP 48PS1 KP 48PS2 minimum afstand 2 2 m KP 53PS1 minimum afstand 2 4 m KP 61PS1 KP 61PS2 minimum afstand 2 7 m KP 53PS1 minimum afstand 2 4 m KP 48PS1 KP 48PS2 minimum afstand 2 2 m Aanvullende informatie ...

Page 167: ...udio video uitgang monitor uitgang Terminals aan de voorkant AV4 ingangen q video S ingang 4 pins DIN video ingang RCA connector audio ingangen RCA connectors aansluiting koptelefoon stereo mini aansluiting Geluidsuitgang 2 x 30 W muzieksterkte 2 x 15 W RMS Ingang middelste luidspreker 30 W RMS indien als middelste luidspreker gebruikt Energieverbruik 225 W Energieverbruik in standby stand 0 7 W A...

Page 168: ... om Beeldinstellingen weer te geven en stel het contrast kleur en helderheid bij Druk herhaaldelijk op de toets op de afstandsbediening totdat het 1 symbool in beeld komt Druk op de toets op de afstandsbediening Controleer d m v het Menusysteem of in het menu Kenmerk Luidspreker is gekozen onder Hoofd Gebruik het Menusysteem om Beeldinstellingen weer te geven Stel de kleurbalans bij Zet de apparat...

Page 169: ...ο 7 Σύνδεση της κεραίας και του βίντεο 7 Θέση σε λειτουργία για πρώτη φορά Ενεργοποίηση της τηλε ρασης projection και αυτ µατος συντονισµ ς 8 Ρύθµιση της καταχώρησης χρώµατος Σύγκλιση 10 Σύστηµα των µενού Εισαγωγή στο σύστηµα των µενού της οθ νης 10 Οδηγ ς γρήγορης παραποµπής στα διάφορα µενού 11 Χρήση του συστήµατος των µενού Ρύθµιση της Εικ νας 12 Ρύθµιση του Ήχου 13 Χρήση του Λειτουργίες 15 Συν...

Page 170: ...κτα αντικείµενα και τις ακάλυπτες πηγές φωτ ς π χ κεριά µακριά απ την τηλε ραση Για να αποσυνδέσετε το καλώδιο του ρεύµατος απ την πρίζα τραβήξτε το απ το φις Mην τραβάτε ποτέ το καλώδιο Mην τοποθετείτε βαριά αντικείµενα πάνω στο καλώδιο του ρεύµατος δι τι ενδέχεται να προκληθούν σε αυτ φθορές Σας συνιστούµε να τυλίξετε το πλεονάζον καλώδιο γύρω απο τα στηρίγµατα που βρίσκονται στο πίσω µέρος της ...

Page 171: ... επιλογής σήµατος εισ δου Υποδοχή εισ δου βίντεο S Υποδοχή εισ δου βίντεο Υποδοχές εισ δου Hi Fi Πλήκτρο Αυτ µατης σύγκλισης Υποδοχή ακουστικών υποδοχή αριστερής πλευράς υποδοχές δεξιάς πλευράς Πιέστε το κάλυµµα στο µπροστιν µέρος της τηλε ρασης projection πιέστε επάνω στο σηµείο για να ανοίξετε τον πίνακα ελέγχου Πλήκτρα αλλαγής προγραµµάτων επιλέγουν τηλεοπτικά κανάλια Γενική περιγραφή Έλεγχος τ...

Page 172: ...ίντεο Για περισσ τερες πληροφορίες ανατρέξτε στο κεφάλαιο Τηλεχειριστήριο άλλων συσκευών Sony Εκτ ς απ τις λειτουργίες της τηλε ρασης λα τα χρωµατιστά πλήκτρα χρησιµοποιούνται και για το Teletext Για περισσ τερες πληροφορίες διαβάστε το κεφάλαιο Teletext αυτού του εγχειριδίου Προσωρινή απενεργοποίηση τηλε ρασης Πιέστε για να απενεργοποιήσετε προσωρινά την τηλε ραση η ένδειξη προσωρινής απενεργοποί...

Page 173: ...IN Ο Euro connector προσφέρεται κατ πιν παραγγελίας Αν τον χρησιµοποιείτε η σύνδεση αυτή µπορεί να βελτιώσει την ποι τητα της εικ νας και του ήχου κατά την χρήση του βίντεο Εάν δεν έχετε στην διάθεσή σας καλώδιο για Euro connector µετά τον αυτ µατο συντονισµ της τηλε ρασης projection θα πρέπει να συντονίσετε το σήµα του βίντεο Προς τούτο συµβουλευτείτε το κεφάλαιο Συντονισµ ς της τηλε ρασης µε το ...

Page 174: ...τη συνέχεια πιέστε το πλήκτρο ΟΚ για την επιβεβαίωση της επιλογής Επιλέξτε Κλειστ στη θέση µιας χώρας εάν δεν επιθυµείτε να αποθηκευτούν τα κανάλια τηλεοπτικοί σταθµοί σε µια προσδιορισµένη διάταξη που θα αρχίζει απ την θέση του προγράµµατος αριθµ ς 1 4 Το µενού αυτ µατου συντονισµού θα εµφανιστεί στην οθ νη της τηλε ρασης στην επιλεγµένη γλώσσα Πιέστε το πλήκτρο ΟΚ για την επιλογή Ναι 5 Στην οθ ν...

Page 175: ... προγράµµατος στην µνήµη του οποίου επιθυµείτε να παραµείνει το επιλεγµένο κανάλι τηλεοπτικ ς σταθµ ς και στη συνέχεια πιέστε το πλήκτρο ΟΚ Το επιλεγµένο κανάλι περνά στη νέα θέση προγράµµατος και τα υπ λοιπα κανάλια αλλάζουν αναλ γως 3 Επαναλάβετε τα στάδια β1 και β2 εάν θέλετε να αλλάξετε την θέση και άλλων προγραµµάτων στην τηλε ρασή σας 7 Πιέστε το πλήκτρο MENU για να επανέλθει η κανονική τηλε...

Page 176: ...το πρώτο επίπεδο µενού στην οθ νη 2 Για να ενεργοποιήσετε το µενού ή την επιθυµητή επιλογή πιέστε το joystick προς το 4 ή Για να εισέλθετε στο µενού ή στην επιθυµητή επιλογή πιέστε προς το z Για να εισέλθετε στο µενού ή στην επιθυµητή επιλογή πιέστε προς το Z Για να µετατρέψετε τις ρυθµίσεις της επιθυµητής επιλογής πιέστε προς το 4 Z ή z Για να επιβεβαιώσετε και αποθηκεύσετε την επιλογή πιέστε το ...

Page 177: ...2 3 4 5 6 7 8 9 10 11 C03 C05 C07 C08 C09 C11 C12 C13 C14 C15 C16 TV 5 PRO 7 EU SP SWF RTL SAT MDR DDI DSF RTL 2 KAB 1 Συντονισµ ς µε το χέρι Γλώσσα Χώρα Χειροκίνητο Πρ γραµµα Πρ σθετες Λειτουργίες RGB Ρύθµιση Προσωπικ Επίδειξη Επιλέξτε Εισαγωγή Συντονισµ ς µε το χέρι Επιλέξτε Εισαγωγή Γλώσσα Χώρα Χειροκίνητο Πρ γραµµα Πρ σθετες Λειτουργίες RGB Pύθµιοη Προσωπικ Επίδειξη Συντονισµ ς µε το χέρι Γλώσ...

Page 178: ...µ νο για το σύστηµα χρώµατος NTSC π χ βιντεοταινίες των Ηνωµένων Πολιτειών 4 Πιέστε το joystick προς το 4 Z z για να τροποποιήσετε την ρύθµιση του επιλεγµένου στοιχείου και στησυνέχεια πιέστε το πλήκτρο ΟΚ για να αποθηκευτεί η νέα ρύθµιση 5 Επαναλάβετε τα στάδια 3 και 4 εάν θέλετε να τροποποιήσετε άλλες ρυθµίσεις 6 Πιέστε το πλήκτρο MENU για να επανέλθει η κανονική τηλεοπτική εικ να Γρήγορη αλλαγή...

Page 179: ...ποµπής π χ σε διαφηµίσεις ιφ Ήχος Για στερεοφωνικές εκποµπές Mono 4 Stereo Για δίγλωσσες εκποµπές Mono για το κανάλι mono εάν διατίθεται A για το κανάλι 1 4 B για το κανάλι 2 Ακουστικά l Ένταση Z Χαµηλ τερη z ψιλ τερη l ιφ Ήχος Για στερεοφωνικές εκποµπές Mono 4 Stereo Για δίγλωσσες εκποµπές Mono για το κανάλι mono εάν διατίθεται A για το κανάλι 1 B για το κανάλι 2 4 PAP µ νο εάν το ΡΑΡ είναι ενεργ...

Page 180: ... επανέλθει η κανονική τηλεοπτική εικ να Γρήγορη αλλαγή του τύπου ήχου Ο τύπος ήχου δύναται να τροποποιηθεί άµεσα χωρίς την πρ σβαση στο µενού Ρύθµιση Ήχου 1 Πιέστε επανειληµµένα το πλήκτρο απ το τηλεχειριστήριο γα άµεση πρ σβαση και επιλογή του είδους ήχου που επιθυµείτε Χρήστης Φωνικά Τζαζ Ροκ Ποπ ή Επίπεδη 2 Πιέστε το πλήκτρο ΟΚ για να επανέλθει η κανονική τηλεοπτική εικ να S RM 892 PROGR MENU 1...

Page 181: ...και στησυνέχεια πιέστε το πλήκτρο ΟΚ για την αποθήκευσή της 5 Πιέστε το πλήκτρο MENU για να επανέλθει η κανονική τηλεοπτική εικ να Λειτουργίες Αποτέλεσµα Λειτουργία Ηχείο Βασικ ήχος της τηλε ρασης projection 4 Center in ήχος εν ς εξωτερικού ισοσταθµιστή Χρονοδιακ πτης 4 Oχι 10 Λεπ 20 Λεπ 90 Λεπ Ένα λεπτ πριν τεθεί σε λειτουργία η αυτ µατη προσωρινή απενεργοποίηση Standby της τηλε ρασης projection ...

Page 182: ...ίσει αυτ µατα να ψάξει να βρει το επ µενο διαθέσιµο κανάλι τηλε ρασης ή το κανάλι του βίντεο Εάν δεν επιθυµείτε να αποθηκεύσετε το κανάλι που βρέθηκε πιέστε το joystick προς το για να συνεχιστεί η αναζήτηση rταv βρείτε τo κανάλι που επιθυµείτε να αποθηκεύσετε πιέστε το πλήκτρο OK γ Για εξωτερικές πηγές εισ δου ΕΧΤ πιέστε το joystick προς το για να επιλέξετε τη πηγή εισ δου που είναι συνδεδεµένη η ...

Page 183: ...για να επιλέξετε ένα γράµµα έναν αριθµ ή ένα κεν και στη συνέχεια πιέστε προς το z για την καταχώρηση αυτού του χαρακτήρα Επιλέξτε τους τέσσαρες άλλους χαρακτήρες µε τον ίδιο τρ πο 8 rταν επιλέξτε λους τους χαρακτήρες πιέστε το πλήκτρο ΟΚ 9 Επαναλάβετε τα στάδια 5 έως 8 για την καταχώρηση και άλλων καναλιών 10 Πιέστε το πλήκτρο MENU για να επανέλθει η κανονική τηλεοπτική εικ να Με την επιλογή εν ς...

Page 184: ...ίζεται στην οθ νη της τηλε ρασης Παρ λα αυτά το κανάλι δύναται να επιλεχθεί πατώντας τα αντίστοιχα αριθµητικά πλήκτρα απ το τηλεχειριστήριο Σύστηµα των µενού Μπορείτε να προγραµµατίσετε αυτή την τηλε ραση projection ώστε να προσπερνά τα ανεπιθύµητα προγράµµατα ταν τα επιλέγετε µε τα πλήκτρα PROGR Εάν αργ τερα επιθυµείτε να επανακτήσετε το υπερπηδηµένο πρ γραµµα εκτελέστε τις Λειτουργίες που στη συ...

Page 185: ...ου του καναλιού 7 έως 7 και στην συνέχεια πιέστε το πλήκτρο ΟΚ Επαναλάβετε τα στάδια 5 και 6 β εάν θέλετε να ρυθµίσετε την ένταση ήχου και άλλων καναλιών γ AFT Πιέστε το joystick προς το ή 4 για να ρυθµίσετε την συχν τητα του καναλιού απ 15 έως 15 και στην συνέχεια πιέστε το πλήκτρο ΟΚ Επαναλάβετε τα στάδια 5 και 6 γ για τον µικροσυντονισµ και άλλων καναλιών δ ΑΠΟΚΩ Πιέστε το joystick προς το ή 4 ...

Page 186: ...ή τηλεοπτική εικ να ταν εισέρχεστε στο µενού Συντονισµ ς µε το χέρι στην επιλογή Προσωπικ εµφανίζεται πάντα ο κωδικ ς που καταχωρίσατε και δεν θα µπορέσετε ποτέ να εισέλθετε σε αυτή την επιλογή Σύστηµα των µενού Μπορείτε να καταχωρίσετε στην τηλε ραση projection ένα κωδικ αναγνώρισης ο οποίος θα έχει µέχρι έντεκα χαρακτήρες γράµµατα ή αριθµούς Αυτ θα διευκολύνει την αναγνώριση σε περίπτωση κλοπής ...

Page 187: ... µιας σειράς των περισσ τερων λειτουργιών που διαθέτει η τηλε ραση projection Σηµείωση Πιέστε το πλήκτρο απ το τηλεχειριστήριο για να διακοπεί η επίδειξη και για να επανέλθει η κανονική τηλεοπτική εικ να S RM 892 PROGR MENU 1 4 7 2 5 8 0 3 6 9 VIDEO TV Ρύθµιση Εικ νας Επιλέξτε Εισαγωγή Μενού Λειτουρ Εικ νας Κονιράστ Φωτειν τητα Χρώµα Οξύτητα Μηδενισµ ς Τεχνητή Νοηµοσύνη Μείωση Θορύβου Ψηφιακή Λειτ...

Page 188: ...συνέχεια πιέστε προς το z 6 Πιέστε το joystick προς το z για να επιλέξετε Κέντρο και στη συνέχεια πιέστε προς το ή 4 για να ρυθµίσετε µεταξύ 10 και 10 το κέντρο της εικ νας Πιέστε το πλήκτρο ΟΚ για την αποθήκευση 7 Πιέστε το πλήκτρο MENU για να επανέλθει η κανονική τηλεοπτική εικ να Ρύθµιση Εικ νας Επιλέξτε Εισαγωγή Μενού Λειτουρ Εικ νας Κονιράστ Φωτειν τητα Χρώµα Οξύτητα Μηδενισµ ς Τεχνητή Νοηµοσ...

Page 189: ...ρα Επιλέξτε τους τέσσαρες άλλους χαρακτήρες µε τον ίδιο τρ πο 6 rταν επιλέξτε λους τους χαρακτήρες πιέστε το πλήκτρο ΟΚ 7 Επαναλάβετε τα στάδια 4 έως 6 για την καταχώρηση και άλλων καναλιών εισ δου 8 Πιέστε το πλήκτρο MENU για να επανέλθει η κανονική τηλεοπτική εικ να Με την επιλογή µιας συσκευής στην οποία καταχωρήθηκε ένα νοµα στο σήµα εισ δου το νοµα αυτ θα εµφανίζεται για ορισµένα δευτερ λεπτα...

Page 190: ...ειριστηρίου για να επιλέξετε ένα τηλεοπτικ κανάλι ή πιέστε το πλήκτρο για να επιλέξετε µια είσοδο βίντεο 2 Για να αλλάξετε την εικ να της δεξιάς οθ νης Βρισκ µενοι µέσα στον τύπο ΡΑΡ πιέστε το πλήκτρο του τηλεχειριστηρίου rταν εµφανιστεί το σύµβολο στο κάτω µέρος της δεξιάς οθ νης πιέστε τα αριθµητικά πλήκτρα του τηλεχειριστηρίου για να επιλέξετε ένα τηλεοπτικ κανάλι ή πιέστε το πλήκτρο για να επι...

Page 191: ...ιλογή µιας δευτερεύουσας σελίδας Μια σελίδα του Teletext µπορεί να αποτελείται συγχρ νως απ αρκετές δευτερεύουσες σελίδες Σε αυτές τις περιπτώσεις µετά απ ορισµένα δευτερ λεπτα εµφανίζεται µια σειρά πληροφοριών στο κάτω µέρος της οθ νης µε τον αριθµ απ τις δευτερεύουσες σελίδες που περιέχει αυτή η σελίδα Πιέστε το joystick προς το 4 ή για να επιλέξετε την δευτερεύουσα σελίδα Πάγωµα µιας σελίδας Te...

Page 192: ...κοποιηµένη σελίδα χρ νου πως για παράδειγµα µια σελίδα χρ νου ώρας σε µια συγκεκριµένη ώρα Μετά την επιλογή αυτής της λειτουργίας και αφού εµφανιστεί το δευτερεύον µενού της σελίδας χρ νου ώρας στην οθ νη 1 Πιέστε τα αριθµητικά πλήκτρα απ το τηλεχειριστήριο για να καταχωρίσετε τα τρία ψηφία της σελίδας που επιθυµείτε 2 Πιέστε ξανά τα αριθµητικά πλήκτρα για να καταχωρίσετε τα τέσσερα ψηφία της ώρας...

Page 193: ...στιγµή ή θα εµφανιστεί το µενού Εκποµπές σε Εκρεµ τητα εάν η εκποµπή πρ κειται να πραγµατοποιηθεί αργ τερα Ανεξάρτητη Ρύθµιση Προγραµµάτων Μπορείτε να προετοιµάσετε έναν προσωπικ κατάλογο µε τους τύπους προγραµµάτων της αρεσκείας σας 1 Πιέστε το joystick προς το 4 ή για να επιλέξετε την εικ να και στη συνέχεια πιέστε προς το z για να εισέλθετε στο µενού Ανεξάρτητη ρύθµιση 2 Πιέστε το joystick προς...

Page 194: ...ίντεο VPS PDC Πιέστε το joystick προς το Z ή z για να επιλέξετε VPS PDC και στη συνέχεια πιέστε επανειληµµένα το πλήκτρο ΟΚ για να επιλέξετε Ναι ή rχι Με αυτή τη ρύθµιση έχετε εξασφαλισµένη την εγγραφή ολ κληρης της εκποµπής έστω και αν υπάρξουν αλλαγές προγράµµατος λειτουργεί µ νο αν το επιλεγµένο κανάλι µεταδίδει ένα σήµα VPS PDC Ταχύτητα Πιέστε το joystick προς το για να επιλέξετε Ταχύτητα και ...

Page 195: ... να ήχος του συντονιστή της τηλε ρασης Εικ να ήχος της επιλεγµένης πηγής Εικ να ήχος που φαίνονται στην οθ νη έξοδος του monitor Καµιά έξοδος Σήµα ήχου Καµιά έξοδος Καµιά έξοδος Καµιά έξοδος Σήµα ήχου για τα ακουστικά Για να αποφύγετε την παραµ ρφωση της εικ νας Μη συνδέετε ταυτ χρονα συσκευές στις υποδοχές F και G Εξωτερικές συνδέσεις Μπορείτε να συνδέσετε στην τηλε ραση projection µια µεγάλη σει...

Page 196: ...υτείτε το κεφάλαιο Ρύθµιση και επιλέξτε Center in στην επιλογή Ηχείο Έχετε υπ ψη τι η µέγιστη ισχύ εισ δoυ αυτής της υπoδoχής είvαι 30W Σιγoυρευτείτε τι δεv υπερβαίvετε αυτ τo ριo Σύνδεση συσκευών Mono µονοφωνικών Συνδέστε το καλώδιο της συσκευής στον ακροδέκτη L G S I που βρίσκεται στην εµπρ ς ψη της τηλε ρασης projection και επιλέξτε το σήµα εισ δου 4 ακολουθώντας τις παρακάτω αναφερ µενες οδηγί...

Page 197: ... Λειτουργίες στο Euvτovισµ ς µε τo χέρι και επιλέξτε ΑΠΟΚΩ Αποκωδικοποιητής στην θέση AV2 για κάθε κωδικοποιηµένο κανάλι Για περισσ τερες πληροφορίες ανατρέξτε στο κεφάλαιο Χρήση της Λειτουργίας Πρ σθετες Λειτουργίες Για περισσ τερες πληροφορίες σχετικά µε το Smartlink παρακαλούµε ανατρέξτε στις Οδηγίες Χρήσης του βίντεο Smartlink Με τα πλήκτρα που βρίσκονται κάτω απ την τάπα του τηλεχειριστηρίου ...

Page 198: ...η ακτίνα τηλεθέασης Ακτίνα οριζ ντιας τηλεθέασης συνιστούµενη θέση για τον χρήστη Ακτίνα κάθετης τηλεθέασης συνιστούµενη θέση για τον χρήστη 20º 20º 60º 60º KP 61PS1 KP 61PS2 ελάχιστη απ σταση 2 7 m KP 48PS1 KP 48PS2 ελάχιστη απ σταση 2 2 m KP 53PS1 ελάχιστη απ σταση 2 4 m KP 61PS1 KP 61PS2 ελάχιστη απ σταση 2 7 m KP 53PS1 ελάχιστη απ σταση 2 4 m KP 48PS1 KP 48PS2 ελάχιστη απ σταση 2 2 m Πρ σθετες...

Page 199: ...νει είσοδο για σήµατα ήχου εικ νας είσοδο βίντεο S έξοδο ήχου εικ νας έξοδος monitor Μπροστιν µέρος Είσοδοι AV4 q είσοδος βίντεο S DIN 4 ακίδων είσοδος βίντεο σύνδεσης RCA είσοδος ήχου συνδέσεις RCA Υποδοχή ακουστικών µίνι στέρεο υποδοχή Έξοδος ήχου 2 x 30 W Μουσική ισχύς 2 x 15 W RMS Είσοδος κεντρικού ηχείου 30 W RMS εάν χρησιµοποιείται σαν κεντρικ ηχείο Κατανάλωση ρεύµατος 225 W Κατανάλωση ρεύµα...

Page 200: ...νού επιλέξτε Ρύθµιση Εικ νας και ρυθµίστε Κ ντραστ Χρώµα και Φωτειν τητα Πιέστε το πλήκτρο απ το τηλεχειριστήριο επανειληµµένα µέχρι να εµφανιστεί στην οθ νη το σύµβολο 1 Πιέστε το πλήκτρο απ το τηλεχειριστήριο Χρησιµοποιώντας το σύστηµα των µενού ελέγξτε αν στο µενού Λειτουργίες είναι επιλεγµένο Ηχείο στο Βασικ Χρησιµοποιώντας το σύστηµα των µενού επιλέξτε Ρύθµιση Εικ νας και ρυθµίστε το χρώµα Κλ...

Page 201: ...ve Video baqlantwsw 7 TV nin ilk kez çalwxtwrwlmasw Televizyon açma ve otomatik kanal ayarw 8 Renklerin üst üste konum ayarw Aynw noktada birlexme 10 Menü sistemi Menü sisteminin ekranda tanwtwmw 10 Menüler araswnda hareket edebilmek için hwzlw kwlavuz 11 Menü sisteminin kullanwmw Resim ayarw 12 Ses ayarw 13 Özellikler Menüsünün kullanwmw 15 TV cihazwnwn manuel elle ayarw 16 Vericinin bireysel tan...

Page 202: ...ibi hiçbir parçaswna dokumaywn TV nin havalandwmalarwnw örtmeyiniz Hava akimi saqlamak için cihaz çevresinde en az 10 cm lik bir alanw box bwrakwnwz TV yi asla swcak nemli yada axwrw tozlu mekanlarda bwrakmaywnwz TV yi mekanik titrexime maruz kalabileceqi mekanlarda kurmaywnwz Yangwn tehlikesini önlemek için yanwcw yada açik alevli örneqin mum objeleri TV den uzak tutunuz TV yi yumuxak hafif nemli ...

Page 203: ...arw düqmeleri Girix kaynaqw seçim düqmesi S Video girixi Video girixi Audio girixleri Otomatik ayar düqmesi Kulaklwk girixi Sol taraftaki baqlantwlar Saq taraftaki baqlantwlar Retroprojektörün ön tarafwndaki ixarete basarak ön kumanda panelini açwnwz Bir önceki veya sonraki program seçim düqmesi Seçilen TV yaywnwnwn Genel tanwtwm Cihazla verilen aletlerin kontrol edilmesi Retroprojektörün düqmeler...

Page 204: ...wlwr Videonun kullanwmw Daha çok bilgi için Uzaktan kumanda ve diger Sony cihazlarw maddesine baxvurun Bütün renkli tuxlar televizyonun yanwswra TeleteÍt ixlemlerinde de kullanwlwr Daha ayrwntwlw bilgi için bu kullanwm kwlavuzunun TeleteÍt bölümünü okuyun TV cihazwnwn geçici olarak kapatwlmasw TV cihazwnwn geçici olarak kapatmak için bu tuxa baswnwz bekleme modu yanacaktwr Tekrar çalwxtwrmak için ...

Page 205: ...eya OUT IN Eurokonektör kablo tercih edilebilinir Eqer bu yolu seçerseniz Bu baqlantwyla daha iyi bir görüntü ve ses alabilirsiniz Eqer Eurokonektör kullanmazsanwz Retroprojektore otomatik kanal ayarw yaptwktan sonra birde manuel elle videonun kanal ayarwnw yapmanwz gerekir Bu bilgileri TV nin manuel ele ayarw bölümünden alabilirsiniz Sizin videonuzun kwlavuz kitabwna bakarakta videonuzun kanal si...

Page 206: ...stemiyorsanwz Ülke seçimini Kapalw tuxlaywn ve böylece programlarwn pozisyonu numa ra 1 den baxlwyacak 4 Seçtiqiniz dil otomatik arama menüsü ile ekrana gelecek Evet için OK tuxuna baswn 5 Otomatik olarak yeni bir menü gelecek ekrana ve size antenin baqlw olup olmadwqwnw soracak Antenin baqlw olup olmadwqwnw kontrol ettikten sonra cihazwn Otomatik kanal aramaya gecmesi için OK tuxuna baswn Retropr...

Page 207: ...eçmek için veya 4 doqru bastwrwn ve devamwnda OK tuxuna baswn seçilen kanal yeni program pozisyonuna geçecek ve diqer kanallar uyumlu olarak yer deqixtirecektir 3 Eqer diqer kanallarwn yerlerini deqixtirmek isterseniz 1 ve 2 i tekrarlaywn 7 Tekrar normal televizyon ekranwna dönmek için MENU tuxuna baswn Retroprojektörün çalwxmaya hazwr S RM 892 PROGR MENU 1 4 7 2 5 8 0 3 6 9 VIDEO TV Program Swral...

Page 208: ...w ekranda görüntülemek için MENU tuxuna baswnwz 2 Menü veya istenilen seçimi deqixtirmek için joystiqi 4 veya doqru bastwrwn Menüye ve yapwlan terçihi girmek için joystiqi z bastwrwn Menüdeki bir önceki terçihe dönmek için joystiqi Z bastwrwn Seçilen obsiyonun ayarlarwnw deqixtirmek için 4 Z veya z bastwrwn Seçimi hafwzaya almak ve teyit etmek için OK tuxuna baswn 3 Tekrar normal televizyon ekranw...

Page 209: ...m Ayarlarw RGB Programlanmasw Kixisel Bilgi Gösteri Seç Menüde Gir Manuel Ayarlar DÌL Ülke Manuel Program Ayarw Daha Baxka Program Ayarlarw RGB Programlanmasw Kixisel Bilgi Gösteri Seç Menüde Gir Manuel Ayarlar DÌL Ülke Manuel Program Ayarw Daha Baxka Program Ayarlarw RGB Programlanmasw Kixisel Bilgi Gösteri Seç Menüde Gir Manuel Ayarlar DÌL Ülke Manuel Program Ayarw Daha Baxka Program Ayarlarw RG...

Page 210: ...xisel bölümü seçilirse yapwlabilinir Sadece NTSC renk sistemi için kullanwlabilinir mesela Amerikan video kasetleri 4 Seçilen ixlevin ayarwnw deqixtirmek için joystiqi 4 Z z bastwrwn ve ardwndan yeni ayarw hafwzaya almak için OK tuxuna baswn 5 Diqer ayarlarw deqixtirmek için 3 4 safhalarw tekrarlaywn 6 Normal TV ekranwna dönmek için MENU tuxuna baswnwz Resim modunun hwzlw deqixtirilmesi Menüdeki R...

Page 211: ... 4 Stereo 2 dilde yapwlan yaywnlar için Mono eqer varsa mono kanal için A kanal 1 için 4 B kanal 2 için Kulaklwk l Ses Ayarw Z Daha az z Daha çok l Çift Ses Stereo yaywnlar için Mono 4 Stereo 2 dilde yapwlan yaywnlar için Mono eqer varsa mono kanal için A kanal 1 için B kanal 2 için 4 PAP eqer PAP hazwrsa Sadece EÊualizer modunun kixisel imleçi kalwcw olarak hafwzaya alwnabilinir Diqerleri Vocal J...

Page 212: ...önmek için MENU tuxuna baswnwz Ses modunun hwzlw deqixtirilmesi Menüdeki Ses ayarw bölümüne hiç girmeden ses modunu hwzlwca deqixtirebilirsiniz 1 Wstediqiniz Ses moduna Kixisel Vocal Jazz Rock Pop ve Düz doqrudan girebilmek için uzaktan kumanda cihazwnwn tuxuna baswn 2 Normal TV ekranwna dönmek için OK tuxuna baswn S RM 892 PROGR MENU 1 4 7 2 5 8 0 3 6 9 VIDEO TV Equalizer Modu Kixisel Vocal Jazz ...

Page 213: ...a almak için OK tuxuna baswn 5 Normal TV ekranwna dönmek için MENU tuxuna baswnwz Özellikler Etki Wxlem Hoparlör Normal Retroprojektorün sesi 4 Merkez Dwx amplifikatörün sesi Otomatik 4 Kap kapanma 10 daki 20 daki 90 daki Retroprojektor bekleme standby konumuna bir dakika kala ekranda geri kalan zamanw otomatik olarak gösterir TV yi seqrederken geri kalan geçici kapanma süresini görmek için tuxuna...

Page 214: ...diqiniz bir kanalw atlamak ve baxka bir kanal aramak için joystiqi bastwrwn Hafwzaya alwnmaswnw istediqiniz bir kanalw bulduqunuzda OK tuxuna baswn c Dwx girix kaynaklarw için EÈT Aletin baqlantwswnw yaptwqwnwz girix kaynaqwnw AV1 AV2 AV3 ve AV4 seçmek için joystiqi bastwrwn ve devamwnda hafwzaya almak için OK tuxuna baswn 9 Daha fazla kanal ayar ve hafwza ixlemleri için 4 ten 8 e a b c ixlemlerin...

Page 215: ...er kabul ixlemini z bastwrarak yapwn Diqer dört karekteri aynw xekilde xeçin 8 Bütün isimlerin seçimi bittiqinde OK tuxuna baswn 9 Diqer kanallar için 5 ten 8 e kadar olan basamaklarw tekrarlaywn 10 Normal TV ekranwna dönmek için MENU tuxuna baswnwz Wsimlendirilen bir kanal seçildiqinde isim ekranda birkaç saniye kalwr S RM 892 PROGR MENU 1 4 7 2 5 8 0 3 6 9 VIDEO TV Resim Ayarlarw Resim Modu Kont...

Page 216: ...aswtaswyla baswlarak çaqwrwlabilmektedir Menü sistemi Bu retroprojektorü istenmeyen program numaralarwnwn PROG tuxlarwyla seçildiklerinde atlanmalarw için programlayabilirsiniz Daha sonra bu atlanan program numaralarwnw tekrar çaqwrmak isterseniz axaqwda belirtilen talimatlarw yeniden uygulaywnwz yalnwz 6 axamada maddede Açk yerine Kap komutunu seçin Program konumlarwnwn atlanmasw S RM 892 PROGR M...

Page 217: ...na baswn Diqer kanallarwn ses ayarlarw için 5 ve 6 b ixlemlerini tekrarlaywn c AFT Kanal 15 ten 15 e kadar olan kanallarwn frekans ayarw için joystiqi veya 4 bastwrwn Devaminda OK tuxuna baswn Diqer kanallarwn hassas ayarw için 5 ve 6 c ixlemlerini tekrarlaywn d DEKODER AV1 Dekoder ve AV2 Eurokonektora baqlw dekoder veya 4 SMARTLINK seçimi için joystiqi 1 veya 2 q2 bastwrwn devamwnda OK tuxuna bas...

Page 218: ...r menüsüne girdiqinizde Kixisel bilgi bölümünde her zaman girilen kod görünecek ve asla bu bölüme tekrar girilinmeyecektir Menü sistemi Cihazwnwza en fazla 10 karakterden oluxan bir güvenlik kodu yazabilirsiniz harf veya numara Bu kod cihazwn çalwnmasw durumda telafi edilmesini kolaylaxtwrwr Bu kod sadece bir kere girilir Unutmamak için bu kodu bir tarafa not alwn Kixisel bilgi girimi S RM 892 PRO...

Page 219: ...liklerini birbiri ardwna ekrana gelmeye baxlwyacak Not Gösterimi durdurmak ve normal TV ekranwna dönmek için uzaktan kumandanwn tuxuna baswn S RM 892 PROGR MENU 1 4 7 2 5 8 0 3 6 9 VIDEO TV Resim Ayarlarw Resim Modu Kontrast Parlaklwk Renk Keskinlik Normal Sanal Zeka Gürültü Tarama Dijital Modu Açk Açk DRC 50 Seç Menüde Gir Kixisel Ayar Otomatik Program Ayarw Program Swralama NexTView Seçimi AV Ay...

Page 220: ...z Menü sistemi RGB senyalli bir kaynaqa Eurokonektör 1 baqlantwsw için mesela DVD dijital video disk üreticisi resim geometrik ayarw yapmak gerekli olabilir RGB kaynak için resim geometrik ayarw S RM 892 PROGR MENU 1 4 7 2 5 8 0 3 6 9 VIDEO TV Resim Ayarlarw Resim Modu Kontrast Parlaklwk Renk Keskinlik Normal Sanal Zeka Gürültü Tarama Dijital Modu Açk Açk DRC 50 Seç Menüde Gir Kixisel Ayar Otomati...

Page 221: ...wrarak yapwn Diqer dört karekteri aynw xekilde seçin 6 Bütün seçim ixlemi tamamlandwqwnda OK tuxuna baswn 7 Diqer girix senyalleri için 4 ten 6 ya olan ixlemleri tekrarlaywn 8 Normal TV ekranwna dönmek için MENU tuxuna baswnwz Girix senyalini adlandwrdwqwnwz bir cihazw seçtiqiniz vakit verilen isim ekranda bir kaç saniye görünecektir S RM 892 PROGR MENU 1 4 7 2 5 8 0 3 6 9 VIDEO TV Resim Ayarlarw ...

Page 222: ...ktan kumandanwn numaralarwnw kanal seçimi için veya tuxuna baswn video girixi seçimi için 2 Saq taraftaki görüntüyü deqixtirmek için PAP modunda iken uzaktan kumandanwn tuxuna baswn Saq ekranwn alt tarafwnda sembolü görününce numaralw tuxlara kanal seçimi için veya baswn video girixi seçimi için Ekranlarwn yer degiximi PAP modunda iken uzaktan kumandanwn tuxuna basarak ekranlarwn yerleri deqixtiri...

Page 223: ...yfasw birkaç alt sayfadan meydana gelebilir Bu durumda birkaç saniye içinde ekranwn alt kwsmwna alt sayfalarw içeren bir bilgi hattw gelecek Wstenilen alt sayfanwn seçimi için joystiqi 4 veya bastwrwn TeleteÍt sayfaswnwn dondurulmasw Bir sayfayw dondurmak ve deqixmesini engellemek için tuxuna baswn ve iptal için aynw tuxa yeniden baswn Liste sayfaswnw görüntülemek Görüntülemek için tuxuna baswn ge...

Page 224: ...aate bir sayfa zamanlaywcw Bu seçimin arkaswndan ekrana sayfa zamanlaywcw alt menüsü gelir 1 uzaktan kumandanwn rakamlw tuxlarwnw kullanarak istediqiniz sayfanwn üç haneli numaraswnw girin 2 Arzulanan saati belirtmek için numaralw tuxlarla dört rakam girin 3 Vakti hafwzaya almak için OK tuxuna baswn ekranwn üst sol köxesinde saat belirecek ve zamanw gelince istenen sayfa ekrana gelecektir Sayfalar...

Page 225: ...Programlarwn kixisel düzenlemeleri Hoxunuza giden programlarwn kixisel listesini hazwrlamaya bilirsiniz 1 Wkon seçimi için joystiqi 4 veya bastwrwn ve devamwnda kixisel düzenlemeler menüsüne girmek için z baswnwz 2 Sizin seçiminizi ekrana getirmek için joystiqi 4 veya bastwrwn ve devamwnda teyit çin OK tuxuna baswn 3 Wstediqiniz her ixlevi listenizde bulundurmak için 2 noyu tekrarlaywn 4 Liste haz...

Page 226: ...qi Z veya z bastwrwn ve devamwnda OK tuxuna tekrar tekrar basarak Açk Kap seçimini yapwnwz Bu ayarla programda deqixiklik olmaswna raqmen bütün yaywnwn kaywdw garanti edilir Eqer seçilen kanal VPS PDC sinyali veriyorsa Hwz Hwz seçimi için joystiqi veya bastwrwn ve devamwnda OK tuxuna tekrar tekrar basarak SP standart süre veya LP uzun süre seçimini yapwnwz Uzun süre xekliyle video kasetinin süresi...

Page 227: ... Onanan çwkwx sinyalleri Video audio TV ayar tertibatw Video audio seçilen kaynak Ekrana gelen video audio monitor çwkwxw Çwkwxswz Audio sinyali Çwkwxswz Çwkwxswz Çwkwxswz Kulaklwk audio sinyali Görüntünün bozulmaswnw önlemek için F ve G konektörlerine aynw anda cihaz baqlamaywnwz Baqlantw seçimi Axaqwdada görebileceqiniz gibi bir çok harici isteqe baqlw cihaz Retroprojektörün baqlanabilir Wsteqe ...

Page 228: ...danwxwn unutmaywn bu konektöre en fazla güç girixi 30Á Bu swnwrw sakwn geçmeyin Mono cihazlarwn baqlantwsw Retroprojektörün ön panelindeki L G S I konektörüne audio kablosunu girin ve axaqwdaki talimatlarw izleyerek girix sinyalini 4 seçin Girix sinyalinin seçilmesi ve görüntülenmesi Baqlanan cihazwn girix sinyalini TV ekranwna çwkarmak için cihaza baqlanan konektörün sembolünü seçmek gerekir mesa...

Page 229: ...lar ayarlar girin ve DEKODER ixlemini seçin Her kodlanmwx kanal için AV2 pozisyonunda daha genix bilqi için Daha baxka program ayarlar fonksiyonun kullanwmw bölümüne bax vurunuz Smartlink üzerine daha fazla bilqiye ihtiyaç duyulursa bunu videonuzun kwlavuz kitabwna bax vurarak yapwnwz Smartlink Uzaktan kumanda cihazwnwn kapaqwnwn altwndaki tuxlarla diger Sony cihazlarwnw kontrol edebilirsiniz 1 Uz...

Page 230: ...an için tavsiye edilen pozisyon Dik görüntü açwsw kullanan için tavsiye edilen pozisyon 20º 20º 60º 60º KP 61PS1 KP 61PS2 en kwsa uzaklwk mesafesi 2 7m KP 48PS1 KP 48PS2 en kwsa uzaklwk mesafesi 2 2m KP 53PS1 en kwsa uzaklwk mesafesi 2 4m KP 61PS1 KP 61PS2 en kwsa uzaklwk mesafesi 2 7m KP 53PS1 en kwsa uzaklwk mesafesi 2 4m Ek bilgiler KP 48PS1 KP 48PS2 en kwsa uzaklwk mesafesi 2 2m ...

Page 231: ...rminaller AV4 girixleri q S video girixi 4 pin DIN Video girixi RCA konektörü Audio girixi RCA girixi Kulaklwk girixi mini girix stereo Ses çwkwxw 2 Í 30 Á müzik güçü 2 Í 15 Á RMS Ana hoparlör girixi 30 Á RMS eqer merkez hoparlör olarak kullanwlwrsa Güç tüketimi 225 Á Geçici bekleme standby modu güç tüketimi 0 7 Á Boyutlar an Í al Í prf KP 61PS1 KP 61PS2 yaklaxwk 1372 Í 1528 Í 658 mm KP 53PS1 yakl...

Page 232: ...ndaki düqmesiyle tekrar çalwxwtwrwn Menü sistemini kullanarak Görüntü ayar menüsüne girerek görüntü renk ve parlaklwk ayarlarwnw yapwn sembolü ekranda görünene kadar uzaktan kumandanwn 1 tuxuna birkaç defa baswn Uzaktan kumanda cihazwnwn tuxuna baswn Menü sistemini üzerinden Özellikler menüsüne girerek Hoparlör ün Normal konumda olmasw gerektiqini kontrol ediniz Menü sistemini kullanarak Resim Aya...

Page 233: ...Sony España S A Printed in Spain Ecological Paper Totally Chlorine Free ...

Reviews: