background image

3

Model name1[KP-46WT510] Model name2[KP-51WS510] Model name3[KP-57WS510] Model name4[KP-65WS510]

[4-094-605-12]

IMPORTANT SAFEGUARDS

For your protection, please read these instructions 
completely, and keep this manual for future reference.

Carefully observe and comply with all warnings, cautions 
and instructions placed on the set or described in the 
operating instructions or service manual.

WARNING

To guard against injury, the following basic safety 
precautions should be observed in the installation, use 
and servicing of the set.

Use

Power Sources

This set should be operated only from 
the type of power source indicated on 
the serial/model plate. If you are not sure 
of the type of electrical power supplied 
to your home, consult your dealer or 
local power company. For those sets designed to operate 
from battery power, refer to the operating instructions.

Grounding or Polarization

This set is equipped with a polarized AC power cord plug 
(a plug having one blade wider than the other), or with a 
three-wire grounding type plug (a plug having a third pin 
for grounding). Follow the instructions below:

For the set with a polarized AC power cord 
plug

This plug will fit into the power outlet 
only one way. This is a safety feature. If 
you are unable to insert the plug fully 
into the outlet, try reversing the plug. If 
the plug still fails to fit, contact your electrician to have a 
suitable outlet installed. Do not defeat the safety purpose 
of the polarized plug by forcing it in.

For the set with a three-wire grounding type 
AC plug

This plug will only fit into a grounding-
type power outlet. This is a safety 
feature. If you are unable to insert the 
plug into the outlet, contact your 
electrician to have a suitable outlet 
installed. Do not defeat the safety purpose of the 
grounding plug.

Overloading

Do not overload wall outlets, extension 
cords or convenience receptacles 
beyond their capacity, since this can 
result in fire or electric shock.

Always turn the set off when it is not 
being used. When the set is left 
unattended and unused for long 
periods of time, unplug it from the 
wall outlet as a precaution against the 
possibility of an internal malfunction that could create a 
fire hazard.

If a snapping or popping sound from a TV 
set is continuous or frequent while the TV 
is operating, unplug the TV and consult 
your dealer or service technician. It is 
normal for some TV sets to make 
occasional snapping or popping sounds, 
particularly when being turned on or off.

Object and Liquid Entry

Never push objects of any kind into the 
set through the cabinet slots as they may 
touch dangerous voltage points or short 
out parts that could result in a fire or 
electric shock. Never spill liquid of any 
kind on the set.

Attachments

Do not use attachments not 
recommended by the manufacturer, as 
they may cause hazards.

Cleaning

Clean the cabinet of the projection TV 
with a dry soft cloth. To remove dust 
from the screen, wipe it gently with a soft 
cloth. Stubborn stains may be removed 
with a cloth slightly dampened with 
solution of mild soap and warm water. Never use strong 
solvents such as thinner or benzine for cleaning. 

If the picture becomes dark after using the projection TV 
for a long period of time, it may be necessary to clean the 
inside of the projection TV. Consult qualified service 
personnel.

Summary of Contents for KP-46WT510 - 46" 16:9 Hi-scan Projection Television

Page 1: ......

Page 2: ...hat provides guidelines for proper grounding and in particular specifies that the cable ground shall be connected to the grounding system of the building as close to the point of cable entry as practical Use of this television receiver for other than private viewing of programs broadcast on UHF VHF transmitted by cable companies or satellite for the use of the general public may require authorizat...

Page 3: ...d or solid object should fall inside the cabinet unplug the projection TV immediately and have it checked by qualified service personnel before operating it further If you will not be using the projection TV for several days disconnect the power by pulling the plug itself Never pull on the cord For details concerning safety precautions see IMPORTANT SAFEGUARDS on page 3 Installing To prevent inter...

Page 4: ...fit into a grounding type power outlet This is a safety feature If you are unable to insert the plug into the outlet contact your electrician to have a suitable outlet installed Do not defeat the safety purpose of the grounding plug Overloading Do not overload wall outlets extension cords or convenience receptacles beyond their capacity since this can result in fire or electric shock Always turn t...

Page 5: ...less proper ventilation is provided Do not place the set near or over a radiator or heat register or where it is exposed to direct sunlight Power Cord Protection Do not allow anything to rest on or roll over the power cord and do not place the set where the power cord is subject to wear or abuse Antennas Outdoor Antenna Grounding If an outdoor antenna is installed follow the precautions below An o...

Page 6: ...us voltage or other hazards Refer all servicing to qualified service personnel Replacement Parts When replacement parts are required be sure the service technician certifies in writing that he has used replacement parts specified by the manufacturer that have the same characteristics as the original parts Unauthorized substitutions may result in fire electric shock or other hazards Safety Check Up...

Page 7: ... name1 KP 46WT510 Model name2 KP 51WS510 Model name3 KP 57WS510 Model name4 KP 65WS510 4 094 605 12 6 Model name1 KP 46WT510 Model name2 KP 51WS510 Model name3 KP 57WS510 Model name4 KP 65WS510 4 094 605 12 ...

Page 8: ......

Page 9: ... name1 KP 46WT510 Model name2 KP 51WS510 Model name3 KP 57WS510 Model name4 KP 65WS510 4 094 605 12 8 Model name1 KP 46WT510 Model name2 KP 51WS510 Model name3 KP 57WS510 Model name4 KP 65WS510 4 094 605 12 ...

Page 10: ...a DVD Player with Component Video Connectors 26 Connecting a DVD Player with A V Connectors 27 Connecting a Digital TV Receiver 28 Connecting a Camcorder 29 Connecting an AV Receiver 30 Using the CONTROL S Feature 31 Setting Up the Projection TV Automatically 32 Adjusting the Convergence Automatically FLASH FOCUS 33 Adjusting the Convergence Manually 34 Using the Features Using the Remote Control ...

Page 11: ...rder CineMotion Reverse 3 2 pulldown processing provides optimal picture quality for film based sources media originally shot in 24 frames per second Twin View Using Multi Image Driver MID X Twin View allows you to watch two programs side by side with the ability to zoom in on one picture and listen to the program in the selected window You can watch pictures from two different sources 1080i 720p ...

Page 12: ...h the EIA 861 standard and is not intended for use with personal computers Using this manual We recommend that you carefully review the contents of the following three sections in the order shown to ensure that you fully understand the operation of your new projection TV 1 Installing and Connecting the Projection TV This section guides you through your initial setup It shows you how to install you...

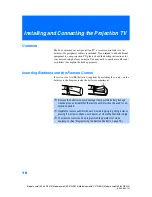
Page 13: ...es and or splitters to complete the hookup properly Inserting Batteries into the Remote Control Insert two size AA R6 batteries supplied by matching the and on the batteries to the diagram inside the battery compartment Remove the batteries to avoid damage from possible battery leakage whenever you anticipate that the remote control will not be used for an extended period Handle the remote control...

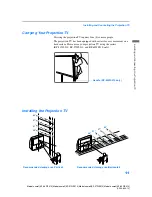
Page 14: ... TV has been equipped with casters for easy movement on a hard surface Please move your projection TV using the casters KP 51WS510 KP 57WS510 and KP 65WS510 only Installing the Projection TV 20 20 min 1 8 m approx 6 ft min 2 1 m approx 7 ft 65 min 2 4 m approx 8 ft 57 51 46 min 1 6 m approx 5 ft 60 60 min 1 8 m approx 6 ft min 2 1 m approx 7 ft 51 57 65 min 2 4 m approx 8 ft 60 min 1 6 m approx 5 ...

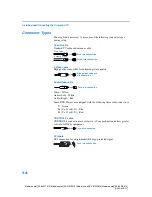
Page 15: ...d picture quality Audio Video cable Video Yellow Audio Left White Audio Right Red Some DVD Players are equipped with the following three video connectors Y Green PB CB Cb or B Y Blue PR CR Cr or R Y Red CONTROL S cable CONTROL S connections are exclusive to Sony products and allow greater control of all Sony equipment DVI cable DVI connection for a high bandwidth copy protected signal Plug Type Sc...

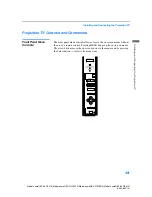
Page 16: ...0 Model name4 KP 65WS510 4 094 605 12 Projection TV Controls and Connectors Front Panel Menu Controls The front panel menu controls allow access to the on screen menus without the use of a remote control Pressing MENU brings up the on screen menus The arrow buttons move the on screen cursor in the menus and by pressing the Select button selects the menu item ...

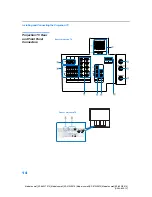
Page 17: ...ting the Projection TV 14 Model name1 KP 46WT510 Model name2 KP 51WS510 Model name3 KP 57WS510 Model name4 KP 65WS510 4 094 605 12 Projection TV Rear and Front Panel Connectors 0 Rear of projection TV Front of projection TV ...

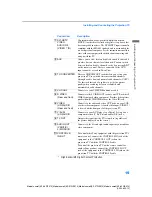
Page 18: ...TV Use this jack instead of a splitter to get better picture quality when switching between scrambled and unscrambled cable channels 4 VHF UHF Connects to your VHF UHF antenna or cable 5 S VIDEO Rear and front Connects to the S VIDEO OUT jack of your VCR or other S VIDEO equipped video component Provides better picture quality than the VHF UHF jacks or the Video IN jack 6 VIDEO L R AUDIO Rear and ...

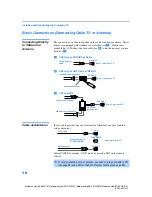
Page 19: ...ble B VHF Only or UHF Only or VHF UHF C VHF and UHF Cable and Antenna If your cable provider does not feature local channels you may find this setup convenient Select CABLE or antenna ANT mode by pressing ANT on the remote control 75 ohm coaxial cable Rear of projection TV VHF UHF Rear of projection TV Antenna connector 300 ohm twin lead cable VHF UHF Rear of projection TV 75 ohm coaxial cable VHF...

Page 20: ...outed through your cable box only one channel is sent to the projection TV so you can not use the Twin View or Channel Index features for your cable box 1 Connect the Cable TV cable to the projection TV s VHF UHF jack 2 Using a coaxial cable connect the projection TV s TO CONVERTER jack to the cable box s IN jack The projection TV s internal converter allows you to switch between unscrambled signa...

Page 21: ...s IN jack 2 Using a coaxial cable connect the cable box s OUT jack to the TV s VHF UHF jack Also set Cable to On in the Channel menu see page 55 Your Sony remote control can be programmed to operate your cable box see Programming the Remote Control on page 70 To change channels using the cable box set your projection TV to channel 3 or 4 depending on the cable box channel output If you will be con...

Page 22: ...e making any connections 1 Connect the cable TV cable to the VCR s IN jack 2 Using a coaxial cable connect the VCR s OUT jack to the projection TV s VHF UHF jack 3 Using AUDIO and S VIDEO cables connect the VCR s Audio and S Video OUT jacks to the projection TV s AUDIO and S VIDEO IN jacks Coaxial cable Rear of Projection TV VIDEO yellow AUDIO L white AUDIO R red Cable VCR VMC 810S 820S not suppli...

Page 23: ... sent to the projection TV so you cannot use the Twin View feature Disconnect all power sources before making any connections 1 Connect the Cable TV cable to the projection TV s VHF UHF jack 2 Using a coaxial cable connect the TV s TO CONVERTER jack to the cable box s IN jack The projection TV s internal converter allows you to switch between unscrambled signals coming straight into the projection...

Page 24: ... not supplied S VIDEO If your VCR is not equipped with S VIDEO use a VIDEO cable yellow instead of the S VIDEO cable You will not be able to change channels on the VCR Set your projection TV and VCR to channel 3 or 4 depending on your cable box Pressing ANT on the remote control switches between the channels coming in through the cable box scrambled and those coming directly to the projection TV u...

Page 25: ...o the projection TV s AUDIO and VIDEO IN jacks Rear of projection TV VCR playback VCR recording VMC 810S 820S not supplied AUDIO R red AUDIO L white VIDEO yellow To perform tape editing set the projection TV to the video input intended for playback by pressing TV VIDEO on the remote control You may need to change the video input on your VCR Consult your VCR s operating manual for instructions If b...

Page 26: ...ceiver s SATELLITE IN jack 2 Using AUDIO and S VIDEO cables connect the satellite receiver s AUDIO and S VIDEO OUT jacks to the projection TV s AUDIO and S VIDEO IN jacks 3 Connect a coaxial cable from your cable or antenna to the projection TV s VHF UHF jack If your satellite receiver is not equipped with S VIDEO use a VIDEO cable yellow instead of the S VIDEO cable Coaxial cable Satellite receiv...

Page 27: ...and S VIDEO OUT jacks to the VCR s AUDIO and S VIDEO IN jacks 5 Using AUDIO and S VIDEO cables connect the VCR s AUDIO and S VIDEO OUT jacks to the TV s AUDIO and S VIDEO IN jacks Coaxial cable Rear of projection TV S VIDEO AUDIO R red AUDIO L white VIDEO yellow Satellite receiver VCR YC 15V 30V not supplied VMC 810S 820S not supplied YC 15V 30V not supplied VMC 810S 820S not supplied Satellite an...

Page 28: ...odel name3 KP 57WS510 Model name4 KP 65WS510 4 094 605 12 Connecting an Audio Receiver Disconnect all power sources before making any connections Using audio cables connect the projection TV s AUDIO OUT VAR FIX jacks to the audio receiver s audio LINE IN jacks Rear of projection TV AUDIO R red AUDIO L white Line input RK 74A not supplied ...

Page 29: ...onent video cables connect the DVD player s Y B Y and R Y jacks to the Y PB and PR jacks on the projection TV Use the VIDEO IN 5 or 6 connections 2 Using an audio cable connect the DVD player s Audio OUT jacks to the projection TV s AUDIO IN jacks Be sure to use the same row of inputs that you used for the video connection VIDEO IN 5 or 6 The Y B Y and R Y jacks on your DVD player are sometimes la...

Page 30: ...onnect the DVD player s Audio OUT jacks to the projection TV s AUDIO IN jacks 2 Using an S VIDEO cable connect the DVD player s S VIDEO jack to the projection TV s S VIDEO jack If your DVD player has video component output connectors for best picture quality use the connection described on page 26 Rear of projection TV YC 15V 30V not supplied DVD player RK 74A not supplied AUDIO R red AUDIO L whit...

Page 31: ...sary to view 480p 720p and 1080i formats You may also use the S VIDEO or Composite Video connections however component video Y PB PR will provide the best picture quality for all format types Be sure to read the Set top box manual Some Digital TV Receivers are equipped with a DVI connection Refer to your Digital TV Receiver manual for setup instructions using this connection z z VMC 10HG not suppl...

Page 32: ...refer you can also connect the camcorder to the projection TV s rear Audio and Video IN jacks Using AUDIO and S VIDEO cables connect the camcorder s Audio and S VIDEO OUT jacks to the projection TV s AUDIO and S VIDEO IN jacks If you have a mono camcorder connect its left audio output to the projection TV s AUDIO L MONO jack If your camcorder is not equipped with S VIDEO use a VIDEO cable yellow i...

Page 33: ... TV to AUDIO VIDEO 2 IN on the AV receiver 5 Using an AUDIO VIDEO cable connect the video equipment to the AV receiver 6 Select the Setup menu and set Video Label to Receiver to fix your TV s input to AV receiver see Video Label on page 61 Change Video Label for the VIDEO 1 input to Receiver see page 61 You can connect an AV receiver using both composite video and S VIDEO If both are connected the...

Page 34: ...S Feature CONTROL S allows you to control your projection TV system and other Sony equipment with one remote control In addition to allowing you to control multiple devices with one remote control the CONTROL S feature allows you to always point your remote control at your projection TV instead of having to point it at the other equipment which might be hidden or out of direct line of sight Rear o...

Page 35: ...it later by using the Auto Program feature in the Channel menu see page 56 Using Auto Setup 1 Press POWER on the front panel of your projection TV or on the remote control to turn on the projection TV 2 Press the TV FUNCTION button on your remote control Red light will briefly appear 3 Press CH on your projection TV to run Auto Setup or press CH to exit If you use the channel buttons on your remot...

Page 36: ... Receive a TV or cable TV program 2 Press FLASH FOCUS The cross pattern shown below appears and FLASH FOCUS begins to work The adjustment is completed when the cross pattern becomes white and you are returned to the program you were watching It is recommended to perform FLASH FOCUS about 30 minutes after the projection TV is first turned on You cannot perform any other functions until FLASH FOCUS ...

Page 37: ...edges 4 Using the joystick move the to surround a cross that you want to adjust Press The changes to red 5 If the cross that you selected has red edges move the joystick until the red image is replaced with a white cross Once you have finished this or the cross does not have red edges press The changes to blue 6 If the cross you selected has blue edges move the joystick until the blue image is rep...

Page 38: ...t back from the picture when adjusting the convergence Begin with the crosses in the center area of the screen and once those are adjusted move to the crosses on the edges of the screen You can make separate adjustments to each wide mode Full Normal Zoom Wide Zoom and 1080i high definition input The cross pattern settings appear different in each wide mode but the adjustment procedure is the same ...

Page 39: ...nnel label if set and channel number Press again to turn Display off See page 59 for details on setting the time 5 JUMP Press to jump back and forth between two channels The projection TV alternates between the current channel and the last channel that was selected 6 FREEZE Freezes the window picture Press again to restore the picture 7 INDEX Press to enter the Scrolling Channel Index mode You can...

Page 40: ...TV VIDEO 1 VIDEO 2 VIDEO 3 VIDEO 4 VIDEO 5 VIDEO 6 and VIDEO 7 qh 0 9 and ENTER Press 0 9 to select a channel the channel changes after 2 seconds Press ENTER to select immediately qj GUIDE Turns on off Twin View For details see Using Twin View on page 43 Displays the program guide of your satellite qk MENU Press to display the projection TV on screen menu Press again to exit from the menu ql CH Sc...

Page 41: ...ming the remote control to operate non Sony video equipment For details see Programming the Remote Control on page 70 9 POWER Press to turn on the DVD VCR player you have programmed into the remote control For instructions see Programming the Remote Control on page 70 q M Fast forward qa Use to switch control for connected video equipment You can program one video source for each switch position F...

Page 42: ...nnel for example to select channel 10 press 1 and 0 The channel will change after 2 seconds or you can press ENTER for immediate selection 5 CH Press to scan through the channels up or down 6 VOL Press to adjust the volume up or down 7 JUMP Press to alternate or jump back and forth between two channels The projection TV will jump between the current channel and the last channel selected 8 MUTING P...

Page 43: ...selected see Video Label on page 61 qd MTS SAP Press to scroll through the Multi channel TV Sound MTS options see MTS on page 53 qf PIC MODE Press PIC MODE repeatedly to directly choose one of four different video modes that best suits the program you are watching Vivid Select for enhanced picture contrast and sharpness Standard Select to display a standard picture for normal viewing environments ...

Page 44: ... This projection TV is capable of receiving 1080i 720p 480p and 480i digital TV formats note that 720p is displayed as 480p To view a digital TV program 1 Connect the DTV receiver to VIDEO 5 6 or 7 IN on the projection TV for details see page 28 2 Press TV VIDEO to select VIDEO 5 6 or 7 3 Select a digital channel on the DTV receiver For details see the Operating Manual of the DTV receiver 4 Adjust...

Page 45: ...Move the joystick up or down to highlight the channel you want to watch The program of that channel appears in the preview window Press to select Your Favorite Channel options can be set automatically or manually The factory setting for Favorite Channel is Auto When Favorite Channel is set to Auto the last eight channels selected with 0 9 buttons will be set as Favorite Channel options If you want...

Page 46: ...2 Press To cancel twin pictures Press again or press Activating the Picture Although two pictures appear on the screen at the same time only one picture is active For an active picture you can Change channels Adjust the volume Switch the input sources from VHF UHF to cable by pressing ANT or TV VIDEO to switch the video input When the picture on the right is activated the input sources cannot be s...

Page 47: ...a cable box you can view the cable box output in one window and view a different source such as a VCR or DVD player in the second window by using the TV VIDEO button Sources connected to the AUX VIDEO 5 VIDEO 6 and VIDEO 7 inputs display in the left window but not the right If you are viewing a 4 3 source and a 16 9 enhanced source such as a DVD side by side the 4 3 source appears larger Twin View...

Page 48: ...activate the left picture if not already activated 2 Move the joystick up to enlarge the picture and move the joystick down to reduce the picture To enlarge the right picture reduce the left 1 Move the joystick right to activate the right picture if not already activated 2 Move the joystick up to enlarge the picture and move the joystick down to reduce the picture When you adjust the twin screen s...

Page 49: ...ation such as phone numbers recipes etc To use the Freeze function 1 When the program information you want to capture is displayed press FREEZE 2 The projection TV switches to Twin View mode and displays the frozen picture on the right while the current program continues on the left 3 To cancel and return to normal viewing press FREEZE Freeze feature is not available if you are already in Twin Vie...

Page 50: ...the bottom right side of the screen then frozen It scrolls up and the next channel appears on the bottom right and the process is repeated with the other channels 2 Move the joystick up and down so that the channel you wish to view is displayed in the cyan frame and press To return to scrolling move the joystick up and down again 3 To enlarge the selected channel into the left frame press again Th...

Page 51: ...ictures received through Scrolling Channel Index is snowy the entire screen may become unstable In this case skip the snowy channel see Channel Skip Add on page 56 If you leave the Scrolling Channel Index screen displayed for an hour without any additional operation Scrolling Channel Index is canceled and the normal picture reappears The Scrolling Channel Index cannot be used in combination with s...

Page 52: ...ograms broadcast in 720p 1080i it is not possible to change between Wide Screen modes You can also access the Wide Mode settings in the Screen menu For details see page 57 z Example Description Wide Zoom enlarges the center portion of the 4 3 picture proportionately however only the left and right edges of the screen are stretched to fill the 16 9 screen The picture has a normal appearance as much...

Page 53: ...g 51 Offers enhanced audio options such as listening to second audio programming SAP or customizing the Effect of the sound on your projection TV 53 Allows you to set up a Favorite Channel list run the Auto Program function and more 55 Allows you to set the wide screen mode adjust the vertical center in wide mode and set the 4 3 Default mode 57 Lets you set the clock on your projection TV and allo...

Page 54: ...to another use the PIC MODE on the remote control z Option Description Mode Customized picture viewing Vivid Select for enhanced picture contrast and sharpness Standard Recommended for Normal viewing conditions Movie Select for soft film like picture Pro Select for professional monitor like appearance You can alter the Video menu settings Picture Brightness Color etc for each Mode Picture Adjust t...

Page 55: ...4 605 12 DRC Mode Digital Reality Creation Creates a high resolution picture with 4x density for high quality sources i e DVD player Satellite receiver Interlaced Recommended for moving pictures Progressive Recommended for still images and text CineMotion Recommended for 24 frame per second films Option Description ...

Page 56: ...ludes the following options Option Description Treble Adjust to increase or decrease higher pitched sounds Bass Adjust to increase or decrease lower pitched sounds Balance Adjust to emphasize left or right speaker balance Steady Sound On Select to stabilize the volume Off Select to turn off Steady Sound Effect TruSurround Select for surround sound for stereo programs only Simulated Adds a surround...

Page 57: ...y through your external audio system speakers Audio Out Easy control of volume adjustments Variable The projection TV s speakers are turned off but the volume output from your audio system can still be controlled by the projection TV s remote control Fixed The projection TV s speakers are turned off and the volume bass and treble output of the projection TV is fixed Use your audio receiver s volum...

Page 58: ...u screen Selecting Channel Options The Channel menu includes the following options Option Description Favorite Channel Auto Select if you want Favorite Channel options to be set automatically to the last eight channels selected with the 0 9 buttons Manual Select if you want to input your own selections as Favorite Channel options 1 Press to select a favorite channel number 2 Use the joystick to sc...

Page 59: ...select one of these settings if you have connected the device to the AUX jack see page 15 Video 1 Use when connecting a cable box to control external video sources TV output should be connected through the cable box Auto Program Automatically programs the projection TV for all receivable channels Channel Skip Add Removes and adds viewable channels 1 Use the joystick to scroll through the channels ...

Page 60: ... Description Wide Mode Select a Wide Mode to use for 4 3 sources Wide Zoom Select to enlarge the 4 3 picture while the upper and lower parts of the picture are condensed to fit the wide screen Normal Select to return the 4 3 picture to normal mode Full Select to enlarge the 4 3 picture horizontally only to fill the wide screen Zoom Select to enlarge the 4 3 picture horizontally and vertically to a...

Page 61: ...ertain theatrical releases will be shown in aspect ratios that require the display of black bands at the top and bottom of your 16 9 screen For more details check the documentation that came with your DVD or contact your content provider Option Description If 4 3 Default is set to anything but Off the Wide Mode setting changes only for the current channel When you change channels or inputs Wide Mo...

Page 62: ... current time and Daylight Saving Mode 1 Move the joystick to Timer 1 or Timer 2 then press 2 Use the joystick to enter your day time channel and timer duration preferences then press to select each one 3 Press MENU to exit the menu screen To reset the Clock or Timers Press RESET on the remote control after selecting that option in the Timer menu Selecting Timer Options The Timer menu includes the...

Page 63: ... Parental Control Allows you to set up the TV to block programs according to their content and rating levels For details about setting see Using the Parent Menu on page 62 Caption Vision Allows you to select from three closed caption modes for programs that are broadcast with closed captioning Off Turns off Caption Vision CC1 CC2 CC3 CC4 Displays a printed version of the dialog or sound effects of...

Page 64: ...cks on the back of your projection TV Select Skip if you do not have a component connected to a particular set of input jacks VIDEO 1 Receiver VHS DVD Satellite Cable Box 8 mm DTV LD Beta Skip VIDEO 2 3 4 VHS DVD Satellite Cable Box 8 mm DTV LD Beta Skip VIDEO 5 6 7 DVD Satellite Cable Box DTV HD Skip If you select Skip your projection TV skips this connection when you press TV VIDEO When you have...

Page 65: ...ing First set a password then select the country you reside in U S A or Canada and your desired rating 1 Press MENU 2 Move the joystick to the Setup icon and press 3 Make sure that Parental Control is selected and press 4 Use the 0 9 buttons on the remote control to enter your four digit password 5 Confirm your password by entering it again Your password is stored and the Parent menu options appea...

Page 66: ... select U S A or Canada according to the country you reside in and press 8 Move the joystick down to select Parental Lock and press 9 Move the joystick up or down to select a desired rating and press If you select Child Youth Young Adult or Custom the Parental Control is activated automatically If you want to select the ratings from Custom see Using Custom Rating Options on page 65 10 Press MENU t...

Page 67: ... buttons Parental Control will be canceled temporarily until you turn your projection TV off Option Description Parental Lock Turn ratings on off and select a rating system Off Parental lock is off No programs are blocked from viewing Child Maximum ratings permitted are US TV Y TV G G Canada TV Y C G Youth Maximum ratings permitted are US TV PG PG Canada TV PG PG 8 ans Young Adult Maximum ratings ...

Page 68: ...2 to display the Parental Lock options 2 Move the joystick up or down to select Custom and press 3 Make sure that Movie Ratings is selected and press 4 Move the joystick up or down to select the rating to be blocked and press The indicator automatically appears beside the selected rating and all higher ratings indicating that the programs that match the ratings will be blocked To unblock a rating ...

Page 69: ...ing that the programs that match the ratings will be blocked To unblock a rating select it by moving the joystick up or down then press The indicator changes into and all lower ratings are unblocked Some TV ratings have additional content ratings called extenders The extenders are defined as follows D sexually suggestive Dialog FV Fantasy Violence L Coarse Language S Sexual situations and V Violen...

Page 70: ... and press appears beside the selected extender indicating that the programs that match the extender can be viewed If you press again is displayed to show that the programs that match the extender will be blocked again 9 Repeat step 8 for other extenders All programs that match the ratings you select and higher except for the extenders that were canceled will be blocked 10 Press MENU to exit the m...

Page 71: ... suggested TV 14 Parents Strongly cautioned TV MA Mature Audience only Content Based Options FV Fantasy Violence D Suggestive Dialogue L Strong Language S Sexual situations V Violence Unrated Block programs or movies that are broadcast without a rating Block Blocks all programs and movies that are broadcast without a rating Allow Allows programs and movies that are broadcast without a rating The c...

Page 72: ...he following options If you selected U S A see page 68 Option Description English Rating C All children C8 Children 8 years and older G General programming PG Parental Guidance 14 Viewers 14 and older 18 Adult programming French Rating G General programming 8 ans Not recommended for young children 13 ans Not recommended for ages under 13 16 ans Not recommended for ages under 16 18 ans Programming ...

Page 73: ...e number to complete the following procedure To program a cable box or a satellite receiver 1 Open the panel of the remote control 2 Press CODE SET inside the panel 3 Close the panel and press SAT CABLE FUNCTON 4 Enter the three digit manufacturer s code number using the 0 9 buttons 5 Press ENTER 6 To check if the code number works aim the projection TV s remote control at the component and press ...

Page 74: ...tion TV s remote control at the component open the panel and press the green POWER button If it responds the programming is completed If not try using the other codes listed for that manufacturer Tips If more than one code number is listed try entering them one by one until you come to the correct code for your component If you enter a new code number the code number you previously entered at that...

Page 75: ...ch 325 338 321 NEC 314 336 337 Olympic 309 308 Optimus 327 Panasonic 308 309 306 307 Pentax 305 304 Philco 308 309 Philips 308 309 310 Pioneer 308 Quasar 308 309 306 RCA PROSCAN 304 305 308 309 311 312 313 310 329 Realistic 309 330 328 335 324 338 Sansui 314 Samsung 322 313 321 Sanyo 330 335 Scott 312 313 321 335 323 324 325 326 Sharp 327 328 Shintom 315 Signature 2000 M Ward 338 327 SV2000 338 Sy...

Page 76: ... the panel Change channels CH Record N and REC simultaneously Play N Stop x Fast forward M Rewind the tape m Pause X press again to resume normal playback Search the picture forward or backward M or m during playback release to resume normal playback Change input mode Slide switch To Do This Press Turn on off green POWER button inside the panel Play N Stop x Pause X press again to resume normal pl...

Page 77: ... Select Cable Box SAT CABLE FUNCTION Select a channel 0 9 buttons ENTER Change channels CH Back to previous channel JUMP To Do This Press Turn on off SAT CABLE POWER Select Satellite Receiver SAT CABLE FUNCTION Select a channel 0 9 buttons ENTER Change channels CH Back to previous channel JUMP Display channel number DISPLAY Display DBS guide GUIDE Display DBS menu MENU Move highlight cursor Joysti...

Page 78: ...at least 3 4 feet away from fluorescent lights Check the orientation of the batteries Dark poor or no picture screen lit good sound Adjust the Picture setting in the Video menu see page 51 Adjust the Brightness setting in the Video menu see page 51 Check antenna cable connections Adjust the convergence again using FLASH FOCUS see Adjusting the Convergence Automatically FLASH FOCUS on page 33 Good ...

Page 79: ...TV channels that are not presently in TV memory see page 56 Lost password In the password screen see page 62 enter the following master password 4357 The master password clears your previous password it cannot be used to temporarily unblock channels Cannot change channels with the remote control Be sure you have not inadvertently switched your projection TV from channel 3 or 4 setting if you are u...

Page 80: ...u cannot get anything but TV channels in your second picture Be sure the video label has not been set to skip your video inputs See the Setup menu on page 60 Favorite Channel does not display your choices Verify that Favorite Channel is set to Manual in the Channel menu see Favorite Channel on page 55 Some video sources do not appear when you press TV VIDEO Ensure that Video Label is not set to SK...

Page 81: ...F 2 13 UHF 14 69 CATV 1 125 Power Requirements 120V 60 Hz Number of Inputs Outputs DVI HDTV 1 terminal 3 3V T M D S 50 ohms The DVI input terminal is compliant with the EIA 861 standard and is not intended for use with personal computers Video IN 4 1 Vp p 75 ohms unbalanced sync negative S Video IN 3 Y 1 Vp p 75 ohms unbalanced sync negative C 0 286 Vp p Burst signal 75 ohms Audio IN 6 500 mVrms 1...

Page 82: ... 4 27 1 4 inches 1 326 1 377 690 mm KP 57WS510 60 3 4 57 3 4 29 1 2 inches 1 542 1 466 750 mm KP 65WS510 Mass 135 lb 61 3 kg KP 46WT510 172 lb 78 2 kg KP 51WS510 195 lb 88 6 kg KP 57WS510 300 lb 136 kg KP 65WS510 Power Consumption In Use 230 W In Standby Under 1 W Supplied Accessories Remote Control RM Y909 AA R6 Batteries 2 supplied for remote control Optional Accessories AV Cable VMC 810 820 830...

Page 83: ...51 Connecting Audio receiver 25 AV receiver 30 Cable box 16 21 Cable or antenna 16 Camcorder 29 Digital TV Receiver 28 DVD player 26 27 Satellite receiver 23 24 VCR 20 22 24 Connector Types 12 Contents of box 10 CONTROL S 31 Convergence adjusting automatically 33 Convergence adjusting manually 33 D Daylight saving 59 Digital Reality Creation 52 Digital TV connecting 28 watching 41 Digital TV progr...

Page 84: ...h Cable box 74 DVD player 73 Satellite receiver 74 VCR 73 Removing channels from the channel list 56 RESET button 36 Resetting Audio options 53 Timer options 59 Video options 51 S S Video cable 12 SAT CABLE function button 37 SAT CABLE power button 37 Satellite receiver connecting 23 using with TV remote control 74 Setting up channels 32 56 Setup menu 50 60 Sharpness adjusting 51 SLEEP button 36 S...

Page 85: ......

Page 86: ......

Reviews: