background image


8


First Time Operation


Switching On the Projection TV and Automatically Tuning


The first time you switch on your TV, a sequence of menu screens appear on the TV enabling you to: 1) choose the language 

of the menu screen, 2) search and store all available channels (TV Broadcast) and 3) change the order in which the channels 
(TV Broadcast) appear on the screen.

However, if you need to change any of these settings at a later date, you can do that by selecting the appropriate option in 

the 

 (Set Up menu) or by pressing the Auto Start Up Button 

/

 on the TV set. 


1


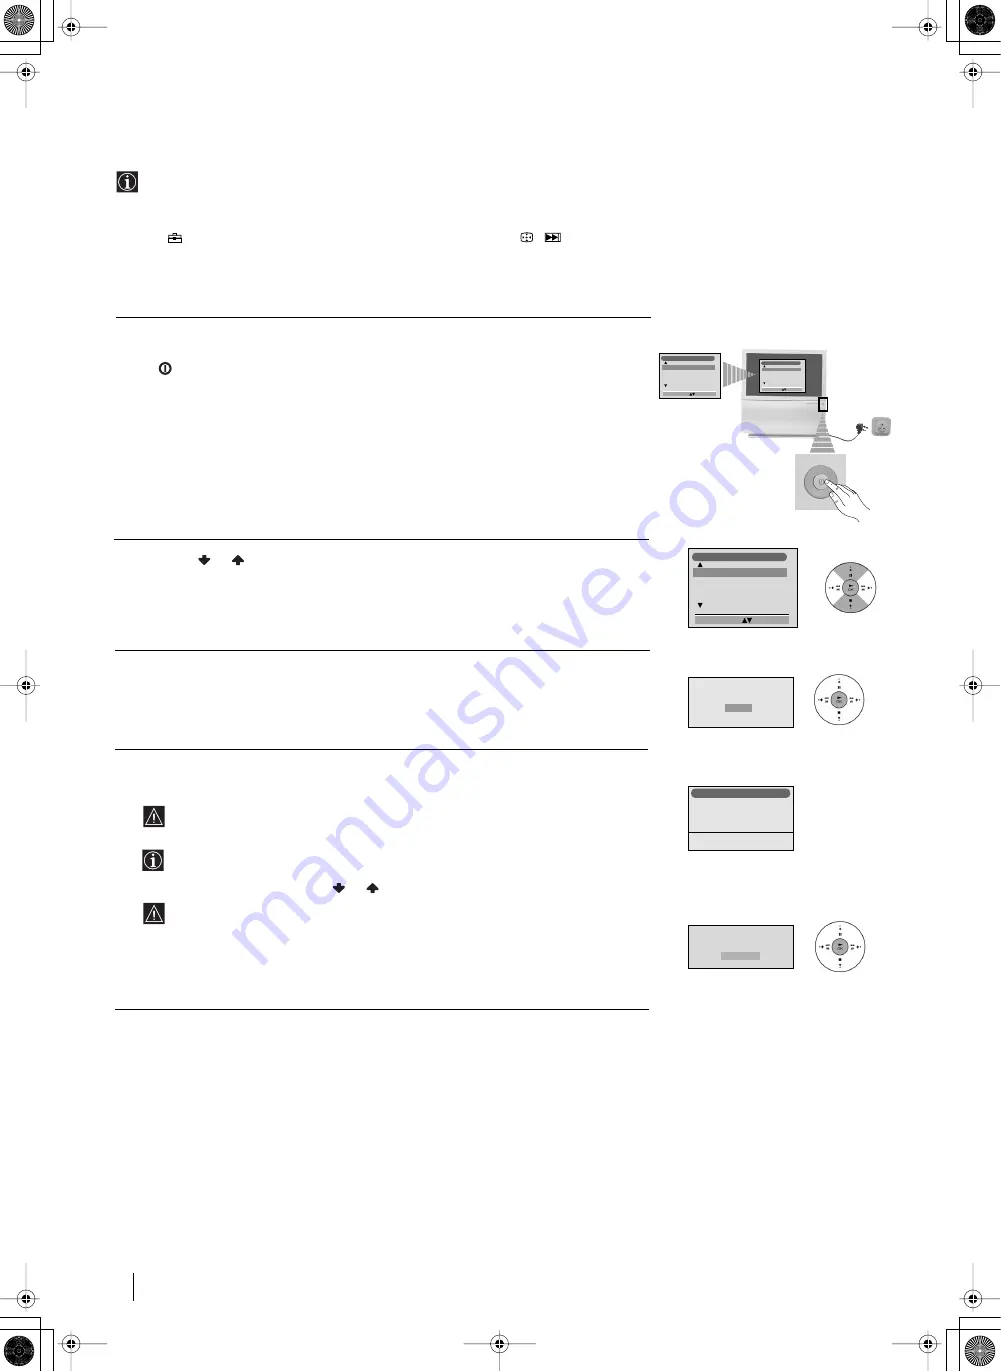
Connect the Projection TV plug to the mains socket (220-240V AC, 50Hz)
The first time that the TV set is connected, it is usually turned on. If the TV is off, press 

the 

 on/off button on the TV set to turn on the TV.

The first time you switch on the TV, a 


Language


 menu displays automatically on the 

TV screen.


2


Press the 

or

button on the remote control to select the language, then press the 


OK


 button to confirm your selection. From now on all the menus will appear in the 

selected language. 


3


The Auto Tuning menu appears on the screen. Press the 


OK 


button to select 


Yes


.


4


The projection TV starts to automatically search and store all available broadcast 

channels for you. 


This procedure could take some minutes. Please be patient and do not press 

any buttons, otherwise automatic tuning will not be completed.

In some countries the TV Broadcaster installs the channels automatically (ACI 

system). In this case, the TV Broadcaster sends a menu in which you can select 
your city by pressing the

or

button and 

OK

 to store the channels.

If no channels were found during the auto tuning process then a new menu 

appears automatically on the screen asking you to connect the aerial. Please 
connect the aerial (see page 7) and press 

OK

. The auto tuning process will start 

again.

Language

English

Norge

Français

Italiano

Nederlans

Select Language:

Confirm: OK

Language

English

Norge

Français

Italiano

Nederlans

Select Language:

Confirm: OK

Language

English

Norge

Français

Italiano

Nederlans

Select Language:

Confirm: OK

continued...

Programme:                  
Channel:
System                      

  Searching...

  1

 C 01

B/G

Auto Tuning

Do you want to start 

automatic tuning?

Yes

No

No channel found

Please connect aerial

Confirm

03GBKP44PX2U.fm  Page 8  Tuesday, January 14, 2003  4:29 PM

Summary of Contents for KP-44PX2U

Page 1: ...R 4 088 416 42 1 Instruction Manual KP 44PX2U 2002 by Sony Corporation GB 100 Hz Projection TV 01COVER fm Page 1 Tuesday January 14 2003 4 25 PM ...

Page 2: ...nce with the following instructions The wires in this mains lead are coloured in accordance with the following code Blue Neutral Brown Live As the colours of the wires in the mains lead of this apparatus may not correspond with the coloured markings identifying the terminals in your plug proceed as follows The wire which is coloured blue must be connected to the terminal which is marked with the l...

Page 3: ... and VCR 7 Inserting Batteries into the Remote Control 7 First Time Operation Switching On the TV and Automatically Tuning 8 Adjusting Colour Registration Convergence 10 Menu system Introducing and Using the Menu System 10 On Screen Display Menus Guide 11 Menu Guide Picture Adjustment 12 Sound Adjustment 12 Sleep Timer 13 Auto Format 13 AV3 Output 13 PIP Input 14 PIP Position 14 Language 14 Auto T...

Page 4: ...er lead or aerial lead during lightning storms Do not cover the ventilation openings of the TV For ventilation leave a space of at least 10cm all around the set To prevent fire keep inflammable objects or naked lights eg candles away from the TV Pull out the power lead by the plug Do not pull on the power lead itself Take care not to place heavy objects on the power lead as this could result in da...

Page 5: ... º Joystick a If Media Selector is switched to TV When MENU is switched on use these buttons to operate the menu system For details refer to Introducing and Using the Menu System on page 10 When MENU is switched off press OK to show a channel overview Then press or to select the channel and then press again the OK button to watch the selected channel b If Media Selector is switched to VCR or DVD U...

Page 6: ...utton Press this button to adjust the colour registration For more details please refer to the chapter Adjusting Colour Registration Convergence on page 10 or 2 Auto Start Up Button Press and hold this button for approximately 2 seconds to start the auto start up sequence For more details please refer to the chapter Switching On the Projection TV and Automatically Tuning on page 8 Standby indicato...

Page 7: ...rt the supplied batteries using the correct polarities Always remember to dispose of used batteries in an environmental friendly way or For more details of VCR connection please refer to the section Additional information when connecting equipment on page 21 VCR Scart lead is optional OUT IN 03GBKP44PX2U fm Page 7 Tuesday January 14 2003 4 29 PM ...

Page 8: ...nguage 3 The Auto Tuning menu appears on the screen Press the OK button to select Yes 4 The projection TV starts to automatically search and store all available broadcast channels for you This procedure could take some minutes Please be patient and do not press any buttons otherwise automatic tuning will not be completed In some countries the TV Broadcaster installs the channels automatically ACI ...

Page 9: ...wish to rearrange then press the button 2 Press the or button to select the new programme number position for your selected channel TV Broadcast then press OK 3 Repeat steps b 1 and b 2 if you wish to change the order of the other channels 6 Press the MENU button to remove the menu from the screen Programme Sorting Programme 01 TVE2 41 TVE 02 TVE 03 ANT3 04 TELE5 05 C 06 C44 Select new position Mo...

Page 10: ...U button to switch the first level menu on 2 To highlight the desired menu or option press or To enter the selected menu or option press To return to the last menu or option press To alter the settings of your selected option press or To confirm and store your selection press OK 3 Press the MENU button to remove the menu from the screen Introducing and Using the Menu system Your projection TV uses...

Page 11: ... Contrast Brightness Colour Sharpness Reset Noise Reduction Personal AUTO Features Sleep Timer Auto Format AV3 Output PIP Input PIP Position Select Enter Off On AUTO AV1 Select Enter Features Sleep Timer Auto Format AV3 Output PIP Input PIP Position Off On AUTO AV1 Select Enter Features Sleep Timer Auto Format AV3 Output PIP Input PIP Position Off On AUTO AV1 Select Enter Features Sleep Timer Auto...

Page 12: ... level changes according to the broadcast signal On volume level of the channels will stay the same independent of the broadcast signal e g in the case of advertisements TV Speakers On to listen to the TV from the set speakers Off to listen to the TV from an external amplifier connected to the audio outputs on the rear of the projection TV set If you are listening to the TV through headphones the ...

Page 13: ...u allows you to select the source to be output from the Scart connector 3 3 so that you can record from this Scart any signal coming from the projection TV or from an external equipment connected to the Scart connectors 1 1 or 2 2 or side connectors 4 or 4 and 4 If your VCR supports Smartlink this procedure is not necessary To do this after selecting the option press Then press or to select the de...

Page 14: ...ut PIP Input PIP Position Select Enter Menu Off On AUTO AV1 Select Enter Features Sleep Timer Auto Format AV3 Output PIP Input PIP Position Off On AUTO AV1 Select Enter Features Sleep Timer Auto Format AV3 Output PIP Input PIP Position Off On AUTO AV1 Picture Adjustment Select Enter Menu Picture Mode Contrast Brightness Colour Sharpness Reset Noise Reduction Personal AUTO Features Sleep Timer Auto...

Page 15: ...ther four characters in the same way and finally press OK to store continued Enter Set Up Select Language Auto Tuning Programme Sorting Programme Labels AV Preset Manual Programme Preset Detail Set Up Set Up Auto Tuning Programme Sorting Select NexTView AV Preset Manual Set Up Select Enter Menu Set Up Auto Tuning Programme Sorting Select NexTView AV Preset Manual Set Up Select Enter Menu Set Up La...

Page 16: ...une the broadcast reception Normally the automatic fine tuning AFT will give the best possible picture however you can manually fine tune the TV to obtain a better picture reception in case the picture is distorted To do this while watching the channel TV Broadcast you wish to fine tune select the AFT option and press Next press or to adjust the fine tuning between 15 and 15 Finally press OK twice...

Page 17: ...ure between 10 and 10 Finally press OK to confirm and store Picture Adjustment Select Enter Menu Picture Mode Contrast Brightness Colour Sharpness Reset Noise Reduction Personal AUTO Enter Detail Set Up Select RGB Centring 0 Set Up Auto Tuning Programme Sorting Select NexTView AV Preset Manual Set Up Select Enter Menu Set Up Auto Tuning Programme Sorting Select NexTView AV Preset Manual Set Up Sel...

Page 18: ...ode To freeze a teletext page Press Press it again to cancel the freeze To reveal concealed information e g answer to a quiz Press Press it again to conceal the information To select a sub page A teletext page may consist of several sub pages In this case the page number that appears on the upper left corner will change from white to green and one or more arrows will appear next to the page number...

Page 19: ...amme is broadcast press the green button on the remote control At the time that programme should be broadcast a reminder message is displayed on the TV Record and Remind options will be shown on the screen as soon as a programme have been selected but they will not be shown if you are watching the NexTView service on a TV channel which is not a NexTView provider Record and Remind will not be avail...

Page 20: ...ed on TV screen monitor out Video audio from selected source No output No output No output Audio signal to headphones Connecting Optional Equipment Using the following instructions you can connect a wide range of optional equipment to your projection TV VCR VCR VCR Hi fi DVD A B C D 8mm Hi8 DVC camcorder S VHS Hi8 DVC camcorder F E G H To avoid picture distortion Do not connect equipment to E and ...

Page 21: ...ted the device e g Your VCR is connected to the connector with the symbol Y1 1 Press the button on the remote control repeatedly until you see the symbol 1 on the screen 1 Connect your equipment to the designated projection TV socket as it is indicated on the previous page 2 Switch on the connected equipment 3 To watch the picture of the connected equipment press the button repeatedly until the co...

Page 22: ...MARTLINK on the rear of the Projection TV The features of SmartLink are Tuning information such as the channel overview are downloaded from the projection TV set to the VCR Direct projection TV recording While watching TV you need to press just one button on the VCR to record this programme Automatically switching on With the projection TV in standby mode pressing the Play z button on your VCR aut...

Page 23: ... that the main functions work If your device is not working or some of the functions do not work please check that you entered the correct code set or try the next code listed against the brand Your brand codes may be lost if weak batteries are not replaced within a few minutes To reset your brand of DVD or VCR please repeat the above steps A small label is added inside the battery door to allow y...

Page 24: ...the projection TV so that you can view the screen from within the areas shown below Horizontal viewing area Vertical viewing area 20 20 60 60 minimum distance 1 7 m Optimum viewing position Optimum viewing position minimum distance 1 7 m 03GBKP44PX2U fm Page 24 Tuesday January 14 2003 4 29 PM ...

Page 25: ...deo input phono jack 4 audio input phono jacks headphones jack Sound Output 2 x 30 W music power 2 x 15 W RMS Power Consumption 225 W Standby Power Consumption 0 7 W Dimensions w x h x d approx 1100 x 1160 x 536 mm Weight approx 61 Kg Accessories supplied 1 Remote Control RM 938 2 Batteries IEC designated AA size Other features Digital Comb Filter High resolution 100 Hz picture Digital Plus Telete...

Page 26: ...the remote control Check that TV Speakers is On in the Sound Adjustment menu Check that headphones are not connected Using the menu system select the Picture Adjustment menu and select Reset to return to factory settings This is not a malfunction Press the number buttons on the remote control to select the desired channel Adjust the colour registration For more details please refer to Adjusting Co...

Page 27: ...56 27 Emley Moor 44 51 47 41 37 North West 28 Winter Hill 55 62 59 65 48 North East 29 Bilsdale West Moor 33 26 29 23 30 Caldbeck 30 34 28 32 56 31 Chatton 39 45 49 42 32 Pontop Pike 58 64 61 54 Scotland 33 Angus 57 63 60 53 34 Black Hill 40 46 43 50 37 35 Sandale 22 67 36 Caldbeck 28 32 56 37 Craigkelly 31 27 24 21 48 38 Darvel 33 26 23 29 39 Durris 22 28 25 32 67 40 Eitshal Lewis 33 26 23 29 41 ...

Page 28: ...http www sony net Sony España S A Printed in Spain 04UNCOVER fm Page 1 Tuesday January 14 2003 4 29 PM ...

Reviews: