background image

23

GB

The Digital Set-up Menu

This menu contains several features that will allow you to 
customise the Digital side of your TV.

To do this: 

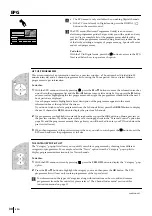
With the TV in Digital mode, press the


button to access 

the “Digital INFO display” on the TV screen, then press the 

BLUE

 button to access the “Set-up” (“Main Menu”). Next 

read below how to operate each option.

FAVOURITE PROGRAMME

This option allows you to store your favourite channels (TV Broadcast) in a list for quick access.

To do this: 

1

Once you have entered into the “Main Menu” press the 

V

 or 

v

 button to highlight “

Favourite 

Programme

” then press the 

OK

 button to display the “Favourite Programme Set” menu.

2

Press the 

V

 or 

v

 button to scroll through the list until the channel you wish to store as a favourite is 

highlighted. If you do not wish to select one of these channels as a favourite, press the 

RED

 or 

GREEN


button to display the previous or next 5 channels in the list.

3

When you have found and highlighted a programme you want to register as a favourite, press the 

OK


button. A tick appears alongside that programme in the display. 

•  Press the 

OK

 button again to cancel your selection.

•  Press the 

YELLOW

 button if you wish to delete (clear) all favorite settings

4

Repeat steps 2 and 3 to store other programmes as favourites.

5

Press the 

BLUE

 button to return to the “Main Menu” or press the 

MENU

 button to exit from the menu.

WALLPAPER

This option allows you customise the background pattern of the Digital menus.

To do this: 

1

Once you have entered into the “Main Menu”, press the 

V

 or 

v

 button to highlight “

Wallpaper

” then 

press the 

OK

 button to display the “Wallpaper” menu.

2

Press the 

V

 or 

v

 button to select your choice of wall paper (4 different choices) followed by the 

OK


button to store.

3

Press the 

BLUE

 button to return to the “Main Menu” or press the 

MENU

 button to exit from the menu.

continued...

The Digital Menus

BLUE

Channel 5

Tue 18 Mar

15:27 

Subtitles

Set-up

Audio

REC/Timer

    Pickid Lake        

                                09:05-09:25

American talk show. Today's guests are sporting a variety of 
"faice" books.

05

    The Wright Stuff
                             09:05-09:25

Main Menu

Favourite Programme
Wallpaper
Parental Control
Auto Tuning
Detail Set-up
CAM Set-up

Press OK key  to enter.

Digital Set-up

Exit

Summary of Contents for KP-44DX2

Page 1: ...11 1 KP 44DX2 2003 by Sony Corporation GB 100 Hz Digital Projection TV Operating Instructions Before operating theTV please read the Safety Information section of this manual Retain this manual for future reference ...

Page 2: ...ate plug fitted in accordance with the following instructions The wires in this mains lead are coloured in accordance with the following code Blue Neutral Brown Live As the colours of the wires in the mains lead of this apparatus may not correspond with the coloured markings identifying the terminals in your plug proceed as follows The wire which is coloured blue must be connected to the terminal ...

Page 3: ...d Using the different Menu Systems 13 The General TV Menus 14 On Screen Display Guide for the General TV Menus 14 The Picture Adjustment menu 15 The Sound Adjustment menu 16 The Features menu 17 The Set Up menu 19 The Digital Menus 21 On Screen Display Guide for the Digital Menus 21 The Digital INFO Menu 22 The Digital Set up menu 23 The Digital Detail Set up menu 26 Analogue Teletext 28 Digital T...

Page 4: ... of the TV For ventilation leave a space of at least 10cm all around the set To prevent fire keep inflammable objects or naked lights eg candles away from the TV Pull out the power lead by the plug Do not pull on the power lead itself Take care not to place heavy objects on the power lead as this could result in damage We recommend you wind any excess lead around the holders provided on the rear of ...

Page 5: ...5 GB Checking the Accessories supplied 1 Remote control RM 948 1 RF Loopthrough 2 Batteries AA size Overview ...

Page 6: ... to switch on teletext 9 Joystick a If Media Selector is switched to TV When MENU is switched on use these buttons to operate the different menu systems See page 13 When MENU is switched off press OK to display The Programme Index Table or The Channel Index Menu See page 11 b If Media Selector is switched to VCR or DVD Using these buttons you can control the main functions of your VCR or DVD Besid...

Page 7: ...he chapter Adjusting Colour Registration Convergence on page 10 or 2 Auto Start Up Button Press and hold this button for approximately 2 seconds to start the auto start up sequence For more details please refer to the chapter Switching On the Projection TV and Automatically Tuning on page 9 Standby indicator Press on the mark Selecting Input source Volume control buttons Programme Up or Down Butto...

Page 8: ...mme Preset on page 20 to tune in the projection TV to the output of your VCR Also refer to your VCR instruction manual to find out how to find the output channel of your VCR For more details of VCR connections as well as other connections please refer to the section Additional information when connecting equipment on page 33 Inserting Batteries into the Remote Control Make sure you insert the supp...

Page 9: ...y take some time a message is included in the display to inform you of the tuning progress b When Digital tuning is complete the analogue display appears automatically and the search and store procedure for the analogue channels begins This procedure could take some minutes Please be patient and do not press any buttons otherwise automatic tuning will not be completed If no Digital and no Analogue...

Page 10: ...en and Blue Lines 1 Press on the mark on the right side of the projection TV 2 Press button The Auto Convergence function works for about 10 seconds When the white cross disappears from the screen your projection TV is ready for use The Auto Convergence function does not work when no signal is input the input signal is weak the screen is exposed to spotlights or direct sunlight you watch the telet...

Page 11: ...e menu contains a list of all the available channels TV Broadcast The name of the programme currently being shown along with its start and finish times is shown for each of the available channels The current channel is previewed in the top right corner of the screen with its channel name and number displayed below it 2 Press the V or v buttons to move the coloured cursor up or down the list to sel...

Page 12: ...annel Index menu will now contain only programmes of the type selected 4 Press the OK button to exit the Channel Index Menu c Favourite programmes This option allows you to create a list of your favourite programmes To add a programme to the Favourite list 1 With the Channel Index menu on screen press the V or v buttons to highlight the programme you want as a favourite 2 Press the BLUE button to ...

Page 13: ... the chapter The Digital Menus pages 21 27 To operate any of the above menu systems use the following buttons 1 To switch on the General TV Menus press the MENU button Digital Menus press the button 2 To navigate through the General TV Menus To highlight the desired menu or option press V or v To enter the selected menu or option press b To return to the last menu or option press B To alter the se...

Page 14: ...t Up Select Language Auto Tuning Programme Sorting Programme Labels AV Preset Manual Programme Preset Detail Set Up Start Auto Tuning Set Up Select Language Auto Tuning Programme Sorting Programme Labels AV Preset Manual Programme Preset Detail Set Up Enter Set Up Select Language Auto Tuning Programme Sorting Programme Labels AV Preset Manual Programme Preset Detail Set Up Enter Set Up Select Lang...

Page 15: ...mes DVD and Digital Set Top Box receivers Personal for individual settings Movie for films Contrast Press B or b to reduce or enhance picture contrast Brightness Press B or b to darken or brighten the picture Brightness can only be altered if Picture Mode is set to Personal Colour Press B or b to decrease or to increase color intensity Colour can only be altered if Picture Mode is set to Personal ...

Page 16: ...olume level changes according to the broadcast signal TV Speakers Press v or V to select On to listen to the TV from the set speakers or Off to listen to the TV from an external amplifier connected to the audio outputs on the rear of the projection TV If you are listening to the TV through headphones the Effect option will automatically be switched to Off If you select Dolby Virtual on the Effect ...

Page 17: ...een format according to the broadcast signal or Off if you wish to keep your preference Finally press OK to store Even if you have selected On or Off in the Auto Format option you can always modify the format of the screen by pressing repeatedly on the remote control to select one of the following formats Smart Imitation of wide screen effect for 4 3 broadcast 4 3 Conventional 4 3 picture size ful...

Page 18: ...is displayed on the screen If you have connected a decoder to the Scart 2 2 or to a VCR connected to this Scart please remember to change back the AV2 Output to AUTO or TV for correct unscrambling PIP INPUT This option allows you to select the source you want to watch in the PIP screen To do this Once you have entered into the Features menu as it is explained in the previous page and after selecti...

Page 19: ...TV channels This option is only available in Analogue mode To do this After selecting the option press b and then proceed in the same way as in the steps 3 and 4 of the section Switching On the Projection TV and Automatically Tuning on page 9 PROGRAMME SORTING This option allows you to change the order in which the Analogue channels TV Broadcast appear on the screen This option is only available i...

Page 20: ...er selecting the option press b Next with the Programme option highlighted press the PROG button to select the programme number with the channel you wish to name When the programme you want to name appears on the screen select the Label option and press b Next press v or V to select a letter number or for a blank Press bto confirm this character Select the other four characters in the same way Aft...

Page 21: ...fer to the section REC Timer on page 22 Refer to the section Favourite Programme on page 23 Refer to the section Wallpaper on page 23 Refer to the section Parental Control on page 24 Refer to the section Auto Tuning on page 24 Refer to the section Manual Tuning on page 26 Refer to the section PIN Code on page 27 Refer to the section Software Download on page 27 Refer to the section System Informat...

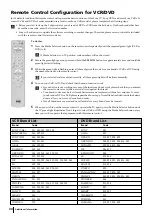
Page 22: ...the MENU button to exit from this menu REC TIMER If you highlight a current programme the REC feature allows you to automatically set your VCR to record the selected programme To do this With the Digital INFO display on the TV screen press the YELLOW button to access the REC pop up menu If your VCR does not have Smartlink a message is displayed reminding you to manually set your VCR Press the RED ...

Page 23: ...ourite press the OK button A tick appears alongside that programme in the display Press the OK button again to cancel your selection Press the YELLOW button if you wish to delete clear all favorite settings 4 Repeat steps 2 and 3 to store other programmes as favourites 5 Press the BLUE button to return to the Main Menu or press the MENU button to exit from the menu WALLPAPER This option allows you...

Page 24: ... below b If you have already set a PIN code 1 Once you have entered into the Main Menu as it is explained in the previous page press the V or v button to highlight Parental Control then press the OK button to display the Parental Control menu 2 Using the numbered buttons on the remote control enter your 4 digit PIN code As you enter each digit it will be represented by a in the PIN entry box If yo...

Page 25: ...er 3 Insert the CAM into the slot on the rear of the Projection TV as shown Take care not to damage the CAM when inserting 4 Insert your viewing card into the CAM 5 After inserting the CAM and the viewing card replace the cover 6 Connect the TV to the mains and switch on 7 With the TV in Digital mode press the button on the remote control to display the Digital INFO display Press the BLUE button t...

Page 26: ... make the select search box active 5 Press the V or v button to begin the search process The words Searching Down or Searching Up appear in the select search box to indicate that the TV is searching If no Digital services are found on the channel you have chosen the channel number changes up or down automatically and the search continues When all services allocated to the selected channel have bee...

Page 27: ...ough your existing aerial To do this 1 Once you have entered into the Detail Set up menu as it is explained in the previous page press the V or v button to highlight Software Download then press the OK button to display the Software Download menu 2 Press the V or v button to change the Current Setting If you wish to receive downloads the Current Setting should be set to ON If you do not wish to re...

Page 28: ...age is not available If this is the case input another page number To access the next or preceding page Press PROG or PROG To superimpose teletext on to the TV Whilst you are viewing teletext press Press it again to cancel teletext mode To freeze a teletext page Press Press it again to cancel the freeze To reveal concealed information e g answer to a quiz Press Press it again to conceal the inform...

Page 29: ...e 11 2 Once the Teletext channel is displayed follow the on screen instructions to access the required information On some pages the TV programme is also displayed Instructions on screen will tell you how to change the displayed programme 3 If when viewing the Teletext pages you are requested to select OK or Cancel press the OK button for OK and the button for Cancel 4 When you have finished viewi...

Page 30: ... is currently being broadcast press the OK button to obtain a preview in the preview window If you have previously set a viewing age limit in the Parental Control option see page 24 and the programme exceeds that age limit you will be asked to enter your PIN code before the preview is allowed 3 When the programme in the preview screen is the one you wish to watch press the button to exit the EPG m...

Page 31: ...age will be displayed reminding you to set your VCR timer 3 Press the V or v buttons to select the correct date Press the b button to highlight the start time 4 Press the V or v buttons to select the start time Press the b button to highlight the stop time 5 Press the V or v buttons to select the stop time Press the b button to highlight the programme 6 Press the V or v buttons to select the progr...

Page 32: ...deo audio from TV tuner Video audio from selected source No output No output No output Audio signal to headphones A C Hi fi DVD VCR CAM slot unscrew and remove the cover After inserting the CAM and the veiewing card screw the cover again MODEMconnection connect to the Modem B If you want to record signals from any external equipment connect the recording device to the C scart DVD Decoder 8mm Hi8 D...

Page 33: ...ns on the remote control Also treble and bass settings can be modified through the Sound Adjustment menu Using Optional Equipment In order to get the input signal of a connected equipment onto the TV screen you need to select the symbol of the connector to which you have connected the device e g Your VCR is connected to the connector with the symbol 1 1 Press the button on the remote control repea...

Page 34: ...5 336 SHARP 019 027 SHARP 324 THOMSON 012 THOMSON 319 350 TOSHIBA 003 TOSHIBA 337 YAMAHA 018 027 020 002 To do this 1 Press the Media Selector button on the remote control repeatedly until the required green light VCR or DVD is lit If Media Selector is on TV position code numbers will not be stored 2 Before the green light goes out press and hold the YELLOW button for approximately 6 seconds until...

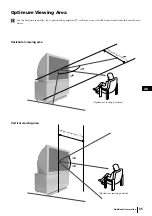
Page 35: ...sition the projection TV so that you can view the screen from within the areas shown below Horizontal viewing area Vertical viewing area 20 20 60 60 minimum distance 1 7 m Optimum viewing position Optimum viewing position minimum distance 1 7 m Additional Information ...

Page 36: ...input 4 pin DIN 3 video input phono jack 3 audio input phono jacks headphones jack Sound Output 2 x 30 W music power 2 x 15 W RMS Power Consumption 220 W Standby Power Consumption 1 W Dimensions w x h x d approx 1100 x 1160 x 536 mm Weight approx 68 Kg Accessories supplied 1 Remote Control RM 948 2 Batteries IEC designated AA size 1 RF Loopthrough cable Other features Digital terrestrial reception...

Page 37: ...ct a local installer Ensure aerial is correctly aligned to transmitter Ensure aerial is plugged directly into the TV not through other equipment Check that the optional equipment is on and press the button repeatedly on the remote control until the correct input symbol is displayed on the screen see page 33 Press the button on the remote control Check that TV Speakers is On in the Sound Adjustment...

Page 38: ...62 59 65 North 26 Belmont 22 28 25 32 56 27 Emley Moor 44 51 47 41 37 North West 28 Winter Hill 55 62 59 65 48 North East 29 Bilsdale West Moor 33 26 29 23 30 Caldbeck 30 34 28 32 56 31 Chatton 39 45 49 42 32 Pontop Pike 58 64 61 54 Scotland 33 Angus 57 63 60 53 34 Black Hill 40 46 43 50 37 35 Sandale 22 67 36 Caldbeck 28 32 56 37 Craigkelly 31 27 24 21 48 38 Darvel 33 26 23 29 39 Durris 22 28 25 ...

Page 39: ......

Page 40: ...mme 19 Noise Reduction 15 Mode 4 3 17 Mode 14 9 17 Noise Reduction 15 O On Off switch 7 On Screen Display Guide for Digital menus 21 On Screen Display Guide for General TV menus 14 Optional equipment connecting 32 using 33 Overview of remote control 6 of the TV set buttons 7 P Q Parental control 24 Personal mode picture 15 Picture Adjustment menu 15 PIN Code 27 PIP input 18 PIP position 18 Plug wi...

Reviews: