background image

31

 GB

KLV-46S200A

2-685-864-

14

(1)

Additional Inf

o

rmation

Sound Output

10 W + 10 W

Optional Accessories

Wall-Mount bracket

SU-WL51 (for KLV-46S200A/KLV-40S200A)
SU-WL31 (for KLV-32S200A/KLV-26S200A)
SU-WL53 (for KLV-46S200A/KLV-40S200A/KLV-32S200A)

Design and specifications are subject to change without notice.

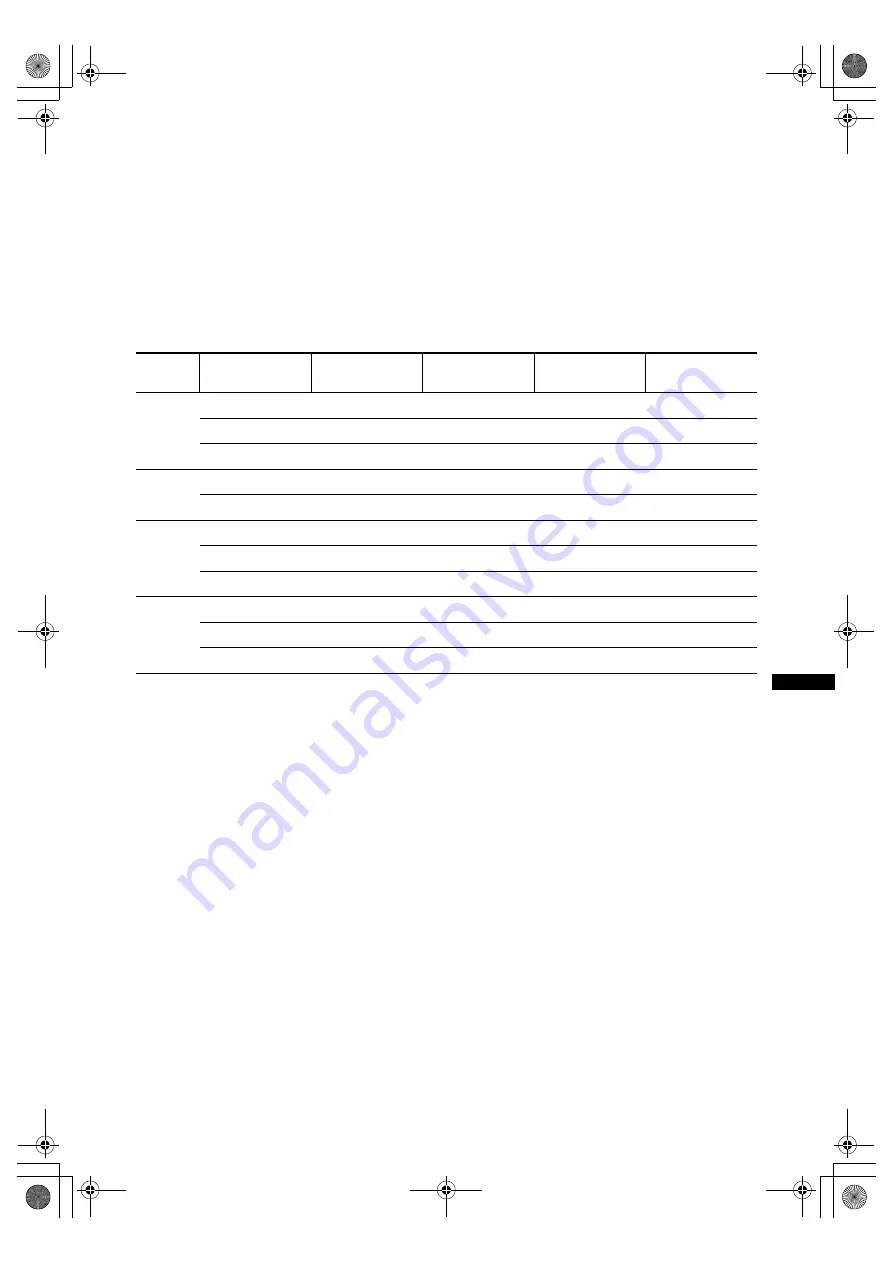
PC input signal Reference chart

• This TV’s PC input does not support Sync on Green or Composite Sync.
• This TV’s PC input does not support interlaced signals.
• For the best picture quality, it is recommended to use the signals (boldfaced) in the above chart with a 60Hz 

vertical frequency from a personal computer. In plug and play, signals with a 60Hz vertical frequency will be 
selected automatically.

Signals

Horizontal 
(Pixel)

Vertical (Line)

Horizontal 
frequency (kHz)

Vertical 
frequency (Hz)

Standard

VGA

640

480

31.5

60

VGA

640

480

37.5

75

VESA

720

400

31.5

70

VGA-T

SVGA

800

600

37.9

60

VESA Guidelines

800

600

46.9

75

VESA

XGA

1024

768

48.4

60

VESA Guidelines

1024

768

56.5

70

VESA

1024

768

60

75

VESA

WXGA

1280

768

47.4

60

VESA

1280

768

47.8

60

VESA

1360

768

47.7

60

VESA

010COV.book  Page 31  Monday, September 11, 2006  2:53 PM

Summary of Contents for KLV-46S200A

Page 1: ...oration LCD Color TV 2 685 864 14 1 GB KLV 46S200A 2 685 864 14 1 Operating Instructions Before operating the TV please read the Safety information section of this manual Retain this manual for future reference 010COV book Page 1 Thursday September 7 2006 1 39 PM ...

Page 2: ...ead this manual thoroughly and retain it for future reference Trademark information Manufactured under license from BBE Sound Inc Licensed by BBE Sound Inc under one or more of the following US patents 5510752 5736897 BBE and BBE symbol are registered trademarks of BBE Sound Inc TruSurround XT SRS and symbol are trademarks of SRS Labs Inc TruSurround XT technology is incorporated under license fro...

Page 3: ...ng pictures from connected equipment 16 17 Using MENU Functions Navigating through menus 17 Picture menu 18 Sound menu 20 Screen menu 22 Setup menu 23 PC Settings menu 25 Channel Setup menu 26 28 Using Optional Equipment Connecting optional equipment 28 30 Additional Information Specifications 30 Troubleshooting 32 Index 35 Start up Guide 4 010COV book Page 3 Thursday September 7 2006 1 39 PM ...

Page 4: ...source or in a place subject to direct sunlight or in a damp room 2 Connecting an antenna VCR The position of AC IN jack varies depending on the TV size MONO L R 1 L R 1 2 3 Y PB CB PR CR L R L R 8 AC IN VIDEO VIDEO IN VIDEO OUT AUDIO R L Connecting an antenna and VCR AC power cord supplied To video and audio outputs Audio Video cable not supplied To antenna output Antenna cable supplied S video c...

Page 5: ...left and right swivel 6 Selecting the language 1 Connect the TV to the AC power outlet 110 240V AC 50 60Hz 2 Press 1 on the TV top side When you switch on the TV for the first time the Language menu appears on the screen When the TV is in standby mode the 1 standby indicator on the TV front is red press 1 on the remote to switch on the TV Top view Front 1 2 3 3 2 010COV book Page 5 Thursday Septem...

Page 6: ...ase be patient and do not press any buttons on the TV or remote Once all available channels have been stored the TV returns to normal operation displaying the channel stored on channel number 1 When a message appears for you to confirm the antenna connections No programs are found Check all the antenna connections and press to start Auto Tuning again 2 The Program Sorting menu appears on the scree...

Page 7: ...lation observe the following Do not install the LCD TV turned backward or sideways Do not install the LCD TV turned over or upside down Do not install the LCD TV on a shelf or in a closet Do not place the LCD TV on a rug or bed Do not cover the LCD TV with cloth such as curtains or items such as newspapers etc Vehicle and ceiling Do not install this LCD TV in a vehicle or hang it from the ceiling ...

Page 8: ...onnected to an AC mains socket outlet with a protective earthing connection Moisture Do not touch the AC power cord with a wet hand If you plug unplug the AC power cord with a wet hand it may cause electric shock Lightning storms For your own safety do not touch any part of the LCD TV AC power cord or antenna lead during lightning storms AC power cord protection Pull out the AC power cord by the p...

Page 9: ... locations injury may result Do not install the LCD TV in a location where the LCD TV protrudes such as pillars Do not install the LCD TV in a location where your face may bump To prevent injury this apparatus must be securely attached to the floor wall in accordance with the installation instructions Placement Never place the LCD TV in hot humid or excessively dusty places Do not install the LCD ...

Page 10: ...vent If the display unit is exposed to extreme temperature the display unit may heat up and it may cause deformations of the casing or malfunctions Do not install the display unit in a place exposed to direct air conditioning If the display unit is installed in such a location moisture may condense on the panel inside the display unit It may cause a malfunction After transporting the display unit ...

Page 11: ...has effective pixels of 99 99 or more black dots may appear or bright points of light red blue or green may appear constantly on the LCD screen This is a structural property of the LCD panel and is not a malfunction Do not expose the LCD screen surface to the sun Doing so may damage the screen surface Do not push or scratch the front filter or place objects on top of this unit The image may be une...

Page 12: ...d screen mode 7 MENU page 17 8 Number buttons In TV mode Selects channels For channel numbers 10 and above enter the second digit within two seconds available only if 1 Digit Direct is set to Off In Text mode Enters the three digits page number to select the page 9 Previous channel Returns to the previous channel watched for more than five seconds 0 PROG page 14 In TV mode Selects the next or prev...

Page 13: ...r right 4 PROG In TV mode Selects the next or previous channel In TV menu Moves through the options up or down 5 1 Power Switches the TV on or off 6 Remote control sensor 7 Picture Off Timer indicator Lights up in green when the picture is switched off page 24 Lights up in amber when the timer is set page 24 8 1 Standby indicator Lights up in red when the TV is in standby mode 9 Power indicator Li...

Page 14: ...ld a page press To reveal hidden information press Tips Ensure that the TV is receiving a good signal or some text errors may occur Some TV channels broadcast a Text service For information on the use of the service select the index page usually Text page 100 When four colored items appear at the bottom of the Text page Fastext is available Fastext allows you to access pages quickly and easily Pre...

Page 15: ...ll the 16 9 screen Displays cinemascopic letter box format broadcasts in the correct proportions Parts of the top and bottom of the picture may be cut off Tip Alternatively you can set Auto Wide to On The TV will automatically select the best mode to suit the broadcast page 22 For PC Input Displays the picture in its original pixel size Bars are shown at the top bottom and both sides for small pic...

Page 16: ... 1 or Video 1 Video 1 Rear or Audio 1 Rear L MONO R Video 2 or Video 2 Video 2 Side or Audio 2 Side L MONO R Video 3 Video 3 Rear Audio 3 Rear L MONO R HD DVD 1Video 1 Rear Y PB CB PR CR Audio 1 Rear L R HD DVD 2Video 2 Rear Y PB CB PR CR Audio 2 Rear L R HDMI Video Audio Rear HDMI IN Audio Rear L R PC Video Rear Left Side PC RGB Audio Rear PC Options Description Close Close the Tools Menu Power S...

Page 17: ...rogram List Allows you to select TV programs from a list of channel labels To watch the desired channel select the channel then press To assign a label to a program see page 26 External Inputs Selects equipment connected to your TV To watch the desired external input select the input source then press To assign a label to an external input see page 23 Settings Opens the Settings menu screen where ...

Page 18: ...your preferred settings Reset Resets all picture settings except Target Inputs and Picture Mode to the factory settings Backlight Adjusts the brightness of the backlight Picture Increases or decreases picture contrast Brightness Brightens or darkens the picture Color Increases or decreases color intensity Hue Increases or decreases the green tones Tip Hue can only be adjusted for a NTSC color syst...

Page 19: ...ings Reset Resets all the advanced video settings to the factory settings Black Corrector Enhances black areas of the picture for stronger contrast Contrast Enhancer Automatically adjusts Picture to the most suitable settings judging from the brightness of the screen This setting is especially effective for dark images increasing vibrancy in the picture Gamma Adjusts the balance between bright and...

Page 20: ...ts Sound Mode and Dual Sound to the factory settings Treble Adjusts higher pitched sounds Bass Adjusts lower pitched sounds Balance Emphasizes left or right speaker balance Intelligent Volume Keeps a constant volume level even when volume level gaps occur e g adverts tend to be louder than programs Volume Offset Increases or decreases the sound level Surround Selects the surround mode TruSurround ...

Page 21: ...annot receive stereo or dual sound when Low or High is selected in Audio Filter page 27 Tips NICAM is receivable in following countries regions Hong Kong Singapore New Zealand Malaysia Thailand etc A2 German is receivable in following countries regions Australia Malaysia Thailand etc If you select other equipment connected to the TV set Dual Sound to Stereo Main or Sub Broadcasting Selection NICAM...

Page 22: ...for PAL SECAM and NTSC signals only 4 3 Default Selects the default screen mode for use with 4 3 broadcasts Wide Zoom Displays conventional 4 3 broadcasts with an imitation wide screen effect Normal Displays conventional 4 3 broadcasts in the correct proportions Off Keeps the current Wide Mode setting when the channel or input is changed Tip This option is available only if Auto Wide is set to On ...

Page 23: ...ich the menus are displayed Video Labels Assigns a name to any equipment connected to the side and rear jacks The name will be displayed briefly on the screen when the equipment is selected You can skip an input source that is not connected to any equipment 1 Press F f to select the desired input source then press 2 Press F f to select the desired option below then press Equipment labels Uses one ...

Page 24: ...de When Display is selected power consumption level will be displayed on the screen when you press or turn on the TV Light Sensor Automatically optimizes the picture settings according to the ambient light in the room Quiet Power On Sets the volume control at a low level when the TV is first turned on gradually increasing the sound to a preset level Speaker Switches on off the TV s internal speake...

Page 25: ...settings Auto Adjustment Automatically adjusts the display position and phase of the picture when the TV receives an input signal from the connected PC Tip Auto Adjustment may not work well with certain input signals In such cases manually adjust Phase Pitch Horizontal Shift and Vertical Shift Phase Adjusts the phase when the screen flickers Pitch Adjusts the pitch when the picture has unwanted ve...

Page 26: ... in which the channels are stored on the TV 1 Press F f to select the channel you want to move to a new position then press 2 Press F f to select the new position for the channel then press Program Labels Assigns a channel name of your choice up to five letters or numbers The name will be displayed briefly on the screen when the channel is selected 1 Press F f to select the channel you want to nam...

Page 27: ...channels manually Label Assigns a name of your choice up to five letters or numbers to the selected channel This name will be displayed briefly on the screen when the channel is selected To input characters follow steps 2 to 4 of Program Labels page 26 AFT Allows you to fine tune the selected program number manually if you feel that a slight tuning adjustment will improve the picture quality You c...

Page 28: ...r Digital Terrestrial Receiver PC Video game equipment DVD player without component video output VCR DVD recorder Hi Fi audio equipment DVD player with component video output 1 2 VCR 1Use an HDMI cable be sure to use only an HDMI cable that bears the HDMI logo HDMI to DVI cable or adaptor not supplied 2When using an HDMI cable it is not necessary to connect the audio cable When using an HDMI to DV...

Page 29: ...ct to the HDMI jack on the TV Video game equipment DVD player without component video output or VCR E Connect to the S video jack 1 or the video jack 1 or 3 and the audio jacks 1 or 3 To avoid picture noise do not connect the camcorder to the video jack 1 and the S video jack 1 at the same time If you connect mono equipment connect to the L MONO jack 1 or 3 DVD recorder or VCR F Connect to the vid...

Page 30: ...9 CATV S01 to S03 S1 to S41 VHF 0 to 12 5A 9A UHF 28 to 69 CATV S01 to S03 S1 to S41 Australia only VHF 1 to 11 UHF 21 to 69 CATV S01 to S03 S1 to S41 New Zealand only I UHF B21 to B68 CATV S01 to S03 S1 to S41 D K VHF C1 to C12 R1 to R12 UHF C13 to C57 R21 to R60 CATV S01 to S03 S1 to S41 Z1 to Z39 M VHF A2 to A13 UHF A14 to A79 CATV A 8 to A 2 A to W 4 W 6 to W 84 Terminals S VIDEO 1 2 S VIDEO 4...

Page 31: ...or the best picture quality it is recommended to use the signals boldfaced in the above chart with a 60Hz vertical frequency from a personal computer In plug and play signals with a 60Hz vertical frequency will be selected automatically Signals Horizontal Pixel Vertical Line Horizontal frequency kHz Vertical frequency Hz Standard VGA 640 480 31 5 60 VGA 640 480 37 5 75 VESA 720 400 31 5 70 VGA T S...

Page 32: ...e screen Check the connection between the optional equipment and the TV Distorted picture Check if any connected optional equipment is installed in front of the TV or beside the TV When installing optional equipment leave some space between the optional equipment and the TV When changing programs or selecting Text turn off any equipment connected to the video input jack on the rear of the TV Broad...

Page 33: ...e Channel Setup menu to preset the channel again page 26 If the sound of some channels is noisy select the channel then perform Manual Program Preset in the Channel Setup menu and select the appropriate TV system TV System page 27 Good picture but no sound The volume level is too low Press 2 to increase the volume level The sound is muted Press or 2 to cancel the muting Some tiny black points and ...

Page 34: ...ptimum wide screen mode During this period an irregular wide screen mode may appear The wide mode is switched automatically according to the revised signal with a Wide ID signal The Auto Wide feature stops working temporarily when you press and resumes after a while To fix in the manually selected wide screen mode set Auto Wide to Off in the Screen menu page 22 Text display is incomplete or garble...

Page 35: ... Color 19 M Manual Program Preset 27 MENU 17 MPEG Noise Reduction 19 N Noise Reduction 19 Normal 15 O On Timer 24 P PC Settings menu 25 Phase 25 Picture 18 Picture Freeze 15 Picture menu 18 Picture Mode 18 Picture Off indicator 13 Pitch 25 Power indicator 13 Power 1 switch 13 Power Management 25 Power Saving Setting 24 Product Information 24 Program 27 Program Block 26 Program Labels 26 Program So...

Page 36: ...Printed in Malaysia KDLV 46S200A 2 685 864 14 1 010COV book Page 36 Thursday September 7 2006 1 39 PM ...

Reviews: