background image

Introducing the Sony LCD Projection TV

12

KF-42/50WE620

2-108-981-

13

(1)

S-VIDEO Inputs: 

Provides a high-quality image from connected 

equipment.

Favorite Channel Preview:

 Allows you to preview up to 16 favorite 

channels without leaving the current channel.

Wide Screen Mode:

 Allows you to watch 4:3 normal broadcasts in 

wide screen mode (16:9 aspect ratio).

Auto Wide:

 Allows you to select the Wide Screen Mode automatically.

Using This Manual

We recommend that you carefully review the contents of the following three 
sections in the order shown to ensure that you fully understand the operation 
of your new LCD projection TV.

1

Installing and Connecting the LCD Projection TV

This section guides you through your initial setup. It shows you how to 
install your LCD projection TV, to connect your new components and to 
connect the antenna and cable.

2

Using the Features

This section shows you how to begin using your new LCD projection 
TV. It also shows you how to use your remote control functions.

3

Using the Menus

This section teaches you how to access on-screen menus and adjust your 
LCD projection TV settings.

Instructions in this manual are written for the remote control. Similar 
controls are also found on the LCD projection TV console.

Summary of Contents for KF-50WE620 - Lcd Projection Tv Hd-monitor Grand Wega

Page 1: ... 2004 Sony Corporation KF 42WE620 KF 50WE620 LCD Projection TV HD Monitor Operating Instructions 2 108 981 13 1 LCD Projection TV KF 42WE620 KF 50WE620 Printed in U S A KF 42 50WE620 2 108 981 13 1 ...

Page 2: ... Refer to them whenever you call upon your Sony dealer regarding this product Model No Serial No Contacting Sony If after reading the following instructions you have additional questions related to the use of your Sony TV Please call one of the following numbers Customers in the continental United States contact the Direct Response Center at 1 800 222 SONY 7669 Customers in Canada contact the Cust...

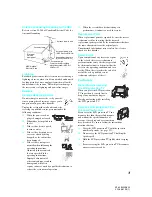
Page 3: ... close to the point of cable entry as practical Use of this television receiver for other than private viewing of programs broadcast on UHF VHF transmitted by cable companies or satellite for the use of the general public may require authorization from the broadcaster cable company and or program owner NOTIFICATION This equipment has been tested and found to comply with the limits for a Class B di...

Page 4: ... to let the moisture evaporate before turning on the LCD projection TV To obtain the best picture do not expose the screen to direct illumination or direct sunlight It is recommended to use spot lighting directed down from the ceiling or to cover the windows that face the screen with opaque drapery It is desirable to install the LCD projection TV in a room where the floor and walls are not of a re...

Page 5: ...e outlet installed Do not defeat the safety purpose of the grounding plug Overloading Do not overload wall outlets extension cords or convenience receptacles beyond their capacity since this can result in fire or electric shock Always turn the set off when it is not being used When the set is left unattended and unused for long periods of time unplug it from the wall outlet as a precaution against...

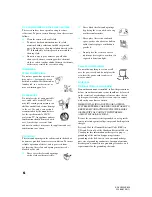
Page 6: ...from overheating these slots and openings must never be blocked or covered Never cover the slots and openings with a cloth or other materials Never block the slots and openings by placing the set on a bed sofa rug or other similar surface Never place the set in a confined space such as a bookcase or built in cabinet unless proper ventilation is provided Do not place the set near or over a radiator...

Page 7: ...uired be sure the service technician certifies in writing that he has used replacement parts specified by the manufacturer that have the same characteristics as the original parts Unauthorized substitutions may result in fire electric shock or other hazards Safety Check Upon completion of any service or repairs to the set ask the service technician to perform routine safety checks as specified by ...

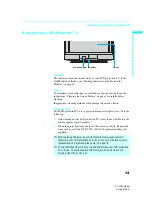
Page 8: ... is low Remote control detection The remote control sensor is in the middle of the TV on the bottom For the best results aim the remote control at this location Important Safety Instructions 1 Read these instructions 2 Keep these instructions 3 Heed all warnings 4 Follow all instructions 5 Do not use this apparatus near water 6 Clean only with dry cloth 7 Do not block any ventilation openings Inst...

Page 9: ...n Audio Receiver 40 Connecting an Audio Receiver 40 Connecting a DVD Player with Component Video Connectors 41 Connecting a DVD Player with A V Connectors 42 Connecting a Digital TV Receiver with Component Connectors 43 Connecting a Digital TV Receiver with DVI HDTV Connector 44 Connecting a Camcorder 45 Using the CONTROL S Feature 46 Setting Up the LCD projection TV Automatically 47 Using the Fea...

Page 10: ......

Page 11: ...eMotion feature provides smoother picture movement when playing back movies or other video sources on film Twin View Using the Multi Image Driver MID X Twin View allows you to watch two programs side by side with the ability to zoom in on one picture and listen to the program in the selected window You can watch pictures from two different sources 1080i 720p 480p or 480i simultaneously Only the le...

Page 12: ...ns in the order shown to ensure that you fully understand the operation of your new LCD projection TV 1 Installing and Connecting the LCD Projection TV This section guides you through your initial setup It shows you how to install your LCD projection TV to connect your new components and to connect the antenna and cable 2 Using the Features This section shows you how to begin using your new LCD pr...

Page 13: ...sh Projection lamp Your LCD projection TV uses a projection lamp as its light source Note the following After turning on your LCD projection TV it may take a while before the picture appears up to 1 minute When the projection lamp wears out the screen goes dark Replace the lamp with a new Sony XL 2100U or XL 2100 replacement lamp not supplied After replacing the lamp be sure to attach the lamp cov...

Page 14: ...ection TV When not using the LCD projection TV for a long period of time Turn off the main power on the front of your LCD projection TV before going to sleep or going out Disconnect the AC plug if idle for more than seven days When turning off the power The fan will continue to blow for about two minutes after turning off the power on the main unit or the remote control Allow several minutes befor...

Page 15: ...nutes then unplug the power cord The cooling fan will continue to blow for about two minutes after turning the power off Allow the lamp to cool down completely before removing it The surface of the lamp remains extremely hot for at least 30 minutes after the power has been turned off Do not put flammable materials and metal objects inside the lamp receptacle of the LCD projection TV after removing...

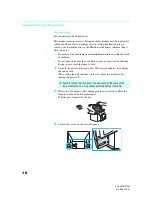
Page 16: ... the reach of children Do not pour water onto the used lamp or put any object inside the lamp Doing so may cause the lamp to burst 1 Turn off the power on the main unit Wait several minutes then unplug the power cord The cooling fan will continue to blow for about two minutes after turning the power off 2 Wait at least 30 minutes after unplugging the power cord to allow the lamp to cool down befor...

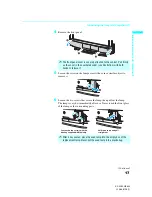
Page 17: ...amp is very hot immediately after use Never touch the front glass of the lamp or the surrounding parts The front panel cover is securely attached to the cabinet Pull firmly on the cover in the numbered order see illustration with both hands to release it After it has cooled place the used lamp into the empty box of the replacement lamp Never put the used lamp into a plastic bag Loosen the two scre...

Page 18: ... In such a case take out the screw and reinsert it straight into the screw hole then tighten the screw completely If the lamp cover is not reattached securely the self diagnostic function may be triggered and the POWER STANDBY indicator flashes three times see page 87 Reattach the new lamp securely into the lamp receptacle Tighten the two screws securely first 1 then 2 with the supplied hex key as...

Page 19: ... securely 10Reattach the rear side panel and tighten the screws Consult your Sony dealer for a Sony XL 2100U or XL 2100 replacement lamp Take great care when replacing the lamp or plugging in unplugging the connecting cords Rough handling may cause the LCD projection TV to fall damaging the TV the TV stand and or the floor Press firmly ...

Page 20: ......

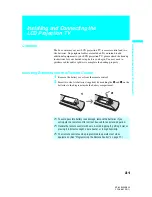
Page 21: ...s to complete the hookup properly Inserting Batteries into the Remote Control 1 Remove the battery cover from the remote control 2 Insert two size AA batteries supplied by matching the e and E on the batteries to the diagram inside the battery compartment To avoid possible battery leak damage remove the batteries if you anticipate the remote control will not be used for an extended period Handle t...

Page 22: ...two people Do not hold the pedestal or the front panel of the LCD projection TV Doing so may cause these parts to break off When moving the LCD projection TV place one hand in the hole on the lower portion of the TV while grasping the top with the other hand as shown in the illustration below Do not grasp the pedestal or the front panel of the LCD projection TV ...

Page 23: ...pushing the LCD projection TV or its stand may cause it to fall As a protective measure secure the LCD projection TV as follows Using the LCD projection TV stand with support belts You can also use the LCD projection TV stand model SU GW11 SU GW1 for KF 50WE620 not supplied or model SU GW11 SU GW2 for KF 42WE620 not supplied with a support belt When Installing Your LCD Projection TV Against a Wall...

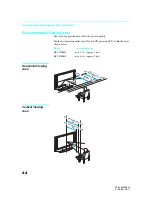
Page 24: ...rea Model Viewing distance KF 42WE620 min 5 9 ft approx 1 8 m KF 50WE620 min 6 6 ft approx 2 0 m 65 65 50 50 60 60 40 40 50 60 42 min 2 0 m approx 6 6 ft min 2 0 m approx 6 6 ft min 1 8 m approx 5 9 ft min 1 8 m approx 5 9 ft min 6 6 ft approx 2 0 m min 5 9 ft approx 1 8 m 50 50 60 60 40 40 50 42 30 30 min 1 8 m approx 5 9 ft min 1 8 m approx 5 9 ft min 2 0 m approx 6 6 ft min 2 0 m approx 6 6 ft ...

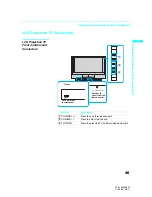
Page 25: ...ctors LCD Projection TV Front Controls and Connectors Button Description 1 CHANNEL Press to scan through channels 2 VOLUME Press to adjust the volume 3 TV VIDEO Press to select the TV or other video equipment OPEN OPEN IR Infrared Receiver CHANNEL VOLUME TV VIDEO To open Push up to open the front panel Receives IR signals from the remote control 1 2 3 ...

Page 26: ...g and Connecting the LCD Projection TV 26 KF 42 50WE620 2 108 981 13 1 LCD Projection TV Rear Side Connectors S VIDEO VIDEO VIDEO 2 INPUT L MONO AUDIO R Rear of LCD projection TV Front side of LCD projection TV ...

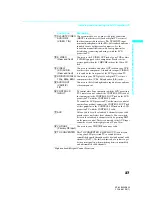
Page 27: ...er s or digital TV receiver s component video Y PB PR and audio L R jacks 5 AUDIO OUT VAR FIX L R Connects to the left and right audio inputs of your audio or video component 6 CONTROL S IN OUT To control other Sony equipment with the LCD projection TV s remote control connect the CONTROL S IN jack of the equipment to the CONTROL S OUT jack on the LCD projection TV with the CONTROL S cable To cont...

Page 28: ...o Right Red Component video cable Some DVD players are equipped with the following three video connectors Y Green PB CB Cb or B Y Blue PR CR Cr or R Y Red CONTROL S cable CONTROL S connections are exclusive to Sony products and allow greater control of all Sony equipment DVI D single link cable For a device such as a digital TV receiver Plug Type Screw on Type Push into connection Screw into conne...

Page 29: ...ble B VHF Only or UHF Only or VHF UHF C VHF and UHF For optimum picture quality a 75 ohm coaxial cable antenna connection is highly recommended Radio waves and other interference can easily affect a 300 ohm twin lead cable resulting in signal deterioration If you use a 300 ohm twin lead cable keep it as far away as possible from the LCD projection TV Do not use an indoor antenna they are especiall...

Page 30: ... TV when the signal is not scrambled Your LCD projection TV s tuner provides a better signal than the cable box Use the Twin View feature When all channels are routed through your cable box only one channel is sent to the LCD projection TV so you cannot use the Twin View feature from your cable box 1 Connect a coaxial cable from your cable service to the LCD projection TV s VHF UHF jack 2 Using a ...

Page 31: ...able box s OUT jack to the LCD projection TV s AUX jack Pressing ANT on the remote control switches between the channels coming in through the cable box scrambled and those coming directly to the LCD projection TV unscrambled Rear of LCD projection TV TO CONVERTER VHF UHF AUX Cable box OUT IN Signal 75 ohm coaxial cable not supplied CATV cable unscrambled channels ...

Page 32: ...e to the cable box s IN jack 2 Using a coaxial cable connect the cable box s OUT jack to the LCD projection TV s VHF UHF jack Also set Cable to On in the Channel menu see page 67 Setting the Channel Fix feature in the Channel menu see Selecting Channel Options on page 67 ensures that you do not accidentally switch the channels on your LCD projection TV Your Sony remote control can be programmed to...

Page 33: ...ial cable from your cable service to the VCR s IN jack 2 Using a coaxial cable connect the VCR s OUT jack to the LCD projection TV s VHF UHF jack 3 Using A V and S VIDEO cables connect the VCR s AUDIO and S VIDEO OUT jacks to the LCD projection TV s AUDIO VIDEO and S VIDEO IN jacks Coaxial cable Rear of LCD projection TV VIDEO yellow AUDIO L white AUDIO R red Coaxial cable VCR A V cable not suppli...

Page 34: ... only one signal is sent to the LCD projection TV so you cannot use the Twin View feature Disconnect all power sources before making any connections 1 Connect the coaxial cable from your cable service to the LCD projection TV s VHF UHF jack 2 Using a coaxial cable connect the LCD projection TV s TO CONVERTER jack to the cable box s IN jack The LCD projection TV s internal converter allows you to s...

Page 35: ...llow AUDIO L white AUDIO R red S VIDEO Coaxial cable Coaxial cable If your VCR is not equipped with S VIDEO use a VIDEO cable yellow instead of the S VIDEO cable You will not be able to change channels on the VCR Set your LCD projection TV and VCR to channel 2 6 depending on your cable box channel output Pressing ANT on the remote control switches between the channels coming in through the cable b...

Page 36: ...ion TV VCR playback VCR recording A V cable not supplied AUDIO R red AUDIO L white VIDEO yellow A V cable not supplied To perform tape editing set the LCD projection TV to the video input intended for playback by pressing TV VIDEO on the remote control You may need to change the video input on your VCR Consult your VCR s operating manual for instructions If your VCRs have S VIDEO jacks For best pi...

Page 37: ...ing A V and S VIDEO cables connect the satellite receiver s AUDIO VIDEO and S VIDEO OUT jacks to the LCD projection TV s AUDIO VIDEO and S VIDEO IN jacks 3 Connect a coaxial cable from your cable or antenna to the LCD projection TV s VHF UHF jack If your satellite receiver is not equipped with S VIDEO use a VIDEO cable yellow instead of the S VIDEO cable Coaxial cable Satellite receiver A V cable ...

Page 38: ...onnect the VCR s VHF UHF OUT jack to the LCD projection TV s VHF UHF jack 4 Using A V and S VIDEO cables connect the satellite receiver s AUDIO VIDEO and S VIDEO OUT jacks to the VCR s AUDIO VIDEO and S VIDEO IN jacks 5 Using A V and S VIDEO cables connect the VCR s AUDIO VIDEO and S VIDEO OUT jacks to the LCD projection TV s AUDIO VIDEO and S VIDEO IN jacks Coaxial cable Rear of LCD projection TV...

Page 39: ... sure your VCR s video input is set correctly Consult your VCR s operating manual for instructions Use TV VIDEO to select VIDEO 1 to watch satellite TV or the VCR your VCR must be turned on VHF UHF to watch cable TV If your VCR or satellite receiver is not equipped with S VIDEO use a VIDEO cable yellow instead of the S VIDEO cable ...

Page 40: ...dio receiver s audio LINE IN jacks Rear of LCD projection TV AUDIO R red AUDIO L white Line input RK C310 C320 C330 not supplied Audio receiver Connecting an Audio Receiver Disconnect all power sources before making any connections Using audio cables connect the LCD projection TV s AUDIO VIDEO OUT VAR FIX jacks to the audio receiver s audio LINE IN jacks Rear of LCD projection TV AUDIO R red AUDIO...

Page 41: ...V Use the HD DVD IN 5 or 6 inputs 2 Using audio cables connect the DVD player s AUDIO OUT jacks to the LCD projection TV s AUDIO IN jacks Be sure to use the same row of inputs that you used for the video connection HD DVD IN 5 or 6 The Y B Y and R Y jacks on your DVD player are sometimes labeled Y CB and CR or Y PB and PR If so connect the cables to like colors Rear of LCD projection TV DVD player...

Page 42: ...o the LCD projection TV s S VIDEO jack If your DVD player has video component output connectors for best picture quality use the connection described on page 41 Rear of LCD projection TV DVD player Audio cable not supplied AUDIO R red S VIDEO AUDIO L white To take advantage of the wide screen modes set the TV s aspect ratio to 16 9 on your DVD player For details refer to the operating instructions...

Page 43: ...jection TV s AUDIO VIDEO IN jacks HD DVD IN 5 or 6 The Y PB and PR jacks do not provide audio so audio cables must be connected to provide sound Component video connection is necessary to view 480i 480p 720p and 1080i formats For 480i signal you may also use the S VIDEO or composite video connections however component video Y PB PR will provide the best picture quality for all format types z Compo...

Page 44: ... VIDEO jack 2 Using an audio cable connect the digital TV receiver s AUDIO OUT jacks to the LCD projection TV s DVI HDTV AUDIO jacks The DVI HDTV VIDEO connector does not provide audio so audio cables must be connected to provide sound z VIDEO OUT 480i VIDEO OUT 1080i 720p 480p AUTHORIZED SERVICES ONLY RGB OUT DVI HDTV OUT TYPE 1 L1 L2 Y PB PR R1 AUDIO OUT S VIDEO OPTICAL OPTICAL AUDIO OUT R2 2 10...

Page 45: ... s rear AUDIO and VIDEO IN jacks Using A V and S VIDEO cables connect the camcorder s AUDIO VIDEO and S VIDEO OUT jacks to the LCD projection TV s AUDIO VIDEO and S VIDEO IN jacks If you have a mono camcorder connect its left audio output to the LCD projection TV s AUDIO L MONO jack If your camcorder is not equipped with S VIDEO use a VIDEO cable yellow instead of the S VIDEO cable S VIDEO VIDEO V...

Page 46: ... system and other Sony equipment with one remote control In addition to allowing you to control multiple devices with one remote control the CONTROL S feature allows you to always point your remote control at your LCD projection TV instead of having to point it at the other equipment which might be hidden or out of direct line of sight Rear of LCD projection TV ...

Page 47: ...ater by using the Auto Program feature in the Channel menu see page 67 Using Auto Setup 1 Press POWER on the front panel of your LCD projection TV or on the remote control to turn on the LCD projection TV 2 Press TV FUNCTION on the remote control until the TV indicator lights up 3 Press CHANNEL on your LCD projection TV to run Auto Setup or press CHANNEL to exit If you use the channel buttons on y...

Page 48: ......

Page 49: ...Zoom Normal Full and Zoom For details see Using Wide Screen Mode on page 58 PICTURE MODE Press repeatedly to step through the available video picture modes Vivid Standard and Pro Also available in the Video menu For details see Selecting Video Options on page 60 4 0 9 Press 0 9 to select a channel the channel changes after 2 seconds ENT Press to select channel immediately after entering numbers JU...

Page 50: ...er press SLEEP repeatedly until SLEEP OFF appears Pressing POWER also cancels the Sleep timer and turns off the power While the Sleep feature is set press once to view the remaining time qg SAT CABLE GREEN Press to turn on off the satellite or cable TV For instructions see Programming the Remote Control on page 77 qh POWER GREEN Press to turn on off the LCD projection TV If a video input indicatio...

Page 51: ... wf ANT Press to change between the VHF UHF input and the AUX input GUIDE Displays the program guide of your satellite receiver wg CH Press to scan one by one through channels To scan rapidly through the channels press and hold down CH or CH up or down wh Press to scroll an audio option TruSurround Simulated and Off wj MTS SAP Press to scroll through the Multi channel TV Sound MTS options Stereo A...

Page 52: ...ogram 1 Connect the digital TV receiver to HD DVD IN 5 or 6 DVI HDTV IN 7 on the LCD projection TV for details see page 44 2 Press TV VIDEO on the remote control to select VIDEO 5 or 6 VIDEO 7 3 Select a digital channel on the digital TV receiver For details see the Operating Manual of the digital TV receiver 4 Adjust the volume of the LCD projection TV as necessary Be sure to program the remote c...

Page 53: ... more channels to your favorites list repeat steps 4 5 To clear a Favorite Channel press V or v to highlight the channel you want to clear Press and then press RESET 7 Press MENU to exit the menu For details on using the Channel menu see page 67 Displaying a List of Favorite Channels 1 Press FAVORITES The Favorite Channel options appear 2 Press V or v to highlight the channel you want to watch The...

Page 54: ... tuned to a working channel 2 Press To cancel twin pictures Press again or press Activating the Picture Although two pictures appear on the screen at the same time only one picture is active Change the picture size by using the V or v button For an active picture you can Change channels Adjust the volume Switch the input sources from VHF UHF to cable by pressing ANT or TV VIDEO to switch the video...

Page 55: ... a cable box and other video equipment connected you can view the cable box output in one window and view a different source such as a VCR or DVD player in the second window by using the TV VIDEO button Sources connected to the AUX VIDEO 5 VIDEO 6 and VIDEO 7 inputs display in the left window but not the right If you are viewing a 4 3 source and a 16 9 enhanced source such as a DVD side by side th...

Page 56: ...left picture if not already activated 2 Press V to enlarge the picture and v to reduce the picture To enlarge the right picture reduce the left 1 Press b to activate the right picture if not already activated 2 Press V to enlarge the picture and v to reduce the picture When you adjust the twin screen sizes the LCD projection TV memorizes the change The next time you use the Twin View function the ...

Page 57: ...o use the Freeze function 1 When the program information you want to capture is displayed press FREEZE 2 The LCD projection TV switches to Twin View mode and displays the frozen picture on the right while the current program continues on the left 3 To cancel and return to normal viewing press FREEZE again Freeze feature is not available if you are already in Favorite Channel see page 53 or Twin Vi...

Page 58: ...16 9 screen keeping the original image as much as possible Normal returns the 4 3 picture to its original size Full stretches the 4 3 picture horizontally only to fill the 16 9 screen Zoom enlarges the 4 3 picture horizontally and vertically to an equal aspect ratio that fills the 16 9 screen Useful for watching Letterbox movies When you change channels or inputs the screen mode settings revert to...

Page 59: ... MENU JUMP TOP MENU FAVORITES SAT CABLE DVD VCR MUTING DVD VCR MODE SAT CABLE PICTURE WIDE Menu Icon Description Page Allows you to make adjustments to your picture settings It also allows you to customize the Picture Mode based on the type of program you are viewing 60 Offers enhanced audio options such as listening to second audio programming SAP or customizing the Effect of the sound on your LC...

Page 60: ...ption Mode Customized picture viewing Vivid Select for enhanced picture contrast and sharpness Standard Recommended for normal viewing conditions Pro Select to display a picture with minimum enhancements You can alter the Video menu settings Picture Brightness Color etc for each mode You may set up a Picture Mode Vivid Standard Pro independently for each Video input Video 1 Video 7 including the A...

Page 61: ...te colors a red tint NR Noise Reduction Select to reduce the noise level of connected equipment This also reduces the noise level from the VHF UHF jack signal Select from High Medium Low and Off Mild Mode On Select for a natural soft picture Off Select to turn off the Mild Mode Mild Mode is unavailable when the Picture Mode is set to Vivid Advanced Video Program DRC Mode Creates a high resolution ...

Page 62: ...you move the z higher along the Reality axis the picture becomes more detailed As you move the z to the right along the Clarity axis the picture becomes smoother 3 To save the setting press To return the Custom options to the default factory settings press the RESET button Advanced Video is unavailable when you have selected Mild Mode or you are watching 1080i 720p or 480p sources with Video 5 to ...

Page 63: ...iption Treble Adjust to increase or decrease higher pitched sounds Bass Adjust to increase or decrease lower pitched sounds Balance Adjust to emphasize left or right speaker balance Steady Sound Auto Select to stabilize the volume Off Select to turn off Steady Sound Effect TruSurround Select for surround sound for stereo programs only Simulated Adds a surround like effect to mono programs Off Norm...

Page 64: ...o Out Easy control of volume adjustments Variable The LCD projection TV s speakers are turned off but the volume output from your audio system can still be controlled by the LCD projection TV s remote control Fixed The LCD projection TV s speakers are turned off and the volume bass and treble output of the LCD projection TV is fixed Use your audio receiver s volume control to adjust the volume thr...

Page 65: ...g options To change from one Wide Mode to another use WIDE MODE on the remote control Option Description Wide Mode Select a screen mode to use for 4 3 sources Wide Zoom Select to enlarge the 4 3 picture to fill the 16 9 screen keeping the original image as much as possible Normal Select to return the 4 3 picture to normal mode Full Select to enlarge the 4 3 picture horizontally only to fill the wi...

Page 66: ...ns only when the LCD projection TV receives 480i and 480p signals If 4 3 Default is set to anything but Off the Wide Mode setting changes only for the current channel When you change channels or inputs Wide Mode is automatically replaced with the 4 3 Default setting To retain the current Wide Mode setting as channels and inputs are changed set 4 3 Default to Off Vertical Center Adjust Allows you t...

Page 67: ... details see Using Favorite Channels on page 53 Cable On Select if you are receiving cable channels with a CATV cable Off Select if you are using an antenna You should run Auto Program after changing the Cable setting Channel Fix Useful when you have a cable box or satellite receiver connected 2 6 Fix your TV s channel setting to 2 6 and use the cable box or satellite receiver to change channels S...

Page 68: ...n label up to 40 channels 1 Press the arrow buttons to highlight Channel Label and press 2 Press V or v to scroll through the channel numbers 1 125 Then press to select the channel number that you want to assign a label 3 Press the arrow buttons to highlight Label and press 4 Press V or v to scroll through the label characters A Z 0 9 etc Then press to select the highlighted character 5 Repeat to ...

Page 69: ...he Parent menu If you lose your password see Lost password on page 86 P a r e n t a l L o c k O f f C h a n g e P a s s w o r d S e l e c t C o u n t r y U S A P r e s s t o c h a n g e S e t t i n g s Option Description Parental Lock Turn ratings on off and select a rating system Off Turn Parental Lock off No programs are blocked from viewing Child Maximum ratings permitted are US TV Y TV G G Can...

Page 70: ...ns 3 Confirm the new password by entering it again 4 Press MENU to exit the menu screen Viewing Blocked Programs You can view a blocked program by entering the password 1 Press ENT when tuned to a blocked program 2 Enter your password using the 0 9 buttons Parental Control will be canceled temporarily until you turn your LCD projection TV off Option Description Change Password Select to change you...

Page 71: ...wed TV Rating Block programs by their rating content or both Age Based Options TV Y All children TV Y7 Directed to older children 7 and over TV G General audience TV PG Parental guidance suggested TV 14 Parents strongly cautioned for audience under 14 TV MA Mature audience only Content Based Options FV Fantasy violence D Suggestive dialogue L Strong language S Sexual situations V Violence Unrated ...

Page 72: ...TV PG V Violence rating may contain moderate violence while a TV 14 V Violence rating may contain more intense violence Option Description English Rating C All children C8 Children 8 years and older G General programming PG Parental guidance 14 Viewers 14 and older 18 Adult programming French Rating G General programming 8 ans Not recommended for young children under 8 13 ans Not recommended for a...

Page 73: ...e following options Option Description Caption Vision Allows you to select from three closed caption modes for programs that are broadcast with closed captioning Off Turns off Caption Vision CC1 CC2 CC3 CC4 Displays on screen text of the dialog or sound effects of a program Should be set to CC1 for most programs Text1 Text2 Text3 Text4 Displays network station information presented using either ha...

Page 74: ...d to a particular set of input jacks Video 1 2 3 4 VHS DVD Receiver Satellite Cable Box 8mm DTV Game LD Web Beta Skip Video 5 6 7 DVD Satellite Cable Box DTV HD Game Skip If you select Skip your LCD projection TV skips this connection when you press TV VIDEO If you select Receiver your LCD projection TV s input is fixed for Video 1 only Game Picture Adjust Allows you to move the position of the pi...

Page 75: ... one of the following options then press Program Select to set the Timer by day time duration and channel Off Select to turn off the Timer Your previous settings are saved 3 If you selected Program in step 2 press V and v to set the day s hour minute duration and channel number Press or press b to confirm each setting and move to the next setting Press B to go back to the previous setting 4 Press ...

Page 76: ...r LCD projection TV Before adjusting After adjusting Auto Factory setting Automatically corrects double images Level 1 4 manual Select 1 4 to move the ghost image to align the two High Altitude On Set to use the unit at an altitude of 1 500 m 4 921 ft or higher Off Set to use the unit at normal altitudes ...

Page 77: ...function button you want to program To program a cable box or a satellite receiver Press SAT CABLE FUNCTION To program video equipment Press DVD VCR FUNCTION 3 Enter the three digit manufacture s code number using the 0 9 buttons 4 Press ENT enter 5 To check if the code number works aim the TV s remote control at the equipment and press DVD VCR and or SAT CABLE POWER that corresponds with that equ...

Page 78: ...05 338 Instant Replay 309 308 JC Penney 309 305 304 330 314 336 337 JVC 314 336 337 345 346 347 Kenwood 314 336 332 337 LG 332 LXI SEARS 332 305 330 335 338 Magnavox 308 309 310 Marantz 314 336 337 Marta 332 Memorex 309 335 Minolta 305 304 Mitsubishi MGA 323 324 325 326 Multitech 325 338 321 NEC 314 336 337 Olympic 309 308 Optimus 327 Orion 317 Panasonic 308 309 306 307 Pentax 305 304 Philco 308 3...

Page 79: ...or your connected equipment Remote control operation tips are provided below Operating a Cable Box Operating a Satellite Receiver To Do This Press Turn on off SAT CABLE POWER Select cable box SAT CABLE FUNCTION Select a channel 0 9 ENT Change channels CH Back to previous channel JUMP To Do This Press Turn on off SAT CABLE POWER Select satellite receiver SAT CABLE FUNCTION Select a channel 0 9 ENT ...

Page 80: ...ack To Do This Press Turn on off DVD VCR POWER If you have a DVD changer to skip disks F1 Play N Stop x Pause X press again to resume normal playback Step through different tracks of the disc M to step forward or m to step backward Step through different chapters of a video disc CH to step forward or CH to step backward Display the DVD menu TOP MENU To Do This Press Turn on off DVD VCR POWER Selec...

Page 81: ...2 Record z and N simultaneously VCR Play N VCR Stop x VCR Fast forward M VCR Rewind the tape m VCR Pause X VCR Search the picture forward or backward M or m during playback release to resume normal playback VCR Display the DVD menu TOP MENU Play N DVD Stop x DVD Pause X DVD Step through different tracks of the disc M to step forward or m to step backward DVD Step through different chapters of a vi...

Page 82: ...is connected to the LCD projection TV s AUDIO VIDEO IN jacks such as a VCR or DVD player in the second window by pressing TV VIDEO while in Twin View Sources connected to the AUX HD DVD IN 5 and 6 DVI HDTV IN 7 inputs will display only in the left Twin View window There is no Twin View window or it is just static Be sure the Twin View window is set to a video input or channel that has a signal air...

Page 83: ... Remote control does not operate non Sony video equipment If you replaced the batteries to the remote recently the code numbers for the video equipment may need to be reset There may be more than one code for the equipment that you are attempting to operate There is a possibility that some non Sony equipment cannot be operated by your Sony TV remote You may need to use the equipment s original rem...

Page 84: ... The default setting is Auto If doubled images appear with Auto select the best value from 1 to 4 see page 76 Black box on screen You have selected a text option in the Setup menu and no text is available See page 73 to reset Setup selections To turn off this feature set the Caption Vision option to Off If you were trying to select closed captioning select CC1 instead of Text 1 4 Black bands appea...

Page 85: ...speakers If the Speaker option is set to Off and the Audio Out option is set to Fixed in order to output the sound to your audio system use your audio receiver to adjust the sound see page 63 Or to use the TV remote control set the Audio Out option to Variable To turn on the TV speakers set the Speaker option to On see page 64 Problem Possible Remedies Cannot receive upper channels UHF when using ...

Page 86: ... to temporarily unblock channels LED on the display unit is lit The POWER STANDBY indicator lights up when the TV is turned on If the LED blinks continuously this may indicate the TV needs service The TIMER indicates that the timer is set When the timer is set this LED will remain lit even when the LCD projection TV is turned off LCD projection TV is fixed to one channel Use Auto Program in the Ch...

Page 87: ...ource is ready to turn on The POWER STANDBY indicator flashes three times The lamp cover is not attached securely When corrected the POWER STANDBY indicator goes out and the LCD projection TV enters standby mode see page 18 The LAMP indicator flashes The lamp for the light source has burned out Replace it with a new one see page 15 If the LCD projection TV does not function properly after correcti...

Page 88: ...ntended for use with personal computers Video IN 4 1 Vp p 75 ohms unbalanced sync negative S Video IN 4 Y 1 Vp p 75 ohms unbalanced sync negative C 0 286 Vp p Burst signal 75 ohms Audio IN 7 500 mVrms 100 modulation Impedance 47 kilohms AUDIO OUT VAR FIX 1 500 mVrms at the maximum volume setting Variable 500 mVrms Fixed Impedance output 2 kilohms CONTROL S IN OUT 1 minijacks Component Video Input ...

Page 89: ...formation KF 42 50WE620 2 108 981 13 1 Design and specifications are subject to change without notice Optional Accessories TV Stand SU GW11 for KF 50WE620 KF 42WE620 SU GW1 for KF 50WE620 SU GW2 for KF 42WE620 Lamp XL 2100U XL 2100 ...

Page 90: ......

Page 91: ...annel list adding channels 68 Channel menu 59 67 Channel Skip Add 68 Channels Auto Program 67 creating labels 68 setting up 47 Clock Timers 75 Closed caption modes 73 Color temperature adjusting 61 Color adjusting 61 Connecting Audio receiver 40 Cable box 30 32 34 35 Cable or Antenna 29 Camcorder 45 Digital TV Receiver 43 DVD player 41 42 Satellite receiver 37 39 VCR 33 36 38 Connector Types 28 Co...

Page 92: ...ture size adjusting in Twin View 56 POWER button GREEN 50 POWER STANDBY 87 Presetting channels 53 Problems troubleshooting 82 86 R Ratings setting 71 viewing blocked programs 70 Remote control Function of buttons 49 inserting batteries 21 programming 77 78 Removing channels from the channel list 68 RESET button 50 Resetting Audio options 63 Video options 60 S S Video cable 28 Satellite receiver co...

Page 93: ...le box connecting 34 with cable connecting 33 with satellite receiver connecting 37 Vertical Center 66 Vertical Size 66 Video inputs labeling 74 Video menu 59 60 Video Modes selecting 60 Viewing area recommended 24 Viewing Blocked Programs 70 VOL button 50 W Wide Mode 65 WIDE MODE button 49 Z Zoom feature with Twin View 56 ...

Page 94: ......

Page 95: ... 2004 Sony Corporation KF 42WE620 KF 50WE620 LCD Projection TV HD Monitor Operating Instructions 2 108 981 13 1 LCD Projection TV KF 42WE620 KF 50WE620 Printed in U S A KF 42 50WE620 2 108 981 13 1 ...

Reviews: