background image

3

GB

GB

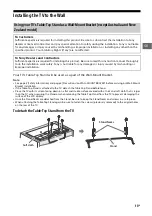
• Only qualified service personnel should carry out wall 

installations.

• For safety reasons, it is strongly recommended that you use 

Sony accessories, including:

Wall-Mount Bracket (Supplied) (except Australia and New 
Zealand)

Wall-Mount Bracket SU-WL450

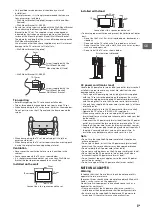
• Be sure to use the screws supplied with the Wall-Mount Bracket 

when attaching the Mounting Hooks (Stand)/Wall-Mount 
Bracket to the TV set. The supplied screws are designed as 
indicated by illustration when measured from the attaching 
surface of the Mounting Hooks (Stand)/Wall-Mount Bracket.
The diameter and length of the screws differ depending on the 
Wall-Mount Bracket model.
Use of screws other than those supplied may result in internal 
damage to the TV set or cause it to fall, etc.

Wall-Mount Bracket (Supplied)

Wall-Mount Bracket SU-WL450

Transporting

• Before transporting the TV set, disconnect all cables.
• Two or three people are needed to transport a large TV set.
• When transporting the TV set by hand, hold it as shown below. 

Do not put stress on the LCD panel and the frame around the 
screen.

• When transporting the TV set, do not subject it to jolts or 

excessive vibration.

• When transporting the TV set for repairs or when moving, pack 

it using the original carton and packing material.

Ventilation

• Never cover the ventilation holes or insert anything in the 

cabinet.

• Leave space around the TV set as shown below.
• It is strongly recommended that you use a Sony Wall-Mount 

Bracket in order to provide adequate air circulation.

Installed on the wall

Installed with stand

• To ensure proper ventilation and prevent the collection of dirt or 

dust:

Do not lay the TV set flat, install upside down, backwards, or 
sideways.

Do not place the TV set on a shelf, rug, bed or in a closet.

Do not cover the TV set with a cloth, such as curtains, or items 
such as newspapers, etc.

Do not install the TV set as shown below.

AC power cord (mains lead)

Handle the AC power cord (mains lead) and outlet (mains socket) 
as follows in order to avoid any risk of fire, electrical shock or 
damage and/or injuries:

The shape of AC power plug (mains plug), which is supplied 
with the TV set, varies depending on the regions. Be sure to 
connect the appropriate supplied AC power cord (mains lead) 
with the plug that fits into the AC power outlet (mains socket).

Use only Sony supplied AC power cords (mains lead), not those 
of other brands.

Insert the plug fully into the AC power outlet (mains socket).

Operate the TV set on a 100–240 V AC supply only.

When wiring cables, be sure to unplug the AC power cord 
(mains lead) for your safety and take care not to catch your feet 
on the cables.

Disconnect the AC power cord (mains lead) from the AC power 
outlet (mains socket) before working on or moving the TV set.

Keep the AC power cord (mains lead) away from heat sources.

Unplug the AC power plug (mains plug) and clean it regularly. If 
the plug is covered with dust and it picks up moisture, its 
insulation may deteriorate, which could result in a fire. 

Note

• Do not use the supplied AC power cord (mains lead) on any 

other equipment.

• Do not pinch, bend, or twist the AC power cord (mains lead) 

excessively. The core conductors may be exposed or broken.

• Do not modify the AC power cord (mains lead).
• Do not put anything heavy on the AC power cord (mains lead).
• Do not pull on the AC power cord (mains lead) itself when 

disconnecting the AC power cord (mains lead).

• Do not connect too many appliances to the same AC power 

outlet (mains socket).

• Do not use a poor fitting AC power outlet (mains socket).

NOTE ON AC ADAPTER

Warning

To reduce the risk of fire or electric shock, do not expose this 
apparatus to rain or moisture.
To prevent fire or shock hazard, do not place objects filled with 
liquids, such as vases, on the apparatus.
Do not install this equipment in a confined space, such as a 
bookshelf or similar unit.
• Please ensure that the AC power outlet (mains socket) is 

installed near the equipment and shall be easily accessible.

• Be sure to use the supplied AC adapter and AC power cord 

(mains lead). Otherwise it may cause a malfunction.

Screw (supplied with the 
Wall-Mount Bracket)

Mounting Hook (Stand)

5 mm

Screw (supplied with the 
Wall-Mount Bracket)

Wall-Mount Bracket

10-12 mm

30 cm

10 cm

10 cm

10 cm

Leave at least this space around the set.

30 cm

10 cm

10 cm

Leave at least this space around the set.

6 cm

Air circulation is blocked.

Wall

Wall

Summary of Contents for KDL-43W800D

Page 1: ...KDL 55W800C 50W800C 43W800C Television Reference Guide ...

Page 2: ...anges to certain features settings and functionalities of this TV e g TV Guide Picture Sound Eco setting can slightly change the power consumption Depending upon such changed settings e g Shop mode the power consumption may vary which possibly could exceed the stated energy rating To reset the TV to ENERGY RATING qualified settings complete the initial set up procedure in Auto Start up under the s...

Page 3: ...ug mains plug which is supplied with the TV set varies depending on the regions Be sure to connect the appropriate supplied AC power cord mains lead with the plug that fits into the AC power outlet mains socket Use only Sony supplied AC power cords mains lead not those of other brands Insert the plug fully into the AC power outlet mains socket Operate the TV set on a 100 240 V AC supply only When ...

Page 4: ...result Broken pieces Do not throw anything at the TV set The screen glass may break by the impact and cause serious injury If the surface of the TV set cracks do not touch it until you have unplugged the AC power cord mains lead Otherwise electric shock may result When not in use If you will not be using the TV set for several days the TV set should be disconnected from the AC power mains for envi...

Page 5: ...ts may appear or bright points of light red blue or green may appear constantly on the LCD screen This is a structural property of the LCD screen and is not a malfunction Do not push or scratch the front filter or place objects on top of this TV set The image may be uneven or the LCD screen may be damaged If this TV set is used in a cold place a smear may occur in the picture or the picture may be...

Page 6: ...der or the store where you made the purchase You may contact our company s toll free number in India for assistance Attention statement is subject matter of BEE and applicable if functions is available Home mode conditions are as per BEE guideline only Notice for customer in UAE This product complies with the India E waste Rule 2011 The E waste Rules 2011 is an Indian directive aimed at reducing t...

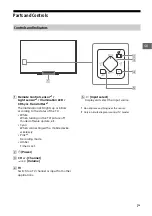
Page 7: ...ning on the TV picture off mode software update etc Cyan When connecting with a mobile device wirelessly Pink 2 Recording mode Amber Timer is set Power CH Channel Volume TV Switch to a TV channel or input from other applications Input select Display and select the input source 1 Do not place anything near the sensor 2 Only on limited region country TV model Controls and Indicators TV Ȫ ȫ Ȭ ȭ ...

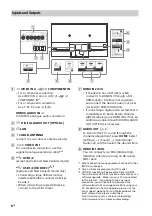
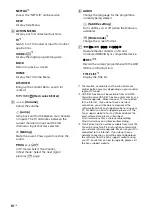
Page 8: ...ompatible with Audio Return Channel ARC technology use HDMI IN 4 If not an additional connection with DIGITAL AUDIO OUT OPTICAL is necessary AUDIO OUT To listen to the TV s sound through the connected equipment press HOME Select Settings Sound Headphone Audio out and then select the desired item HDMI IN 1 MHL You can connect your MHL Mobile High definition Link device using an HD quality MHL cable...

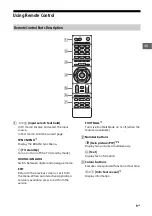
Page 9: ...ogue mode EXIT Return to the previous screen or exit from the menu When an Interactive Application service is available press to exit from the service FOOTBALL 1 Turn Live Football Mode on or off when the feature is available Number buttons Twin picture PIP 1 3 Display two pictures simultaneously Text Display text information Colour buttons Execute correspondent function at that time Info Text rev...

Page 10: ...le device REC 1 2 Record the current programme with the USB HDD recording function TITLE LIST 1 Display the Title list 1 The location availability and function of remote control button may vary depending on your country region TV model 2 HDD REC function will be available from mid 2015 You will receive HDD REC function automatically as a software upgrade Make sure your TV is connected to the Inter...

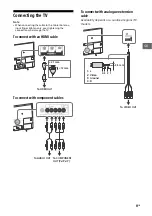
Page 11: ...ghtening the connection can damage the TV To connect with an HDMI cable To connect with component cables To connect with analogue extension cable Availability depends on countries regions TV models To HDMI OUT 21 mm 12 mm To AUDIO OUT To COMPONENT OUT PR PB Y To VIDEO OUT 3 5 mm 1 2 3 4 1 L 2 Video 3 Ground 4 R ...

Page 12: ...nna aerial cable Component cable HDMI cable Standard definition SD videos have picture signals with a vertical resolution of 480 NTSC or 576 PAL SECAM lines High definition HD videos have picture signals with a vertical resolution of 720 or 1 080 lines ...

Page 13: ...n be sure to fasten the screws previously removed to the original holes on the rear of the TV To detach the Table Top Stand from the TV Using your TV s Table Top Stand as a Wall Mount Bracket except Australia and New Zealand model To Customers Sufficient expertise is required for installing this product Be sure to subcontract the installation to Sony dealers or licensed contractors and pay special...

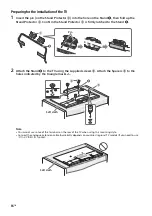
Page 14: ...upplied 2 Make sure that the wall has enough space for the TV and is capable of supporting a weight of at least four times that of the TV Refer to the following table on installing the TV to the wall See page 23 26 Specifications for the TV s weight A Paper Template B Wall Mount Base 1 C Stand Protector 2 D Screw PSW M8 12 2 E Spacers 2 Screen centre point ...

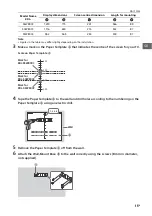
Page 15: ...using an electric drill 5 Remove the Paper Template A off from the wall 6 Attach the Wall Mount Base B to the wall correctly using the screws 8 mm in diameter not supplied Model Name KDL Display dimensions Screen centre dimension Length for mounting 55W800C 1 230 715 201 566 89 50W800C 1 116 654 215 552 87 43W800C 962 565 253 544 87 150 200 250 300 Scale on Paper Template A Mark for KDL 55W800C Ma...

Page 16: ...d to the Stand B 2 Attach the Stand B to the TV using the supplied screws D Attach the Spacers E to the holes indicated by the triangle marks f Note You cannot use some of the terminals on the rear of the TV when using this mounting style Connect the analogue extension cable Availability depends on countries regions TV models if you need to use VIDEO IN 1 socket ɹ C Pin E B D Soft cloth Soft cloth...

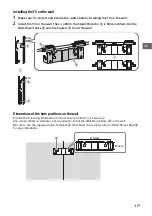
Page 17: ... Wall Mount Base B and the Spacers E touch the wall Dimensions of the hole positions on the wall Provide the following information to the licensed contractors if necessary Use screws 8 mm in diameter not supplied to install the Wall Mount Base B on the wall Be sure to use the supplied Paper Template A that shows the actual position of Wall Mount Base B for easy installation B C B B E Wall Wall 170...

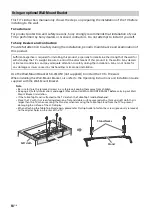
Page 18: ... on WALL MOUNT BRACKET before carrying out Wall Mount Bracket installation If the Table Top Stand is attached to the TV detach the Table Top Stand beforehand Place the TV with its screen facing down on a flat and stable surface covered with a thick and soft cloth that is larger than the TV when securing the Stand or when removing the Table Top Stand from the TV to prevent damaging the surface of t...

Page 19: ...e only a flat head screwdriver to install the Wall Mount Attachment Use of another tool might result in over torqueing the Wall Mount Attachment and damaging the TV 2 Make sure that the wall has enough space for the TV and is capable of supporting a weight of at least four times that of the TV Refer to the following table on installing the TV to the wall See page 23 26 Specifications for the TV s ...

Page 20: ...e place for future use Retain this manual for future reference Standard mounting Slim mounting Note You cannot use some of the terminals on the rear of the TV when using this mounting style Connect the analogue extension cable Availability depends on countries regions TV models if you need to use the VIDEO IN 1 socket Model Name KDL Display dimensions Screen centre dimension Length for mounting St...

Page 21: ...to 5 of Installation Guide and Installing the TV to the Wall of Operating Instructions supplied with the Wall Mount Bracket Refer to the instructions supplied with the Wall Mount Bracket for your model to install the TV on the wall Model Name KDL Hook location 55W800C 50W800C 43W800C a Screw PSW 6 x 20 Pulley Screw PSW 6 x 20 Belt Spacer 20mm Soft cloth a ...

Page 22: ...es red interval time is three seconds Disconnect the AC power cord mains lead and inform your dealer or Sony service centre When the illumination LED is not flashing check the items as follows You can also refer to Troubleshooting in the Help Guide or perform self diagnosis by selecting Help Self diagnostics If the problem persists have your TV serviced by qualified service personnel Troubles and ...

Page 23: ... country area selection Sound output 10 W 10 W Wireless technology Protocol IEEE802 11a b g n Bluetooth Version 4 1 Input Output jacks Antenna aerial cable 75 ohm external terminal for VHF UHF VIDEO IN 1 Video Audio input mini jack COMPONENT IN YPBPR Component Video 1080p 50 60 Hz 1080i 50 60 Hz 720p 50 60 Hz 576p 576i 480p 480i Audio input phono pin jack VIDEO IN 2 Video input common phono pin wi...

Page 24: ... Glasses TDG BT500A Operating temperature 0 ºC 40 ºC Power and others Power requirements 19 5 V DC with AC adapter Rating Input 100 V 240 V AC 50 60 Hz Energy Efficiency Class For Jordan and Mauritius Only KDL 55W800C A KDL 50W800C A KDL 43W800C A Screen size measured diagonally Approx KDL 55W800C 55 inches 138 8 cm KDL 50W800C 50 inches 125 7 cm KDL 43W800C 43 inches 108 0 cm Power Consumption Fo...

Page 25: ...DMI High Definition Multimedia Interface and the HDMI Logo are trademarks or registered trademarks of HDMI Licensing LLC in the United States and other countries Manufactured under license from Dolby Laboratories Dolby and the double D symbol are trademarks of Dolby Laboratories BRAVIA and are trademarks of Sony Corporation Gracenote Gracenote eyeQ Gracenote VideoID Gracenote Video Explore the Gra...

Page 26: ...26GB ...

Page 27: ......

Page 28: ... 2015 Sony Corporation Printed in Malaysia 4 562 036 13 1 Customer Support and Contact ...

Reviews: