background image

11

Setti

ng u

p

 yo

ur TV

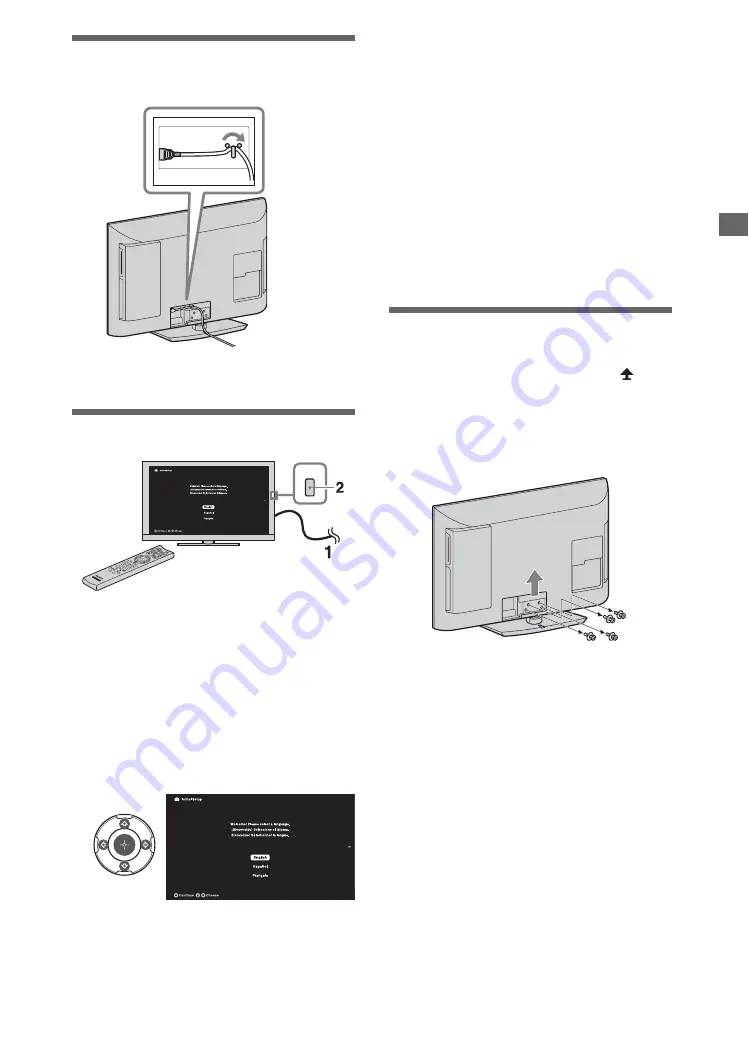
Organizing the AC power 
cord

Running initial setup

1

Complete your cable connections 
before proceeding with the 

Initial 

Setup

.

Connect the TV to your nearest power 
outlet.

2

Press 

POWER 

on the TV.

When you switch the TV on for the first 
time, the 

Language

 menu appears on 

the screen.

3

Follow the instructions on the screen.

~

Home

 mode sets the TV to settings optimized for 

home viewing (this setting is ENERGY STAR 
compliant).

4

Select 

Continue

 to scan for available 

channels and enable the 

TV Guide On 

Screen

®

 feature. If you receive channels 

from a cable box or satellite receiver 
and do not wish to use the TV’s built-in 
tuner, select 

Skip

Selecting 

Skip

 will disable the 

TV Guide 

On Screen

 feature, which is only 

available when the TV’s tuner is used.

~

If you skip the channel scan while in the setup 
menus, TV Guide will be disabled.

Detaching the Table-Top 
Stand from the TV

Remove only the screws marked with 

 on 

the TV.

~

Do not remove the Table-Top Stand for any 
reason other than to install corresponding 
accessories on the TV.

POWER

Summary of Contents for KDL-32EX40B - 32" Class Bravia Ex40b Series Hdtv

Page 1: ...nstructions Setting up your TV To watch TV Additional Information KDL 40EX40B 32EX40B Sony Customer Support U S A www sony com tvsupport Canada www sony ca support United States Canada 1 800 222 SONY 1 877 899 SONY Please Do Not Return the Product to the Store ...

Page 2: ...data in the TV Guide On Screen system BRAVIA and S Force Motionflow BRAVIA Sync and are trademarks or registered marks of Sony Corporation XrossMediaBar is a trademark of Sony Corporation XMB is a trademark of Sony Corporation and Sony Computer Entertainment Inc PlayStation is a registered trademark and PS3 is a trademark of Sony Computer Entertainment Inc DLNA the DLNA Logo and DLNA CERTIFIED are...

Page 3: ...LCD TV technology be sure to remove all accessory contents from the packaging before setting up your TV 2 Source To experience the stunning detail of your BRAVIA TV you need access to HD programming Upgrade your signal or content source to high definition HD by contacting your HD service provider Receive over the air HD broadcasts with an HD quality antenna connected directly to the back of your T...

Page 4: ... remote control Inserting batteries into the remote control Guidelines for Remote Control Point your remote control directly at the IR sensor located on your TV Make sure that no objects are blocking the path between the remote control and the IR sensor on your TV Fluorescent lamps can interfere with your remote control try turning off the fluorescent lamps If you are having problems with the remo...

Page 5: ...nd floor materials If the TV is brought directly from a cold to a warm location or is placed in a very damp room or is placed in a room in which heating has just been turned on moisture may condense on the surface or inside the TV Should this occur turn off the TV and leave the TV off until the moisture evaporates and then the TV can be used If a disc is inserted in the built in BD player eject an...

Page 6: ...definition HD and standard definition SD video formats supported by your BRAVIA TV inputs For supported PC formats refer to the i Manual Recommendation of the F type plug Projection of the inner wire from the connection part must be less than 1 5 mm 1 5 mm ...

Page 7: ...et Top Box with HDMI connection Shown with a Set Top Box with COMPONENT connection Cable System or VHF UHF Antenna System Set Top Box IN 1 ARC Set Top Box L R 1 L PR PB Y R 2 1 AUDIO VIDEO IN MONO CABLE ANTENNA Cable or Antenna Continued ...

Page 8: ...O HDMI OUT AC IN PB CB PR CR OPT IN SAT OPT IN VIDEO 1 COAX IN AUDIO IN DVD DVD IN SAT IN VIDEO 2 BD IN OUT AUDIO IN AUDIO IN FRONT R AM R L R L FRONT L SUR R SUR L CENTER SUBWOOFER Rear of TV BD Player Cable Antenna SAT Dish HD Cable Box or HD Satellite Receiver A V Receiver Signifies a BRAVIA Sync capable device Side Panel L R 1 L PR PB Y R L AUDIO PC HDMI 1 AUDIO IN R 2 1 AUDIO CABLE ANTENNA AU...

Page 9: ...wn with PC Connection with SD VCR DVD L R 1 L PR PB Y R L AUDIO PC HDMI 1 AUDIO IN R 2 1 AUDIO CABLE ANTENNA AUDIO VIDEO IN LAN PC IN IN RGB 1 ARC MONO Rear of TV Notebook PC PC DVD VCR Splitter Cable Antenna VCR DVD Combo or ...

Page 10: ...the angle brace to the wall stud Attach the other side to the Stand 2 Secure the TV to the Stand Use the optional hardware listed below not supplied M4 16 machine screw screwed into the TV s Table Top Stand A screw or similar attach it to the Stand Rope or chain strong enough to support the weight of the TV Make sure that there is no excess slack in the rope or chain An alternative way to secure t...

Page 11: ...RGY STAR compliant 4 Select Continue to scan for available channels and enable the TV Guide On Screen feature If you receive channels from a cable box or satellite receiver and do not wish to use the TV s built in tuner select Skip Selecting Skip will disable the TV Guide On Screen feature which is only available when the TV s tuner is used If you skip the channel scan while in the setup menus TV ...

Page 12: ...eight Do not install the TV in an inclined position It is designed to be operated in a vertical position only Eject and take out any disc from the built in BD player before installing the TV on a wall Be sure to use the screws supplied with the Wall mount bracket when attaching the mounting hooks to the TV set The supplied screws are designed so that they are 8 mm to 12 mm in length when measured ...

Page 13: ...tion can lead to overheating of the TV and may cause damage to your TV or cause a fire 30 cm 11 7 8 inches 6 cm inches 4 inches 10 cm 4 inches 10 cm 2 3 8 Leave at least this much space around the set Installed with stand inches 11 7 8 4 inches 10 cm 4 inches 10 cm 4 inches 10 cm 30 cm Installed on the wall Leave at least this much space around the set Never install the TV set as follows Air circu...

Page 14: ...e TV or on the remote control to turn on the TV 2 Select a TV channel To use the Guide Press GUIDE to display the TV Guide On Screen to view scheduled programs or to select a program to watch Press again to exit the Guide Use with 0 9 and ENT to select digital channels For example to enter 2 1 press and ENT GUIDE OPTIONS HOME 0 9 ENT 2 1 Settings Picture Display Adjust the picture and screen setti...

Page 15: ... Description x Troubleshooting You can find solutions for your problems x Index Images and illustrations may differ from what you are watching on this TV Your BRAVIA TV comes with an on screen manual To learn more about your TVs features you can access your i Manual with the touch of a button 1 Press i MANUAL 2 Press F f G g to navigate and select items 1 2 Welcome to i Manual BRAVIA TV Features W...

Page 16: ...e disc slot 1 Insert a disc into the slot with the playback side facing away from you 2 For a video disc playback starts automatically For a music or photo disc select from the Music or Photo category in the XMB and press If playback does not start automatically select from the Video category in the XMB and press ...

Page 17: ...wer and press POWER on the TV If the STANDBY indicator lights up in red press POWER on the remote control Tiny black dots and or bright dots appear on the screen The screen is composed of pixels Tiny black dots and or bright dots pixels on the screen do not indicate a malfunction General The TV turns off automatically the TV enters standby mode Check if the Sleep Timer Timer or Idle TV Standby is ...

Page 18: ...a cloth slightly moistened with a solution of mild soap and warm water If using a chemically pretreated cloth please follow the instruction provided on the package Never use strong solvents such as a thinner alcohol or benzine for cleaning Do not plug in the TV into the wall outlet until the moisture from cleaning has evaporated The TV should also be placed on a stable surface to prevent it from t...

Page 19: ... speed may differ depending on the network environment 10BASE T 100BASE TX communication rate and communication quality are not guaranteed for this TV 1 USB DLNA Refer to the i Manual for supported format EXT External memory slot For connecting the USB memory DC output 5 V 500 mA Max Power and others Power requirement 110 V 240 V AC 50 60 Hz U S A Canada 120 V AC 60 Hz Power consumption 176 W 128 ...

Page 20: ...bility of digital cable television programming in your area depends on the type of programming and signal provided by your cable service provider Compatible Wall Mount Bracket Information Use the following Sony Wall Mount Bracket with your TV model Use with other Wall Mount Brackets may cause instability and could result in property damages or injury To Customers Sufficient expertise is required f...

Page 21: ...laying side of a disc to remove surface scratches When ejecting a disc from the built in BD player by pressing Z on the TV be sure to take out the disc from the disc slot Do not leave the disc in the disc slot Eject and take out the disc from the disc slot and turn off the TV when not using the TV Do not expose the disc to direct sunlight or heat sources such as hot air ducts or leave it in a car ...

Page 22: ... When ejecting a disc the disc may hit objects and cause damage or injury Keep an open space around the disc slot Take out any discs from the built in BD player when you move the TV If you don t the disc may be damaged Eject and take out the disc before moving the TV Do not pull out the AC power cord while the built in BD player is playing Be sure small children do not put hands into the disc slot...

Page 23: ......

Page 24: ...on Software Updates Your TV is capable of receiving software updates For the latest information about software updates for your TV visit United States Canada http www sony com tvsupport http www sony ca support NOTE If your TV is connected to the Internet you can check for software updates by selecting Settings Product Support and then Automatic Software Update Printed in U S A ...

Reviews: