background image

22

EN

Advanced Features

Making calls with one-touch dialing

1

Pick up the handset, or press 

(SPEAKERPHONE)

.

When you want to select the phone number stored in the
second memory of the one-touch dial button, press

(LOWER)

.

2

Press the desired one-touch dial button.

The phone number stored in the one-touch dial button will
be dialed.

To check the phone number before one-touch dialing

When not making a call, press the desired one-touch dial button. Each
time the button is pressed, the display shows the name, the phone
number, and then the display goes off successively.

To check the phone number stored in the second memory of the one-
touch dial button, first press 

(LOWER)

 and then press the one-touch

dial button.

The number stored in the button appears on the display for 20 seconds.

To dial the number, pick up the handset or press 

(SPEAKERPHONE)

while the number is displayed.

Note

When there is no name stored to a one-touch dial button, “NO NAME” appears
on the display. The display shows “NO DATA” when there is neither a phone
number nor a name stored.

One-touch dialing (continued)

Summary of Contents for IT-M602 - Telephone With Speaker Phone

Page 1: ...Operating Instructions Manual de instrucciones IT M602 1998 by Sony Corporation 3 864 042 12 1 2 Line ID Telephone ES EN ...

Page 2: ...ked by placing the product on the bed sofa rug or other similar surface This product should never be placed near or over a radiator or heat register This product should not be placed in a built in installation unless proper ventilation is provided 7 This product should be operated only from the type of power source indicated on the marking label If you are not sure of the type of power supply to y...

Page 3: ...one line Excessive RENs on the telephone line may result in the devices not ringing in response to an incoming call In most but not all areas the sum of the RENs should not exceed five 5 0 To be certain of the number of devices that may be connected to a line as determined by the total RENs contact the local telephone company 5 If your equipment IT M602 causes harm to the telephone network the tel...

Page 4: ...d used in accordance with the instructions may cause harmful interference to radio communications However there is no guarantee that interference will not occur in a particular installation If this equipment does cause harmful interference to radio or television reception which can be determined by turning the equipment off and on the user is encouraged to try to correct the interference by one or...

Page 5: ... Receiving a call while talking Caller ID Features 25 Understanding the Caller ID service 25 When you receive a call 26 Looking at the Caller ID list 26 Viewing the Caller ID list 27 Saving the phone numbers in the Caller ID list 28 Erasing data from the Caller ID list 29 Using the Caller ID list 29 Calling back a number from the Caller ID list 30 Storing a number of the Caller ID list into one to...

Page 6: ...ne Phone AC power adaptor AC T69 Getting Started Checking the package contents Make sure you have received the following items in the package If anything is missing contact your local Sony dealer Handset Screws 4 Telephone line cords 3 Handset cord ...

Page 7: ... from heat sources such as radiators airducts and sunlight away from excessive moisture extremely low temperatures dust mechanical vibration or shock Connect the phone If you want to hang the phone on the wall mount the phone first see page 34 To connect the handset Connect one end of the handset cord to the handset and the other end to the HANDSET jack on the phone Step 2 continued ...

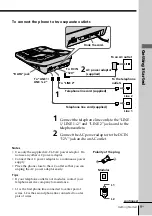
Page 8: ...ecttheACpoweradaptortotheDCIN 12V jackandtoanACoutlet Step 2 Setting up the phone continued To DC IN 12V AC power adaptor supplied Telephone line cord supplied To the telephone outlet To an AC outlet 2 1 To LINE 1 LINE 1 2 Hook the cord To connect the phone to a single outlet having two lines DATA jack ...

Page 9: ...utlet so that you can unplug the AC power adaptor easily Tips If your telephone outlet is not modular contact your telephone service company for assistance L1 is the first phone line connected to center pair of wires L2 is the second phone line connected to outer pair of wires To connect the phone to two separate outlets To an AC outlet Line 2 To the telephone outlets Line 1 continued Polarity of ...

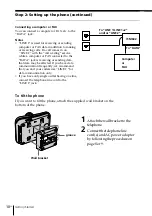
Page 10: ...ed If you have data communication frequently we recommend that you and your callers use LINE 2 for data communication only If you have only single outlet having one line connect the telephone line cord to the LINE 2 jack To tilt the phone If you want to tilt the phone attach the supplied wall bracket on the bottom of the phone 1 Attachthewallbrackettothe telephone 2 Connectthetelephoneline cord s ...

Page 11: ...ng mode tone or pulse Depending on your dialing system set the DIAL MODE switch as follows If you aren t sure of your dialing system Make a trial call with the DIAL MODE switch set to T If the call connects leave the switch as is otherwise set to P If your dialing system is Set the switch to Tone T Pulse P DIAL MODE switch ...

Page 12: ... calls from the Caller ID list When you connect the AC power adaptor to an AC outlet for the first time or if the area code is erased the following display appears When AREA CODE is displayed enteryourthree digitsareacodeusingthe dialingkeys Youwillhearaconfirmation beep To check the area code PressJogButton The area code appears on the display for 20 seconds To change the area code 1 Press PROGRA...

Page 13: ...2 The corresponding LINE 1 or LINE 2 button lights up 2 Dial the phone number The phone number dialed appears on the display 3 When you re done talking replace the handset in the cradle or press SPEAKERPHONE The LINE 1 or LINE 2 button goes off Basics TONE HOLD HANDSET VOLUME switch SPEAKERPHONE LINE 1 Making calls continued LINE 2 RINGER LEVEL LINE 1 switch RINGER LEVEL LINE 2 switch MUTING REDIA...

Page 14: ... automatically connected When neither line is in use line 1 is connected To Do this Adjust the handset volume During phone conversation set the HANDSET VOLUME switch You can select from three level positions Adjust the speaker volume Slide the SPEAKER VOLUME control Adjust the ringer volume You can adjust the ringer level of line 1 and 2 respectively Set the RINGER LEVEL LINE 1 or LINE 2 switch to...

Page 15: ...Press LINE 1 or LINE 2 to select the line if necessary The corresponding line button lights up 2 Press REDIAL to redial the last number dialed The last number dialed appears on the display and is automatically redialed Notes The last number dialed cannot be stored separately for each line It is the very last one you have dialed using either line If the last number dialed exceeds 32 digits or if it...

Page 16: ...ts or if it is erased the number cannot be redialed Making another call while talking Example Making a call on line 2 while talking on line 1 1 Press HOLD while talking The line 1 is put on hold and the LINE 1 button flashes slowly 2 Press LINE 2 3 Dial a phone number for the second party Now you can talk to the second party on line 2 To put on hold line 2 and resume the conversation on line 1 pre...

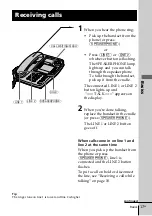
Page 17: ...LK appears on the display 2 When you re done talking replace the handset in the cradle or press SPEAKERPHONE The LINE 1 or LINE 2 button goes off When calls come in on line 1 and line 2 at the same time When you pick up the handset from the phone or press SPEAKERPHONE line 1 is connected and the LINE 2 button flashes To put a call on hold or disconnect the line see Receiving a call while talking o...

Page 18: ...l on line 2 while talking on line 1 1 Press HOLD Line 1 is put on hold and the LINE 1 button flashes slowly 2 Press LINE 2 Now you can talk to the other caller on line 2 To put line 2 on hold and resume the conversation on line 1 press HOLD and then LINE 1 To disconnect line 2 and resume the conversation on line 1 press LINE 1 Note If you do not press HOLD in step 1 line 1 will be disconnected To ...

Page 19: ...LOWER When you store the phone number in the first memory of a one touch dial button make sure that the LOWER button is not lit Whenyoustorethephone numberinthesecondmemory ofaone touchdialbutton press LOWER so that the LOWER buttonlightsup 3 Pressoneoftheone touchdial button 4 EnterthenameusingJogDial Youcanenterupto15 characters TurnJogDialuntilthedesired characterappearsandpressJog Button Enter...

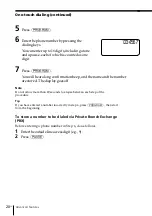
Page 20: ...ndthenumber arestored Thedisplaygoesoff Note Do not allow more than 20 seconds to elapse between each step of the procedure Tip If you have entered a number incorrectly in step 6 press PROGRAM then start from the beginning To store a number to be dialed via Private Branch Exchange PBX Before entering a phone number in Step 6 do as follows 1 Entertheoutsidelineaccessdigit e g 9 2 Press PAUSE One to...

Page 21: ...acter tobechangedflashes 3 TurnJogDialuntilthedesiredcharacterappears andpressJogButton Repeatsteps2and3tochangethename Ifyou wanttochangeonlythenumber skipthesesteps 4 Press PROGRAM Thephonenumberappears 5 Enterthenewphonenumberasdescribed previouslybypressingthedialingkeys Ifyoudon twanttochangethenumber skipthis step 6 Press PROGRAM Youwillhearalongconfirmationbeepandthe nameand orthenumberisch...

Page 22: ... the button is pressed the display shows the name the phone number and then the display goes off successively To check the phone number stored in the second memory of the one touch dial button first press LOWER and then press the one touch dial button The number stored in the button appears on the display for 20 seconds To dial the number pick up the handset or press SPEAKERPHONE while the number ...

Page 23: ...e 2 Three way conference 1 Press HOLD whiletalkingon oneline Thelineinuseisputonhold 2 Press LINE 1 or LINE 2 whicheverisnotused 3 Dialaphonenumberforthe secondparty 4 Press CONF conference after you reconnectedtothesecond party The CONF lamp lights up Now youcantalktobothparties Note If you do not press HOLD in step 1 the first line will be disconnected Having a conference call continued ...

Page 24: ...o disconnect the lines during a three way conference To disconnect both lines at the same time replace the handset in the cradle If you talk through the speakerphone press SPEAKERPHONE To disconnect line 1 and continue talking on line 2 only Press LINE 2 To disconnect line 2 and continue talking on line 1 only Press LINE 1 To put the lines on hold during a three way conference Press HOLD Both line...

Page 25: ...dacall Whenyouanswerthecall theCallerIDdisplaychangestothe TALK display Notes Thecaller sphonenumberand ornamewillnotappearinthefollowing cases OUTOFAREA whenthecallismadethroughatelephonecompany whichdoesnotofferCallerIDservice includinginternationalcalls PRIVATE whenthecallis blocked Forprivacyreasons manystates allowcallerstheoptiontopreventhisorhertelephonedatafrombeing displayedontheotherpart...

Page 26: ...ghtto displayolderdataortotheleft todisplaynewerdata Notes NEW data will not be changed to OLD data unless all NEW data is viewed at one time If only some NEW data is viewed that data will not be counted as OLD data if there is NEW data that has not yet been viewed When you have checked all data by turning Jog Dial to the left TOP OF LIST appears When you have checked all data by turning Jog Dial ...

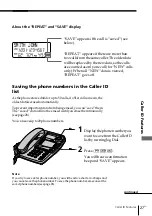
Page 27: ...t Asthephonestoresdataforupto50calls ifa51stcallcomesin the oldestdataiserasedautomatically Topreventimportantdatafrombeingerased youcan save them The saved datawillnotbeeraseduntilyouerasethemmanually seepage28 Youcansaveupto20phonenumbers 1 Displaythephonenumberyou wanttosavefromtheCallerID listbyturningJogDial 2 Press PROGRAM Youwillhearaconfirmation beepand SAVE appears Note Ifyoutrytosavea21s...

Page 28: ... To erase the entire list at once 1 Makesurethatnodataor END OF LIST is displayed 2 Press ERASE Youwillhearaconfirmation beepandtheentirelistiserased Notes Ifyouintendtoerasetheentirelistwithanynewcallsremaining youwill hearfiveshorterrorbeepsandyoucannoterasethelist The saved numbers seepage27 arenoterasedevenifyouerasetheentire list Toerasethe saved numbersintheCallerIDlist followtheprocedure in...

Page 29: ...er ID list 1 Displaythephonenumberyou wanttocallbyturningJogDial 2 Confirmthenumberandpress JogButton Thephoneautomaticallydials thedisplayednumber Notes Ifthenumberdisplayedinstep1isnottheoneyoushouldcallback youcan changethenumberofdigitsofthephonenumberasdescribedonpage31 IfthephoneisconnectedtoaPrivateBranchExchange PBX youmaynot beabletocallbackfromtheCallerIDlistbecauseanoutsidelineaccessdig...

Page 30: ...ess PROGRAM Youwillhearaconfirmation beepandthephonestoresthe number Notes Donotallowmorethan20secondstoelapsebetweeneachstepofthe procedure Ifthenumberdisplayedinstep1isnottheoneyoushouldstore youcan changethenumberofdigitsofthephonenumberasdescribedonpage31 IfthephoneisconnectedtoaPrivateBranchExchange PBX youmayneed toaddanoutsidelineaccessdigit Using the Caller ID list continued SMITH JOHN PRE...

Page 31: ... appears on the display Each time you press the number of digits changes as follows When the area code does not match When the area code matches 2 Continue the operation to call or store the phone number with the correct number of digits pages 29 and 30 Notes Youneedtoadjustthenumberofdigitseachtimeyoucallbackfromthe CallerIDlistasthechangestotheCallerIDdataisnotstoredinmemory Youmaynotbeabletocha...

Page 32: ...o Caller ID with call waiting as a single service Thisisanewservicethatcombinesthetwoservices Even though you now have a Caller ID with call waiting compatible phone unless you subscribe to the combined Caller ID with call waiting service you will not be able to see the name and number of the second caller When a new call comes in while you are talking CALL WAITING appearsonthedisplayandthenthecal...

Page 33: ...ingtoberetrieved If you have messages MESSAGE WAITING will appear onthedisplay Thisdisplaywillbeclearedwhenyou retrieveyourmessages Note Youcannotusethisfeature ifyouhavenotsubscribedtoyourtelephone company smessageservice Fordetailsontheavailabilityofthisservice pleaseaskyourtelephone company To erase MESSAGE WAITING on the display If MESSAGE WAITING remains on the display press ERASE Display ERA...

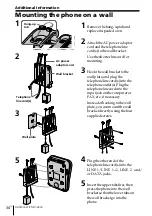
Page 34: ...utlet s Plugthe telephonelinecordintothe inputjackonthecomputeror FAX etc ifnecessary Insteadofhookingtothewall plate youcanmountthewall bracketdirectlyusingthefour suppliedscrews 4 Plugtheotherendofthe telephonelinecord s intothe LINE 1 LINE 1 2 LINE 2 and or DATA jacks 5 Inserttheuppertabsfirst then pressthephoneintothewall bracketsothatthelowertabson thewallbracketgointothe phone Wall bracket T...

Page 35: ... Notes Youcannotoperatethephoneotherthanformakingorreceivingcalls Sincethespeakerphonedoesnotfunctionduringapowerfailure youshould usethehandsetwhenmakingorreceivingcalls Thereisnoeffectonthememoryandareacode Setting the LINE SELECT AT POWER FAILURE switch Youcannotswitchline1and2duringpowerfailure sosettheLINE SELECT AT POWER FAILURE switch to L line 1 or L line 2 to set theactiveline Onlythesele...

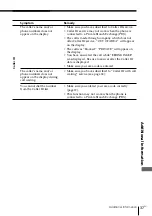
Page 36: ...to dial Make sure your area code is entered Make sure the number you last dialed including the tone and pause digits if used does not exceed 32 digits The number you last dialed is erased Use the SPEAKER VOLUME control on the phone to increase the speaker volume Set the RINGER LEVEL switches to H or L page 14 Make sure you follow the procedure for storing the number correctly page 19 Make sure the...

Page 37: ...cted to a Private Branch Exchange PBX The call is made through company which does not offer Caller ID service OUT OF AREA will appear on the display The call was blocked PRIVATE will appear on the display You have answered the call while RINGING was displayed Be sure to answer after the Caller ID data is displayed Make sure your area code is entered Make sure you have subscribed to Caller ID with ...

Page 38: ...m AC power adaptor Dial signal Tone 10 PPS pulse selectable Dimensions Approx 7 1 4 x 2 5 8 x 9 1 4 inches w h d approx 183 x 65 x 233 mm Mass Approx 1 lb 14 oz approx 850 g Supplied accessories See page 6 Design and specifications are subject to change without notice ...

Page 39: ...o tone dialing temporarily 14 H I J K L Hold 14 16 18 M N Making calls 13 Mounting the phone on a wall 34 O One touch dialing 19 OUT OF AREA 25 P Q Package contents 6 Power failure 35 PRIVATE 25 Pulse dialing 11 R Receiving calls 17 Redialing 15 REPEAT 27 S SAVE 27 Saving Caller ID data 27 Setting up dialing mode 11 phone 7 Speakerphone performance 15 Specifications 38 Storing Caller ID data into ...

Page 40: ...de ventilación y evite dejarlo sobre la cama sofá sillón o superficie similar Este producto nunca debe colocarse cerca de un radiador o calefacción o encima de éste Este producto no debe colocarse en una instalación empotrada salvo que se provea ventilación apropiada 7 Este producto sólo debe operarse desde el tipo de fuente de alimentación indicada en la etiqueta de especificaciones Si no está se...

Page 41: ...arte 68 de la FCC Con este equipo se suministran un cable y una clavija modular que cumplen con las normas de la FCC 4 El REN se utiliza para determinar la cantidad de dispositivos que podrán conectarse a la línea telefónica El exceso de REN conectados a la línea telefónica puede resultar en que los dispositivos no contesten a llamadas entrantes En la mayoría de las zonas no en todas la suma de RE...

Page 42: ...ón razonable contra interferencia dañina en una instalación residencial Este equipo genera utiliza y puede radiar energía de radiofrecuencia y si no se instala y se usa de acuerdo con las instrucciones puede ocasionar interferencia dañina en las radiocomunicaciones Sin embargo no hay garantía de que no ocurra interferencia en una instalación específica En caso de que este equipo ocasione interfere...

Page 43: ...nte 25 Descripción del servicio de identificación de demandante 25 Cuando reciba una llamada 26 Lista de identificación de demandantes 26 Vista de la lista de identificación de demandantes 27 Almacenamiento de números de teléfono en la lista de identificación de demandantes 28 Borrado de datos de la lista de identificación de demandantes 29 Utilización de la lista de identificación de demandantes ...

Page 44: ... alimentación de CA AC T69 Preparativos Microteléfono Tornillos 4 Cables de línea telefónica 3 Cable del microteléfono Paso 1 Comprobación del contenido del paquete Compruebe si con el paquete ha recibido los ítemes siguientes Si falta alguno póngase en contacto con su proveedor Sony ...

Page 45: ...da alejada de fuentes térmicas tales como radiadores conductos de ventilación y la luz solar alejada de humedad excesiva temperaturas extremadamente bajas polvo vibraciones y golpes Conexión del teléfono Si desea colgar el teléfono en una pared monte primero el teléfono consulte la página 34 Para conectar el microteléfono Conecte un extremo del cable del microteléfono en éste y el otro en la toma ...

Page 46: ...toma DC IN 12V y a un tomacorriente de CA Paso 2 Instalación del teléfono continuación A DC IN 12V Adaptador de alimentación de CA suministrado Cable de línea telefónica suministrado A la toma telefónica A un tomacorriente de CA 2 1 A LINE 2 LINE 1 2 Enganche el cable Para conectar el teléfono a una sola toma que posea dos líneas Toma DATA ...

Page 47: ...rriente de CA a fin de poder desenchufar fácilmente el adaptador de alimentación de CA Sugerencias Si la toma telefónica no es modular póngase en contacto con la compañía telefónica para solicitar ayuda L1 es la primera línea telefónica conectada al par central de conductores L2 es la segunda línea telefónica conectada al par exterior de conductores Para conectar el teléfono a dos tomas separadas ...

Page 48: ...ón de datos le recomendamos que usted y los demandantes utilicen LINE 2 solamente para la comunicación de datos Si usted solamente posee una toma con una sola línea conecte el cable de línea telefónica a la toma LINE 2 Para inclinar el teléfono Si desea inclinar el teléfono fíjele el soporte para instalación mural suministrado en la parte superior de su base 1 Fijeelsoporteparainstalación muralene...

Page 49: ...os Dependiendo de su sistema de marcación ajuste el selector DIAL MODE de la forma siguiente Si no está seguro de su sistema de marcación Realice una llamada de prueba con el selector DIAL MODE en T Si la llamada se conecta deje así el selector En caso contrario póngalo en P Si su sistema de marcación es Ponga el selector en Por tonos T Por pulsos P Selector DIAL MODE ...

Page 50: ...ficación de demandantes Cuando conecte el adaptador de alimentación de CA por primera vez a un tomacorriente de CA o si se borra el código de área aparecerá la visualización siguiente Cuandosevisualice AREA CODE introduzcasucódigodeáreade tresdígitosutilizandolasteclas demarcación Ustedoiráunpitidode confirmación Para comprobar el código de área Presioneelmandodelanzadera El código de área aparece...

Page 51: ...sione LINE 1 o LINE 2 Se encenderá la tecla LINE 1 o LINE 2 correspondiente 2 Marque el número de teléfono El número de teléfono marcado aparecerá en el visualizador 3 Cuando termine de hablar cuelgue el microteléfono o presione SPEAKERPHONE La tecla LINE 1 o LINE 2 se apagará Operaciones básicas TONE HOLD Selector HANDSET VOLUME SPEAKERPHONE LINE 1 Realización de llamadas LINE 2 Selector RINGER L...

Page 52: ...les Realización de llamadas continuación Notas Cuando esté utilizando otra conexión conectada a LINE 1 o LINE 2 la tecla LINE1 o LINE 2 parpadeará Si entra otra llamada por la otra línea la tecla correspondiente parpadeará pero el teléfono no sonará consulte la página 18 Sugerencias Usted podrá cambiar a interfono durante la conversación presionando SPEAKERPHONE En este caso podrá colgar el microt...

Page 53: ...esione LINE 1 o LINE 2 para seleccionar la línea si es necesario La tecla de la línea correspondiente se encenderá 2 Presione REDIAL para volver a llamar al último número marcado El último número marcado aparecerá en el visualizador y se volverá a marcar automáticamente Notas El último número marcado no podrá almacenarse por separado para cada línea El número será el último marcado utilizando cual...

Page 54: ...cación Realización de otra llamada durante la conversación Ejemplo Para realizar una llamada a través de la línea 2 durante la conversación a través de la línea 1 1 Presione HOLD mientras esté conversando La línea 1 pasará a retención y la tecla LINE 1 parpadeará lentamente 2 Presione LINE 2 3 Marque el número de teléfono de su segundo interlocutor De esta forma podrá conversar con el segundo inte...

Page 55: ...isualizador aparecerá TALK 2 Cuando termine de hablar cuelgue el microteléfono o presione SPEAKERPHONE La tecla LINE 1 o LINE 2 se apagará Cuando lleguen llamadas a ambas líneas 1 y 2 Cuando descuelgue el microteléfono o presione SPEAKERPHONE se conectará la línea 1 y la tecla LINE 2 parpadeará Para poner una llamada en retención o desconectar la línea consulte Recepción de una llamada durante la ...

Page 56: ...1 o LINE 2 Recepción de una llamada durante la conversación Si llega otra llamada mientras esté hablando a través de una línea parpadeará la tecla de la línea correspondiente Ejemplo Para recibir una llamada a través de la línea 2 durante la conversación a través de la línea 1 1 Presione HOLD La línea 1 pasará a retención y la tecla LINE 1 parpadeará lentamente 2 Presione LINE 2 De esta forma podr...

Page 57: ... memoria de una tecla de marcación abreviada cerciórese de que la tecla LOWER no esté encendida Cuando almacene número en la segunda memoria de una tecla de marcación abreviada presione LOWER de forma que se encienda la tecla LOWER 3 Presione una de las teclas de marcación abreviada 4 Introduzca el nombre utilizando el mando de lanzadera Usted podrá introducir hasta 15 caracteres Gire el mando de ...

Page 58: ...e y el número se almacenarán Nota No deje que transcurran más de 20 segundos entre cada paso del procedimiento Sugerencia Si ha introducido un número incorrectamente en el paso 6 presione PROGRAM y comience de nuevo desde el principio Para almacenar un número marcado a través de una centralita privada PBX Antes de introducir el número de teléfono en el paso 6 realice lo siguiente 1 Introduzca el d...

Page 59: ...iar 3 Gire el mando de lanzadera hasta que aparezca el carácter deseado y presione el botón de lanzadera Repita los pasos 2 y 3 para cambiar el nombre Si desea cambiar solamente el número salte estos pasos 4 Presione PROGRAM Aparecerá el número de teléfono 5 Introduzca el nuevo número de teléfono como se ha descrito anteriormente presionando las teclas de marcación Si no desea cambiar el número sa...

Page 60: ...a vez que presione la tecla el visualizador mostrará el nombre el número de teléfono y después la visualización desaparecerá sucesivamente Para comprobar el número de teléfono almacenado segunda memoria de una tecla de marcación abreviada presione en primer lugar LOWER y después presione la tecla de marcación abreviada El número almacenado en la tecla aparecerá en el visualizador durante 20 segund...

Page 61: ... mientras esté conversando a través de una línea La línea se pondrá en retención 2 Presione LINE 1 o LINE 2 de acuerdo con la línea que no esté utilizando 3 Marque el número de teléfono del segundo interlocutor 4 Presione CONF conferencia después de haberse conectado al segundo interlocutor La lámpara CONF se encenderá Ahora podrá conversar con ambos interlocutores Nota Si no presiona HOLD en el p...

Page 62: ... desconectar las líneas durante una conferencia tripartita Para desconectar ambas líneas al mismo tiempo cuelgue el microteléfono Si está conversando a través del interfono presione SPEAKERPHONE Para desconectar la línea 1 y continuar conversando a través de la línea 2 solamente Presione LINE 2 Para desconectar la línea 2 y continuar conversando a través de la línea 1 solamente Presione LINE 1 Par...

Page 63: ... ID de llamada la fecha y hora se ajustan de forma automática al recibir una llamada Cuando conteste a la llamada la visualización de identificación de demandante cambiará a TALK Notas Elnúmerodeteléfonoy oelnombredeldemandantenoapareceránenloscasossiguientes OUTOFAREA cuandolallamadaserealiceatravésdeunacompañíatelefónicaqueno ofrezcaelserviciodeidentificacióndedemandante incluyendollamadasintern...

Page 64: ...lamadamás recienteaparecerándurante20 segundos 2 Gireelmandodelanzadera hacialaderechaparhacerque sevisualicenlosdatosmás antiguosohacialaizquierda parahacerquesevisualicenlos másrecientes Notas Losdatos NEW nopodráncambiarsea OLD amenosquesehayanvisto todoslosdatos NEW Sisolamentesevenalgunosdatos NEW tales datosnosecontaráncomo OLD sihaydatos NEW quenosehayanvisto todavía Cuandohayacomprobadotod...

Page 65: ...éfono almacena datos para 50 llamadas cuando llegue la 51 a los datos más antiguos se borrarán automáticamente Para evitar que se borren datos importantes usted podrá guardarlos Los datos guardados no se borrarán mientras usted no los borre manualmente consulte la página 28 Usted podrá guardar hasta 20 números de teléfono 1 Hagaquesevisualiceelnúmero deteléfonoquedeseeguardar delalistadeidentifica...

Page 66: ...ciónylosdatosse borrarán Para borrar toda la lista a la vez 1 Cercióresedeque noaparecen datos ni END OF LIST 2 Presione ERASE Ustedoiráunpitidode confirmaciónyseborrarátoda lalista Notas Siintentaborrartodalalistaconnuevasllamadasrestantes oirácincopitidos cortosdeerrorynopodráborrarlalista Losnúmeros guardados consultelapáginas27 noseborraránincluso aunqueborretodalalista Paraborrarnúmeros guard...

Page 67: ...ación de un número desde la lista de identificación de demandantes 1 Hagaquesevisualiceelnúmero deteléfonoquedeseemarcar girandoelmandodelanzadera 2 Confirmeelnúmeroypresione elbotóndelanzadera Elteléfonomarcará automáticamenteelnúmero visualizado Notas Sielnúmerodedígitosdelnúmerodeteléfonovisualizadoenelpaso1noes elquetienequemarcar podrácambiarlocomosedescribeenlapágina31 Sielteléfonoestáconect...

Page 68: ...de confirmaciónyelteléfono almacenaráelnúmereo Notas Nodejequetranscurranmásde20segundosentrecadapasodel procedimiento Sielnúmerodedígitosdelnúmerodeteléfonovisualizadoenelpaso1noes elquetienequemarcar podrácambiarlocomosedescribeenlapágina31 Sielteléfonoestáconectadoaunacentralitaprivada PBX esposiblequeno puedallamardesdelalistadeidentificacióndedemandantesporquees necesarioundígitodeaccesoalalí...

Page 69: ... teléfono con el número correcto de dígitos Cada vez que presione el número de dígitos cambiará de la forma siguiente Cuando el código de área no coincida Cuando el código de parea coincida 2 Continúe la operación para marcar o almacenar el número de teléfono con el número correcto de dígitos páginas 29 y 30 Notas Ustedtendráqueajustarelnúmerodedígitoscadavezquemarquedesdelalistade identificaciónd...

Page 70: ... y de Llamada en espera por separado tendrá que suscribirse al servicio de Identificación de demandante con llamada en espera por separado Éste es un nuevo servicio que combina los dos Aunque actualmente posea un teléfono compatible con el servicio de Identificación de demandante con llamada en espera a menos que se abone a dicho servicio no podrá ver el nombre ni el número del demandante Cuando l...

Page 71: ... ser escuchados Si tiene mensajes En el visualizador aparecerá MESSAGE WAITING Esta visualización desaparecerá cuando escuche sus mensajes Nota Ustednopodráutilizarestafunciónsinosehasuscritoaesteserviciode mensajesdesucompañíatelefónica Conrespectoalosdetallessobreladisponibilidaddeesteservicio consulteasu compañíatelefónica Para borrar el mensaje MESSAGE WAITING del visualizador Mientras en el v...

Page 72: ...ma de entrada de su PC o facsímil etc si es necesario En vez de enganchar el teléfono en la placa mural podrá montar directamente el soporte para instalación mural directamente utilizando los tornillos suministrados 4 Enchufe el otro extremo del de los cable s en las tomas LINE 1 LINE 1 2 LINE 2 y o DATA 5 Inserte en primer las lengüetas superiores y después presione el teléfono contra el soporte ...

Page 73: ...epararealizarorecibirllamadas Comoelmododeinterfononofuncionaráduranteuncortedelsuministro eléctrico tendráqueutilizarelmicroteléfonopararealizaryrecibirllamadas Lamemoriadelcódigodeáreanoseveráafectada Ajuste del selector LINE SELECT AT POWER FAILURE Durante un corte del suministro eléctrico no podrá cambiar entre las líneas 1 y 2 Por lo tanto ponga el selector LINE SELECT AT POWER FAILURE en L l...

Page 74: ...i los utilizó Compruebe si ha introducido su código de área Ha presionado una tecla de marcación en la que no hay número de teléfono almacenado Almacene correctamente el número página 19 Realización recepción de llamadas Marcación abreviada Solución de problemas Si experimenta cualquiera de los problemas siguientes cuando utilice su teléfono use esta guía como ayuda para solucionarlo Si el problem...

Page 75: ...a llamada se realizó a través de una compañía que no ofrece el servicio de identificación de demandante En el visualizador aparecerá OUT OF AREA La llamada fue bloqueada En el visualizador aparecerá PRIVATE Ha contestado a la llamada mientras estaba visualizándose RINGING Cerciórese de contestar después de que se hayan visualizado los datos de identificación de demandante Cerciórese de haber intro...

Page 76: ...e CA Señal de marcación Tonos y 10 PPS pulsos por segundo seleccionable Dimensiones Aprox 7 1 4 x 2 5 8 x 9 1 4 pulgadas an al prf aprox 183 x 65 x 233 mm Masa Aprox 1 lb 14 oz aprox 850 g Accesorios suministrados Consulte la página 6 El diseño y las especificaciones están sujetos a cambio sin previo aviso ...

Page 77: ...identificación de demandantes 27 almacenamiento en teclas de marcación abreviada 30 fecha y hora 25 lista de identificación de demandantes 26 llamada desde la lista 29 Identificación de demandante con llamada en espera 32 M N Marcación abreviada 19 Marcación por pulsos 11 Modo de marcación cambio temporal a la marcación por tonos 14 elección 11 Montaje del teléfono en una pared 34 O OUT OF AREA 25...

Page 78: ......

Page 79: ...Para clientes en EE UU Guarde el recibo y únalo a su tarjeta de GARANTÍA para el caso de tener que llevar su equipo a reparar a un centro de reparaciones autorizado por Sony ...

Page 80: ...Sony Corporation Printed in China For the customers in the USA Be sure to save the receipt and attach it to your WARRANTY card when having your equipment repaired at an authorized Sony service station ...

Reviews: