


127
Exporting Recorded Images
Chap
ter
5
Oper
at
ion and
C
ont
ro
l
3
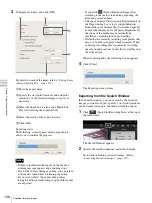
Click to select the recorded images you want to export
in the list of search results.
4
Switch to the timeline view, specify the start point
(mark in) and end point (mark out), and then perform
the export.
1
Click
(Timeline) to switch to the timeline
view.
2
Specify the start point (mark in) and end point
(mark out) on the timeline.
Click
(Mark In) or
(Mark Out) to set the
current playback position as the start point or end
point.
The mark in or mark out position can also be moved
by dragging and dropping.
3
Click
(Export Recording Data).
The Export dialog box appears. The subsequent
procedure is the same as Step 3 of
Setting Items of Export Dialog Box
This dialog box is displayed by clicking
(Export
Recorded Image) on the main screen
.
After configuring each item, click [OK].
Export Name
Enter the export name.
Mark In
Enter a start point for the recorded images to be exported.
You can also set a start point on the timeline of the Search
window. If a mark in is set on the timeline of the Search
window, that value is displayed automatically. You can
adjust the value manually, as necessary.
Mark Out
Enter an end point for the recorded images to be exported.
You can also set an end point on the timeline of the Search
window. If a mark out is set on the timeline of the Search
window, that value is displayed automatically. You can
adjust the value manually, as necessary.
Current Playback Date and Time
This displays the date and time that the image currently
displayed in the monitor frame was recorded.
Export Media File Player
Select the check box to also export Media File Player for
viewing the exported files.
Capacity Requirement
This displays the space required for exporting the specified
recorded images.
Location
Select the media of the export location.
Available Capacity
This displays the free space of the output location.
OK
This starts exporting.
3
1
2
Summary of Contents for Ipela NSR-1050H
Page 138: ......