background image

32

Operating the Cooking
Timer (Countdown Timer)

The timer can be set at one minute intervals
between 1–120.

1

Turn 

TIMER

 until the desired time

appears in the Clock Display Window.

 “TIMER” will appear in the Clock Display
Window when TIMER is turned. After
setting the time, the current time is
displayed again if you do not perform any
operation for more than 65 seconds.

2

Push 

TIMER

 once.

Timer indicator lights and beep sounds.
While the timer is set, the Clock Display
Window shows the remaining time.

To display the current time, press 

CLOCK

.

Cooking Timer ON—

When the time has elapsed, the buzzer will
sound and the TIMER indicator flashes.

Cooking Timer OFF—

The buzzer is turned off automatically after 60
minutes and the Clock Display Window shows
current time.

To Stop Cooking Timer

Press 

TIMER

 to turn off the buzzer.

To Deactivate Cooking Timer

Press 

TIMER

. The TIMER indicator goes off

and the current time appears in the Clock
Display Window.

Note
If a power failure occurs while the Cooking timer is
operating, the remaining time becomes invalid.

Other Useful
Functions

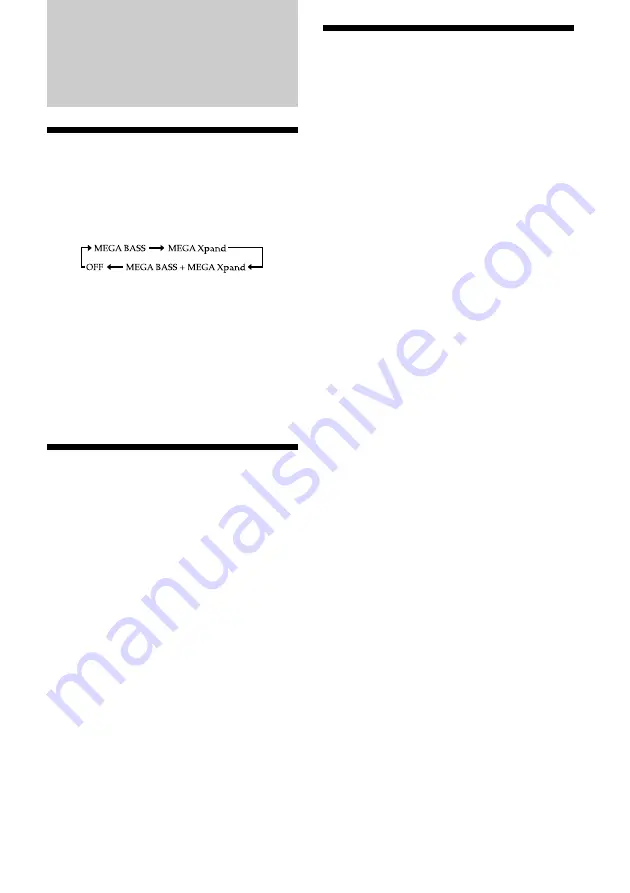
Selecting the audio
emphasis

Press 

SOUND

 repeatedly to select the desired

sound mode.
Each press changes the sound mode as follows:

To obtain vast sound

The “MEGA Xpand” system produces a
extensive sound.

To obtain powerful bass sound

The “MEGA BASS” system produces a
powerful bass sound.

Note
“MEGA Xpand” is not effective in monaural.

To attenuate the volume

Press 

MUTING

 on the remote control.

While attenuating, “VOL 0” flashes on the
Clock Display Window. To return to the
previous volume level, press 

MUTING

 again.

Summary of Contents for ICF-DVD57TV - Dvd Tv Clock Radio

Page 1: ...93 845 21 1 Operating Instructions Owner s Record The model number and the serial number are located on the top Record the serial number in the space provided below Refer to them whenever you call upon your Sony dealer regarding this product Model No ICF DVD57TV Serial No LCD TV DVD Kitchen Clock Radio ...

Page 2: ...ined by turning the equipment off and on the user is encouraged to try to correct the interference by one or more of the following measures Reorient or relocate the receiving antenna Increase the separation between the equipment and receiver Connect the equipment into an outlet on a circuit different from that to which the receiver is connected Consult the dealer or an experienced radio TV technic...

Page 3: ...tton 21 Changing angles 22 Using the PBC playback control function 22 Changing the audio 23 Changing the audio output 23 Changing Setup Setting for the DVD player GENERAL SETUP 25 Settings for digital audio output AUDIO SETUP 26 Language settings for DVD playback LANGUAGE SETUP 27 Settings for Parental Control PARENTAL SETUP 28 Setting the password PASSWORD 28 Selecting the Parental Control mode o...

Page 4: ...duct incorporates copyright protection technology that is protected by method claims of certain U S patents other intellectual property rights owned by Macrovision Corporation and other rights owners Use of this copyright protection technology must be authorized by Macrovision Corporation and is intended for home and other limited viewing uses only unless otherwise authorized by Macrovision Corpor...

Page 5: ...it mainly by using the controls on the supplied remote control DVD may be used as a general term for DVD VIDEOs DVD Rs DVD Rs and DVD RWs DVD RWs The icons below are used in this manual Icon Meaning The function is available for DVD VIDEOs DVD Rs DVD RWs in video mode or for DVD RWs in VR Video Recording mode DVD Rs DVD RWs in VR Video Recording mode The function is available for Video CDs or CD R...

Page 6: ...this system depending upon the recording quality or physical condition of the disc or the characteristics of the recording device Furthermore the disc will not play if it has not been correctly finalized For more information see the operating instructions for the recording device A disc recorded in packet write format cannot be played DVD region code this unit can play This unit has a region code ...

Page 7: ...ing CATV or an Antenna Connecting directly to cable or an antenna On AUDIO VIDEO INPUT connectors You can connect a VCR etc to the AUDIO VIDEO INPUT connectors for playback on the device Note When connecting another device to the unit be sure to connect the unit to the power source after all other connections are completed ...

Page 8: ...et the L mark to the dot which becomes the lowest position then you can adjust the height in 4 steps H L by turning the spacer counterclockwise Template L Low Dot Before Installation The unit should be installed in an area with good reception Improving the Reception FM The AC power cord functions as an FM antenna Extend the AC power cord fully to improve FM reception AM When installing the unit ro...

Page 9: ...ise for example refrigerator microwave oven fluorescent lamp etc Mounting screw Setting the Clock 1 Plug in the unit AM 12 00 will flash in the Clock Display Window 2 Press CLOCK for a few seconds You will hear a beep and the hour digits will start to flash in the Clock Display Window 3 Press RADIO TUNE TIME SET m fast reverse or M fast forward until the correct hour appears in the Clock Display W...

Page 10: ...peakers left right qd Z OPEN CLOSE button 17 qf AUX button 29 To watch the AUDIO VIDEO INPUT Location of controls qg TV button 12 13 To turn on the TV qh DVD button 17 To turn on the player qj RADIO ON BAND button 15 16 To turn on the radio qk OFF button 13 15 17 To turn off the AUX TV DVD Radio unit ql x Stop button 18 19 w u Play Pause button 17 19 wa TV CH PRESET Previous Next button 13 16 18 2...

Page 11: ...on 32 To attenuate the volume qf TV button 12 13 To turn on the TV qg OFF button 13 15 17 To turn off the AUX TV DVD Radio unit qh RADIO BAND button 15 16 To turn on the radio qj DVD button 17 To turn on the unit qk TV MENU button 12 30 To change the screen settings ql u Play Pause button 17 19 w x Stop button 18 19 wa AUDIO button 23 To change the audio output audio language ws ANGLE button 22 To...

Page 12: ...hannels The Initial Setup screen appears when you turn your TV on for the first time Using Initial Setup To run Initial Setup the first time you turn on your TV 1 Press TV to turn on the TV The Initial Setup screen appears 2 Press TV CH PRESET Next TUNE CH button to perform Auto Program or press TV CH PRESET Previous TUNE CH to exit If you select Auto Program CABLE or ANTENNA appears on the displa...

Page 13: ...E and STANDARD modes are also available Press MODE SCREEN SIZE repeatedly The current mode is displayed on the screen first Each time the button is pressed the screen mode switches in the following sequence FULL To show an image with an aspect ratio of 16 9 ZOOM ZOOM To show an image with an aspect ratio of 4 3 enlarged to the left and right edges of the screen with the overflowing parts top and b...

Page 14: ...25 cable TV channels For details on CATV subscription consult your nearest CATV company Note You cannot receive or set the CATV channels and UHF channels at the same time To display the channel number Press DISP Display on the remote control The current channel number appears in the display Press DISP Display once to turn display off ...

Page 15: ...ed Press RADIO ON BAND RADIO BAND lightly The Clock Display Window shows the band and frequency for a few seconds and then changes back to the current time To turn off the Radio Press OFF Switching between monaural and stereo The radio is set for stereo reception at the default setting If FM stereo reception is poor set to FM MONO monaural Noise will be reduced although the sound will not be heard...

Page 16: ...ENTER When you press ENTER the selected preset number lights up in the Clock Display Window Example Clock Display Window shows as below when you preset FM 90 0 MHz in preset number 2 RADIO To preset another station repeat these steps To change the preset station preset a new station The previous station will be canceled Tuning in a Preset Station 1 Press RADIO ON BAND RADIO BAND to turn on the rad...

Page 17: ...s automatically If playback does not start automatically press u Play Pause to start playback CD The total play time appears Press u Play Pause to start playback 5 Press VOLUME VOL or to adjust the volume To turn off the power Press OFF Notes Read the operating instructions supplied with the disc to play with this unit Depending on the recording method used on the disc it may take a minute or more...

Page 18: ... speed t 1 8 normal speed t 1 16 normal speed t normal playback speed 1 If the resume playback function is activated you can resume playback later by pressing u For details see Resume playback page 19 2 X is displayed on the screen 3 DVD Video CD No sound is output during fast forward or fast reverse Searching a chapter title track directly Use the remote control To select the desired chapter trac...

Page 19: ...RESS B TO CONTINUE disappears on the screen at this time The resume function will be deactivated when the disc is ejected Playing repeatedly Repeat Playback You can play all of the chapters or titles on a disc or a single track repeatedly REPEAT Press REPEAT during playback Each time you press the button repeat playback mode changes as follows DVD CHAPTER repeats the current chapter TITLE repeats ...

Page 20: ...play repeatedly to select DISPLAY OFF Displaying elapsed time You can display the elapsed time and the remaining time of DVDs Video CDs and Audio CDs DISP During playback press DISP Display The elapsed time or the remaining time is displayed at the upper left Each time you press DISP Display the display changes as follows DVD TITLE ELAPSED Elapsed time of the title TITLE REMAIN Remaining time of t...

Page 21: ...n use the original menu such as Title menu and DVD menu In title menu you can play your favorite scene or song by selecting titles of songs and scenes You can select an item subtitle language audio language etc by selecting a DVD menu The contents of title menus and DVD menus differ depending on the DVD There may be some DVDs which have no recorded menus ENTER v V b B MENU TOP MENU Using the TOP M...

Page 22: ...Return to display the PBC menu Changing angles Some DVDs have multiple alternative angles recorded for certain scenes If you have set ANGLE MARK to ON page 25 a notice appears at the scene ANGLE 1 During playback of a DVD having multiple alternative angles recorded press ANGLE when a notice appears The number of the currently selected angle is displayed at the upper right 2 Press ANGLE repeatedly ...

Page 23: ...switch the audio language only if multiple audio languages are recorded on the DVD You can also change the audio languages by using the DVD menu page 21 or the LANGUAGE SETUP menu page 27 You can change to a specific audio language using the LANGUAGE SETUP menu only if the language is included in both the disc and the menu In some discs the initial language to be output is specified regardless of ...

Page 24: ...g for parental control ENTER v V b B SETUP Refer to Changing the screen setting page 30 for settings of the monitor 1 Press SETUP G E N E R A L S E T U P A N G L E M A R K R E S E T S E L E C T E N T E R Q U I T S E T U P 2 Press b or B button to select the desired item General Setup Audio Setup Language Setup Parental Setup 3 Press ENTER 4 Press v or V button to select the desired setting 5 Press...

Page 25: ... ON a notice appears at the scene This setting is available while the playback is stopped and the resume function is canceled ON A notice will appear at the scene OFF A notice will not appear at the scene RESET You can reset Setup Menus to the factory setting 1 Press SETUP then press b or B button repeatedly until GENERAL SETUP appears on the screen 2 Press ENTER 3 Press v or V button repeatedly t...

Page 26: ... the DRC level from 9 steps including OFF This setting affects the outputs of OPTICAL OUTPUT MAX Makes the low sounds clear even if you turn the volume down OFF Set to enjoy the dynamic sound Settings for digital audio output AUDIO SETUP A U D I O S E T U P D O W N M I X D I G I T A L O U T P U T D R C S E L E C T E N T E R Q U I T S E T U P DOWNMIX You can select the downmix mode from Surround or...

Page 27: ...G S E B T I T L E E N G A U D I O S E L E C T E N T E R Q U I T S E T U P O R I G I N A L The following settings are available while playback is stopped and the resume function is canceled OSD Switches the language used for the menus on the screen Default ENGLISH MENU You can select the desired language for the disc s menu Default ENGLISH Note Regardless of your setting the language other than you...

Page 28: ...number buttons to enter a new password 7 Press the number buttons to enter the password again to confirm 8 Press ENTER 9 Press SETUP to exit the Setup Menu Notes If you forget your registered password enter 5370 If you enter the wrong password in OLD PASSWORD you cannot enter a new one in NEW PASSWORD Selecting the Parental Control mode on and off PARENTAL CONTROL When the PARENTAL COTROL mode is ...

Page 29: ...TUP appears on the screen 2 Press ENTER 3 Press v or V button repeatedly to select Level then press ENTER 4 Press v or V button repeatedly to select the limitation level then press ENTER 5 Enter the password and press ENTER Only when the PARENTAL CONTROL is set to ON 6 Press SETUP to exit the Setup Menu Refer to the following table Parental levels of the table are on the MPAA Motion Picture Associ...

Page 30: ... setting Press TV CH PRESET Previous or Next TUNE CH or to select YES Press ENTER to enter the setting CABLE Press TV CH PRESET Previous or Next TUNE CH or to select one of the following options ON Select if you are receiving cable channels with a CATV cable OFF Select if you are using a TV antenna Press ENTER to enter the setting MTS Press TV CH PRESET Previous or Next TUNE CH or to select one of...

Page 31: ...or Next TUNE CH or to select one of the following options HIGH Select when the sound of playing the DVD is small NORMAL Select when the sound of playing the DVD is normal Press ENTER to enter the setting To exit the screen setting mode Press TV MENU ...

Page 32: ...ically after 60 minutes and the Clock Display Window shows current time To Stop Cooking Timer Press TIMER to turn off the buzzer To Deactivate Cooking Timer Press TIMER The TIMER indicator goes off and the current time appears in the Clock Display Window Note If a power failure occurs while the Cooking timer is operating the remaining time becomes invalid Other Useful Functions Selecting the audio...

Page 33: ...void leaving them in parked cars or on dashboards rear trays Do not attach labels or use discs with sticky ink residue Such discs may stop spinning when used causing a malfunction or may ruin the disc Do not use any discs with labels or stickers attached The following malfunctions may result from using such discs Inability to eject a disc due to a label or sticker peeling off and jamming the eject...

Page 34: ...nies Please be aware that among those discs there are some that do not conform to the CD standard and may not be playable by this product Attention Regarding DualDisc Software A DualDisc is a two sided disc product which mates DVD recorded material on one side with digital audio material on the other side However since the audio material side does not conform to the Compact Disc CD standard playba...

Page 35: ...Less than 1 000 µW This output is the value measured at a distance of about 200 mm from the objective lens surface on the optical pick up block with 7 mm aperture Frequency response CD 20 20 000 Hz 1 1 dB DVD Video 20 22 000 Hz 1 1 dB Wow and flutter Below measurable limit Output OPTICAL OUTPUT Radio section Frequency range FM 87 5 108 MHz AM 530 1 710 kHz General Time display 12 hour system Speak...

Page 36: ...es Adjust the antenna Double images or ghosts Check your outdoor antenna or call your cable service Cannot receive higher number channels UHF when using an antenna Make sure Cable is set to OFF in the TV MENU Perform Auto Program to add channels that are not presently in the memory Cable stations don t seem to work Make sure Cable is set to ON in the TV MENU The clock does not show the correct tim...

Page 37: ... the remote control while receiving AM band Sporadic loss of sound in operation Dusty or defective disc t Clean or replace the disc Volume too high t Reduce the volume The remote control does not function Batteries could be weak Replace them Make sure the batteries have been inserted correctly into the remote control Make sure that you are pointing the remote control at the remote sensor on the un...

Page 38: ...378 Indonesian 7876 Dutch 8482 Turkish 6679 Tibetan 7383 Icelandic 7879 Norwegian 8484 Tatar 6682 Breton 7384 Italian 7982 Oriya 8487 Twi 6765 Catalan 7387 Hebrew 8065 Punjabi 8575 Ukrainian 6779 Corsican 7465 Japanese 8076 Polish 8582 Urdu 6783 Czech 7473 Yiddish 8083 Pushto Pashto 8590 Uzbek 6789 Welsh 7487 Javanese 8084 Portuguese 8673 Vietnamese 6865 Danish 7565 Georgian 8185 Quechua 8679 Vola...

Page 39: ...39 ...

Page 40: ... blade wider than the other or with a three wire grounding type plug a plug having a third pin for grounding Follow the instructions below For the appliance with a polarized AC power cord plug This plug will fit into the power outlet only one way This is a safety feature If you are unable to insert the plug fully into the outlet try reversing the plug If the plug should still fail to fit contact y...

Page 41: ...en exposed to rain or water The appliance does not appear to operate normally or exhibits a marked change in performance This indicates a need for service If the appliance does not operate normally when following the operating instructions adjust only those controls that are specified in the operating instructions Improper adjustment of other controls may result in damage and will often require ex...

Page 42: ...42 ...

Page 43: ...43 ...

Page 44: ...Sony Corporation Printed in China Printed on 100 recycled paper using VOC Volatile Organic Compound free vegetable oil based ink ...

Reviews: