background image

15

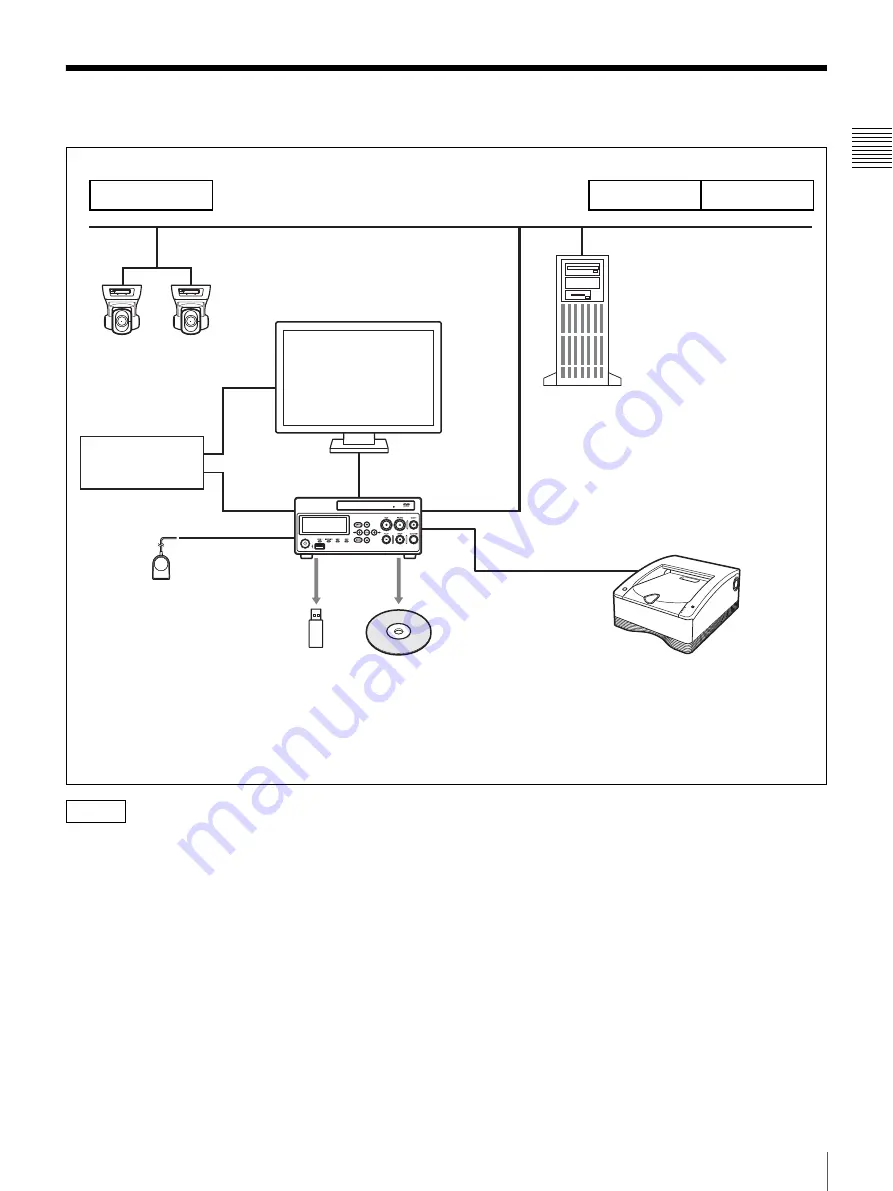
System Configuration Example

  Chapt

er 1  Ov

erv

ie

w

System Configuration Example

The FS-24 has an Ingress Protection rating of IPx3. 
Therefore, do not operate it environments exposed to 
splashing liquids (e.g., surgical operating rooms). For 
safety, use a device with a rating of IPx6 or higher when 
operating in such environments.

Operating room

HVO-500MD/550MD

Endoscopic device

FS-24

Foot switch

Simultaneously record data to one of two 
external storage media and the server.
(Recording to DVD is only available on 
the HVO-550MD.)

Hospital network

Doctor’s office

ICU

File server

IP cameras in 
operating room

Printer

Caution

Summary of Contents for HVO-500MD

Page 1: ...HD Video Recorder Instructions for Use Before operating the unit please read this manual thoroughly and retain it for future reference HVO 500MD 550MD 4 564 082 11 1 2014 Sony Corporation ...

Page 2: ... tested and found to comply with the limits for a Class B digital device pursuant to part 15 of the FCC Rules These limits are designed to provide reasonable protection against harmful interference in a residential installation This equipment generates uses and can radiate radio frequency energy and if not installed and used in accordance with the instructions may cause harmful interference to rad...

Page 3: ...system complies with the requirements of the system standard IEC60601 1 1 If in doubt consult the qualified service personnel 3 The leakage current could increase when connected to other equipment 4 For this particular equipment all accessory equipment connected as noted above must be connected to mains via an additional isolation transformer conforming with the construction requirements of IEC606...

Page 4: ...which it will be used Guidance and manufacturer s declaration electromagnetic emissions The HVO 500MD 550MD is intended for use in the electromagnetic environment specified below The customer or the user of the HVO 500MD 550MD should assure that it is used in such an environment Emission test Compliance Electromagnetic environment guidance RF emissions CISPR 11 Group 1 The HVO 500MD 550MD uses RF ...

Page 5: ...l environment Surge IEC 61000 4 5 1 kV line s to line s 2 kV line s to earth Not applicable Mains power quality should be that of a typical commercial or hospital environment Voltage dips short interruptions and voltage variations on power supply input lines IEC 61000 4 11 5 UT 95 dip in UT for 0 5 cycle 40 UT 60 dip in UT for 5 cycles 70 UT 30 dip in UT for 25 cycles 5 UT 95 dip in UT for 5 sec N...

Page 6: ...nsmitters as determined by an electromagnetic site survey a should be less than the compliance level in each frequency range b Interference may occur in the vicinity of equipment marked with following symbol NOTE 1 At 80 MHz and 800 MHz the higher frequency range applies NOTE 2 These guidelines may not apply in all situations Electromagnetic propagation is affected by absorption and reflection fro...

Page 7: ...requency of transmitter m 150 kHz to 80 MHz d 1 2 80 MHz to 800 MHz d 1 2 800 MHz to 2 5 GHz d 2 3 0 01 0 12 0 12 0 23 0 1 0 38 0 38 0 73 1 1 2 1 2 2 3 10 3 8 3 8 7 3 100 12 12 23 For transmitters rated a maximum output power not listed above the recommended separation distance d in meters m can be estimated using the equation applicable to the frequency of the transmitter where P is the maximum o...

Page 8: ... Configuring Recording Settings User Settings 23 Displaying the User Settings Screen 23 Configuring Input Signal Settings 23 Configuring Image Quality Settings 24 Configuring Save Settings 26 Configuring Print Settings 27 Using the On Screen Keyboard Text Entry 29 Names and Functions of Parts On Screen Keyboard 29 Handling Discs 30 Notes on Handling 30 Inserting and Removing Discs 31 Function Keys...

Page 9: ...k 42 Playing Back the Most Recent Data Quick Playback 42 Recording Preparation 43 Patient Information and Data Storage Settings 43 Using a Hard Keyboard for Patient Information and Data Storage Settings 45 Registering Multiple Patients in Advance 46 Test Recording 48 Image Search 49 Specifying Search Conditions 49 Viewing Thumbnails of Recorded Data 50 Playback from the Search Results List 51 Sort...

Page 10: ...ettings 83 Network Tab 83 File Server Tab 85 NTP Tab 85 Initial User Settings 87 Quality Tab 87 Save Tab 88 Editing the Doctor List 90 Registering Doctor Information 90 General Tab 91 File Server Tab 91 Print Tab 92 Sorting the Doctor List 93 Editing Doctor Information 93 Deleting Doctor Entries 93 Editing the Case List 94 Registering Categories 94 Sorting the Category List 95 Editing Category Nam...

Page 11: ...r part of the software or operation manual supplied with the recorder as well as renting or leasing of the software without the authorization of the right holder is prohibited under copyright law Sony assumes no responsibility for damages loss of income or any claims from a third party arising out of use of the recorder or supplied software For complete terms and conditions of the warranty for the...

Page 12: ...m a cold to a warm location or if ambient temperature suddenly rises moisture may form on the outer surface of the unit and or inside of the unit This is known as condensation If condensation occurs turn off the unit and wait until the condensation clears before operating the unit Operating the unit while condensation is present may damage the unit On consumable parts The HDD fan battery and DVD d...

Page 13: ... the unit first and make sure that startup is complete i e READY appears in the front panel display before turning on the video input device Usage Notes Do not block the vents To prevent the interior of the unit from overheating maintain a clearance of at least 10 cm 4 in around the unit Do not subject the unit to severe shocks The internal mechanism may be damaged or the body warped Do not cover ...

Page 14: ...ple controls or copy the data at a later time This is useful when you want to edit recorded images on a computer Using this unit for medical purposes The connectors on this unit are not isolated Always use USB compatible external hard drives and USB memory devices that operate solely on the power supplied by the unit Connecting a device that operates on an AC power supply may result in an influx o...

Page 15: ...urgical operating rooms For safety use a device with a rating of IPx6 or higher when operating in such environments Operating room HVO 500MD 550MD Endoscopic device FS 24 Foot switch Simultaneously record data to one of two external storage media and the server Recording to DVD is only available on the HVO 550MD Hospital network Doctor s office ICU File server IP cameras in operating room Printer ...

Page 16: ...16 Names and Functions of Parts Chapter 1 Overview Names and Functions of Parts Front HVO 500MD HVO 550MD ...

Page 17: ...n Use this to move the cursor up or select an item that is above the current item B m button Use this to move the cursor left or select an item that is to the left of the current item You can also use this button to rewind during playback of recorded data v button Use this to move the cursor down or select an item that is below the current item b M button Use this to move the cursor right or selec...

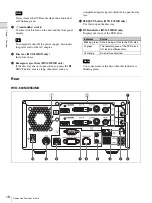
Page 18: ... If the disc tray does not open when you press the Z EJECT button insert a long thin object such as a straightened paper clip into this hole to open the disc tray n Z EJECT button HVO 550MD only Use this to open the disc tray o DVD indicator HVO 550MD only Displays the status of the DVD drive You cannot remove the disc when this indicator is blinking green Rear HVO 500MD 550MD Note Tip Indicator S...

Page 19: ...upported Using this unit for medical purposes The connectors on this unit are not isolated Always use USB compatible external hard drives and USB memory devices that operate solely on the power supplied by the unit Connecting a device that operates on an AC power supply may result in an influx of leakage currents from the connected device which may in turn result in electric shocks to the patient ...

Page 20: ...log composite video signals B Video input block a HDMI input connector Type A Inputs HDMI signals We recommend using a Sony HDMI cable not supplied b DVI D input connector 19 pin DVI Inputs DVI D signals c S VIDEO input connector 4 pin mini DIN Inputs analog S Video signals d VIDEO input connector BNC type Inputs analog composite video signals If HDMI DVI D input images are not displayed turn on t...

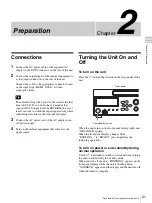
Page 21: ...ming selections in the front panel display 3 Connect the AC power cord of the AC adapter to an AC power supply 4 Turn on the medical equipment that will act as the signal source Turning the Unit On and Off To turn on the unit Press the 1 on standby switch on the front panel of the unit When the unit turns on the front panel display lights and WELCOME appears When the front panel display changes fr...

Page 22: ...disconnect the power cord of the AC adapter Configuring System Settings Be sure to configure the system settings before you begin operating the unit The system settings should be configured by the system administrator For details on system settings see System Administrator Settings page 63 Tip ...

Page 23: ...nd v buttons to select Settings and press the ENTER button The Settings screen appears 3 Use the B and b buttons to select User Settings and press the ENTER button The User Settings screen appears 4 Use the B and b buttons to select a tab and press the ENTER button 5 Configure the settings in each tab as necessary 6 When you finish configuration use the V v B and b buttons to select Apply and pres...

Page 24: ...guring Image Quality Settings page 24 If you are finished configuring use the V v B and b buttons to select Apply and press the ENTER button Configuring Image Quality Settings Configure image quality settings for videos 1 Use the B and b buttons to select the Quality tab Rec Time and Rec Quantity display the following information For the HVO 500MD Estimated recording time available for USB media 5...

Page 25: ...lity tab appears again 3 If you selected JPEG in step B use the v button to select the Quality box and press the ENTER button The Quality screen appears 4 Use the V and v buttons to select the image quality and press the ENTER button The Quality screen closes and the Quality tab appears again 5 Use the v button to select the Capture box and press the ENTER button The Capture screen appears 6 Use t...

Page 26: ...een that appears and press the ENTER button Metadata Output Select whether to include metadata when copying recorded data to external media in the setting screen that appears and press the ENTER button The default setting is Not Used Metadata is saved to the uppermost directory of the recorded data folder Folder Structure Select the directory structure that will be used when writing to external me...

Page 27: ...the Sony UP DR80MD printer You can select the printer for use from the System Admin Settings screen Device Settings screen Device tab For details on this setting see Device Tab page 76 1 Use the B and b buttons to select the Print tab The name of the printer selected for use appears in the Printer box 2 Configure each setting Select an item using the V B b and v buttons and press the ENTER button ...

Page 28: ...acility Name Select whether to print the name of the facility Rec Timestamp Select whether to print the time at which the image was recorded Watermark Select whether to print watermarks To print watermarks you must import a watermark file that is created in the proper format beforehand You can import the watermark file from the System Admin Settings screen Device Settings screen Device tab To prin...

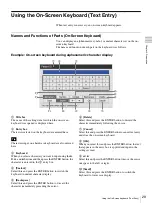
Page 29: ...er you want to input using the V v B and b buttons and then press the ENTER button the character is entered in the B entry box D Umlaut Select this and press the ENTER button to switch the keyboard to umlaut character display E Backspace Select this and press the ENTER button to discard the character immediately preceding the cursor F Delete Select this and press the ENTER button to discard the ch...

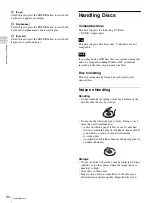
Page 30: ...sc may become disabled Disc formatting This unit automatically formats new and previously unused discs Notes on Handling Handling Do not touch the recording or playback surface of the disc Handle the disc by its edge Do not use the following types of disc Doing so may cause the unit to malfunction A disc on which a paper label or a seal is attached A disc on which the glue of cellophane tape or a ...

Page 31: ...play When the READY message appears proceed to the following steps 2 Press the Z EJECT button The disc tray opens 3 Insert the disc 4 Gently push in the disc tray The disc tray closes When an incompatible disc is inserted The DVD indicator lights orange and a message notifying you of the incompatible media appears on the menu screen Remove the disc and insert a compatible disc To remove a disc 1 P...

Page 32: ...able use of the function keys set Keyboard Mode to Hard Keyboard in the System Admin Settings screen Device Settings screen The function keys are enabled only when the hard keyboard mode is enabled 1 Press the MENU button The MENU screen appears 2 Use the V and v buttons to select Settings and press the ENTER button The Settings screen appears 3 Use the B and b buttons to select System Admin Setti...

Page 33: ...image of the recording Other Assignable Functions Aside from the factory assigned functions the following functions can also be assigned to the function keys Audio record ON Record audio Audio record OFF Stop audio recording Input signal select DVI D Switch the input signal to DVI D Input signal select HDMI Switch the input signal to HDMI Input signal select S VIDEO Switch the input signal to S VI...

Page 34: ...ure For details on assigning functions see CUSTOM Button Control under General 2 Tab page 69 Step 1 Record 1 Press the z REC button Recording starts REC appears while recording is in progress If images are recorded and patient information has not been entered in the Recording Preparation screen patient IDs will be automatically assigned The letter U appears at the beginning of automatically assign...

Page 35: ...AY button If the most recent data recorded is a still image playback will not occur Press the B PLAY button The most recent recorded data plays back The following appears during playback You can also perform the following operations during playback Fast forward playback Press the M FF button Depending on the structure of the data fast forward playback may not be possible for the entire recording R...

Page 36: ...re still images from live image transmissions To capture still images manually the capture function must be assigned to the CUSTOM button The default setting for the CUSTOM button is Capture For details on assigning functions see CUSTOM Button Control under General 2 Tab page 69 Press the CUSTOM button The following appears during image capture v The still image data is saved Recorded data entries...

Page 37: ...ecording Press the x STOP button Recording stops and the following appears Recording will take longer to stop if data is being saved to external media in addition to the internal hard disk Wait a moment for the writing process to complete Tip xSTOP button END 1234567890123456 ...

Page 38: ...or recorded data The function automatically deletes recorded data starting with recorded data on external media with the oldest start dates for recording whenever the remaining capacity on the unit s internal hard disk becomes low This is done to maintain free space on the unit s internal hard disk at all times Manual Recording 1 Press the z REC button Recording starts If you press the MENU button...

Page 39: ... the recording preparation time After 24 hours recording will stop automatically Recorded data directory Video data is stored in one of the following directories depending on the system administrator settings Video data directory uppermost folder of the external media recording start date year month day hour minute second _patient ID MOVIE or uppermost folder of the external media patient ID recor...

Page 40: ...USTOM button at the moment you want to capture the still image A chapter separator is also created at the position in which the still image was captured You can configure format setting for still images files in the User Settings screen Quality tab For details on this setting see Configuring Image Quality Settings page 24 Still image data directory Still image data is stored in one of the followin...

Page 41: ...stops If simultaneous saving to external media is enabled in addition to saving to the unit s internal hard disk the following screen appears Wait a moment for the data transfer to complete 3 When the data transfer is complete use the B and b buttons to select Close and press the ENTER button The MENU screen appears again Stopping Recording to External Media and Automatic Printing Perform the foll...

Page 42: ...k via simple controls You can also play back recorded data from search results For details see Image Search page 49 Playing Back the Most Recent Data Quick Playback When you press the B PLAY button the most recent recorded data that is stored on the unit s internal hard disk will play back Playback operations You can use the buttons on the front panel of the unit to perform the following playback ...

Page 43: ... configure the storage destination and quality settings for recorded data and then perform a test recording You can also register information for multiple patients in advance and simply recall the corresponding patient information on the day of the procedure or examination You can prepare for recording and test record in the Recording Preparation screen Patient Information and Data Storage Setting...

Page 44: ...s on using the on screen keyboard see Using the On Screen Keyboard page 29 Sex Select the patient s gender in the setting screen that appears and press the ENTER button Date of Birth Select the year month and day in the setting screens that appear and press the ENTER button 4 Configure storage settings for recorded data Select an item using the V and v buttons and press the ENTER button to display...

Page 45: ...d media automatically select Auto Detect If the external media is currently inserted and recognized the remaining recording times are also displayed Servers will not be detected automatically When Auto Detect is enabled and multiple media are inserted data will be recorded to the media in the following order of priority USB1 t DVD You cannot change media types in the middle of recording when Auto ...

Page 46: ...ter up to 100 patients to the patient list When you exceed 100 existing patients will be overwritten automatically starting with the oldest Recalling Patients Recall patients that have been registered in advance 1 In the Recording Preparation screen use the V v B and b buttons to select Call List and press the ENTER button The Patient List screen appears 2 Use the V and v buttons to select the pat...

Page 47: ...ent List screen appears 4 When you finish editing settings use the V v B and b buttons to select Apply and press the ENTER button The Patient List screen appears again Deleting Registered Patients from the List Delete patients that were registered in advance from the list 1 In the Recording Preparation screen use the V v B and b buttons to select Call List and press the ENTER button The Patient Li...

Page 48: ...ect Test Record and press the ENTER button The following message appears 2 Use the B and b buttons to select Yes and press the ENTER button Recording starts and the following screen appears while test recording is in progress After images are recorded for five seconds playback starts automatically When the test recording is finished the Recording Preparation screen appears again 3 Use the V v B an...

Page 49: ... conditions Select an item using the V v B and b buttons and press the ENTER button to display the text entry screen for that item Patient ID Enter an identification number for the patient using the on screen keyboard For details on using the on screen keyboard see Using the On Screen Keyboard page 29 Patient Name Enter the patient s name using the on screen keyboard For details on using the on sc...

Page 50: ...bnails of Recorded Data You can view thumbnail images of recorded data in an image list 1 Select Image List for the operation box in the Recording List screen 2 In the Recording List screen use the V and v buttons to select the recorded data and press the ENTER button The Image List screen appears and thumbnail images of the recorded data are displayed 3 To switch between video and still image thu...

Page 51: ...ation box in the Recording List screen 2 To play back an entire recorded data entry use the V and v buttons to select the recorded data you want to play back in the Recording List screen search results list and press the B PLAY button 3 To play back by chapter select the recorded data you want to play back and press the ENTER button The Image List screen appears and thumbnail images of the recorde...

Page 52: ...the V and v buttons to select the Order box and press the ENTER button The Order screen appears 5 Use the V and v buttons to select Descending or Ascending and press the ENTER button Depending on the selected category the descending and ascending orders are as follows The Sort screen appears again Category Descending Ascending Recording Date Start with newest Start with oldest Patient ID Alphabeti...

Page 53: ...corded Data page 61 Printing You can select still images for printing from the Recording List screen For details on configuring the number of images to print on each sheet and other print settings see Configuring Print Settings page 27 1 Select Image List for the operation box in the Recording List screen 2 In the Recording List screen use the V and v buttons to select the recorded data and press ...

Page 54: ...elect Print and press the ENTER button The Image List screen appears again 7 Use the V and v buttons to select Execute and press the ENTER button The Print screen appears 8 Change the settings as necessary 9 If you want to enter a comment use the V and v buttons to select the Comment box and press the ENTER button The on screen keyboard appears 10Use the on screen keyboard to enter a comment selec...

Page 55: ...procedure If the power supply is disconnected before the writing of the data is complete the validity of the written data cannot be guaranteed When recording to external media the media can be switched out up to three times for a single piece of recorded data When this limit is exceeded the Exchange media limit exceeded message appears on the Save to screen 1 If you are copying to a DVD disc or US...

Page 56: ...ach doctor and press the ENTER button 7 Use the V and v buttons to select Execute and press the ENTER button Copying of recorded data starts To cancel copying select Abort and press the ENTER button 8 Select Close and press the ENTER button The Recording List screen appears again To select data for copying from the Image List thumbnail display screen This section describes how to select thumbnail ...

Page 57: ...f Recorded Data page 50 5 Select the check boxes for the recorded data you want to copy Select a thumbnail using the V v B and b buttons and press the ENTER button to select or clear the check box Example Still image display screen 6 Use the V v B and b buttons to select the Operation box and press the ENTER button The Operation screen appears 7 Use the V and v buttons to select Save to and press ...

Page 58: ... press the ENTER button 11Use the v button to select Close and press the ENTER button The Image List screen appears again Editing Patient Information You can edit the ID name and other patient information that is attached to recorded data and not yet configured When Change Patient Info is set Not Used in the System Admin Settings screen Function Settings screen General 1 tab you can only edit pati...

Page 59: ...are selected patient information editing will be disabled 4 Use the V v B and b buttons to select Execute and press the ENTER button The Change screen appears 5 Edit each item as necessary Select an item using the V v B and b buttons and press the ENTER button to display the setting screen for that item For details on each item see Patient Information and Data Storage Settings page 43 6 Use the V ...

Page 60: ...ess the ENTER button The Recording List screen appears again 3 Select the check boxes for the recorded data you want to protect Select recorded data using the V and v buttons and press the ENTER button to select or clear the check box 4 Use the V v B and b buttons to select Execute and press the ENTER button The recorded data is protected and the icon appears To remove protection Select UnProtect ...

Page 61: ...n 3 Select the check boxes for the recorded data you want to delete Select recorded data using the V and v buttons and press the ENTER button to select or clear the check box 4 Use the V v B and b buttons to select Execute and press the ENTER button A confirmation message appears 5 Use the B and b buttons to select Yes and press the ENTER button When deletion of the recorded data is complete a not...

Page 62: ...ing and Playback For details on displaying the Recording List Screen see Image Search page 49 The Image List screen appears 3 Use the V v B and b buttons to select Rec Info and press the ENTER button The information on recorded data is displayed ...

Page 63: ...2 Register or edit the password for the system administrator settings Network Settings page 83 Configure initial settings related to the network and server Initial User Settings page 87 Configure initial setting values related to recording quality and storage media Editing the Doctor List page 90 Register and edit information regarding the doctors performing the surgical procedures and examination...

Page 64: ...he current software version appear at the bottom left About the Service Menu The Service Menu is a function reserved for service personnel It cannot be used by general users Language Settings Configure the display language and date display format 1 In the System Admin Settings screen use the V v B and b buttons to select Language and press the ENTER button The Language screen appears 2 Use the V a...

Page 65: ... configuration use the V v B and b buttons to select Apply and press the ENTER button The configurations are saved and the System Admin Settings screen appears again Date and Time Settings Configure the current date and time 1 In the System Admin Settings screen use the V v B and b buttons to select Date and Time and press the ENTER button The Date and Time screen appears 2 Configure the date 1 Us...

Page 66: ...GMT 08 00 Tijuana Baja California a GMT 08 00 Pacific Time US and Canada a GMT 07 00 Arizona GMT 07 00 Chihuahua La Paz Mazatlan Old a GMT 07 00 Chihuahua La Paz Mazatlan New a GMT 07 00 Mountain Time US and Canada a GMT 06 00 Guadalajara Mexico City Monterrey Old a GMT 06 00 Guadalajara Mexico City Monterrey New a GMT 06 00 Saskatchewan GMT 06 00 Central America GMT 06 00 Central Time US and Cana...

Page 67: ...katerinburg GMT 05 00 Tashkent GMT 05 30 Sri Jayawardenepura GMT 05 30 Chennai Kolkata Mumbai New Delhi GMT 05 45 Kathmandu GMT 06 00 Astana Dhaka GMT 06 00 Almaty Novosibirsk a GMT 06 30 Yangon Rangoon GMT 07 00 Krasnoyarsk a GMT 07 00 Bangkok Hanoi Jakarta GMT 08 00 Irkutsk Ulaanbaatar a GMT 08 00 Kuala Lumpur Singapore GMT 08 00 Perth a GMT 08 00 Taipei GMT 08 00 Beijing Chongqing Hong Kong SAR...

Page 68: ... v B and b buttons to select Apply and press the ENTER button The configurations are saved and the System Admin Settings screen appears again General 1 Tab Configure initial system settings 1 Use the B and b buttons to select the General 1 tab 2 Configure each setting Select an item using the V and v buttons and press the ENTER button to display the setting screen for that item Facility Name Enter...

Page 69: ...n other tabs use the V v B and b buttons to select a tab If you are finished configuring Function Settings use the V v B and b buttons to select Apply and press the ENTER button to save the configurations General 2 Tab Configure initial system settings 1 Use the B and b buttons to select the General 2 tab 2 Configure each setting Select an item using the Vand v buttons and press the ENTER button t...

Page 70: ...ion that was being performed when a recovery operation was executed in the setting screen that appears and press the ENTER button The default setting is Use Recovery of recorded data is the only action performed when Not Used is selected Auto Eject DVD HVO 550MD only Select whether to automatically eject DVD discs when they are full in the setting screen that appears and press the ENTER button The...

Page 71: ...tting screen that appears and press the ENTER button If you select Use the recording status the status of data transfer to media and other status information will appear on the recording screens that are output Data is being written if the media status is green and an error has occurred if it is orange The default setting is Not Used Show Play Status Select whether to display playback status infor...

Page 72: ...e will appear To prepare a logo file To display a logo prepare a logo file that can be imported to the unit and copy it onto a USB memory device beforehand 1 Prepare the logo file The logo file must meet the following conditions File format 24 bit bitmap File name MenuLogo bmp Size 43 height 400 width pixel Background RGB 102 102 102 gray 2 Copy the logo file onto a USB memory device Create a fold...

Page 73: ...n to display the setting screen for that item Region Select NTSC or PAL in the setting screen that appears and press the ENTER button The default setting is NTSC I O Timing Select the input and output timing in the setting screen that appears and press the ENTER button Select Normal as signal processing is usually performed under normal circumstances There will be a slight delay in signal outputs ...

Page 74: ...Auto Live is set to Single or Multi Select the duration for which still images are displayed after capture in the setting screen that appears and press the ENTER button The default setting is 0 5 sec HD Recording Format Select the HD format to use during recording in the setting screen that appears and press the ENTER button The default setting is 1080i Audio Select whether to record audio in the ...

Page 75: ...he setting screen for that item Input Detect Duration Select from 0 to 3 seconds for the duration for which input signals are detected The default setting is 3 sec Image distortion may occur if a duration of 2 seconds or less is selected DVI Input Range Select between limited and full range for the range mode during DVI input The tonal range for Limited Range is 16 to 235 and the tonal range for F...

Page 76: ...nit For details on devices that can be connected to the HVO 500MD 550MD contact your local Sony representative 1 Use the B and b buttons to select the Device tab 2 Configure each setting Select an item using the V and v buttons and press the ENTER button to display the setting screen for that item USB 2 USB 3 Select the devices connected to USB 2 and 3 ports on the rear panel of the unit in the se...

Page 77: ...unit via the selected connector Printer Used When a printer is specified in the above USB 2 USB 3 or RS 232C setting the printer s name appears here Keyboard Mode Select whether to use the soft keyboard i e on screen keyboard or a hard keyboard in the setting screen that appears and press the ENTER button The default setting is Soft Keyboard 3 To configure settings in other tabs use the V v B and ...

Page 78: ...you select Import Watermark and press the ENTER button the following message appears Select OK and press the ENTER button When import of the watermark file is complete a notification message will appear Import Logo Import a logo file Copy the logo file onto a USB memory device and insert the device into a USB port on the unit For details on preparing a logo file see To prepare a logo file page 79 ...

Page 79: ...rintLogo Contact Switch Tab Configure these settings when you want to control the unit via contact switch devices connected to the contact switch connectors on the rear panel of the unit or when you want to use the tally lamp control and video input switching functions for the monitor 1 Use the B and b buttons to select the Contact Switch tab 2 Configure the Contact Switch 1 and Contact Switch 2 s...

Page 80: ... pause control of the Record Video Pause function will not operate immediately after recording starts Wait about 5 seconds before performing the control The Advanced screen appears again 6 Use the V and v buttons to select Apply and press the ENTER button The Contact Switch tab appears again 3 If you want to use the tally lamp control and video input switching functions for the monitor configure t...

Page 81: ...rom the eight pins on the monitor connector assign one pin each for camera signal inputs endoscopic image inputs recorder signal inputs image inputs from this unit and the recording status tally lamp tally lamp on off control Pin number 5 is reserved for GND and cannot be selected The same pin number cannot be configured for contact switches 1 and 2 Pin assignment settings will vary depending on t...

Page 82: ...NTER button The Password Settings screen appears 2 Use the V and v buttons to select Password Lock and press the ENTER button The Password Lock screen appears 3 Use the V and v buttons to select Use and press the ENTER button The default setting is Not Used 4 Use the V and v buttons to select Apply and press the ENTER button The configuration is saved The password is not configured under default c...

Page 83: ...tails on using the on screen keyboard see Using the On Screen Keyboard page 29 3 Use the V and v buttons to select Apply and press the ENTER button The new password is saved Network Settings Configure initial settings related to the network and server 1 In the System Admin Settings screen use the V v B and b buttons to select Network Settings and press the ENTER button The Network Settings screen ...

Page 84: ...ss using the on screen keyboard For details on using the on screen keyboard see Using the On Screen Keyboard page 29 Subnet Mask Enter the subnet mask using the on screen keyboard For details on using the on screen keyboard see Using the On Screen Keyboard page 29 Default Gateway Enter the IP address for the default gateway using the on screen keyboard If you are only using a local network and not...

Page 85: ...ing share server appear 4 Configure each setting Select an item using the V and v buttons and press the ENTER button to display the setting screen for that item Server Name Enter the server name using the on screen keyboard For details on using the on screen keyboard see Using the On Screen Keyboard page 29 Share Name Enter the share name using the on screen keyboard Use only alphanumeric characte...

Page 86: ...the address for the NTP server using the on screen keyboard For details on using the on screen keyboard see Using the On Screen Keyboard page 29 Port No Enter the port number using the on screen keyboard The default setting is 123 For details on using the on screen keyboard see Using the On Screen Keyboard page 29 5 To configure settings in other tabs use the V v B and b buttons to select a tab If...

Page 87: ...v B and b buttons to select Apply and press the ENTER button The configurations are saved and the System Admin Settings screen appears again Quality Tab Configure quality settings for videos The settings configured here will be used as the initial values for the Quality tab in the User Settings screen 1 Use the B and b buttons to select the Quality tab 2 Configure the quality setting for videos Se...

Page 88: ...rame capture or field capture mode in the setting screen that appears and press the ENTER button Rec Quantity displays the following information For the HVO 500MD Estimated recording time available for USB media 500 GB For the HVO 550MD Estimated recording time available for single layer DVD R1 discs 4 7 GB 4 When you finish configuration use the V v B and b buttons to select Apply and press the E...

Page 89: ...ut settings page 89 Folder Structure Select the directory structure that will be used when writing to external media in the setting screen that appears and press the ENTER button The default setting is Date Patient ID When recorded data with the same patient ID is created a new recording date folder is created under the patient ID folder and the recorded data is saved to the new folder 3 When you ...

Page 90: ...lt setting is TXT Encryption Select whether to encrypt the metadata that is output The default setting is Not Used Key Configure this when Encryption is set to Use The key is configured using 32 hexadecimal digits 0 to 9 a to f 3 When you finish configuration use the V v B and b buttons to select Apply and press the ENTER button The Save tab appears again Editing the Doctor List Register and edit ...

Page 91: ...nd cannot be changed Name Enter the name of the doctor up to 20 characters using the on screen keyboard For details on using the on screen keyboard see Using the On Screen Keyboard page 29 Video Quality Select the video image quality in the setting screen that appears and press the ENTER button The default setting is the setting configured in the System Admin Settings screen Initial User Settings ...

Page 92: ...yboard see Using the On Screen Keyboard page 29 Password Enter the password using the on screen keyboard For details on using the on screen keyboard see Using the On Screen Keyboard page 29 3 When you finish configuration use the V v B and b buttons to select Add and press the ENTER button The Edit Doctor List screen appears again Print Tab Configure print settings 1 Use the B and b buttons to sel...

Page 93: ...n press the ENTER button The Edit Doctor screen appears 2 After editing the settings select Apply and press the ENTER button The configurations are saved For details on each setting see the following General Tab page 91 File Server Tab page 91 Print Tab page 92 If you change the doctor name you will not be able to use the previous doctor name to search for recorded data attributed to that name Del...

Page 94: ...d examinations The case information that is registered here will be used in the case lists that appear in other screens Registering Categories Register categories for exams 1 In the System Admin Settings cases use the V v B and b buttons to select Edit Case List and press the ENTER button The Edit Case List screen appears 2 Use the B and b buttons to select Edit and press the ENTER button The Edit...

Page 95: ...ded Sorting the Category List 1 Use the V and v buttons to select a category to reposition select Up or Down and then press the ENTER button The category moves up or down one position at a time 2 Use the v button to select Apply and press the ENTER button The configurations are saved and the Edit Case List screen appears again Editing Category Names 1 Use the V v B and b buttons to select a catego...

Page 96: ...ses 1 In the System Admin Settings screen use the V v B and b buttons to select Edit Case List and press the ENTER button The Edit Case List screen appears 2 Use the B and b buttons to select the Category box and press the ENTER button The Category screen appears 3 Select the appropriate category and press the ENTER button 4 Use the V v B and b buttons to select Add and press the ENTER button The ...

Page 97: ...min Settings screen appears again Editing Case Names 1 Use the V and v buttons to select a case to rename select Edit and then press the ENTER button The Edit screen appears 2 Rename the case select Apply and then press the ENTER button 3 Use the v button to select Apply and press the ENTER button The configuration is saved Deleting Cases 1 In the Edit Case List screen use the V and v buttons to s...

Page 98: ...uto Delete and press the ENTER button The Auto Delete Setting screen appears 2 Configure the auto delete threshold value 1 Select Auto Delete Value and press the ENTER button The Auto Delete Value screen appears 2 Use the V and v buttons to select the auto delete threshold value and press the ENTER button The default setting is 10 3 Use the V and v buttons to select Apply and press the ENTER butto...

Page 99: ...t If the error persists contact your local Sony representative SYSTEM ERR 0300 to 0399 Database error Restart the unit If the error persists contact your local Sony representative SYSTEM ERR 0400 to 0499 Recovery failure Restart the unit If the error persists contact your local Sony representative SYSTEM ERR 0500 to 0599 File data error Restart the unit If the error persists contact your local Son...

Page 100: ...space on the internal hard disk Delete any unnecessary recorded data KEY INHIBIT Front panel buttons disabled Button operations on the front panel are disabled WARN FAN System CPU fan warning A fan rotation malfunction has occurred Contact your local Sony representative WARN TEMP System CPU temperature warning An internal temperature error has occurred Check your operating environment WARN HDD Int...

Page 101: ...and output connectors on the rear panel of the unit tMake sure that the cables are connected properly page 18 The input and output connections on the rear panel of the unit are incorrect tMake sure that the cables are connected properly page 18 The connection cables are damaged tCheck the cables There is no audio or the audio is noisy The connection cables are disconnected from the input and outpu...

Page 102: ...ING BUT NOT LIMITED TO PROCUREMENT OF SUBSTITUTE GOODS OR SERVICES LOSS OF USE DATA OR PROFITS OR BUSINESS INTERRUPTION HOWEVER CAUSED AND ON ANY THEORY OF LIABILITY WHETHER IN CONTRACT STRICT LIABILITY OR TORT INCLUDING NEGLIGENCE OR OTHERWISE ARISING IN ANY WAY OUT OF THE USE OF THIS SOFTWARE EVEN IF ADVISED OF THE POSSIBILITY OF SUCH DAMAGE Live555 Streaming Media This product uses Live555 Stre...

Page 103: ...r Input connectors HDMI Type A 1 DVI D DVI 19 pin 1 TMDS single link S VIDEO Mini DIN 4 pin type 1 Y 1 0 Vp p 75 Ω Sync negative C BURST 0 286 Vp p 75 Ω NTSC C BURST 0 3 Vp p 75 Ω PAL VIDEO BNC type 1 Composite 1 0 Vp p 75 Ω Sync negative AUDIO Stereo mini jack 1 1 4 Vrms full bit input impedance 10 kΩ or higher unbalanced DC IN DIN 3 pin AC adapter Output connectors HDMI Type A 1 DVI D DVI 19 pin...

Page 104: ...air or with oxygen or nitrous oxide Mode of operation Continuous Caution 3 2 1 Notes Always make a test recording and verify that it was recorded successfully SONY WILL NOT BE LIABLE FOR DAMAGES OF ANY KIND INCLUDING BUT NOT LIMITED TO COMPENSATION OR REIMBURSEMENT ON ACCOUNT OF FAILURE OF THIS UNIT OR ITS RECORDING MEDIA EXTERNAL STORAGE SYSTEMS OR ANY OTHER MEDIA OR STORAGE SYSTEMS TO RECORD CON...

Page 105: ...onitor controls 80 Multi auto live 74 N Network 83 Network settings 83 NTP 85 O On standby switch 21 On screen keyboard 29 P Password settings 82 Patient ID 68 Patient information 58 Peripheral devices 76 Playback 42 Print 92 Print settings 27 Printing 53 Protecting data 59 Q Quality 87 Quick playback 35 42 R Recording 38 Recording list 49 52 Recording preparation 43 Registering cases 96 Registeri...

Page 106: ......

Reviews: