background image

GB 

12

Replacing the Lamp

Replacing the Lamp

The lamp used as a light source is 
consumable product. Thus replace the 
lamp with a new one in the following 
cases.
• When the lamp has burnt out or dims
•  “Please replace the Lamp.” appears on 

the screen

• The LAMP/COVER indicator lights up 

(repeats flashing three times)

The lamp life varies depending on 
conditions of use.  
Use an LMP-E191 Projector Lamp as the 
replacement lamp.
Use of any other lamps than the 
LMP-E191 may cause damage to the 
projector.

If the lamp breaks, ask qualified Sony 
personnel to replace the lamp and to check 
inside.


• Pull out the lamp by holding the handle.
• When removing the lamp, make sure it 

remains horizontal, then pull straight up. Do 
not tilt the lamp. If you pull out the lamp 
while it is tilted and if the lamp breaks.

1

Turn off the projector, and disconnect 
the AC power cord from the AC 
outlet.

When replacing the lamp after using the 
projector, wait for at least an hour for the 
lamp to cool.

2

Place a protective sheet (cloth) 
beneath the projector. Turn the 
projector over so you can see its 
underside.

Be sure that the projector is stable after 
turning it over.

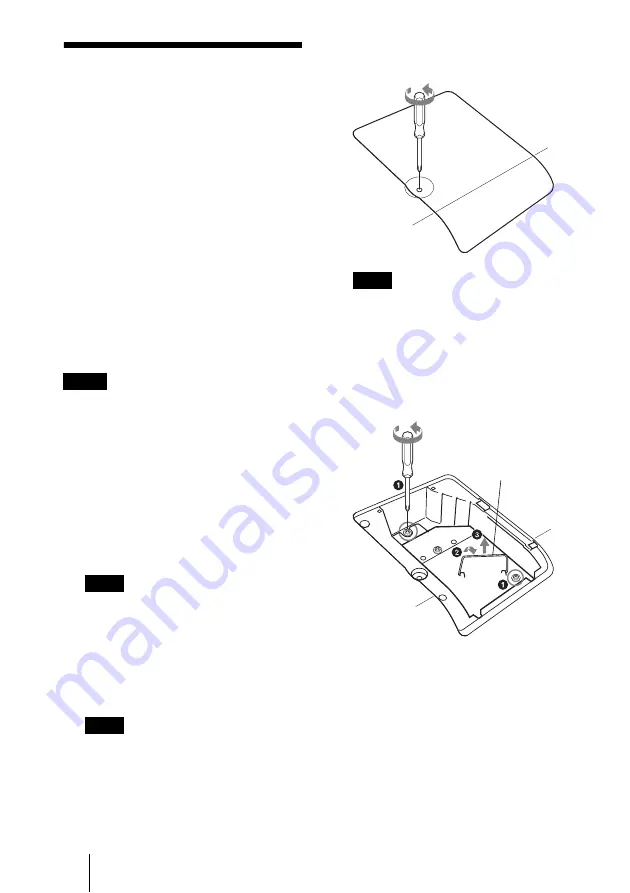
3

Open the lamp cover by loosening the 
screw with a Phillips screwdriver.

For safety reasons, do not loosen any other 
screws.

4

Loosen the two screws on the lamp 
unit with the Phillips screwdriver 
(

a

). Fold out the handle (

b

), then 

pull out the lamp unit by the handle 
(

c

).


Notes

Note

Note

Note

Handle

Summary of Contents for HDMI VPL-EX7

Page 1: ...守らないと 火災や人身事故になることがあります この取扱説明書には 事故を防ぐための重要な注意事項と製品の 取り扱いかたを示してあります この取扱説明書をよくお読みのうえ 製品を安全にお使いください お読みになったあとは いつでも見られるところに必ず保管してください 簡易説明書 JP Quick Reference Manual___ GB Guide de référence rapide _ FR Manual de referencia rápida __ ES Kurzreferenz _____________ DE Guida rapida all uso_______ IT ______________ CS ...

Page 2: ... お買い上げ店またはソニーの相談窓口にご連 絡ください m 1 電源を切る 2 電源コードや接続コードを抜く 3 お買い上げ店またはソニーの相談窓口に連絡す る 安全のために 安全のための注意事項を守る 定期点検をする 故障したら使わない 万一 異常が起きたら 煙が出たら 異常な音 においがしたら 内部に水 異物が入ったら 製品を落としたりキャビネットを破損したときは 警告表示の意味 取扱説明書および製品 では 次のような表示を しています 表示の内容 をよく理解してから本 文をお読みください この表示の注意事項を 守らないと 火災や感電 などにより死亡や大け がなど人身事故につな がることがあります この表示の注意事項を 守らないと 感電やその 他の事故によりけがを したり周辺の物品に損 害を与えたりすること があります 注意を促す記号 行為を禁止する記号 行為を指示する記号 ...

Page 3: ...3JP 目次 目次 警告 4 注意 6 電池についての安全上のご注意 7 ランプについての安全上のご注意 8 設置 使用時のご注意 9 CD ROM 取扱説明書の見かた 12 画像を映す 13 映す 13 調整する 14 電源を切る 14 ランプを交換する 15 エアーフィルターをクリーニング する 17 故障かな と思ったら 18 主な仕様 20 JP ...

Page 4: ...設定 点検 修理はお買 い上げ店またはソニーの相談窓口 にご相談ください レンズをのぞかない 投影中にプロジェクターのレンズ をのぞくと光が目に入り 悪影響 を与えることがあります 内部に水や異物を入れない 水や異物が入ると火災や感電の原 因となることがあります 万一 水や異物が入ったときは すぐに 電源を切り 電源コードや接続 ケーブルを抜いて お買い上げ店 またはソニーの相談窓口にご相談 ください 排気口 吸気口をふさがない 排気口 吸気口をふさぐと内部に 熱がこもり 火災や故障の原因と なることがあります また 手を 近づけるとやけどをする場合があ ります 風通しをよくするために 次の項目をお守りください 壁から 30cm 以上離して設置す る 密閉された狭い場所に押し込め ない 布などで包まない 立てて使用しない プロジェクターの下に布や紙を 敷かない お手入れの際は 電源を切って...

Page 5: ...ます 天井への取り付け 移動は絶対に自分でやら ない 天井への取り付け 移動は必ずお 買い上げ店またはソニーの相談窓 口にご依頼ください 有料 天井の強度不足 取り付け方法が 不十分のときは落下し大けがの原 因となります 熱感知器や煙感知器のそばに設置しない 熱感知器や煙感知器のそばに設置 すると 排気の熱などにより 感 知器が誤動作するなど 思わぬ事 故の原因となることがあります 長時間の外出 旅行の時は 電源プラグを抜 く 安全のため 必ず電源プラグをコ ンセントから抜いてください アースキャップやコネクターカバーは幼児 の手の届かないところへ保管する お子様が誤って飲むと 窒息死す る恐れがあります 万一誤って飲み込まれた場合はた だちに医者に相談してください 特に小さなお子様にはご注意くだ さい ...

Page 6: ...原因になり危険 です スプレー缶などの発火物や燃えやすいもの を排気口やレンズの前に置かない 火災の原因となることがあります 投影中にレンズのすぐ前で光を遮らない 遮光した物に熱による変形などの 影響を与えることがあります 落雷のおそれがあるときは 電源プラグに触 れない 感電の原因となります アジャスター調整時に指を挟まない アジャスターを調整する場合は アジャスターに手などが触れない よう慎重に行ってください ア ジャスターに指を挟み けがの原 因になることがあります 設置の際 本機と設置部分での指挟みに注意 する 設置する際 本機と設置部分で指 を挟まないように慎重に取り扱っ てください 排気口周辺には触れない 排気口周辺はランプの熱で温度が 高くなっています 手などを触れ ると火傷の原因となります 定期的にエアーフィルターをクリーニング する ランプ交換に合わせて 必ずエアー フィ...

Page 7: ...難防止用バーを運搬や設置目的で使用し ない プロジェクターの後面にある盗難 防止用バーには市販の盗難防止ワ イヤーを取り付けるなどの目的で 使用してください この盗難防止用バーを使って持ち 上げたり 吊り下げなどの設置に 利用したりすると 落下してけが や故障の原因となることがありま す 定期的に内部の掃除を依頼する 長い間掃除をしないと内部にほこ りがたまり 火災や感電の原因と なることがあります 1 年に 1 度 は 内部の掃除をお買い上げ店ま たはソニーの相談窓口にご依頼く ださい 有料 特に 湿気の多くなる梅雨の前に 掃除をすると より効果的です 運搬する際は キャリングケースを使用する 本機をキャリングケースに入れず に運搬すると 落下してけがや故 障の原因となることがあります 充分に冷えた状態でキャリングケースに収 納する 電源を切った直後に本機をキャリ ングケースに収納すると...

Page 8: ...速やかに新しいランプと交換 してください ランプ交換はランプが充分に冷えてから行 う ランプが破裂したときはすぐに交換を依頼 する 電源を切った直後はランプが高温に なっており さわるとやけどの原因とな ることがあります ランプ交換の際は 電源を切ってから1時間以上たって 充 分にランプが冷えてから行ってくださ い 下記の注意を守らないと 火災や感電により死亡 や大けがにつながること があります ランプが破裂した際には プロジェク ター内部やランプハウス内にガラス片 が飛散している可能性があります ソ ニーの相談窓口にランプの交換と内部 の点検を依頼してください また 排 気口よりガスや粉じんが出たりするこ とがあります ガスには水銀が含まれ ていますので 万が一吸い込んだり 目に入ったりした場合は けがの原因 となることがあります 本機または使用済みランプを廃棄す る場合 本機のランプの...

Page 9: ...自動的に電源 が切れます 本機の周囲から 30cm 以内には物を置かないよ うにしてください 吸気口には小さな紙などが吸い込まれやすいの でご注意ください 温度や湿度が高い場所 温度や湿度が非常に高い場所や温度が著しく低い 場所での使用は避けてください 空調の冷暖気が直接当たる場所 結露や異常温度上昇により 故障の原因となるこ とがあります 熱感知器や煙感知器のそば 感知器が誤動作する原因となることがあります ほこりが多い場所 たばこなどの煙が入る場 所 ほこりの多い場所 たばこなどの煙が入る場所で の使用は避けてください この様な場所で使用す るとエアーフィルターがつまりやすくなったり 故障や破損の原因となります また エアーフィ ルターの汚れは内部の温度が上昇する原因になる ので ランプ交換に合わせてに掃除してください 設置に適さない場所 ...

Page 10: ...の目的で使用してください この盗難防止用 バーを使って持ち上げたり 吊り下げなどの設置 に利用したりすると 落下や破損による事故の原 因となります 海抜 1500m 以上でのご使用に際しては 設置設定 メニューの 高地モード の設定を 入 にして ください 切 のままご使用になりますと 部品 の信頼性などに影響を与える恐れがあります 液晶プロジェクターについて 液晶プロジェクターは非常に精密度の高い技術で 作られていますが 黒い点が現われたり 赤と青 緑の点が消えないことがあります また すじ状 の色むらや明るさのむらが見える場合もあります これらは 液晶プロジェクターの構造によるもの で 故障ではありません また 複数台の液晶プロジェクターを並べてスク リーンへ投射してご使用される際に プロジェク ター毎に色合いのバランスが異なるため 同一機 種の組み合わせであっても設置時点で色合いの違...

Page 11: ...ナー 酸性洗浄液 アルカリ性洗浄液 研磨剤入り洗浄剤 化学ぞう きんなどはレンズ表面を傷めますので 絶対に使 用しないでください 外装のお手入れについて 乾いた柔らかい布で軽く拭いてください 汚れが ひどいときは 薄い中性洗剤溶液を少し含ませた 布で拭きとり 乾いた布でカラ拭きしてくださ い アルコールやベンジン シンナー 殺虫剤をかけ ると 表面の仕上げを傷めたり 表示が消えてし まうことがあるので 使用しないでください 布にゴミが付着したまま強く拭いた場合 傷が付 くことがあります ゴムやビニール製品に長時間接触させると 変質 したり 塗装がはげたりすることがあります 持ち運びをするときは 本機は精密機器です 本機をキャリングケースに 入れて持ち運びするときは 衝撃を与えたり 落 としたりしないでください 破損の原因となりま す また 本機をキャリングケースに収納する際 には 電源コー...

Page 12: ...ピュータの CD ROM ドライブにセットしてくださ い しばらくすると CD ROM が自動 的に起動します 読みたい取扱説明書 を選んでください 取扱説明書のファ イルは CD ROM の中に収録されてい ます お使いのコンピュータによっては CD ROM が自動的に起動しない場合が あります 以下の手順で 取扱説明書のファイル を直接開いてください Windows の場合 1 マ イ コ ン ピ ュ ー タ を 開 く Windows Vista では コンピュー タ と表示されます 2 CD ROM の ア イ コ ン を 右 ク リックして エクスプローラ を選 ぶ 3 ウ ィ ン ド ウ の 中 で index htm ファイルをダブルクリックして読み たい取扱説明書を選ぶ Macintosh の場合 1 デスクトップの CD ROM アイ コンをダブルクリックする 2 ind...

Page 13: ...タンバイ キーを押す b 接続している機器の電源を入れる c リモートコマンダーまたはコントロールパネルの INPUT キーを押して 映 したい画像を選ぶ d コンピューターとの接続時は映像信号の出力先を切り換える 映す Fn Fx F7 Power INPUT MENU NETWORK USB RESET ENTER APA 2 2 4 4 5 5 INPUT 1 1 1 1 入力 A 入力 B VPL EX70 のみ ビデオ S ビデオ または ...

Page 14: ...アジャスターをロックします b 画像の大きさを調整する c 画像のフォーカスを調整する 画質モードを選べる画質設定メニューや 最適な画面のアスペクト比 縦横比 を選べるスクリーン設定メニューがあります 1 1 オン スタンバイ キーを押す 2 メッセージが表示されたらもう一度 1 オン スタンバイ キーを押す 3 ファンが止まり 1 オン スタンバイ キーが赤く点灯するのを確認してから 電 源コードを抜く ダイレクトパワーオン オフ機能 オフ ゴー機能使用時を除 く 調整する 電源を切る 1 1 2 2 3 3 アジャスター 調整ボタン ...

Page 15: ...の原因になります ランプが破損している場合は ソニーの 相談窓口にランプの交換と内部の点検を ご依頼ください ランプを取り出すときは 必ず取り出し 用のハンドルを持って引き出してくださ い ランプを取り出すときは ランプを水平 に持ち上げ 傾けないでください ラン プを傾けて持つと ランプが破損するこ とがあります 1 本機の電源を切り 電源コードをコン セントから抜く 本機を使用した後にランプを交換する場 合は ランプを冷やすため 1 時間以上 たってからランプを交換してください 2 本機や机に傷がつかないよう布などを 敷き その上で本機を裏返す プロジェクターを しっかりと安定させ てください 3 ランプカバーのネジ 1 本 をプラス ドライバーでゆるめ ランプカバーを 開く 安全のため 他のネジは絶対にはずさな いでください 4 ランプのネジ 2 本 をプラスドライ バーでゆるめ a...

Page 16: ...め ネジ 1 本 を 締める ランプカバーはしっかりと取り付けてく ださい きちんと取り付けられていない と 電源が入りません 7 本機の向きを元にもどす 8 電源コードを接続する 1 キーが赤色に点灯します 9 1 キーを押して電源を入れる 10 MENU キーを押して初期設定メ ニューを選ぶ 11 ランプタイマー初期化 を選び ENTER キーを押す 12 V キーで 実行 を選び ENTER キーを押す ランプタイマーが 0 に初期化され ランプを交換し フィルターを掃 除しましたか というメッセージ が表示されます フィルター掃除のしかたは 次の エアーフィルターをクリーニング する を参照してください 13 v キーで はい を選ぶ ランプタイマー初期化が完了しま した というメッセージが表示され ます ご注意 ご注意 ランプタイマー初期化 ...

Page 17: ...れにくい ときは フィルターをはずして洗って ください 1 電源を切り 電源コードを抜く 2 エアーフィルターカバーを引き出して 取りはずす 3 エアーフィルターを引き出して取りは ずす 4 中性洗剤を薄めた液で洗ったあと日陰 で乾かす 5 エアーフィルターをエアーフィルター カバーのつめにはめて エアーフィル ターカバーを本機に取り付ける エアーフィルターのクリーニングを怠る と ゴミがたまり 内部に熱がこもって 故障 火災の原因となることがあります エアーフィルターカバーはしっかり取り 付けてください きちんと取り付けられ ていないと 電源が入りません エアーフィルターには表裏があります フィルターを入れるときは フィルター カバーの形状に合わせて入れてください エアーフィルター つめ ご注意 ...

Page 18: ...続されていない c 接続を確認してください 接続手順が正しくない c 本機は DDC2B Display Data Channel 2B に対応しています お使いのコンピューターが DDC に対応している場合は 1 本機 とコンピューターを接続し 2 本機の電源を入れ 3 コン ピューターを起動してください 入力切り換えが正しくない c 投影する映像を正しく選んでください 映像が消画 ミューティング されている c PIC MUTING キーを押して ミューティングを解除してくださ い 出力信号がコンピューターの外部モニターに出力されるように設定 されていない あるいは外部モニターとコンピューターの液晶ディ スプレイの両方に出力するように設定されている c 出力信号をコンピューターの外部モニターのみに出力するように 設定してください 画面にノイズが出る 入力信号のドット数と LCD パネル...

Page 19: ...プカバーまたはエアーフィルターカバーがはずれている c カバーをしっかりはめてください LAMP COVER イン ジケーターがオレン ジ色点滅する 3 回 点滅パターンの繰り 返し ランプの交換時期がきた c ランプを交換してください ランプが高温になっている c 60 秒以上たって ランプが冷えてから もう一度電源を入れてく ださい 1 キーが赤色点滅す る 2 回点滅パター ンの繰り返し 内部が高温になっている c 排気口 吸気口がふさがれていないか確認してください 標高が高い場所で使用されている c 高地モードが 入 に設定されているか確認してください 1 キーが赤色点滅 する 4 回点滅パ ターンの繰り返し ファンが故障している c お買い上げ店またはソニーの相談窓口にご相談ください 1 キーが赤色点滅す る 6 回点滅パター ンの繰り返し 電源コードを抜いて 1 インジケーター...

Page 20: ...60 自動切り換え 手動切り 換え NTSC4 43 とは NTSC 方式で 録画されたビデオカセットを NTSC4 43 方式のビデオデッキで 再生したときのカラー方式で す 対応コンピューター信号 2 fH 19 92 kHz fV 48 92 Hz 最高入力解像度信号 SXGA 1400 1050 fV 60 Hz 2 接続するコンピューターの信号の解像度と 周波数は プリセット信号の範囲内に設定 してください 対応ビデオ信号 15 k RGB コンポーネント 50 60 Hz プログレッシブ コンポーネント 50 60 Hz DTV 480 60i 575 50i 480 60p 575 50p 720 60p 720 50p 1080 60i 1080 50i コンポジットビ デオ Y C ビデオ 外形寸法 約 314 109 269 mm 幅 高さ 奥行き 突起部含ま ず 質量...

Page 21: ...ブル 1 8 m 1 1 967 100 11 Sony キャリングケース 1 電源コード 1 レンズキャップ 1 取扱説明書 CD ROM 1 簡易説明書 1 保証書 1 セキュリティラベル 1 本機 別売アクセサリーを含む の仕 様および外観は改良のため予告なく変 更することがありますが ご了承くだ さい お使いになる前に 必ず動作確認を行っ てください 故障その他に伴う営業上の 機会損失等は保証期間中および保証期間 経過後にかかわらず 補償はいたしかね ますのでご了承ください 別売アクセサリー プロジェクターランプ LMP E191 交換用 別売アクセサリーの中には 国 地域に よって販売されていないものがあります ソニーの相談窓口に確認してください ご注意 ...

Page 22: ...LE FOR OTHER COUNTRIES 1 Use the approved Power Cord 3 core mains lead Appliance Connector Plug with earthing contacts that conforms to the safety regulations of each country if applicable 2 Use the Power Cord 3 core mains lead Appliance Connector Plug conforming to the proper ratings Voltage Ampere If you have questions on the use of the above Power Cord Appliance Connector Plug please consult a ...

Page 23: ...d Representative for EMC and product safety is Sony Deutschland GmbH Hedelfinger Strasse 61 70327 Stuttgart Germany For any service or guarantee matters please refer to the addresses given in separate service or guarantee documents For the State of California USA only Perchlorate Material special handling may apply See www dtsc ca gov hazardouswaste perchlorate Perchlorate Material Lithium battery...

Page 24: ... Precautions 5 Notes on Installation and Usage 6 Using the CD ROM Manuals 9 Projecting 10 Projecting 10 Adjusting the Projector 11 Turning off the Power 11 Replacing the Lamp 12 Cleaning the Air Filter 14 Troubleshooting 15 Specifications 17 ...

Page 25: ...t is recommended that the carpet and wall paper be changed to a dark color Preventing internal heat build up The unit is equipped with ventilation holes intake and ventilation holes exhaust Do not block or place anything near these holes or internal heat build up may occur causing picture degradation or damage to the projector Cleaning Before cleaning Be sure to disconnect the AC power cord from t...

Page 26: ... may generate color distinctions because each projector has its own color balance even if the projectors are the same models Notes on Installation and Usage Do not install the projector in the following situations Installation is these situations or locations may cause a malfunction or damage to the unit Poorly ventilated locations Allow adequate air circulation to prevent internal heat build up D...

Page 27: ...ng the unit in a very dusty or extremely smoky environment Otherwise the air filter will become obstructed and this may cause a malfunction of the unit or damage it Dust preventing the air passing through the filter may cause a rise in the internal temperature of the unit Clean the air filter whenever you replace the lamp Do not use the projector under the following conditions Do not stand the uni...

Page 28: ...r to fall or be damaged When using the projector at an altitude of 1 500 m or higher turn on High Altitude Mode in the INSTALL SETTING menu Failing to set this mode when using the projector at high altitudes could have adverse effects such as reducing the reliability of certain components Note on carrying the projector The unit is manufactured using high precision technology When transporting the ...

Page 29: ... ROM into the CD ROM drive of your computer and the CD ROM will start automatically after a while Select the Operating Instructions you want to read The CD ROM may not start automatically depending on the computer In this case open the Operating Instructions file as follows In case of Windows 1 Open My Computer Computer is displayed in Windows Vista 2 Right click the CD ROM icon and select Explore...

Page 30: ...s the INPUT key on the Remote Commander or the control panel to select the input source d When the computer is connected set it to output the signal to only the external monitor Projecting Fn Fx F7 Power INPUT MENU NETWORK USB RESET ENTER APA 2 2 4 4 5 5 INPUT 1 1 1 1 or Input A Input B VPL EX70 only Video S Video ...

Page 31: ...th the Picture menu to select the picture mode and the Screen menu to select the appropriate aspect ratio of the picture 1 Press the 1 on standby key 2 When a message appears press the 1 on standby key again 3 Unplug the AC power cord from the wall outlet after the fan stops running and the 1 on standby key lights in red Except when using the Direct Power On Off function or the Off Go function Adj...

Page 32: ...he handle When removing the lamp make sure it remains horizontal then pull straight up Do not tilt the lamp If you pull out the lamp while it is tilted and if the lamp breaks 1 Turn off the projector and disconnect the AC power cord from the AC outlet When replacing the lamp after using the projector wait for at least an hour for the lamp to cool 2 Place a protective sheet cloth beneath the projec...

Page 33: ...u 11 Select Lamp Timer Reset and then press the ENTER key 12 Select Execute with the V key and then press the ENTER key The Lamp Timer is initialized to 0 and Change the Lamp and clean the Filter is displayed in the menu screen Refer to page 14 for Cleaning the Air Filter 13 Select Yes with the v key Lamp Timer Reset Complete is displayed in the menu screen Disposal of the used lamp For the custom...

Page 34: ...w out the air filter cover and remove it 3 Remove the air filter 4 Wash the air filter with a mild detergent solution and dry it in a shaded place 5 Attach the air filter so that it fits into the each claws on the air filter cover and replace the cover If you neglect to clean the air filter dust may accumulate clogging it As a result the temperature may rise inside the unit leading to a possible m...

Page 35: ...he projector on according to the following procedures 1 Connect the projector to the computer 2 Turn the projector on 3 Start the computer Input selection is incorrect c Select the input source correctly The picture is muted c Press the PIC MUTING key to release the picture muting The computer signal is not set to output to an external monitor or set to output both to an external monitor and a LCD...

Page 36: ...and then turn on the power again 1 key flashes in red Repetition rate of 2 flashes The internal temperature is unusually high c Check to see that nothing is blocking the ventilation holes The projector is being used at a high altitude c Ensure that High Altitude Mode in the INSTALL SETTING menu is set to On 1 key flashes in red Repetition rate of 4 flashes The fan is broken c Consult with qualifie...

Page 37: ...1400 1050 fV 60 Hz 2 Set the resolution and the frequency of the signal of the connected computer within the range of acceptable preset signals of the projector Applicable video signals 15 k RGB component 50 60 Hz Progressive component 50 60 Hz DTV 480 60i 575 50i 480 60p 575 50p 720 60p 720 50p 1080 60i 1080 50i Composite video Y C video Dimensions Approx 314 109 269 mm 12 3 8 4 3 8 10 5 8 inches...

Page 38: ...GB 18 Specifications Optional accessories Projector Lamp LMP E191 for replacement Not all optional accessories are available in all countries Please check with your local Sony Authorized Dealer ...

Page 39: ...19GB Specifications ...

Page 40: ...ositif de coupure d alimentation ou débrancher la fiche d alimentation 1 Utilisez un cordon d alimentation câble secteur à 3 fils fiche femelle fiche mâle avec des contacts de mise à la terre conformes à la réglementation de sécurité locale applicable 2 Utilisez un cordon d alimentation câble secteur à 3 fils fiche femelle fiche mâle avec des caractéristiques nominales tension ampérage appropriées...

Page 41: ... 4 Remarques sur l installation et l utilisation 5 Utilisation des manuels sur le CD ROM 8 Projection 9 Projection 9 Réglage du projecteur 10 Mise hors tension 10 Remplacement de la lampe 11 Nettoyage du filtre à air 13 Dépannage 14 Spécifications 16 FR ...

Page 42: ...l appareil dans une pièce où le sol et les murs ne sont pas revêtus d un matériau réfléchissant la lumière Si le sol et les murs sont revêtus d un matériau réfléchissant la lumière nous vous recommandons de remplacer le revêtement de sol et le revêtement mural par des revêtements de couleur sombre Prévention de l accumulation de chaleur interne L appareil est équipé d orifices de ventilation prise...

Page 43: ...t pas le signe d un dysfonctionnement Lorsque les images sont projetées sur les écrans à partir de plusieurs projecteurs de données LCD elles risquent de générer des distinctions de couleurs car chaque projecteur a son propre équilibre des couleurs même si les modèles des projecteurs sont identiques Remarques sur l installation et l utilisation N installez pas le projecteur dans les situations sui...

Page 44: ... un dysfonctionnement du capteur Emplacements très poussiéreux ou extrêmement enfumés Evitez d installer pas l appareil dans un environnement très poussiéreux ou extrêmement enfumé Le filtre à air pourrait s obstruer avec pour résultat un dysfonctionnement ou des dommages à l appareil La poussière empêchant le passage de l air à travers le filtre risque d entraîner une surchauffe interne de l appa...

Page 45: ...rojecteur à l aide de cette barre il risque de tomber ou d être endommagé Pour une utilisation du projecteur à une altitude de 1 500 m ou plus activez Mode haute altit dans le menu RÉGLAGE D INSTALLATION Si ce réglage du mode n est pas effectué lors d une utilisation du projecteur à haute altitude des effets négatifs peuvent s ensuivre tels qu une baisse de la fiabilité de certains composants Rema...

Page 46: ...dinateur et le CD ROM démarrera automatiquement au bout d un certain temps Sélectionnez le Mode d emploi que vous souhaitez lire Le CD ROM risque de ne pas démarrer automatiquement selon l ordinateur Dans ce cas ouvrez le fichier du Mode d emploi de la façon suivante Dans le cas de Windows 1 Ouvrez Poste de travail Ordinateur s affiche dans Windows Vista 2 Cliquez avec le bouton droit de la souris...

Page 47: ...e INPUT de la télécommande ou du panneau de commande pour sélectionner la source d entrée d Lorsque l ordinateur est raccordé faites en sorte que le signal soit émis vers le moniteur externe uniquement Projection Fn Fx F7 Power INPUT MENU NETWORK USB RESET ENTER APA 2 2 4 4 5 5 INPUT 1 1 1 1 ou Input A Input B VPL EX70 uniquement Video S Video ...

Page 48: ...er le mode d image et du menu Ecran pour sélectionner le rapport de format de l image 1 Appuyez sur la touche 1 marche veille 2 Appuyez de nouveau sur la touche 1 marche veille lorsqu un message apparaît 3 Débranchez la prise d alimentation secteur de la prise murale une fois que le ventilateur a fini de tourner et la touche 1 marche vielle s allume en rouge Sauf lorsque vous utilisez la fonction ...

Page 49: ...née Lorsque vous retirez la lampe assurez vous qu elle demeure à l horizontale et tirez bien droit vers le haut N inclinez pas la lampe Si vous extrayez la lampe inclinée et que la lampe se casse 1 Mettez le projecteur hors tension et débranchez le cordon d alimentation secteur de la prise secteur Avant de remplacer la lampe après avoir utilisé le projecteur attendez au moins une heure pour lui pe...

Page 50: ...eur à l endroit 8 Branchez le cordon d alimentation La touche 1 s allume en rouge 9 Appuyez sur la touche 1 pour mettre le projecteur sous tension 10 Appuyez sur la touche MENU puis sélectionnez le menu RÉGLAGE 11 Sélectionnez Réinit durée lampe puis appuyez sur la touche ENTER 12 Sélectionnez Exécuter avec la touche V et appuyez sur la touche ENTER La durée de lampe est remise à 0 et Changer la l...

Page 51: ... 3 Déposez le filtre à air 4 Lavez le filtre à air au moyen d une solution détergente neutre et faites le sécher dans un endroit ombragé 5 Posez le filtre à air en l engageant dans chaque griffe du couvercle de filtre à air puis remettez le couvercle en place Si vous ne nettoyez pas le filtre à air la poussière risque de s y accumuler et de l obstruer La température peut alors augmenter à l intéri...

Page 52: ...patible avec DDC2B Digital Data Channel 2B Canal de données numériques 2B Si votre ordinateur est compatible avec DDC mettez le projecteur sous tension en procédant comme suit 1 Raccordez le projecteur à l ordinateur 2 Mettez le projecteur sous tension 3 Démarrez l ordinateur La sélection d entrée est incorrecte c Sélectionnez la source d entrée correctement L image a été masquée c Appuyez sur la ...

Page 53: ...c Remplacez la lampe La lampe a atteint une température élevée c Attendez 60 secondes pour que la lampe se refroidisse puis remettez le projecteur sous tension 1 touche clignote en rouge Taux de répétition de 2 clignotements La température à l intérieur du projecteur est anormalement élevée c Assurez vous que les orifices de ventilation ne sont pas obstrués Le projecteur est utilisé à haute altitu...

Page 54: ... lors de la lecture d une cassette vidéo enregistrée en NTSC sur un magnétoscope NTSC4 43 Signaux d ordinateur compatibles2 fH 19 à 92 kHz fV 48 à 92 Hz Résolution maximale du signal d entrée SXGA 1400 1050 fV 60 Hz 2 Spécifiez la résolution et la fréquence du signal de l ordinateur utilisé dans les limites des signaux préprogrammés admissibles du projecteur Signaux vidéo utilisables 15 k RGB comp...

Page 55: ...boursement à cause de la perte de profits actuels ou futurs suite à la défaillance de cet appareil que ce soit pendant la période de garantie ou après son expiration ou pour toute autre raison quelle qu elle soit Accessoires en option Lampe de projecteur LMP E191 pour remplacement Les accessoires en option ne sont pas tous disponibles dans tous les pays et régions Pour plus d informations veuillez...

Page 56: ...sactivar la alimentación o desconecte el enchufe de alimentación 1 Utilice un cable de alimentación cable de alimentación de 3 hilos conector enchufe del aparato recomendado con toma de tierra y que cumpla con la normativa de seguridad de cada país si procede 2 Utilice un cable de alimentación cable de alimentación de 3 hilos conector enchufe del aparato que cumpla con los valores nominales corres...

Page 57: ...e la instalación y el uso 5 Empleo de los manuales en CD ROM 8 Proyección 9 Proyección 9 Ajuste del proyector 10 Apagado de la alimentación 10 Sustitución de la lámpara 11 Limpieza del filtro de aire 13 Solución de problemas 14 Especificaciones 16 ES ...

Page 58: ...sala cuyo suelo y paredes estén hechos con materiales que no reflejen la luz Si el suelo y las paredes están hechas de dicho tipo de material se recomienda cambiar el color de éstos por uno oscuro Prevención de recalentamiento interno La unidad está equipada con orificios de ventilación de entrada y de salida No bloquee estos orificios ni coloque nada cerca de ellos ya que si lo hace puede produci...

Page 59: ...namiento Cuando se proyectan las imágenes en las pantallas desde varios proyectores de datos LCD pueden producirse distinciones de color porque cada proyector posee su propio equilibrio de color aunque los proyectores sean del mismo modelo Notas sobre la instalación y el uso No instale el proyector en las siguientes situaciones La instalación en dichas situaciones o ubicaciones puede producir una ...

Page 60: ...e averíe Ubicaciones con mucho polvo o humo excesivo Evite instalar la unidad en un entorno en el que haya un exceso de polvo o humo Si lo hace el filtro del aire se obstruirá y es posible que la unidad se averíe o no funcione correctamente El polvo que impide que el aire pase por el filtro puede provocar que la temperatura interna de la unidad aumente Limpie el filtro de aire siempre que sustituy...

Page 61: ...o cuelga con esta barra el proyector podría caerse o sufrir daños Si utiliza el proyector a una altitud de 1 500 m o más active Modo gran altitud del menú AJUSTE INSTALACIÓN Si no se establece este modo cuando se utiliza el proyector a altitudes elevadas pueden producirse efectos adversos tales como la reducción de la fiabilidad de determinados componentes Nota sobre el transporte del proyector La...

Page 62: ...ador y el CD ROM se iniciará automáticamente al cabo de unos instantes Seleccione el Manual de instrucciones que desea leer Dependiendo del ordenador es posible que el CD ROM no se inicie automáticamente En tal caso abra el archivo del Manual de instruccionescomoseindicaacontinuación En el caso de Windows 1 Abra Mi PC En Windows Vista aparece Ordenador 2 Haga clic con el botón derecho en el icono ...

Page 63: ...INPUT del mando a distancia o el panel de control para seleccionar la fuente de entrada d Si el ordenador está conectado configúrelo para que la señal se envíe solo al monitor externo Proyección Fn Fx F7 Power INPUT MENU NETWORK USB RESET ENTER APA 2 2 4 4 5 5 INPUT 1 1 1 1 o Input A Input B VPL EX70 solamente Video S Video ...

Page 64: ...odo de imagen y el menú Pantalla para seleccionar la relación de aspecto correspondiente de la imagen 1 Pulse la tecla 1 encendido espera 2 Cuando aparezca un mensaje pulse otra vez la tecla 1 encendido espera 3 Desenchufe el cable de alimentación de CA de la toma mural cuando el ventilador deje de funcionar y la tecla 1 encendido espera se ilumine en rojo Excepto cuando se use la función Encendid...

Page 65: ...izando el asa Al retirar la lámpara asegúrese de que se encuentra en posición horizontal y tire hacia arriba No incline la lámpara Si tira de la lámpara mientras está inclinada la lámpara se rompe 1 Apague el proyector y desenchufe el cable de alimentación de CA de la toma de CA Antes de sustituir la lámpara después de usar el proyector espere al menos una hora hasta que se enfríe 2 Coloque una lá...

Page 66: ...ufe el cable de alimentación La tecla 1 se ilumina en rojo 9 Pulse la tecla 1 para encender el proyector 10 Pulse la tecla MENU y a continuación seleccione el menú AJUSTE 11 Seleccione Reiniciar cont lámp y a continuación pulse la tecla ENTER 12 Seleccione Ejecutar con la tecla V y a continuación pulse la tecla ENTER El contador de la lámpara se inicializa a 0 y se muestra Desea cambiar la lámpara...

Page 67: ...raiga el filtro de aire 4 Lave el filtro de aire con una solución detergente suave y déjelo secar a la sombra 5 Coloque el filtro del aire de forma que encaje en las lengüetas de la cubierta y vuelva a colocar la cubierta No descuide la limpieza del filtro de aire de lo contrario el polvo podría acumularse hasta llegar a obstruirlo Ello podría provocar un aumento de la temperatura en el interior d...

Page 68: ...exiones son incorrectas c Este proyector es compatible con DDC2B Digital Data Channel 2B Canal de datos digitales 2B Si el ordenador es compatible con DDC encienda el proyector de acuerdo con las indicaciones siguientes 1 Conecte el proyector al ordenador 2 Encienda el proyector 3 Encienda el ordenador La selección de entrada es incorrecta c Seleccione la fuente de entrada correctamente La imagen ...

Page 69: ...a la lámpara La lámpara ha alcanzado una alta temperatura c Espere 60 segundos para que la lámpara se enfríe y vuelva a activar la alimentación Tecla 1 parpadea en rojo Frecuencia de repetición de 2 parpadeos La temperatura interna es inusualmente alta c Compruebe que nada bloquee los orificios de ventilación Se está utilizando el proyector a una altitud elevada c Compruebe que la opción Modo gran...

Page 70: ... de color que se utiliza para reproducir vídeos grabados en NTSC en una videograbadora de sistema NTSC4 43 Señales de ordenador aceptables2 fH 19 a 92 kHz fV 48 a 92 Hz Máxima resolución de señal de entrada SXGA 1400 1050 fV 60 Hz 2 Ajuste la resolución y la frecuencia de la señal del ordenador conectado dentro del margen de señales predefinidas que admite el proyector Señales de vídeo aplicables ...

Page 71: ...POR LA PÉRDIDA DE GANANCIAS PRESENTES O FUTURAS DEBIDO AL FALLO DE ESTA UNIDAD YA SEA DURANTE LA VIGENCIA DE LA GARANTÍA O DESPUÉS DEL VENCIMIENTO DE LA GARANTÍA NI POR CUALQUIER OTRA RAZÓN Accesorios opcionales Lámpara de proyector LMP E191 de repuesto No todos los accesorios opcionales están disponibles en todos los países y zonas Solicite información al distribuidor autorizado de Sony más cerca...

Page 72: ...r mit Schutzkontakten entsprechend den Sicherheitsvorschriften die im betreffenden Land gelten 2 Verwenden Sie ein Netzkabel 3 adriges Stromkabel einen Geräteanschluss einen Stecker mit den geeigneten Anschlusswerten Volt Ampere Wenn Sie Fragen zur Verwendung von Netzkabel Geräteanschluss Stecker haben wenden Sie sich bitte an qualifiziertes Kundendienstpersonal WICHTIG Das Namensschild befindet s...

Page 73: ...Installation und Gebrauch 5 Verwenden der Anleitungen auf CD ROM 9 Projizieren 10 Projizieren 10 Einstellen des Projektors 11 Ausschalten der Stromversorgung 11 Auswechseln der Lampe 12 Reinigen des Luftfilters 14 Fehlerbehebung 15 Spezifikationen 17 DE ...

Page 74: ... um eine Senkung des Kontrastverhältnisses zu vermeiden Verdecken Sie zur Leinwand gewandte Fenster mit undurchsichtigen Vorhängen Es ist wünschenswert den Projektor in einem Raum zu installieren dessen Boden und Wände nicht aus lichtreflektierendem Material bestehen Bestehen Fußboden und Wände aus reflektierendem Material wird empfohlen Teppichboden und Tapete durch eine dunklere Art zu ersetzen ...

Page 75: ...doch sein dass im Projektionsbild des LCD Datenprojektors ständig winzige schwarze und oder helle Punkte rote blaue oder grüne enthalten sind Dies ist ein normales Ergebnis des Herstellungsprozesses und ist kein Anzeichen für eine Funktionsstörung Werden Bilder von mehreren LCD Datenprojektoren auf einer Leinwand angezeigt werden möglicherweise Farbunterschiede sichtbar da jederProjektor seine eig...

Page 76: ...eg verursacht wird In der Nähe eines Wärme oder Rauchsensors Eine Funktionsstörung des Sensors könnte auftreten Sehr staubiger oder extrem rauchiger Ort Vermeiden Sie die Installation des Geräts in sehr staubiger oder extrem rauchiger Umgebung Andernfalls setzt sich der Luftfilter zu was zu einer Funktionsstörung oder Beschädigung des Geräts führen kann Ein mit Staub zugesetzter Luftfilter kann ei...

Page 77: ... der Rückseite des Projektors zum Diebstahlschutz indem Sie beispielsweise ein handelsübliches Diebstahlschutzkabel daran befestigen Wenn Sie den Projektor an dem Sicherheitsstift hochheben oder ihn an diesem Stift aufhängen kann dies zum Herunterfallen des Projektors oder zu Beschädigungen führen Wenn Sie den Projektor in einer Höhe von mindestens 1 500 m benutzen stellen Sie Höhenlagenmodus in d...

Page 78: ...Installation und Gebrauch Abstand zwischen der Leinwand und dem Projektor oder der verwendeten Zoomvergrößerungseinstellung manchmal Streifenmuster auf der Leinwand erscheinen Dies ist keine Fehlfunktion des Projektors ...

Page 79: ...ie mitgelieferte CD ROM in das CD ROM Laufwerk Ihres Computers ein Kurz darauf startet die CD ROM automatisch Wählen Sie die gewünschte Bedienungsanleitung aus Je nach verwendetem Computer startet die CD ROM möglicherweise nicht automatisch Öffnen Sie in diesem Fall die Datei mit der Bedienungsanleitung wie folgt Bei Windows 1 Öffnen Sie Arbeitsplatz Bei Windows Vista wird Computer angezeigt 2 Kli...

Page 80: ...die Taste INPUT auf der Fernbedienung oder dem Bedienfeld zur Auswahl der Eingangsquelle d Wenn der Computer angeschlossen ist stellen Sie das Ausgangssignal auf alleinige Ausgabe über den externen Monitor ein Projizieren Fn Fx F7 Power INPUT MENU NETWORK USB RESET ENTER APA 2 2 4 4 5 5 INPUT 1 1 1 1 oder Input A Input B nur VPL EX70 Video S Video ...

Page 81: ...llung des Bildmodus und das Menü Bildschirm mit dem das geeignete Seitenverhältnis des Bilds ausgewählt werden kann 1 Drücken Sie die Taste 1 Ein Bereitschaft 2 Wird eine Meldung angezeigt drücken Sie die Taste 1 Ein Bereitschaft erneut 3 Ziehen Sie das Netzkabel von der Netzsteckdose ab wenn der Ventilator stehen bleibt und die aste 1 Ein Bereitschaft rot leuchtet Außer bei Verwendung der Direkt ...

Page 82: ...uf dass sie horizontal bleibt und ziehen Sie sie gerade nach oben Die Lampe nicht kippen Falls Sie die Lampeneinheit schräg herausziehen und die Lampe bricht können die Bruchstücke verstreut werden und Verletzungen verursachen 1 Schalten Sie den Projektor aus und trennen Sie das Netzkabel von der Netzsteckdose Lassen Sie die Lampe nach dem Gebrauch des Projektors mindestens eine Stunde lang abkühl...

Page 83: ...wieder um 8 Schließen Sie das Netzkabel an Die Taste 1 leuchtet rot auf 9 Drücken Sie die Taste 1 um den Projektor einzuschalten 10 Drücken Sie die Taste MENU und wählen Sie dann das Menü EINSTELLUNG 11 Wählen Sie Lampentimer Rück und drücken Sie dann die Taste ENTER 12 Wählen Sie Ausführen mit der Taste V und drücken Sie dann die Taste ENTER Der Lampentimer wird auf 0 zurückgestellt und Lampe aus...

Page 84: ...Nehmen Sie den Luftfilter heraus 4 Waschen Sie den Luftfilter mit einer milden Reinigungslösung und lassen Sie ihn an einem schattigen Ort trocknen 5 Bringen Sie den Luftfilter so an dass er von allen Klauen an der Luftfilterabdeckung gehalten wird und setzen Sie die Abdeckung wieder ein Falls die Reinigung des Luftfilters vernachlässigt wird kann er sich durch angesammelten Staub zusetzen Als Fol...

Page 85: ...sind Die Anschlüsse sind falsch c Dieser Projektor ist mit DDC2B Digital Data Channel 2B Digitaler Datenkanal 2B kompatibel Wenn Ihr Computer mit DDC kompatibel ist schalten Sie den Projektor nach dem folgenden Verfahren ein 1 Schließen Sie den Projektor an den Computer an 2 Schalten Sie den Projektor ein 3 Starten Sie den Computer Die Eingangswahl ist falsch c Wählen Sie die Eingangsquelle korrek...

Page 86: ...mpe aus Die Lampe ist zu heiß geworden c Lassen Sie die Lampe 60 Sekunden lang abkühlen bevor Sie den Projektor wieder einschalten Taste 1 blinkt in Rot Wiederholrate von 2 Blinkzeichen Die Innentemperatur ist ungewöhnlich hoch c Stellen Sie sicher dass die Lüftungsöffnungen durch nichts blockiert werden Der Projektor wird in großer Höhe benutzt c Vergewissern Sie sich dass Höhenlagenmodus im Menü...

Page 87: ... Frequenz des vom angeschlossenen Computer ausgegebenen Signals innerhalb des Bereichs der akzeptablen Vorwahlsignale des Projektors ein Verwendbare Videosignale 15k RGB Komponenten 50 60 Hz Progressives Komponenten signal 50 60 Hz DTV 480 60i 575 50i 480 60p 575 50p 720 60p 720 50p 1080 60i 1080 50i FBAS Videosignal Y C Videosignal Abmessungen Ca 314 109 269 mm B H T ohne hervorstehende Teile Gew...

Page 88: ...ezifikationen Sonderzubehör Projektorlampe LMP E191 Ersatz Das genannte Sonderzubehör ist nicht in allen Ländern und Regionen erhältlich Bitte überprüfen Sie die Verfügbarkeit bei Ihrem Sony Fachhändler vor Ort ...

Page 89: ...19DE Spezifikationen ...

Page 90: ...re il dispositivo di scollegamento in modo che interrompa il flusso di corrente oppure scollegare la spina di alimentazione 1 Utilizzare un cavo di alimentazione a 3 anime connettore per l apparecchio spina con terminali di messa a terra approvati che siano conformi alle normative sulla sicurezza in vigore in ogni paese se applicabili 2 Utilizzare un cavo di alimentazione a 3 anime connettore per ...

Page 91: ...so 5 Utilizzo dei Manuali del CD ROM 8 Proiezione 9 Proiezione 9 Regolazione del proiettore 10 Spegnimento dell alimentazione 10 Sostituzione della lampada 11 Pulizia del filtro dell aria 13 Guida alla soluzione dei problemi 14 Caratteristiche tecniche 16 IT ...

Page 92: ... il pavimento e le pareti fossero di materiali riflettenti si consiglia di cambiare tappeti e tappezzeria in modo che siano di colore scuro Prevenzione del surriscaldamento interno L apparecchio dispone di prese di ventilazione di aspirazione e di scarico Non bloccare tali prese con oggetti onde evitare il surriscaldamento interno che potrebbe compromettere la qualità delle immagini o danneggiare ...

Page 93: ... dati LCD possono generare colore distinti poiché ciascun proiettore dispone di un proprio bilanciamento dei colori anche se i proiettori appartengono agli stessi modelli Note su installazione e uso Non installare il proiettore nelle seguenti situazioni L installazione in queste posizioni o ambienti potrebbe causare un malfunzionamento o guasto dell unità Posizioni con ventilazione insufficiente F...

Page 94: ...zionamento del sensore Posizioni molto polverose o estremamente fumose Non installare l unità in un ambiente molto polveroso o estremamente fumoso Ciò potrebbe intasare il filtro dell aria causando un malfunzionamento o guasto dell unità La polvere che impedisce il passaggio dell aria attraverso il filtro potrebbe causare un aumento della temperatura interna dell unità Pulire il filtro dell aria o...

Page 95: ...oiettore potrebbe cadere o danneggiarsi Quando si usa il proiettore a una quota di 1 500 m o superiore attivare il Modo quota el nel menu IMPOST INSTALLAZIONE Se non viene impostato questo modo quando il proiettore è usato a quote elevate potrebbero presentarsi effetti negativi come la riduzione dell affidabilità di alcuni componenti Nota sul trasporto del proiettore Il proiettore è prodotto con u...

Page 96: ...o nell unità CD ROM del computer poco dopo il CD ROM si avvierà automaticamente Selezionare le Istruzioni d uso che si desidera leggere A seconda del computer a disposizione il CD ROM potrebbe non avviarsi automaticamente In tal caso aprire le Istruzioni d uso nel seguente modo Per Windows 1 Aprire Risorse del computer Computer è visualizzato in Windows Vista 2 Cliccare con il pulsante destro del ...

Page 97: ...o INPUT sul telecomando o sul pannello di controllo per selezionare la sorgente d ingresso d Dopo avere collegato il computer impostare il segnale solo per la visualizzazione sul monitor esterno Proiezione Fn Fx F7 Power INPUT MENU NETWORK USB RESET ENTER APA 2 2 4 4 5 5 INPUT 1 1 1 1 o Input A Input B solo VPL EX70 Video S Video ...

Page 98: ...ispone del menu Immagine per selezionare il modo immagine e del menu Schermo per selezionare il formato immagine corretto 1 Premere il tasto 1 on standby 2 Quando compare un messaggio premere di nuovo il tasto 1 on standby 3 Scollegare il cavo di alimentazione c a dalla presa a muro dopo che la ventola si è fermata e il tasto 1 on standby si è illuminata in rosso Eccetto quando si usa la funzione ...

Page 99: ... lampada afferrando la maniglia Per rimuovere la lampada tirare direttamente verso l alto la lampada prestando attenzione che rimanga orizzontale Non inclinare la lampada Se la lampada viene tirata fuori mentre è inclinata si romperà 1 Spegnere il proiettore e scollegare il cavo di alimentazione c a dalla presa c a Quando si sostituisce la lampada dopo aver usato il proiettore aspettare almeno un ...

Page 100: ... nuovo il proiettore 8 Collegare il cavo di alimentazione Il tasto 1 si illumina in rosso 9 Premere il tasto 1 per accendere il proiettore 10 Premere il tasto MENU quindi selezionare il menu REGOLAZIONE 11 Selezionare Reimp timer lamp quindi premere il tasto ENTER 12 Selezionare Esegui con il tasto V e premere il tasto ENTER Il timer della lampada è inizializzato a 0 e nella schermata di menu vien...

Page 101: ...il filtro dell aria 4 Lavare il filtro dell aria utilizzando una soluzione detergente neutra ed asciugarlo all ombra 5 Montare il filtro dell aria in modo che si inserisca in ciascuna delle linguette sul coperchio del filtro dell aria e rimontare il coperchio Se il filtro dell aria non viene pulito la polvere potrebbe accumularsi e intasarlo Conseguentemente la temperatura all interno dell unità p...

Page 102: ...ettore è compatibile con DDC2B Digital Data Channel 2B canale dati digitali 2B Se il computer utilizzato è compatibile con DDC accendere il proiettore procedendo come segue 1 Collegare il proiettore al computer 2 Accendere il proiettore 3 Avviare il computer La selezione dell ingresso è errata c Selezionare correttamente la sorgente d ingresso L immagine è disattivata c Premere il tasto PIC MUTING...

Page 103: ...l termine della vita utile c Sostituire la lampada La lampada ha raggiunto una temperatura elevata c Attendere 60 secondi che la lampada si raffreddi quindi riaccendere l alimentazione Tasto 1 lampeggia in rosso frequenza di ripetizione di 2 lampeggi La temperatura interna è insolitamente elevata c Verificare che le prese di ventilazione non siano ostruite Il proiettore è utilizzato a una quota el...

Page 104: ...ualmente NTSC4 43 è lo standard colore usato per riprodurre un video registrato in NTSC su un videoregistratore NTSC4 43 Segnali da computer compatibili2 fH da 19 a 92 kHz fV da 48 a 92 Hz massima risoluzione del segnale di ingresso SXGA 1400 1050 fV 60 Hz 2 Impostare la risoluzione e la frequenza del segnale del computer collegato entro l intervallo dei segnali preimpostati compatibili con il pro...

Page 105: ...MBORSI A CAUSA DELLA PERDITA DI PROFITTI ATTUALI O PREVISTI DOVUTA A GUASTI DI QUESTO APPARECCHIO SIA DURANTE IL PERIODO DI VALIDITÀ DELLA GARANZIA SIA DOPO LA SCADENZA DELLA GARANZIA O PER QUALUNQUE ALTRA RAGIONE Accessori opzionali Lampada del proiettore LMP E191 ricambio Non tutti gli accessori opzionali sono disponibili in tutte le nazioni e aree geografiche Consultare il proprio rivenditore a...

Page 106: ...换同一类型或制造商推荐的电池型 号 处理电池时 必须遵守相关地区或国家 的法律 警告 在安装此设备时 要在固定布线中配置 一个易于使用的断电设备 或者将电源 插头与电气插座连接 此电气插座必须 靠近该设备并且易于使用 在操作设备 时如果发生故障 可以切断断电设备的 电源以断开设备电源 或者断开电源插 头 1 请使用经过认可的电源线 3 芯电源 线 设备接口 带有接地点的插 头 并且都要符合所在国家的安全法 规 2 请使用符合特定额定值 电压 电 流 的电源线 3 芯电源线 设备 接口 插头 如果在使用上述电源线 设备接口 插 头时有任何疑问 请咨询合格的维修人 员 重要 设备铭牌位于底部 ...

Page 107: ...3CS 目录 目录 使用前须知 4 安装和使用注意事项 5 使用 CD ROM 手册 8 投影 9 投影 9 调整投影机 10 关闭电源 10 更换投影灯 11 清洁空气滤网 13 故障排除 14 规格 16 CS ...

Page 108: ...气 请勿堵塞通风孔或将任何物品放 在通风孔旁边 否则可能发生内部蓄 热 造成影像质量下降或损坏本投影 机 清洁 清洁以前 请务必从 AC 插座上拔掉 AC 电源线 清洁空气滤网 请在每次更换投影灯时清洁空气滤网 清洁空气滤网时请参见第 13 页的 清 洁空气滤网 清洁镜头 镜头表面经过特别处理 可以减少光线 反射 由于不当维修可能危害到投影机的使用 性能 所以请注意下述事项 请勿触摸镜头 要清除镜头上的灰尘 时 请使用干燥的软布 请勿使用湿 布 洗涤剂或稀释剂 擦拭镜头时要轻柔 并请使用软布 如清洁布或玻璃清洁布 来擦 对于顽固污渍 请用略微蘸水的软布 如清洁布或玻璃清洁布 来清除 不要使用酒精 苯或稀释剂等溶剂 不要使用酸 碱或研磨类洗涤剂 也 不要使用化学清洁布 因为这些物质 会损坏镜头表面 清洁机壳 要用柔软的干布来清洁机壳 对于顽 固污渍 可用稍蘸中性洗涤剂的布来 清除 再用柔软的...

Page 109: ... 当由于通风孔堵塞而造成 内部蓄热时 温度传感器会工作并自 动关闭电源 请在本机周围留出30厘米以上的空间 小心不要让通风孔吸入诸如纸片或聚 积的灰尘一类的微小物体 热和潮湿 请避免将本机安装在温度或湿度非常 高 或温度非常低的场所 为避免水气凝结 请勿将本机安装在 温度可能急剧升高的场所 受空调的冷暖风直接吹拂的地方 在这样的场所安装投影机可能会由于湿 气凝结或温度升高而导致本机发生故 障 高温或烟雾传感器附近 可能会造成传感器失灵 多尘 多烟雾的场所 勿将本机安装在多尘或多烟雾的环境 中 否则 空气滤网会被堵塞 并可能 导致本机故障或损坏 灰尘会阻挡空气 透过滤网 从而可能导致投影机内部温 度升高 请在每次更换投影灯时清洁空 气滤网 不当安装 ...

Page 110: ...品 请勿在投影期间在镜头面前放置可能会 遮挡光线的物品 来自光线的热量可能 会造成物品损坏 按遥控器上的 PIC MUTING 键消除图像 运输或安装本机时 请勿动用安全销 投影机后部的安全销是用于防盗 比如 在上面安装市售的防盗安全缆 即可达 到此目的 如果手持安全销举起投影 机 或利用安全销悬挂投影机 都可能 导致投影机的坠落或损坏 当在海拔 1 500 米或更高的地区使用投影 机时 请打开 安装设定 菜单中的 高海拔高度模式 当在高海拔地区使 用投影机时 如果没有设定此模式 可 能会产生不良的影响 诸如降低某些组 件的可靠性 关于搬运投影机的注意事项 本机采用高精密度技术制造 当运输存 放于软包内的本机时 切勿令其掉落或 遭受撞击 这样可能会造成损坏 当将 本机存放于软包中时 请断开 AC 电源 线以及所有其它连接着的电缆或导线 并将随机附带的附件保存在软包的口袋 里 不合适的条件 ...

Page 111: ...7CS 安装和使用注意事项 关于屏幕的注意事项 当在不平整的表面使用屏幕时 根据屏 幕与投影机之间的距离或变焦放大倍数 的设定的不同 偶尔可能会在屏幕上出 现条纹图案 这并非投影机的故障 ...

Page 112: ...e Systems 的 URL 下载免费的 Acrobat Reader 软件 阅读使用说明书 使用说明书包含在附带的 CD ROM 中 将附带的 CD ROM 插入电脑的 CD ROM 驱动器中 不久 CD ROM 自动启动 选 择要阅读的使用说明书 CD ROM 可能无法自动启动 视电脑而 定 在这种情况下 请按如下方式打开 使用说明书 对于 Windows 1 打开 My Computer Windows Vista 中显示 电脑 2 右击 CD ROM 图标并选择 Explorer 3 双击 index htm 文件并选择要阅 读的使用说明书 对于 Macintosh 1 双击桌面上的 CD ROM 图标 2 双击 index htm 文件并选择要阅 读的使用说明书 如果您无法打开 index htm 文件 请 在 Operating_Instructions 文件夹中双 击要阅读...

Page 113: ... 按 I 1 打开 待机 键 b 打开与投影机相连的设备 c 按遥控器或控制面板上的 INPUT 键以选择输入信号源 d 连接电脑时 请将其设定为仅向外接显示器输出信号 投影 Fn Fx F7 Power INPUT MENU NETWORK USB RESET ENTER APA 2 2 4 4 5 5 INPUT 1 1 1 1 或 Input A Input B 仅限于 VPL EX70 Video S Video ...

Page 114: ...抬升投影机 调节投影机的倾斜度 然后松开按钮以锁 定调节器 b 调整图像的尺寸 c 调整聚焦 投影机备有 图像设定 菜单 用于选择图像模式 备有 屏幕设定 菜单 用于选择适当的图像纵横比 1 按 1 打开 待机 键 2 显示信息时 再按一下 1 打开 待机 键 3 在冷却扇停止运转且 1 打开 待机 键变为红色后 从墙上电源插座拔下 AC 电源线 除非正在使用直接电源开启 关闭功能或关机即移动功能 调整投影机 1 1 2 2 3 3 调节器调整按钮 关闭电源 ...

Page 115: ... 使用 LMP E191 以外的任何其它投影 灯均可能造成投影机损坏 如果投影灯损坏 请要求 Sony 专业技术人 员更换投影灯或进行检查 握住把手将投影灯拉出 拆下投影灯时 令投影灯处于水平状态 然后将其径直拉出 请勿倾斜投影灯 如果在倾斜状态下拉出投影灯 如果投 影灯损坏 1 关闭投影机电源并从 AC 电源插座 拔下 AC 电源线 在使用投影机后更换投影灯时 请至少等 候 1 个小时让投影灯冷却 2 将保护纸 布 垫在投影机下面 将投影机翻转以看到底面 翻转投影机之后 务必使其平稳 3 用十字螺丝刀拧松螺丝 打开投影 灯盖 为了安全起见 请勿拧松其它任何螺 丝 4 用十字螺丝刀拧松投影灯上的两个 螺丝 a 折起把手 b 然后握 住把手将投影灯拉出 c 注意 注意 注意 注意 把手 ...

Page 116: ...接通电源 切勿将液体或其他物体落入插槽内以 避免电击或起火 6 关上投影灯盖 拧紧螺丝 务必关严投影灯盖使其恢复原状 否 则 无法接通投影机的电源 7 将投影机翻转过来 8 连接电源线 1 键亮为红色 9 按 1 键接通投影机的电源 10 按 MENU 键 然后选择操作设定 菜单 11 选择 重设投影灯操作时间 然 后按 ENTER 键 12 用 V 键选择 执行 然后按 ENTER 键 投影灯操作时间被初始化为 0 并 在菜单屏幕上显示 更换投影灯 并清洁滤网吗 请参见第 13 页的 清洁空气滤网 13 用 v 键选择 是 菜单屏幕上显示 投影灯操作时 间重设完毕 注意 注意 ...

Page 117: ...机 的使用环境或使用方法而异 当难以用真空吸尘器清除滤网上的灰 尘时 请拆下空气滤网进行清洗 1 关闭电源 拔下电源线 2 拔出空气滤网盖将其取下 3 拆下空气滤网 4 用中性洗涤剂清洗空气滤网 然后 放在阴暗处晾干 5 将空气滤网安装固定在空气滤网盖 上的每个脚爪内 然后将盖放回原 位 如果疏忽了清洗空气滤网 灰尘会聚积 并堵塞滤网 这种情况下 装置内部的 温度会升高 可能导致故障或火灾 务必牢固安装空气滤网盖 如果空气滤 网盖没有关严 电源将无法接通 空气滤网有正面和反面 安装空气滤网 时使其与空气滤网盖上的凹口吻合 空气滤网 脚爪 注意 ...

Page 118: ... 连接错误 c 本投影机对应 DDC2B Digital Data Channel 2B 数字数据 通道 2B 如果电脑兼容 DDC 按照下述步骤接通投影机 电源 1 连接投影机至电脑 2 接通投影机电源 3 启动电脑 输入选择不正确 c 请正确选择输入信号源 图像被消除 c 按 PIC MUTING 键解除图像消除功能 电脑信号未被设定为向外部显示器输出 或被设定为同时向 外部显示器和电脑 LCD 显示器输出 c 将电脑的信号设定为仅向外部显示器输出 图像有杂讯 根据由电脑输入的点数和 LCD 面板上的像素数的组合 背景 上可能会出现杂讯 c 改变所连接的电脑的桌面图案 图像不清晰 图像未聚焦 c 调整聚焦 镜头上有水气凝聚 c 接通投影机电源并放置约 2 小时 影像超出屏幕 尽管按下 APA 键 影像周围仍有黑边 c 在屏幕上显示完整影像并按 APA 键 c 正确调整 输入设置 菜单上...

Page 119: ...使用寿命 c 更换投影灯 投影灯的温度过高 c 请等候 60 秒钟让投影灯冷却 然后再次接通电源 1 指示灯以红色闪烁 以 2 次闪烁为一个循 环 内部温度异常升高 c 检查通风孔是否堵塞 在高海拔地区使用投影机 c 请务必确认 安装设定 菜单上的 高海拔高度模式 设 定为 开 1 指示灯以红色闪烁 以 4 次闪烁为一个循 环 冷却扇损坏 c 请向 Sony 公司专业技术人员咨询 1 指示灯以红色闪烁 以 6 次闪烁为一个循 环 在 1 指示灯熄灭后 从墙上电源插座拔下 AC 电源线 将电 源线插进墙上电源插座 然后重新接通投影机电源 如果 1 指示灯以红色闪烁并且该状态持续 说明电气系统有故障 c 请向 Sony 公司专业技术人员咨询 ...

Page 120: ...制式录像机上录制 的 NTSC 视频时使用的彩色 制式 可接收的电脑信号 2 fH 19 至 92 kHz fV 48 至 92 Hz 最大输入信号分辨率 SXGA 1400 1050 fV 60 Hz 2 将所连接电脑的信号的分辨率和频率设定 在投影机可接收预设信号范围内 适用视频信号 15 k RGB 分量 50 60 Hz 顺序 分量 50 60 Hz DTV 480 60i 575 50i 480 60p 575 50p 720 60p 720 50p 1080 60i 1080 50i 复合 视频 Y C 视频 尺寸 约 314 109 269 毫米 宽 高 深 不包括突出部分 重量 VPL EX70 约 3 0 千克 VPL EX7 ES7 约 2 9 千克 电源要求 VPL EX70 EX7 AC 100 至 240 V 2 6 至 1 1 A 50 60 Hz VPL ES...

Page 121: ...17CS ...

Page 122: ...CS 18 ...

Page 123: ...19CS ...

Page 124: ...Sony Corporation Printed in China 203 ...

Reviews: