background image

Pla
yba
ck

Playback

49

When your TV is connected to a VCR

Connect your camcorder to the LINE IN input 
on the VCR using the A/V connecting cable. Set 
the input selector on the VCR to LINE.

When your TV is monaural (When your 
TV has only one audio input jack)

Connect the yellow plug of the A/V connecting 
cable to the video input jack and connect the 
white or the red plug to the audio input jack of 
your TV or VCR.
When you want to play the sound in monaural 
mode, use a connecting cable (optional) for that 
purpose.

If your TV/VCR has a 21-pin connector 
(EUROCONNECTOR)

Use the 21-pin adaptor supplied with your 
camcorder (for modesl with the 

 mark 

printed on their bottom surfaces only). This 
adaptor is designed for output use only.

b

Note

• Pictures in the DV format are not output from the 

COMPONENT OUTPUT jack, if copyright 
protection signals are recorded in the pictures.

Locating a scene on a 
tape for playback

Searching quickly for a desired 
scene – Zero set memory

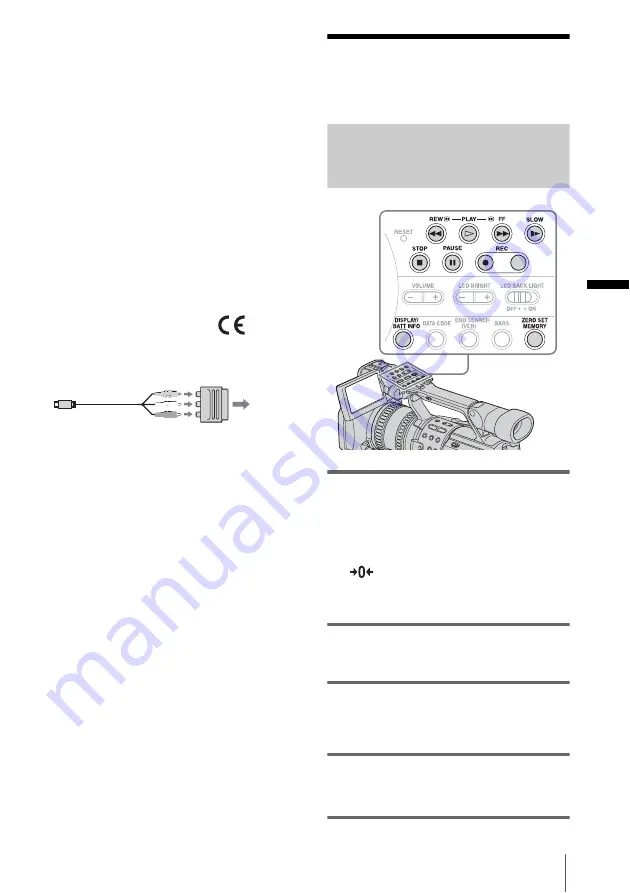
1

During playback, press ZERO SET 
MEMORY on your camcorder or 
Remote Commander at the point you 
want to locate later on.

The tape counter is reset to “0:00:00” and 

 appears on the screen.

If the tape counter is not displayed, press 
DISPALY/BATT INFO.

2

Press 

x

 (stop) when you want to stop 

playback.

3

Press 

m

 (rewind).

The tape stops automatically when the tape 
counter reaches “0:00:00.”

4

Press 

N

 (play).

The playback starts from the point 
designated “0:00:00” on the tape counter.

TV/VCR

,

continued

Summary of Contents for Handycam HDR-FX1E

Page 1: ...2 178 349 11 1 2004 Sony Corporation Operating Instructions Read this first Digital HD Video Camera Recorder HDR FX1E ...

Page 2: ...d to this equipment for your safety and convenience Should the fuse in the plug supplied need to be replaced a fuse of the same rating as the supplied one and approved by ASTA or BSI to BS1362 i e marked with or mark must be used If the plug supplied with this equipment has a detachable fuse cover be sure to attach the fuse cover after you change the fuse Never use the plug without the fuse cover ...

Page 3: ... and lens The LCD screen and the viewfinder are manufactured using extremely high precision technology so over 99 99 of the pixels are operational for effective use However there may be some tiny black points and or bright points white red blue or green in color that appear constantly on the LCD screen and the viewfinder These points are normal results of the manufacturing process and do not affec...

Page 4: ...fasten the grip belt as shown in the following illustration You can change the language to be used for screen display on your camcorder p 18 Do not hold the camcorder by the following parts Viewfinder LCD panel Battery pack Microphone Jack holder ...

Page 5: ...etting the screen language 18 Recording Recording movies 20 Recording for a longer time 22 Using zoom 22 Recording in mirror mode 23 Displaying the recording setup information Status check 24 Adjusting the exposure 25 Adjusting the exposure for backlit subjects 25 Recording the subject lit by strong light SPOT LIGHT 25 Adjusting the white balance 26 Recording using manual adjustments 27 Adjusting ...

Page 6: ...he most recently recorded scenes Rec Review 41 Playback Viewing movies 42 Playing back in various modes 43 Various playback functions 44 Searching for the last scene of the most recent recording END SEARCH 44 Displaying the screen indicators 44 Displaying the date time and camera settings data Data code 44 Displaying the video information Status check 45 Playing the picture on a TV 46 Viewing the ...

Page 7: ...s from a VCR or TV 74 Connecting to a computer 77 Dubbing sound to a recorded tape 78 Connecting an analog VCR to the computer via your camcorder Signal conversion function 81 Troubleshooting Troubleshooting 83 Warning indicators and messages 88 Additional Information Using your camcorder abroad 90 HDV format and recording playback 91 About the InfoLITHIUM battery pack 92 About i LINK 94 Maintenan...

Page 8: ... and slide it down a Slide the OPEN EJECT lever in the direction of the arrow to open the lid The cassette compartment comes out automatically b Insert the cassette with its window side facing out then push the center of the back of the cassette c Press on the cassette compartment Close the cassette lid after the cassette compartment slides back in by itself Battery Pack OPEN EJECT lever Window si...

Page 9: ... format see page 60 4 View the recorded picture on the LCD screen a Open the hood shutter b Open the LCD panel and adjust the angle c While pressing the green button set the POWER switch to CAMERA d Press REC START STOP Recording starts To change to standby mode press REC START STOP again a While pressing the green button set the POWER switch to VCR b Press m rewind c Press N play to start the pla...

Page 10: ...ove the lens hood Large eyecup 1 To attach it to your camcorder see page 16 Wireless Remote Commander 1 A V connecting cable 1 Component video cable 1 Shoe adaptor 1 To attach it to your camcorder see page 104 Rechargeable battery pack NP F570 1 R6 size AA batteries 2 To insert the batteries in the Remote Commander see page 105 Cleaning cassette 1 Shoulder strap 1 To attach it to your camcorder se...

Page 11: ...allic objects This may cause a malfunction Use a nearby wall socket when using the AC Adaptor Disconnect the AC Adaptor from the wall socket immediately if any malfunction occurs 1 Press the battery pack and slide it down 2 With the b mark on the DC plug facing the battery pack connect the AC Adaptor to the DC IN jack on your camcorder 3 Connect the mains lead to the AC Adaptor 4 Connect the mains...

Page 12: ... current remaining recording time both during charging or when the power is turned off The remaining recording time in the selected recording format appears 1 Set the POWER switch to OFF CHG 2 Open the LCD panel and adjust the angle 3 Press DISPLAY BATT INFO The battery information appears for about 7 seconds Keep the button pressed to view it for about 20 seconds A Battery charge level Displays a...

Page 13: ... actual recording to see the recording time The recording time varies depending on the environment where the camcorder is used Press DISPLAY BATT INFO to display the recording time on the screen Playing time Approximate number of minutes available when you use a fully charged battery pack at 25 C 77 F HDV format pictures DV format pictures With the LCD BACKLIGHT switch set to ON b Note The power w...

Page 14: ...l not lose its charge even when it is attached to your camcorder PRECAUTION Even if your camcorder is turned off AC power mains is still supplied to it while connected to the wall socket via the AC Adaptor Connect your camcorder as shown in Step 2 Charging the battery pack p 11 Step 3 Turning the power on You need to set the POWER switch to the respective power mode to record or play back pictures...

Page 15: ... LCD screen facing out If you are using the battery pack for power source you can select the brightness by setting LCD BL LEVEL on the LCD VF SET menu p 58 When you use your camcorder in bright conditions using the battery pack set the LCD BACKLIGHT switch to OFF appears This position saves battery power Even if you change the brightness of the LCD panel the brightness of recorded pictures is not ...

Page 16: ... SET menu then VF B LIGHT p 58 Step 5 Setting the date and time Set the date and time when using this camcorder for the first time If you do not set the date and time the CLOCK SET screen appears every time you turn on your camcorder b Note If you do not use your camcorder for about 3 months the built in rechargeable button type battery gets discharged and the date and time settings may be cleared...

Page 17: ...i DV cassettes only For details on these cassettes such as write protection see page 91 b Note Do not force the cassette into the compartment This may cause a malfunction of your camcorder 1 Slide the OPEN EJECT lever in the direction of the arrow and open the lid The cassette compartment automatically comes out and opens up CAMERA SET WB PRESET AE RESPONSE GA I N SETUP SHOT TRANS STEADYSHOT STDYS...

Page 18: ...ake out the cassette then press The cassette compartment automatically slides back in 3 Close the lid Step 7 Setting the screen language You can select the language to be used on the LCD screen 1 Turn on your camcorder 2 Open the LCD panel and adjust the angle 3 Press MENU 4 Select the OTHERS menu by turning the SEL PUSH EXEC dial then press the dial Window side Push the center of the back of the ...

Page 19: ...desired language by turning the SEL PUSH EXEC dial then press the dial 7 Press MENU to hide the menu screen z Tip Your camcorder offers ENG SIMP simplified English for when you cannot find your native tongue among the options 0 00 00 MENU END LANGUAGE DEUTSCH E HN I KA ENGL I SH ENG S I MP ESPAÑOL FRANÇA I S I TAL I ANO ...

Page 20: ...recording standby 4 Select the recording format To record in the HDV format Select the IN OUT REC menu REC FORMAT then HDV1080i the default setting p 60 appears on the LCD screen and your camcorder is set to recording standby To record in the DV format Select the IN OUT REC menu REC FORMAT then DV p 60 appears on the LCD screen the DV format lamp lights up and your camcorder is set to recording st...

Page 21: ...r ND2 flashes on the screen activate the ND filter p 30 b Note Before changing the battery pack set the POWER switch to OFF CHG When the camcorder is left in recording standby for more than about 5 minutes your camcorder exits the recording standby mode the drum stops rotating to prevent tape wear and battery loss Since the power does not turn off you can restart recording by pressing REC START ST...

Page 22: ... for a slower zoom Press it further for a faster zoom To record a wider range of view Press the W side of the power zoom lever The subject appears farther away Wide angle To record a closer view Press the T side of the power zoom lever The subject appears closer Telephoto Using the handle zoom You can adjust the zoom speed with the handle zoom switch when using the handle zoom lever 1 Set the ZOOM...

Page 23: ...o fast When you zoom using the Remote Commander set the ZOOM switch to LEVER REMOTE Zoomed position and picture angle change when the ZOOM switch is switched from LEVER REMOTE to RING If you rotate the zoom ring fast motor noise will become louder as the zoom motor rotates at high speeds If the motor noise is so loud that can be recorded use the zoom lever or the Remote Commander Recording in mirr...

Page 24: ...and TV TYPE settings p 60 Functions assigned to the ASSIGN buttons p 68 Picture profile setup p 34 1 Press STATUS CHECK 2 Turn the SEL PUSH EXEC dial to display the desired item Each time you turn the dial the items appear in the following order AUDIO t OUTPUT t ASSIGN t PICT PROFILE To turn off the display of the recording setup information Press STATUS CHECK b Note Information of the picture pro...

Page 25: ...pears To cancel the back light function press BACK LIGHT again b Note The back light function is canceled when you press SPOT LIGHT You cannot use the back light function if 2 or more items out of iris gain and shutter speed are adjusted manually Recording the subject lit by strong light SPOT LIGHT When the subject is lit by strong light such as in a theater use the spot light function to prevent ...

Page 26: ...the adjustment data is memorized To recall adjustment data from the memory 1 During recording or in the standby mode set the AUTO LOCK switch to the center position to release the auto lock mode 2 Set the WHT BAL switch to A or B 3 Press WHT BAL The white balance is set to the recalled adjustment b Note Avoid subjecting your camcorder to mechanical shock while A or B is flashing If A or B does not...

Page 27: ... these functions See page 26 for details on how to adjust the white balance b Note If you want to set the exposure intentionally to other than a proper level adjust the iris gain and shutter speed manually If you adjust only one of either iris shutter speed or gain manually you can record with iris priority shutter speed priority or gain priority respectively z Tip To adjust the brightness of pict...

Page 28: ...ore automatic adjustment Press IRIS or set the AUTO LOCK switch to AUTO LOCK b Note If you set the AUTO LOCK switch to AUTO LOCK other manually adjusted items gain shutter speed white balance also become temporarily automatic As you shift the zoom from W wide to T telephoto the aperture value varies from F1 6 to F2 8 z Tip You can select the rotation direction of the iris dial with IRIS DIAL on th...

Page 29: ...d items iris shutter speed white balance also become temporarily automatic Adjusting the shutter speed You can manually adjust and fix the shutter speed for your convenience Depending on the shutter speed you can make the subject look still or on the contrary emphasize the fluidity of movement 1 During recording or in the standby mode set the AUTO LOCK switch to the center position to release the ...

Page 30: ...s of ND filter setting ND filter 1 reduces the volume of light to about 1 6 and ND filter 2 to about 1 32 If ND1 or ND2 flashes in the standby mode set the ND FILTER switch to the respective position If ND1 flashes Set the ND FILTER switch to 1 to turn on ND1 If ND2 flashes Set the ND FILTER switch to 2 to turn on ND2 If ND OFF flashes Set the ND FILTER switch to OFF to turn off the indicator b No...

Page 31: ... press the dial 3 Select ZEBRA LEVEL by turning the SEL PUSH EXEC dial then press the dial 4 Select the desired level by turning the SEL PUSH EXEC dial then press the dial Select a value from 70 to 100 or 100 If you select 70 the zebra pattern appears at the part of 70 5 of the brilliance signal If you select 100 the zebra pattern appears at all areas of the brilliance signal over 100 The default ...

Page 32: ...he power zoom lever towards T telephoto to adjust the focus and then towards W wide angle to adjust the zoom for recording When you want to record a close up image of a subject move the power zoom lever towards W wide angle to fully magnify the image then adjust the focus To focus on a distant subject Record the subject with the FOCUS switch slid down to INFINITY appears If you release the switch ...

Page 33: ...It will not be displayed correctly if you are using a conversion lens optional When the focus mode is switched from automatic to manual When you rotate the focus ring Enhancing the outline to focus PEAKING You can enhance the outline of the image on the screen for easier focusing During recording or in standby mode set the ZEBRA PEAKING switch to PEAKING To cancel peaking Set the ZEBRA PEAKING swi...

Page 34: ...1 In the standby mode press PICTURE PROFILE 2 Select a picture profile number by turning the SEL PUSH EXEC dial then press the dial PP1 through PP6 are available 3 Select SETTING by turning the SEL PUSH EXEC dial then press the dial 4 Select an item to be adjusted by turning the SEL PUSH EXEC dial then press the dial 5 Adjust the picture quality by turning the SEL PUSH EXEC dial then press the dia...

Page 35: ...picture profile settings at once 1 Press PICTURE PROFILE SKINTONE DTL To make wrinkles less noticeable by suppressing the outlines on the part of skin color to be enhanced TYPE1 the color range recognized as a skin color is narrow to TYPE3 the color range recognized as a skin color is wide In the case of TYPE3 the effect may also be applied to a color that is not a skin color OFF no adjustment AE ...

Page 36: ... shutter speed may reach 1 1750 automatically If you adjust the gain manually you cannot obtain the effect of AGC LIMIT If you select CINEFRAME 25 when the shutter speed is slower than 1 12 the shutter speed is automatically set to 1 25 Adjusting the audio recording level Microphone volume level You can adjust the microphone volume when recording Checking the volume with headphones is recommended ...

Page 37: ...u p 53 Step 1 Store the settings 1 Press STORE CHECK EXEC repeatedly to turn on the STORE lamp 2 Adjust the desired items manually To adjust the camera setup items such as iris manually set the AUTO LOCK switch to the center position to release the auto lock mode See pages 26 to 29 for details on adjustment 3 Press a button A or B to select the storage location The setting is stored in the selecte...

Page 38: ...settings by making them change either from Shot A to Shot B or from Shot B to Shot A For example to change from Shot A to Shot B turn on the CHECK lamp and press A followed by REC START STOP then turn on the EXEC lamp and press B You can rehearse the shot transition by pressing the button A or B in which the desired setting was stored before pressing REC START STOP in step 2 To cancel the operatio...

Page 39: ...ill make it easier to check the transition of recording or edit your pictures using index signals Assign the index function to one of the ASSIGN buttons in advance See page 68 to assign a function Press the ASSIGN button assigned to the index function When pressed during recording appears for about 7 seconds and an index signal is recorded When pressed in the standby mode flashes After you press R...

Page 40: ...reen The playback picture may look different depending on the TV connected 1 In the standby mode press MENU 2 Select the CAMERA SET menu by turning the SEL PUSH EXEC dial then press the dial 3 Select DV WIDE REC by turning the SEL PUSH EXEC dial then press the dial 4 Select ON or OFF depending on the TV then press the SEL PUSH EXEC dial 5 Press MENU to hide the menu screen On the LCD screen or vie...

Page 41: ...ed scenes Rec Review You can view a few seconds of the scene recorded just before you stopped the tape In the standby mode press REC REVIEW The last few seconds of the most recently recorded scene are played back Then your camcorder is set to the standby mode ...

Page 42: ...volume by pressing VOLUME decrease increase To stop playback Press x stop To pause Press X pause during playback Press N play or X pause again to restart the playback Playback stops automatically when the pause mode continues for more than 5 minutes To fast forward or rewind Press M fast forward or m rewind in stop mode To review movies on the viewfinder Close the LCD panel Then adjust the viewfin...

Page 43: ...Also you may see mosaic like images of the previously played picture remaining on the screen To return to the normal playback mode press N play Horizontal lines may appear at the top bottom or in the center of the screen This is not a malfunction b Note Pictures in the HDV format are not output from the HDV DV jack when they are paused or played back in other than normal playback mode Pictures in ...

Page 44: ...the tape Displaying the screen indicators You can choose to display the time code tape counter and other information on the screen Press DISPALY BATT INFO The indicator switches on or off as you press the button z Tip You can display the screen indicators during playback on a TV Select the OTHERS menu DISP OUTPUT then V OUT PANEL p 64 However only playback mode indicators and tape counter appear w...

Page 45: ...de the camera settings data Select the OTHERS menu DATA CODE then DATE p 63 Each time you press DATA CODE the date time indicator turns on and off Displaying the video information Status check You can check the setup value of the following items Audio setup such as audio mix p 56 Output signal setup VCR HDV DV etc p 59 Functions assigned to the ASSIGN buttons p 68 1 Press STATUS CHECK 2 Turn the S...

Page 46: ... HDV DV and has an i LINK jack Before connecting the i LINK cable select the IN OUT REC menu VCR HDV DV then AUTO the default setting In case of this connection the TV needs to be set so that it recognizes that the camcorder is connected Refer to the operating manual supplied with the TV for the details To connect the TV using the component video cable To view the picture recorded in the HDV forma...

Page 47: ... on the TV connected The audio will not be output when you connect with the S video cable alone b Note Be sure that you set VCR HDV DV before connecting the i LINK cable Otherwise the TV might not be able to recognize the video signal correctly Pictures in the DV format are not output from the COMPONENT OUTPUT jack if copyright protection signals are recorded in the pictures z Tip If you connect y...

Page 48: ...input jack of your TV or VCR To connect the TV using the A V connecting cable When there is an S video jack on the device to be connected connect it with your camcorder by the S video jacks using an S video cable optional instead of the yellow video plug of the A V connecting cable supplied Use an S video cable to produce high resolution pictures The audio will not be output when you connect with ...

Page 49: ...modesl with the mark printed on their bottom surfaces only This adaptor is designed for output use only b Note Pictures in the DV format are not output from the COMPONENT OUTPUT jack if copyright protection signals are recorded in the pictures Locating a scene on a tape for playback Searching quickly for a desired scene Zero set memory 1 During playback press ZERO SET MEMORY on your camcorder or R...

Page 50: ...ding is less than 2 minutes your camcorder may not accurately find the point where the recording date changes The Date search will not function correctly when there is a blank section between recorded sections on the tape Searching for a recording start point Index search You can locate the point where an index signal is recorded p 39 1 Set the POWER switch to VCR 2 Press SEARCH MODE on the Remote...

Page 51: ...dial then press the dial The available menu items vary depending on the power mode of your camcorder Unavailable items will be grayed out 5 Select the desired setting by turning the SEL PUSH EXEC dial then press the dial 6 Press MENU to hide the menu screen To return to the previous screen select RETURN POWER switch CAMERA SET WB PRESET AE RESPONSE GA I N SETUP SHOT TRANS STEADYSHOT STDYSHOT TYP H...

Page 52: ...page 26 for details AE RESPONSE Select the speed to adjust the exposure automatically in accordance with the brightness of the subject FAST MIDDLE and SLOW are available GAIN SETUP Select the adjustment value for each position H M and L of the GAIN switch p 28 1 Select H M or L by turning the SEL PUSH EXEC dial then press the dial 2 Select an adjustment value by turning the SEL PUSH EXEC dial then...

Page 53: ...able It is set to 4 0 sec in the default setting TRANS CURVE Select the transition curve The figures below show the transition curve of each mode 1 parameter level 2 transition of time b Note Before setting SHOT TRANS turn off all of the STORE CHECK EXEC lamps by pressing the button repeatedly p 37 LINEAR Select to make the transition linearly GSOFT STOP Select to make the transition slowly at the...

Page 54: ...om speed 3 Select OK by turning the SEL PUSH EXEC dial then press the dial 4 Press MENU to hide the menu screen ZEBRA LEVEL See page 31 for details GON Select to activate the SteadyShot function You can select the type of the SteadyShot function in STDYSHOT TYP OFF Select to deactivate the SteadyShot function Select when recording using a tripod More natural pictures are produced You can also deac...

Page 55: ...time will not be indicated correctly The last scene will be longer than other scenes You cannot record index signals during frame recording DV WIDE REC See page 40 for details GOFF Select when you do not want to display the center marker on the screen p 21 ON Select to display the center marker on the screen GOFF Select to record in the standard recording mode ON Select to record pictures using th...

Page 56: ...camcorder for more than 5 minutes AUDIO MIX You can adjust the audio balance between the originally recorded sound ST1 and sound added afterwards ST2 on the tape p 79 b Note You cannot adjust sound recorded in 16 bit audio mode Only the originally recorded sound will be heard when you disconnect the power source from your camcorder for more than 5 minutes AUDIO MODE b Note When recording in the HD...

Page 57: ...Select when you want to record the sound as it is without reducing the noise caused by wind GEXT MIC Select to input an audio signal when a microphone is connected to the MIC LINE jack LINE Select to input an audio signal when an audio device is connected to the MIC LINE jack ...

Page 58: ... this setting LCD BL LEVEL You can adjust the brightness of the LCD screen s backlight The recorded picture will not be affected by this setting b Note When you connect your camcorder to outside power sources BRIGHT is automatically selected for this setting VF B LIGHT You can adjust the brightness of the viewfinder The recorded picture will not be affected by this setting b Note When you connect ...

Page 59: ... and sound disappear temporarily When i LINK CONV is set to ON pictures are output as follows at AUTO an HDV signal is converted to the DV format and output a DV signal is output as it is at HDV an HDV signal is converted to the DV format and output a DV signal is not output at DV a DV signal is output as it is an HDV signal is not output IN OUT REC RETURN VCR HDV DV REC MODE COMPONENT i LINK CONV...

Page 60: ...n HDV1080i is selected in REC FORMAT When the POWER switch is set to VCR this setting is effective only when AUTO or HDV is selected in VCR HDV DV b Note See VCR HDV DV for information about an input signal via an i LINK connection GHDV1080i Select to record in the HDV1080i specification DV Select to record in the DV format GSP SP Select to record in the SP Standard Play mode on a tape LP LP Selec...

Page 61: ... digital device and an analog device to your camcorder and convert the signal transmitted from the connected devices to the appropriate signal on your camcorder G16 9 Select to view your pictures on a 16 9 wide TV The recorded pictures will appear as follows 4 3 Select to view your pictures on a 4 3 standard TV The recorded pictures will appear as follows GOFF Select when you are not using the Sig...

Page 62: ...ce when using your camcorder abroad Set the time difference by turning the SEL PUSH EXEC dial the clock will be adjusted in accordance with the time difference If you set the time difference to 0 the clock returns to the originally set time LANGUAGE You can select or change the language used for the on screen display p 18 You can select from English Simplified English Traditional Chinese Simplifie...

Page 63: ...ose to the subject When the subject reflects the light of the recording lamp GON Select to turn on the format lamp The lamp of the format that is selected in REC FORMAT lights up when the POWER switch is set to CAMERA The lamp of the format that is selected in VCR HDV DV lights up when the POWER switch is set to VCR OFF Select when you do not want to turn on the format lamp The i LINK lamp also do...

Page 64: ... with a cassette inserted and your camcorder calculates the remaining amount of tape After you press N play or DISPLAY BATT INFO ON Select to always display the remaining tape indicator GLCD PANEL Select to show indicators such as the time code on the LCD screen and in the viewfinder V OUT PANEL Select to show indicators such as the time code on the TV screen LCD screen and in the viewfinder GON S...

Page 65: ...enu Add You can add frequently used menu items to Personal Menu for easier and faster access b Note You can add up to 28 menu items each for the CAMERA and VCR modes If you want to add more you must delete a less important menu item before adding a new menu item p 66 1 Press P MENU 2 Select P MENU SETUP by turning the SEL PUSH EXEC dial then press the dial 3 Select ADD by turning the SEL PUSH EXEC...

Page 66: ... to delete by turning the SEL PUSH EXEC dial then press the dial 5 Select YES by turning the SEL PUSH EXEC dial then press the dial The selected menu is deleted from Personal Menu 6 Press P MENU 0 00 00 120min STBY P MENU END Se l ec t t he i t em RETURN WB PRESET AE RESPONSE GAIN SETUP SHOT TRANS STEADYSHOT STDYSHOT TYP 0 00 00 120min STBY P MENU END ADD YES NO STDYSHOT TYP Add t o CAMERA mode s ...

Page 67: ... P MENU 2 Select P MENU SETUP by turning the SEL PUSH EXEC dial then press the dial 0 00 00 120min STBY P MENU END END P MENU SHOT TRANS REC FORMAT AE RESPONSE WB PRESET GAIN SETUP ASS I GN BTN 0 00 00 120min STBY P MENU SETUP RETURN ADD DELETE SORT RESET P MENU END 0 00 00 120min STBY P MENU END Se l ec t i t em t o move RETURN SHOT TRANS ASS I GN BTN REC FORMAT AE RESPONSE WB PRESET GAIN SETUP 1...

Page 68: ...m to the ASSIGN buttons to use them You can assign single function to each ASSIGN 1 2 3 button Functions you can assign to the ASSIGN buttons FADER p 38 STEADYSHOT INDEX SAVE p 39 AUDIO DUB p 79 DISPLAY p 44 BARS p 21 1 Press MENU 2 Select the OTHERS menu by turning SEL PUSH EXEC dial then press the dial 3 Select ASSIGN BTN by turning SEL PUSH EXEC dial then press the dial 4 Select the number of t...

Page 69: ...dial then press the dial 7 Press MENU to hide the menu z Tip When you press the ASSIGN button assigned to the STEADYSHOT the SteadyShot function is released and appears on the LCD screen To activate the SteadyShot fucntion press the same button again You can select the effect level of the SteadyShot function at STDYSHOT TYP on the CAMERA SET menu p 54 There are independent buttons of DISPLAY and B...

Page 70: ...LINK CONV is set to OFF Pictures including those recorded in the HDV format will be dubbed in the DV format when VCR HDV DV is set to AUTO and i LINK CONV is set to ON Only pictures in the selected format will be dubbed when VCR HDV DV is set to HDV or DV Other pictures will be dubbed as blank portions so neither picture nor sound will be dubbed b Note If you change the settings of VCR HDV DV and ...

Page 71: ...tures in the HDV format will be dubbed as blank portions so neither picture nor sound will be dubbed b Note If you change the settings of VCR HDV DV and i LINK CONV with the i LINK cable connected the video device may not be able to recognize the video signal from the camcorder at the time of dubbing If i LINK CONV is set to OFF while VCR HDV DV is set to AUTO pictures recorded in the HDV mode wil...

Page 72: ...not be output if you connect with the S video cable alone b Note Select the OTHERS menu DISP OUTPUT then LCD PANEL the default setting p 64 When you connect your camcorder to a monaural device connect the yellow plug of the A V connecting cable to the video jack and the red or the white plug to the audio jack on the VCR or the TV z Tip To record the date time and camera settings data first have th...

Page 73: ...en the dubbing is finished stop your camcorder and the VCR b Note When you use an i LINK cable the recorded picture becomes rough when a picture is paused on your camcorder while recording it to a VCR Pictures recorded in the HDV format are not output from the HDV DV jack during playback pause or in playback modes other than normal playback When you use an i LINK cable you cannot record the pictur...

Page 74: ...rce you need a dual direction 21 pin adaptor optional Connecting a VCR or TV To record from an HDV compatible device You can record and edit pictures from an HDV compatible VCR Use your camcorder as a recorder and connect it to an HDV compatible device using an i LINK cable optional On this camcorder recorder select the IN OUT REC menu VCR HDV DV then AUTO p 59 before connecting b Note In case of ...

Page 75: ...h the S video cable alone b Note You can record pictures from DV AV devices only in the DV format When you use the A V connecting cable supplied select the OTHERS menu DISP OUTPUT then LCD PANEL the default setting p 64 When you connect your camcorder to a monaural device connect the yellow plug of the A V connecting cable to the video jack and the red or the white plug to the audio jack on the VC...

Page 76: ...cture becomes rough when a picture is paused on your VCR When you use an i LINK cable you cannot record the picture and sound separately When you use an i LINK cable if you pause or stop the recording and restart it the picture may not be recorded smoothly z Tip The i LINK lamp HDV or DV on the HDV DV jack holder will light up and indicate the format of the input signal when you use an i LINK cabl...

Page 77: ...Connect a computer that can handle the signal of the format indicated by the i LINK lamps If you connect a computer that cannot handle the signal the computer may hang up or may not recognize the signal from your camcorder Disconnect the i LINK cable before resetting REC FORMAT when the POWER switch is set to CAMERA Otherwise the computer may hang up z Tip The i LINK lamp HDV or DV on the HDV DV j...

Page 78: ...audio input to be recorded takes precedence in the order of MIC LINE jack t AUDIO VIDEO jack t internal microphone b Note When you use the AUDIO VIDEO jack or the internal microphone to record additional sound the picture will not be output from the AUDIO VIDEO jack Check the picture on the LCD screen or the viewfinder and the sound on the headphones You cannot record additional audio When the tap...

Page 79: ...s X pause and start playing back the audio you want to record at the same time The mark remains on the LCD screen while sound is recorded The new sound is recorded in stereo 2 ST2 7 Press x stop when you want to stop recording To set the end point for audio dubbing During playback press ZERO SET MEMORY at the scene at which you want to stop audio dubbing Then perform steps 4 to 6 The recording sto...

Page 80: ... ST1 and the sound recorded afterwards ST2 then press the dial The original sound ST1 is output in the default setting The adjusted audio balance returns to the default setting about 5 minutes after the battery pack or other power sources have been disconnected 6 Press MENU to hide the menu screen ...

Page 81: ... application software to import video signals must be installed on the computer Connecting a computer Refer to the manual supplied with the application software for the system requirements of the computer b Note Select the OTHERS menu DISP OUTPUT then LCD PANEL the default setting p 64 Before connecting the i LINK cable select the IN OUT REC menu VCR HDV DV then DV p 59 If you do this operation wi...

Page 82: ...U to hide the menu screen 8 Start playback on the analog device 9 Start importing on the computer Refer to the manual supplied with the program software or its on line help for details After importing the picture and sound Stop importing on the computer and stop playback on the analog device b Note Your camcorder may not be able to output the signal to the computer correctly depending on the video...

Page 83: ...ject If you press the RESET button all settings including the clock setting except the Personal Menu and Picture Profile settings are reset A clattering noise is heard when the camcorder is handled with the POWER switch set to OFF CHG or VCR This is because some lens functions on the camcorder use a linear mechanism This is not a malfunction The supplied Remote Commander does not function cSet REM...

Page 84: ...although the remaining battery indicator indicates that the battery pack has enough power to operate A problem has occurred in the remaining battery time indicator or the battery pack has not been charged enough cFully charge the battery again to correct the indication p 11 A problem occurs when the camcorder is connected to the AC Adaptor cTurn off the power and disconnect the AC Adaptor from the...

Page 85: ...he tape does not start when you press REC START STOP on the handle cRelease the HOLD lever p 21 The power abruptly turns off cCharge the battery pack p 11 The zoom does not function cSet the ZOOM switch correctly p 22 cWhen using the zoom lever on the Remote Commander set the ZOOM switch to LEVER REMOTE p 23 The handle zoom does not work cSet the handle zoom switch to H or L p 22 Zoom or shot tran...

Page 86: ...SOUND to STEREO on the AUDIO SET menu p 56 cTurn up the volume p 42 cOn the AUDIO SET menu adjust AUDIO MIX from the ST2 additional sound side until the sound is heard appropriately p 56 cWhen you are using an S VIDEO cable or a component video cable make sure the red and white plugs of the A V connecting cable are connected as well p 46 The sound breaks off cClean the head using the cleaning cass...

Page 87: ... recording devices using a 4 channel microphone This camcorder does not comply with the 4 channel microphone recording standard Symptom Cause and or Corrective Actions Pictures from connected devices are not displayed on the LCD screen or the viewfinder cSet DISP OUTPUT to LCD PANEL on the OTHERS menu p 64 Cannot dub correctly using the A V connecting cable cSet DISP OUTPUT to LCD PANEL on the OTH...

Page 88: ...ve and insert the cassette then operate your camcorder again Do not perform this procedure if moisture starts to condense p 95 cRemove the power source Reconnect it again and operate your camcorder again cChange the tape E 61 ss E 62 ss cContact your Sony dealer or local authorized Sony service facility Inform them of the 5 digit code which starts from E E Battery level warning The battery pack is...

Page 89: ... check the tab cSee page 91 Q The tape has reached the end Others Cannot record due to copyright protection Cannot add audio Disconnect the i LINK cable cSee page 78 Not recorded in SP mode Cannot add audio cSee page 78 Not recorded in 12 bit audio Cannot add audio cSee page 78 Cannot add audio on the blank portion of a tape cSee page 78 HDV recorded tape Cannot add audio cSee page 78 Cannot add a...

Page 90: ...LD TIME on the OTHERS menu then set the time difference p 62 System Used in PAL Australia Austria Belgium China Czech Republic Denmark Finland Germany Holland Hong Kong Hungary Italy Kuwait Malaysia New Zealand Norway Poland Portugal Singapore Slovak Republic Spain Sweden Switzerland Thailand United Kingdom etc PAL M Brazil PAL N Argentina Paraguay Uruguay SECAM Bulgaria France Guiana Iran Iraq Mo...

Page 91: ... copyright signals you cannot copy it to a tape in another video device connected to your camcorder When you record You cannot record software on your camcorder that contains copyright control signals for copyright protection of software Cannot record due to copyright protection appears on the LCD screen or on the TV screen if you try to record such software Your camcorder does not record copyrigh...

Page 92: ...ons for communicating information related to operating conditions between your camcorder and an optional AC Adaptor charger The InfoLITHIUM battery pack calculates the power consumption according to the operating conditions of your camcorder and displays the remaining battery time in minutes With an AC Adaptor charger optional the remaining battery time and charging time appear To charge the batte...

Page 93: ...ery indication will not be restored if it is used in high temperatures for a long time or if left in a fully charged state or when the battery pack is frequently used Use the remaining battery time indication as a guide to the approximate shooting time The E mark that indicates low battery flashes even if there are still 5 to 10 minutes of battery time remaining depending on the operating conditio...

Page 94: ...zed by the Institute of Electrical and Electronics Engineers About i LINK Baud rate i LINK s maximum baud rate varies according to the device There are 3 types S100 approx 100Mbps S200 approx 200Mbps S400 approx 400Mbps The baud rate is listed under Specifications in the operating instructions of each piece of device It is also indicated near the i LINK interface on some device The maximum baud ra...

Page 95: ... not wrap your camcorder with a towel for example and operate it Doing so might cause heat to build up inside When disconnecting the mains lead pull by the plug and not the cord Do not damage the mains lead such as by placing anything heavy on it Keep metal contacts clean Keep the Remote Commander and button type battery out of children s reach If the battery is accidentally swallowed consult a do...

Page 96: ... video head suffers from wear after long use If you cannot obtain a clear image even after using a cleaning cassette it might be because the video head is worn Please contact your Sony dealer or local authorized Sony service facility to have the video head replaced LCD screen Do not add excessive pressure on the LCD screen as it may cause damage If your camcorder is used in a cold place a residual...

Page 97: ...but it will get discharged gradually if you do not use your camcorder The button type battery will be fully discharged in about 3 months if you do not use your camcorder at all However even if the pre installed button type battery is not charged the camcorder operation will not be affected if you are not recording the date Procedures Connect your camcorder to a wall socket using the supplied AC Ad...

Page 98: ...s Effective Approx 1 070 000 pixels Lens Carl Zeiss Vario Sonnar T Combined power zoom lens Filter diameter 72 mm 2 7 8 in 12 Optical F 1 6 2 8 Focal length 4 5 54 mm 3 16 2 1 4 in When converted to a 35 mm still camera 32 5 390 mm 1 5 16 15 3 8 in 40 480 mm 1 5 8 19 in in 4 3 TV mode Color temperature AUTO ONE PUSH A B INDOOR 3 200 K OUTDOOR 5 800 K Minimum illumination 3 lx lux F 1 6 Input Outpu...

Page 99: ...the NP F570 rechargeable battery pack DVM60 cassette and lens hood Supplied accessories See page 10 AC Adaptor AC L15A L15B Power requirements AC 100 240 V 50 60 Hz Current consumption 0 35 0 18 A Power consumption 18 W Output voltage DC 8 4 V 1 5 A Operating temperature 0 C to 40 C 32 F to 104 F Storage temperature 20 C to 60 C 4 F to 140 F Dimensions approx 56 31 100 mm 2 1 4 1 1 4 4 in w h d ex...

Page 100: ...e lever p 97 D Rear remote sensor E Rear camera recording lamp p 20 F BATT RELEASE battery release button p 12 G REC START STOP button p 20 H i LINK lamps HDV DV p 73 Lights up when handling an i LINK signal I Battery pack p 11 J Shoe adaptor attaching part p 104 K Power zoom lever p 22 L EXPANDED FOCUS button p 32 M Grip belt p 4 N POWER switch p 14 ...

Page 101: ...22 L REC REVIEW button p 41 M Format lamps p 20 N Viewfinder p 3 15 O BACK LIGHT button p 25 P SPOT LIGHT button p 25 Q ASSIGN buttons 1 2 3 p 68 R ZEBRA PEAKING switch p 31 33 S IRIS button p 28 T GAIN button p 28 U AUTO LOCK switch p 26 28 29 V WHT BAL white balance button p 26 W SHUTTER SPEED button p 29 Each of the buttons has a raised tactile dot The ASSIGN button has it on the 2 button Use i...

Page 102: ... VCR button p 44 H Handle zoom lever p 22 I Video control buttons Rewind Playback Fast forward Pause Stop Slow Record p 42 J LCD BRIGHT buttons p 15 K LCD BACKLIGHT switch p 15 L ZERO SET MEMORY button p 49 M BARS button p 21 N REC START STOP button and HOLD lever p 21 O AUTO MAN manual audio switch p 36 P CHG charge lamp p 11 Q DC IN jack p 11 R AUDIO LEVEL dial p 36 Each of the buttons has a rai...

Page 103: ...w may damage your camcorder H AUDIO VIDEO jack p 46 48 72 75 78 I MIC PLUG IN POWER LINE jack red p 78 J Microphone p 78 K Front camera recording lamp p 20 L Front remote sensor M Speaker N Lens Carl Zeiss Lens Your camcorder is equipped with a Carl Zeiss lens which can reproduce fine images The lens for your camcorder was developed jointly by Carl Zeiss in Germany and Sony Corporation It adopts t...

Page 104: ...rtment lid p 17 E Viewfinder lens adjustment lever p 15 F PICTURE PROFILE button p 34 G MENU button p 51 H P MENU button p 65 I STATUS CHECK button p 24 45 J SEL PUSH EXEC dial p 51 To attach the shoe adaptor To remove the lens hood Loosen the lens hood fixing screw then turn the lens hood in the direction of the arrow To attach the lens hood Align the marks on the lens hood to those on the camcor...

Page 105: ...ompartment 2 Insert 2 R6 size AA batteries by matching the and on the batteries to the and in the battery compartment 3 Replace the cover back until it clicks b Notes on the Remote Commander Point the remote sensor away from strong light sources such as direct sunlight or overhead lighting Otherwise the Remote Commander may not function properly The Remote Commander may not function properly when ...

Page 106: ... mode p 56 60min q Remaining tape p 21 Frame recording p 55 Output analog images and sound in digital format p 61 HDV input DV input p 76 Zero set memory p 49 Q Z Warning p 88 9 Manual focus p 32 Backlight p 25 Spot light p 25 n Preset white balance p 26 A B One push white balance p 26 Iris closed p 28 L ND 1 R F 1 6 18dB 180 HDV1080i 0 00 00 120min 60min PP1 STBY Example Indicators in the CAMERA ...

Page 107: ...e DATA CODE 44 63 Date search 50 Date time 16 44 Display DISP OUTPUT 64 Display indicators 106 Dual sound track tape 56 Dubbing 70 E END SEARCH 44 Expanded focus 32 Exposure 25 F FADER 38 Focus 32 FORMAT LAMP 63 Frame playback 43 Frame recording FRAME REC 55 Full charge 11 G Gain 28 GAIN SETUP 52 Grip belt 4 H HANDLE ZOOM 54 Handle zoom speed 22 HDV 3 90 91 Headphones jack 103 I i LINK 94 i LINK c...

Page 108: ...onversion function A V c DV OUT 61 81 SKINTONE DTL 35 Skip scan 43 Smooth transition See END SEARCH SP Standard Play See Recording mode REC MODE SPOT LIGHT 25 STATUS CHECK 24 45 SteadyShot STEADYSHOT 54 SteadyShot type STDYSHOT TYP 54 Stereo 56 Sub sound See MULTI SOUND T Tape counter 21 49 Telephoto See Zoom Time code 21 Transition curve TRANS CURVE 53 Transition time TRANS TIME 53 TV color syste...

Page 109: ......

Page 110: ......

Page 111: ......

Page 112: ...Printed in Japan Printed on 100 recycled paper using VOC Volatile Organic Compound free vegetable oil based ink ...

Reviews: