background image

1

GB

Getting started

Charging the battery pack

For information on your camcorder model, see the following page:

Functions and equipment 

 p.12

Supplied items 

 p.13

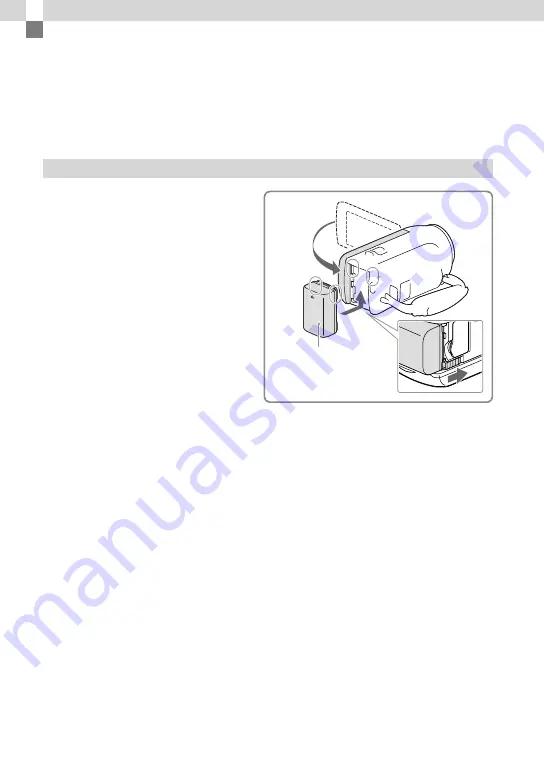
Attaching/Removing the battery pack

Close the LCD screen and attach the 
battery pack.

Align the indentation on the camcorder and 

projection on the battery pack, then slide the 

battery pack upwards.

To remove the battery pack, close the LCD 

screen, then slide the BATT (battery) release 

lever and remove the battery pack.

Battery pack

Summary of Contents for Handycam HDR-CX220E

Page 1: ...l HD Video Camera Recorder Operating Guide 4 447 514 12 1 Table of contents Getting started Recording Playback Saving movies and photos with a computer Saving images on an external media device Customizing your camcorder Others Index Please also refer to http www sony net SonyInfo Support ...

Page 2: ... of fire or electric shock 1 do not expose the unit to rain or moisture 2 do not place objects filled with liquids such as vases on the apparatus Do not expose the batteries to excessive heat such as sunshine fire or the like This symbol is intended to alert the user to the presence of uninsulated dangerous voltage within the product s enclosure that may be of sufficient magnitude to constitute a ...

Page 3: ...let consult an electrician for replacement of the obsolete outlet Protect the power cord from being walked on or pinched particularly at plugs convenience receptacles and the point where they exit from the apparatus Only use attachments accessories specified by the manufacturer Use only with the cart stand tripod bracket or table specified by the manufacturer or sold with the apparatus When a cart...

Page 4: ... regions Voltage Frequency Hz Plug type Austria 230 50 C Belgium 230 50 C Czech 220 50 C Denmark 230 50 C Finland 230 50 C France 230 50 C Germany 230 50 C Greece 220 50 C Hungary 220 50 C Iceland 230 50 C Ireland 230 50 C BF Italy 220 50 C Luxemburg 230 50 C Netherlands 230 50 C Norway 230 50 C Poland 220 50 C Portugal 230 50 C Romania 220 50 C Russia 220 50 C Slovak 220 50 C Spain 127 230 50 C S...

Page 5: ...duras 110 60 A Jamaica 110 50 A Mexico 120 127 60 A Nicaragua 120 240 60 A Panama 110 220 60 A South America Countries regions Voltage Frequency Hz Plug type Argentina 220 50 C BF O Brazil 127 220 60 A C Chile 220 50 C Colombia 120 60 A Peru 220 60 A C Venezuela 120 60 A Middle East Countries regions Voltage Frequency Hz Plug type Iran 220 50 C BF Iraq 220 50 C BF Israel 230 50 C Saudi Arabia 127 ...

Page 6: ... and furniture Use the nearby wall outlet wall socket when using the AC Adaptor Disconnect the AC Adaptor from the wall outlet wall socket immediately if any malfunction occurs while using your camcorder Even if your camcorder is turned off AC power source mains is still supplied to it while connected to the wall outlet wall socket via the AC Adaptor Note on the power cord mains lead The power cor...

Page 7: ...ference that may cause undesired operation Declaration of Conformity Trade Name SONY Model No HDR CX230 Responsible Party Sony Electronics Inc Address 16530 Via Esprillo San Diego CA 92127 U S A Telephone No 858 942 2230 This device complies with Part 15 of the FCC Rules Operation is subject to the following two conditions 1 This device may not cause harmful interference and 2 this device must acc...

Page 8: ...couraged to try to correct the interference by one or more of the following measures Reorient or relocate the receiving antenna Increase the separation between the equipment and receiver Connect the equipment into an outlet on a circuit different from that to which the receiver is connected Consult the dealer or an experienced radio TV technician for help The supplied interface cable must be used ...

Page 9: ...u will help prevent potentially negative consequences for the environment and human health which could otherwise be caused by inappropriate waste handling of the battery The recycling of the materials will help to conserve natural resources In case of products that for safety performance or data integrity reasons require a permanent connection with an incorporated battery this battery should be re...

Page 10: ...r other malfunctions could occur ejecting the memory card when the access lamp p 22 is lit or flashing removing the battery pack or AC Adaptor models with an AC Adaptor from the camcorder or applying mechanical shock or vibration to the camcorder when the POWER CHG charge lamp p 19 is lit or flashing green or the access lamp p 22 is lit or flashing When the camcorder is connected to other devices ...

Page 11: ...lect your country or region 3 Search for the model name of your camcorder within the support page Check the model name on the bottom of your camcorder Selecting items on the LCD screen Move the multi selector towards to select the desired item and then press the center of the selector to complete the selection Supplied Items The numbers in indicate the supplied quantity Camcorder 1 HDMI cable 1 US...

Page 12: ...ame of your camcorder See the bottom of your camcorder Differences in functions Model name Recording media Signal format USB connection SteadyShot Internal memory Memory card Memory card HDR CX220 PJ220 NTSC Input Output Electronic HDR CX220E PJ220E PAL Output only Electronic HDR CX230 PJ230 NTSC Input Output Electronic HDR CX230E PJ230E PAL Output only Electronic HDR CX280 NTSC Input Output Optic...

Page 13: ...CX290E HDR PJ220 PJ220E PJ230 PJ230E Differences in supplied items Model name AC Adaptor Power Cord Mains lead HDR CX220 CX220E CX230 CX230E HDR CX280 CX280E CX290 CX290E PJ220 PJ220E PJ230 PJ230E Notes For the following items the descriptions are explained with the model name Safety Regulation p 2 Parts and controls p 16 Menu lists p 37 Specifications p 46 ...

Page 14: ...els with an AC Adaptor 19 Charging the battery using your computer 19 Setting 21 Preparing your camcorder 21 Changing the recording media Models with internal memory 21 Inserting a memory card 22 Recording Playback Recording 24 Zooming 25 Playback 26 Playing images on a TV 28 Using the built in projector Models with a projector 29 Saving movies and photos with a computer Playing images on a comput...

Page 15: ...rder 34 Saving images on an external media device with high definition HD image quality Models with an AC Adaptor 35 Customizing your camcorder Using menus 36 Menu lists 37 Others Index Troubleshooting 40 Self diagnosis display Warning indicators 41 About handling of your camcorder 42 Specifications 46 Screen indicators 49 Index 51 ...

Page 16: ...21 If you rotate the LCD panel 180 degrees you can close the LCD panel with the LCD screen facing out This is convenient during playback operations Multi selector 11 View Images button PROJECTOR FOCUS lever 29 Projector lens 29 HDR CX220 CX220E CX230 CX230E CX280 CX280E CX290 CX290E HDR PJ220 PJ220E PJ230 PJ230E Speaker PROJECTOR button 29 HDMI OUT jack 28 ...

Page 17: ...in USB Cable 19 Memory card access lamp 22 While the lamp is lit or flashing the camcorder is reading or writing data Tripod receptacle Attach a tripod sold separately the length of the screw must be less than 5 5 mm 7 32 in Depending on the specifications of the tripod your camcorder may not attach in the proper direction Memory card slot 22 BATT battery release lever 18 To fasten the grip belt ...

Page 18: ...pplied items p 13 Attaching Removing the battery pack Close the LCD screen and attach the battery pack Align the indentation on the camcorder and projection on the battery pack then slide the battery pack upwards To remove the battery pack close the LCD screen then slide the BATT battery release lever and remove the battery pack Battery pack ...

Page 19: ...harged Charging the battery using your computer Connect the camcorder to a running computer using the Built in USB Cable The POWER CHG charge lamp turns orange The POWER CHG charge lamp turns off when the battery is fully charged Use the USB connection support cable when the Built in USB Cable is too short for connection DC plug To the wall outlet wall socket DC IN jack Align the mark on the DC pl...

Page 20: ...e your camcorder without any operation for about 2 minutes to save battery power Power Save p 39 Charging time Approximate time min required when you fully charge a fully discharged NP FV30 battery pack supplied When using the AC Adaptor models with an AC Adaptor 115 min When using your computer connected with the Built in USB Cable 150 min The charging times shown above are measured when charging...

Page 21: ...or To turn off the beep sound Select Setup General Settings Beep Off Notes The recording date and time are recorded automatically on the recording media They are not displayed during recording However you can check them as Data Code during playback To display them select Setup Playback Settings Data Code Date Time Changing the recording media Models with internal memory In the default setting movi...

Page 22: ...emory card you can use with your camcorder SD Speed Class Capacity operation verified Described in this manual Memory Stick PRO Duo media Mark2 Up to 32 GB Memory Stick PRO Duo media Memory Stick PRO HG Duo media Memory Stick XC HG Duo media Up to 64 GB SD memory card Class 4 or faster Up to 64 GB SD card SDHC memory card SDXC memory card Operation with all memory cards is not assured Notes A Mult...

Page 23: ...3 GB Getting started format screen appears do not perform the format All the data recorded will be lost The exFAT is a file system that is used for the Memory Stick XC HG Duo media and SDXC memory cards ...

Page 24: ...ou can record photos during movie recording by pressing PHOTO Dual Capture Photo Press PHOTO To display items on the LCD screen Items on the LCD screen disappear if you do not operate the camcorder for a few seconds after you turn the camcorder on or switch between the movie recording and photo shooting modes You can display the icons and indicators by pressing the multi selector if they are not s...

Page 25: ...photo Close view In the default setting you can magnify images up to the following 27 times optical zoom models with electronic SteadyShot 50 times extended zoom models with optical SteadyShot Move the power zoom lever slightly for a slower zoom Move it further for a faster zoom To magnify images further Extended Zoom Models with electronic SteadyShot Set SteadyShot to Standard or Off p 37 You can...

Page 26: ...he desired event to the center and then select it The camcorder displays recorded images as an event automatically based on the date and time MENU 2013 Highlight 1 1 2013 1 2 3 Select the image The camcorder plays from the selected image to the last image in the event 00 00 00 1 1 2013 1 2 1 18 2013 1 19 4 Select the appropriate buttons on the LCD screen for various playback operations Volume Prev...

Page 27: ...images on external media periodically p 35 In the default setting a protected demonstration movie is pre recorded HDR PJ230 PJ230E To play back images with other devices You may not be able to play back with other devices images that were recorded on your camcorder normally Also you may not be able to play back images recorded on other devices with your camcorder Standard definition image quality ...

Page 28: ...quality STD they are played back in standard definition image quality STD even on a high definition TV When you play back standard definition image quality STD movies on a 4 3 TV that is not compatible with the 16 9 signal set Wide Mode to 4 3 to record movies with 4 3 aspect ratio If you connect your camcorder to the TV using more than one type of cable to output images HDMI output takes priority...

Page 29: ...ected image using the PROJECTOR FOCUS lever 4 Move the selection frame using the power zoom lever then press PHOTO You can also use the multi selector for the operations above while projecting images To turn off the projector press PROJECTOR Notes The LCD screen turns off while projecting images Be careful of the following operations or situations while using the projector Make sure not to project...

Page 30: ...camcorder with the LCD screen closed Several other functions When the projected images contain a lot of black faint color unevenness may appear This is caused by light reflection in the projector lens and is not a malfunction ...

Page 31: ...et connection is required to install PlayMemories Home An Internet connection is required to use PlayMemories Online and other online services The services may not be available in some countries regions Software for Mac The PlayMemories Home software is not supported with Mac computers To import images from the camcorder to your Mac and play them use the appropriate software on your Mac For detail...

Page 32: ...er is required to use disc creation function etc 3 Starter Edition is not supported 4 Faster processor is recommended Notes Operation with all computer environments is not assured Installing the PlayMemories Home software in your computer 1 Access the following download site using an Internet browser on your computer then click Install Run www sony net pm 2 Install according to the on screen instr...

Page 33: ... mode can only be saved to a Blu ray disc You cannot create a disc with movies recorded in MP4 mode The camcorder automatically divides an image file that exceeds 2 GB and saves the parts as separate files All image files may be shown as separate files on a computer however the files will be handled properly by the import function and the playback function of the camcorder or the PlayMemories Home...

Page 34: ...ge quality may deteriorate High definition image quality HD movies will be copied with standard definition image quality STD When you connect a monaural device connect the yellow plug of an AV Cable sold separately to the video input jack and the white left channel or the red right channel plug to the audio input jack on the device 1 Insert the recording medium in the recording device a disc recor...

Page 35: ... using the PlayMemories Home software p 33 Notes For this operation you need the USB Adaptor Cable VMC UAM2 sold separately Connect the AC Adaptor and the power cord mains lead to the DC IN jack of your camcorder and the wall outlet wall socket Refer to the instruction manual supplied with the external media device 1 Connect your camcorder and the external media device using the USB Adaptor Cable ...

Page 36: ...ovie Photo Notes Select to finish setting the menu or to return to the previous menu screen To find a menu item quickly The Camera Mic and Setup menus have sub categories Select the sub category icon so that the LCD screen displays the list of menus in the sub category selected When you cannot select a menu item Grayed out menu items or settings are not available When you select the grayed out men...

Page 37: ...nction when shooting photos Digital Zoom Sets the maximum zoom level of the digital zoom Auto Back Light Adjusts the exposure for backlit subjects automatically Face Face Detection Automatically detects faces Smile Shutter Automatically takes a shot whenever a smile is detected Smile Sensitivity Sets the smile detection sensitivity for the Smile Shutter function Microphone Blt in Zoom Mic Records ...

Page 38: ...ets how to assign the file number to photos Playback Settings Data Code Displays information that was recorded automatically at the time of recording Volume Adjusts the volume of playback sound Download Music 3 Downloads your favorite music files from the computer to your camcorder while the camcorder is connected to the computer that can be played with the Highlight Playback scenes Empty Music 3 ...

Page 39: ...wer Save Sets the LCD screen and the power so that they turn off automatically Initialize Initializes all the settings to the default settings Demo Mode Sets playback of the demonstration movie about the functions of the camcorder Clock Settings Date Time Setting Sets the date and time Area Setting Adjusts for a time difference without stopping the clock p 21 1 HDR CX280 CX280E CX290 CX290E 2 HDR ...

Page 40: ...on the symptoms of your camcorder and PlayMemories Home Help Guide p 33 on connecting your camcorder to a computer The power does not turn on Attach a charged battery pack to the camcorder p 18 The plug of the AC Adaptor models with an AC Adaptor has been disconnected from the wall outlet wall socket Connect it to the wall outlet wall socket p 19 The camcorder does not operate even when the power ...

Page 41: ...n a cool place C 13 C 32 Remove the power source Reconnect it and operate your camcorder again E Follow the steps from on page 40 The battery pack is nearly used up Total number of movie scenes or photos exceeds the recordable capacity of your camcorder Delete unnecessary images p 27 PlayMemories Home cannot be installed An Internet connection is required to install PlayMemories Home Check the com...

Page 42: ...The recording medium is full Photos cannot be recorded during processing Wait for a while then record About handling of your camcorder For information on your camcorder model see the following page Functions and equipment p 12 Supplied items p 13 On use and care The camcorder is not dustproofed dripproofed or waterproofed Do not hold the camcorder by the following parts and also do not hold the ca...

Page 43: ...dust gets in your camcorder it may malfunction Sometimes this malfunction cannot be repaired Near windows or outdoors where the LCD screen or the lens may be exposed to direct sunlight This damages the LCD screen For DC or AC operation use the accessories recommended in these operating instructions Do not let your camcorder get wet for example from rain or sea water If your camcorder gets wet it m...

Page 44: ...een Do not apply excessive pressure on the LCD screen as it may cause uneven color and other damage If your camcorder is used in a cold place a residual image may appear on the LCD screen This is not a malfunction While using your camcorder the back of the LCD screen may heat up This is not a malfunction To clean the casing and the projector lens Models with a projector Wipe the casing and the len...

Page 45: ...ery is always charged while your camcorder is connected to the wall outlet wall socket via the AC Adaptor models with an AC Adaptor or while the battery pack is attached The rechargeable battery will be fully discharged in about 3 months if you do not use your camcorder at all Charge the pre installed rechargeable battery before you start using your camcorder However even if the pre installed rech...

Page 46: ... pixels HDR CX220 CX220E CX230 CX230E PJ220 PJ220E PJ230 PJ230E Approx 2 290 000 pixels HDR CX280 CX280E CX290 CX290E Effective photo 16 9 Approx 2 290 000 pixels Effective photo 4 3 Approx 1 710 000 pixels Lens Carl Zeiss Vario Tessar Lens HDR CX220 CX220E CX230 CX230E PJ220 PJ220E PJ230 PJ230E 27 Optical 5 32 Extended while recording movies 4 320 Digital HDR CX280 CX280E CX290 CX290E 27 Optical ...

Page 47: ...ttached HDR PJ220 PJ220E PJ230 PJ230E 58 mm 57 mm 117 mm 2 3 8 in 2 1 4 in 4 5 8 in w h d including the projecting parts 58 mm 57 mm 125 mm 2 3 8 in 2 1 4 in 5 in w h d including the projecting parts and the supplied rechargeable battery pack attached Mass approx HDR CX220 CX220E CX230 CX230E 178 g 6 3 oz main unit only 222 g 7 8 oz including the supplied rechargeable battery pack HDR CX280 CX280E...

Page 48: ...on the screen p 50 The recordable time may vary depending on the recording and subject conditions REC Mode On trademarks Handycam and are registered trademarks of Sony Corporation AVCHD AVCHD Progressive AVCHD logotype and AVCHD Progressive logotype are trademarks of Panasonic Corporation and Sony Corporation Memory Stick Memory Stick Duo Memory Stick PRO Duo Memory Stick PRO HG Duo Memory Stick X...

Page 49: ...ent with your PlayStation 3 by downloading the application for PlayStation 3 from PlayStation Store where available The application for PlayStation 3 requires PlayStation Network account and application download Accessible in areas where the PlayStation Store is available Screen indicators The following indicators appear when you change the settings Left Indicator Meaning MENU button 36 Self timer...

Page 50: ...te number of recordable photos and photo size 38 Playback folder 100 112 Current playing movie or photo Number of total recorded movies or photos Connection to the external media device 34 Bottom Indicator Meaning Micref Level low 37 Wind Noise Reduct 37 Blt in Zoom Mic 37 Low Lux 37 Exposure 37 Intelligent Auto 25 101 0005 Data file name Protect 38 Indicators and their positions are approximate a...

Page 51: ...ayMemories Home 33 Supplied Items 11 T Tripod 17 Troubleshooting 40 TV 28 U USB 19 USB Adaptor Cable 35 USB connection support cable 11 W Warning indicators 41 Wind noise 37 Windows 32 Z Zoom 25 A Attaching Removing the battery pack 18 AVCHD recording disc 11 B Battery pack 18 Beep 21 Built in USB Cable 19 C Care 42 Charging the battery pack 18 Charging the battery pack using your computer 19 Char...

Page 52: ...GB Printed in China 2013 Sony Corporation Additional information on this product and answers to frequently asked questions can be found at our Customer Support Website http www sony net ...

Reviews: