background image

GB

Additional I

nf

or

ma
tion

Precautions

Recording

When you use a memory card with your 

camcorder for the first time, formatting the 

memory card with your camcorder (p. 52) i

recommended for stable operation. 

All data recorded on the memory card will 

be deleted when it is formatted, and cannot 

be recovered. Save important data to your 

computer, etc., beforehand.

Before starting to record, test the recording 

function to make sure that the image and sound 

are recorded without any problems.

Compensation for the contents of recordings 

cannot be provided, even if recording or 

playback is not possible due to a malfunction of 

the camcorder, storage media, etc.

TV color systems differ depending on the 

country/region. To view your recordings on a 

TV, you need a PAL system-based TV.

Television programs, films, video tapes, 

and other materials may be copyrighted. 

Unauthorized recording of such materials may 

be contrary to copyright laws.

The following states will be indicated if 

data is still being written onto the recording 

media after recording has finished. During 

this time, do not apply shock or vibration to 

the camcorder, or remove the battery or AC 

Adaptor.

Access lamp (p. 12) is lit or flashing

The media icon in the upper right of the LCD 

screen is flashing

Note on playback

Images recorded on your camcorder may not 

play correctly on other devices. 

Conversely, images recorded on other devices 

may not play correctly on this camcorder.

Movies recorded on SD memory cards 

cannot be played on A/V equipment of other 

manufacturers.

About images, illustrations, and screen 

displays of this manual

The example images used in this manual for 

illustration purposes are captured using a 

digital still camera, and therefore may appear 


different from images and screen indicators that 

actually appear on your camcorder. And, the 

illustrations of your camcorder and its screen 

indication are exaggerated or simplified for 

understandability.

In this manual, the internal hard disk (DCR-

SR21E) of your camcorder and memory card 

are called “recording media.”

Design and specifications of your camcorder 

and accessories are subject to change without 

notice.

Confirm the model name of your 

camcorder

The model name is shown in this manual when 

there is a difference in specification between 

models. Confirm the model name on the 

bottom of your camcorder. 

The main differences in specification of this 

series are as follows.

Recording 

media

Capacity 

of internal 

recording 

media

Projector

DCR-

SR21E

Internal 

hard 

disk + 

memory 

card

80 GB

DCR-

SX21E

Memory 

card

DCR-

PJ5E

On use and care

The camcorder is not dustproofed, dripproofed 

or waterproofed.

Do not use or store the camcorder and 

accessories in the following locations:

Anywhere extremely hot, cold or humid. 

Never leave them exposed to temperatures 

above 60 

C (140 °F), such as under direct 

sunlight, near heaters or in a car parked in 

the sun. They may malfunction or become 

deformed.

Near strong magnetic fields or mechanical 

Summary of Contents for Handycam DCR-PJ5E

Page 1: ...R21E SX21E Table of contents Preparation Recording Playback Saving movies and photos Using a computer Customizing your camcorder Additional Information Digital Video Camera Recorder Operating Guide 4 290 841 11 1 ...

Page 2: ... GB ...

Page 3: ...ch of small children Keep the battery pack dry Replace only with the same or equivalent type recommended by Sony Dispose of used battery packs promptly as described in the instructions Replace the battery with the specified type only Otherwise fire or injury may result AC Adaptor Do not use the AC Adaptor placed in a narrow space such as between a wall and furniture Use the nearby wall outlet wall...

Page 4: ... 942 2230 This device complies with Part 15 of the FCC Rules Operation is subject to the following two conditions 1 This device may not cause harmful interference and 2 this device must accept any interference received including interference that may cause undesired operation CAUTION You are cautioned that any changes or modifications not expressly approved in this manual could void your authority...

Page 5: ...uropean Union and other European countries with separate collection systems This symbol on the product or on its packaging indicates that this product shall not be treated as household waste Instead it shall be handed over to the applicable collection point for the recycling of electrical and electronic equipment By ensuring this product is disposed of correctly you will help prevent potential neg...

Page 6: ...d to be replaced a fuse of the same rating as the supplied one and approved by ASTA or BSI to BS 1362 i e marked with an or mark must be used If the plug supplied with this equipment has a detachable fuse cover be sure to attach the fuse cover after you change the fuse Never use the plug without the fuse cover If you should lose the fuse cover please contact your nearest Sony service station To se...

Page 7: ... GB ...

Page 8: ... GB Everyday as unforgettable moment with Handycam Capturing Page 14 Recording ...

Page 9: ... GB Sharing Page 23 Creating a disc Sharing now Page 20 Projector DCR PJ5E Only ...

Page 10: ...movies and photos Saving images on a disc 23 Saving images in external media DIRECT COPY 28 Using a computer Useful functions available if you connect the camcorder to a computer 30 Preparing a computer 31 Starting PMB Picture Motion Browser 33 Using PMB Portable 34 Customizing your camcorder Using menus 35 Dividing a movie 40 Getting detailed information from the Handycam Handbook 40 Additional I...

Page 11: ...the BATT battery release lever and remove the battery pack 2 Connect the AC Adaptor to the DC IN jack and the wall outlet wall socket Battery pack BATT battery release lever DCR SR21E DCR PJ5E SX21E To the wall outlet wall socket To the wall outlet wall socket DC plug DC plug Power cord Mains lead Power cord Mains lead ...

Page 12: ...e memory card slot To eject the memory card Lightly push the memory card in once Notes The date and time are automatically recorded on the recording media and can be displayed during playback Show others PLAYBACK SET under PLAYBACK category DATA CODE DATE TIME You can turn off the operation beeps Show others SOUND DISP SET under GENERAL SET category BEEP OFF Access lamp Note direction of notched c...

Page 13: ...1E In the default setting both movies and photos are recorded on the internal hard disk You can change the recording media to Memory card Show others MEDIA SETTINGS under MANAGE MEDIA category MOVIE MEDIA SET or PHOTO MEDIA SET desired recording media YES ...

Page 14: ... If you close the LCD screen while recording movies the camcorder stops recording The maximum continuous recordable time of movies is about 13 hours When a movie file exceeds 2 GB the next movie file is created automatically You can check the recordable time estimated remaining capacity etc Show others MEDIA INFO under MANAGE MEDIA category MODE ...

Page 15: ...n on the LED VIDEO LIGHT by pressing LIGHT Zooming You can magnify images up to 67 times the original size with the power zoom lever Displaying the icons and indicators again You can display the icons and indicators by pressing the multi selector if they are not shown ...

Page 16: ...16 GB Playback on the camcorder 1 Press VIEW IMAGES to display the VISUAL INDEX screen 2 Movie Select Movie Photo Select Photo 3 Select the desired image VIEW IMAGES ...

Page 17: ...back screen You can adjust the volume adjust with Photo playback screen Volume adjustment Previous To stop To fast reverse Next OPTION To fast forward To pause play Previous To start stop slide show To the VISUAL INDEX screen Next OPTION ...

Page 18: ...18 GB Deleting movies and photos 1 Select Show others DELETE under EDIT category EDIT 2 Movie Select DELETE DELETE Photo Select DELETE DELETE ...

Page 19: ...d The mark appears 4 Select YES Notes You cannot restore images once they are deleted Save important movies and photos in advance Do not remove the battery pack or the AC Adaptor from your camcorder while deleting the images It may damage the recording media ...

Page 20: ...wing operations or situations while using the projector Make sure not to project images towards the eyes Make sure not to touch the projector lens The LCD screen and the projector lens become hot while in use Using the projector shortens battery life If you connect the camcorder to a TV and use the projector function sound will be output from the TV however no image will be output ...

Page 21: ...other device a blank blue screen will be projected Perform the following operations when you want to project images on the camcorder Firstly press PROJECTOR to stop projecting Select Show others PROJECTOR under OTHERS category SOURCE MEMORY CARD and then press PROJECTOR again Turn the power of the camcorder off then on again and then press PROJECTOR Changing the aspect ratio of the image You can c...

Page 22: ...corder will be connected to 1 Connect your camcorder to a TV with the A V connecting cable supplied 2 Play back movies and photos on your camcorder Notes For details refer to the instruction manuals supplied with the TV VIEW IMAGES Red TVs VCRs IN AUDIO White VIDEO Yellow Signal flow ...

Page 23: ... Select END EJECT DISC Notes Refer also to the instruction manual supplied with the DVD writer Only unused discs of the following types can be used 12cm DVD R 12cm DVD R The device does not support two layered discs DVDirect Express is referred to as DVD writer in this section Do not do any of the following when creating a disc Turn off the camcorder Disconnect the USB cable or the AC Adaptor Subj...

Page 24: ...dubbing a desired image When creating multiple copies of the same disc When dubbing images in the memory card DCR SR21E Select DISC BURN OPTION on the screen in step 3 Select the recording media containing the movie s you want to save DCR SR21E Select the movie you want to burn on the disc Select YES on the camcorder screen After the operation is completed select EXIT END Playing back a disc on th...

Page 25: ...Select the recording media that contains the images on the camcorder screen USB CONNECT Internal hard disk DCR SR21E USB CONNECT Memory card 3 Record images on the connected device 4 Select END YES after the operation is completed Notes Refer also to the instruction manuals supplied with devices to be connected Sony DVD writer may not be available in some countries regions ...

Page 26: ...etc 2 Connect your camcorder to the recording device with the A V connecting cable supplied 3 Start playback on your camcorder and record it on the recording device 4 When dubbing is finished stop the recording device and then your camcorder VIEW IMAGES Input VIDEO Yellow White AUDIO Red Signal flow ...

Page 27: ...e time or camera settings data Show others PLAYBACK SET under PLAYBACK category DATA CODE a desired setting Show others OUTPUT SETTINGS under GENERAL SET category DISP OUTPUT V OUT PANEL You can change the aspect ratio according to the screen size of display devices TV etc Show others OUTPUT SETTINGS under GENERAL SET category TV TYPE 4 3 When you connect a monaural device connect the yellow plug ...

Page 28: ...of your camcorder with the USB Adaptor Cable sold separately 3 Select Copy 4 Select after the operation is completed Notes For this operation you need the USB Adaptor Cable VMC UAM1 sold separately The USB Adaptor Cable VMC UAM1 may not be available in some countries regions The number of scenes you can save on the external media are as follows Movies 9 999 movies Photos 9 999 frames 899 folders T...

Page 29: ...g images recorded on external media with your camcorder Select Play without copying in step 4 above The VISUAL INDEX screen of the external media is displayed Play back the image You can also view images on a TV connected to your camcorder ...

Page 30: ...hat enable you to do more with the images recorded with the camcorder Windows Easy uploading when away from home With PMB Portable which is pre installed on the camcorder you can play back or upload your images to the Web by connecting your camcorder to a computer away from home View Save on a disc Edit Upload Calendar DVD Network services Joining image files ...

Page 31: ...mended 5 Macintosh equipped with Intel processor Notes Operation with all computer environments is not assured When using a Macintosh The supplied software PMB is not supported by Macintosh computers To import the movies and photos to the computer please contact Apple Inc Step 2 Installing the supplied software PMB Install PMB before connecting your camcorder to a computer Notes If a version of PM...

Page 32: ...NNECT Internal hard disk DCR SR21E USB CONNECT Memory card If the USB SELECT screen does not appear select Show others USB CONNECT under OTHERS category Click Continue on the computer screen Follow the on screen instructions to install the software Depending on the computer you may need to install third party software If the installation screen appears follow the instructions to install the requir...

Page 33: ...he camcorder from the computer The image files may be destroyed or may not be played back Operation is not guaranteed if you perform the above operation Starting PMB Picture Motion Browser Double click the PMB short cut icon on the computer screen Notes If the icon is not displayed on the computer screen click Start All Programs PMB to start PMB Reading PMB Help For details on how to use PMB read ...

Page 34: ...computer with the USB cable The USB SELECT screen appears on the LCD of your camcorder 2 Select the recording media for which you wish to use PMB Portable USB CONNECT Internal hard disk DCR SR21E USB CONNECT Memory card If the USB SELECT screen does not appear Show others USB CONNECT under OTHERS category 3 Click PMB Portable The User Agreement screen appears 4 Configure the settings following the...

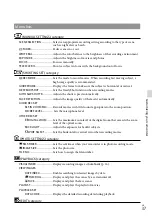
Page 35: ...G SET Items for customized shooting p 37 PHOTO SETTINGS Items for recording photos p 37 PLAYBACK Items for playback p 37 EDIT Items for editing p 37 OTHERS Items for other settings p 38 MANAGE MEDIA Items for recording media p 38 GENERAL SET Other setup items p 39 Operating menus Select with and press the center of the multi selector to confirm your selection An orange frame appears on the selecte...

Page 36: ...t like the pop up window that appears when you right click the mouse on a computer When is displayed at bottom right of the screen you can use the OPTION MENU You select and the menu items you can change in the context appear Select OPTION Select the desired tab the item to change the setting After completing the setting select Notes Grayed out menu items or settings are not available When the ite...

Page 37: ...usts the image quality of the face s automatically AUDIO REC SET BLT IN ZOOM MIC Records movies with vivid sound appropriate to the zoom position MICREF LEVEL Sets the microphone level OTHER REC SET DIGITAL ZOOM Sets the maximum zoom level of the digital zoom that exceeds the zoom level of the optical zoom BACK LIGHT Adjusts the exposure for backlit subjects WIDE SELECT Sets the horizontal to vert...

Page 38: ... the order of movies in a playlist OTHERS category PROJECTOR 2 SOURCE Projects the images recorded on other devices p 21 SCREEN FORMAT Changes the aspect ratio of the projected images p 21 USB CONNECT USB CONNECT 1 Connects the internal hard disk via USB USB CONNECT Connects the memory card via USB DISC BURN Allows you to save images onto discs p 23 BATTERY INFO Displays the battery information MA...

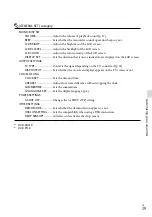
Page 39: ...screen OUTPUT SETTINGS TV TYPE Converts the signal depending on the TV connected p 22 DISP OUTPUT Sets whether the on screen displays appears on the TV screen or not CLOCK LANG CLOCK SET Sets the date and time AREA SET Adjusts for a time difference without stopping the clock SUMMERTIME Sets the summertime LANGUAGE SET Sets the display language p 6 POWER SETTINGS A SHUT OFF Changes the A SHUT OFF s...

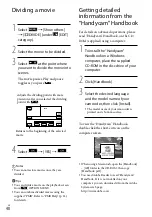
Page 40: ...OM supplied using a computer 1 To install the Handycam Handbook on a Windows computer place the supplied CD ROM in the disc drive of your computer 2 Click Handbook 3 Select the desired language and the model name of your camcorder then click Install The model name of your camcorder is printed on its bottom surface To view the Handycam Handbook double click the short cut icon on the computer screen...

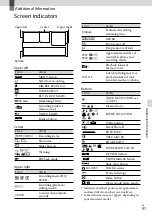
Page 41: ...rding remaining time FADER Drop sensor off Drop sensor activated 9999 9999 Approximate number of recordable photos and recording media Playback folder of memory card 100 112 Current playing movie or photo Number of total recorded movies or photos Bottom Indicator Meaning FACE DETECTION set to OFF Manual focus SCENE SELECTION White balance SteadyShot off EXPOSURE TELE MACRO BACK LIGHT INTELLIGENT A...

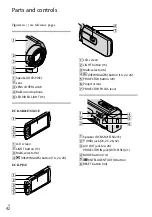
Page 42: ... screen LIGHT button 15 Multi selector 6 VIEW IMAGES button 16 22 26 DCR PJ5E LCD screen LIGHT button 15 Multi selector 6 VIEW IMAGES button 16 22 26 PROJECTOR button 20 Projector lens PROJECTOR FOCUS lever Speaker DCR SR21E SX21E USB jack 23 25 28 32 A V OUT jack 22 26 PROJECTOR IN jack DCR PJ5E 21 MODE button 14 INTELLIGENT AUTO button RESET button 44 ...

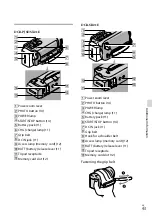
Page 43: ...ccess lamp memory card 12 BATT battery release lever 11 Tripod receptacle Memory card slot 12 DCR SR21E Power zoom lever PHOTO button 14 POWER lamp CHG charge lamp 11 Battery pack 11 START STOP button 14 DC IN jack 11 Grip belt Hook for a shoulder belt Access lamp memory card 12 BATT battery release lever 11 Tripod receptacle Memory card slot 12 Fastening the grip belt ...

Page 44: ...ven when the power is set to on It takes a few seconds for your camcorder to be ready to shoot after the power is turned on This is not a malfunction Disconnect the AC Adaptor from the wall outlet wall socket or remove the battery pack then reconnect it after about 1 minute If your camcorder still does not work press RESET p 42 using a pointed object If you press RESET all settings including the c...

Page 45: ...times contact your Sony dealer or local authorized Sony service facility In this case when you contact them give them all the numbers of the error code beginning with C or E C 04 The battery pack is not an InfoLITHIUM battery pack V series Use an InfoLITHIUM battery pack V series Connect the DC plug of the AC Adaptor to your camcorder securely p 11 C 06 The battery pack temperature is high Change ...

Page 46: ... DCF Ver 2 0 Compatible Exif Ver 2 21 Compatible MPF Baseline Compatible Recording media Movie Photo Internal hard disk DCR SR21E 80 GB Memory Stick PRO Duo media SD memory card Class 2 or faster When measuring media capacity 1 GB equals 1 billion bytes a portion of which is used for system management and or application files The capacity that a user can use is approximately 79 3 GB Image device 2...

Page 47: ...ry pack attached DCR SR21E 59 mm 64 5 mm 113 5 mm 2 3 8 in 2 5 8 in 4 1 2 in w h d including the projecting parts 59 mm 64 5 mm 124 5 mm 2 3 8 in 2 5 8 in 5 in w h d including the projecting parts and the supplied rechargeable battery pack attached DCR SX21E 54 mm 55 5 mm 113 5 mm 2 1 4 in 2 1 4 in 4 1 2 in w h d including the projecting parts 54 mm 55 5 mm 124 5 mm 2 1 4 in 2 1 4 in 5 in w h d in...

Page 48: ...ecordable time may vary depending on the recording and subject conditions REC MODE On trademarks Handycam and are registered trademarks of Sony Corporation Memory Stick Memory Stick Duo Memory Stick PRO Duo Memory Stick PRO HG Duo Memory Stick Micro MagicGate MagicGate Memory Stick and MagicGate Memory Stick Duo are trademarks or registered trademarks of Sony Corporation InfoLITHIUM is a trademark...

Page 49: ...ed on other devices may not play correctly on this camcorder Movies recorded on SD memory cards cannot be played on A V equipment of other manufacturers About images illustrations and screen displays of this manual The example images used in this manual for illustration purposes are captured using a digital still camera and therefore may appear different from images and screen indicators that actu...

Page 50: ...olytic liquid has leaked Consult your local authorized Sony service facility Wash off any liquid that may have contacted your skin If any liquid gets in your eyes wash with plenty of water and consult a doctor When not using your camcorder for a long time To keep your camcorder in optimum state for a long time turn it on and let it run by recording and playing back images about once a month Use up...

Page 51: ...es or perform MEDIA FORMAT data on the internal recording media may not be completely erased When you transfer the camcorder it is recommended that you perform EMPTY See Getting detailed information from the Handycam Handbook on page 40 to prevent the recovery of your data Also when you dispose of the camcorder it is recommended that you destroy the actual body of the camcorder Battery pack When y...

Page 52: ...available under the current recording or playback conditions Save all your recorded image data To prevent your image data from being lost save all your recorded images on external media periodically It is recommended that you save the image data on a disc such as a DVD R using your computer Also you can save your image data using a VCR or a DVD HDD recorder etc p 23 Note on the camcorder battery p...

Page 53: ... flashing Do not use your camcorder in very loud areas DCR SR21E On the drop sensor DCR SR21E To protect the internal hard disk from shock by dropping the camcorder has a drop sensor function When a drop occurs or under a non gravity condition the block noise made when this function is activated by the camcorder may also be recorded If the drop sensor catches a drop repeatedly recording playback m...

Page 54: ...oubleshooting 44 Turning the power on 12 TV 22 U USB cable 23 25 USB CONNECT 23 25 V VIDEO LIGHT 15 VIEW IMAGES 16 VISUAL INDEX 16 Volume 17 W Wall outlet wall socket 11 Warning indicators 45 Windows 31 Z Zoom 43 A A V connecting cable 21 22 26 Altitude 53 B battery pack 11 C Care 49 Charging and running times 48 Charging the battery pack 11 CLOCK SET 12 Computer 31 Computer system 31 D DATA CODE ...

Page 55: ......

Page 56: ...GB Printed in China 2011 Sony Corporation http www sony net Additional information on this product and answers to frequently asked questions can be found at our Customer Support Website ...

Reviews: