background image


6


Overview


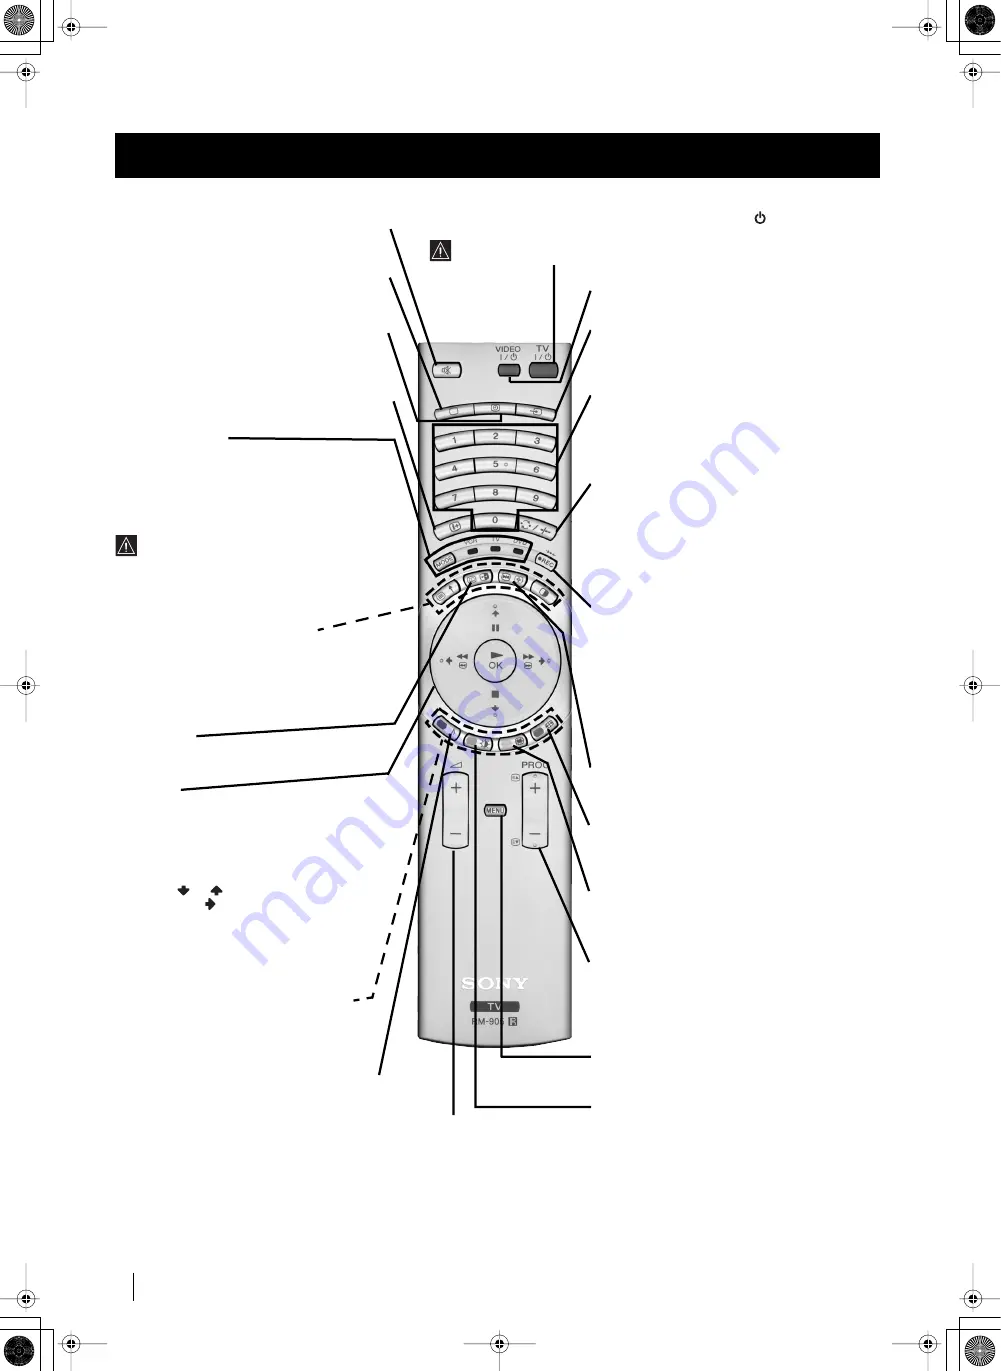
Overview of Remote Control Buttons


Overview


To Temporarily Switch Off:


Press to temporarily switch off TV (the standby indicator


on the TV set lights 

up in red). Press again to switch on TV from standby mode.

After 15-30 minutes without a signal and without any button being pressed, 

the TV set switches automatically into standby mode.


VCR DVD on/off: 


Press this button to switch 

your VCR or DVD on or off.


Selecting Input source:


Press this button 

repeatedly until the input of the desired source 
appears on the TV screen.


Selecting channels:


If Media Selector is switched to TV or VCR, press 

this button to select channels.

For double-digit programme numbers, enter the 

second digit within 2.5 seconds.


a) If Media Selector is switched to TV:


Press this button to watch the last channel 
selected (the last channel watched for at least 5 
seconds).


b) If Media Selector is switched to VCR:


To select a double-digit programme on a Sony 

VCR, e.g. 23, press -/- - first and then the 
buttons 2 and 3.


a) Recording button: 


If Media Selector is switched to VCR, press this 

button to record programmes.


b) Resetting to factory set levels:


Press, for a minimum of 3 seconds, to return the 

picture and sound settings to the factory default 
levels. This will also return the set to the install 
condition and the “Auto Tuning” menu will 
appear on the screen. If this is the case refer to the 
section “Switching on the TV set and 
automatically Tuning” (step 4) of this manual.


Freezing the picture: 


Press this button to 

freeze the picture. Press again to return to the 

normal picture.


Selecting Screen format: 


Press this button 

repeteadly to change the format of the screen (for 

more details, please refer to the section “Changing 

the Screen format”) of this manual.


Displaying Multi PIP (Picture In Picture): 


Press to display Multi PIP mode. Press again to 

cancel. For more details, please refer to the section 

“UsingMulti PIP (Picture In Picture)”.


a) Selecting channels: 


Press this button to 

select the number of the next or previous 
broadcast channel.


b) Teletext: 


These buttons are also used for 

teletext operation. For more detail please refer to 
the section “Teletext” of this manual.


Displaying the menu system: 


Press this 

button to display the menu on the screen. Press 

again to remove the menu display from the screen.


Selecting Picture mode: 


Press this button 

repeatedly to change the picture mode.


Muting the Sound: 


Press to mute TV sound. 

Press again to restore the sound.


Selecting TV mode: 


Press to switch off PAP, 

Multi PIP, Teletext or video input.


Displaying the time: 


Press to switch the time 

display on or off (available only when teletext is 
broadcast).


Displaying On Screen Information: 


Press 

to display all on-screen indications. Press again to 

cancel.


Media Selector:


With this remote control you can operate not

only this TV but also the main functions of

your VCR or DVD.

Switch on the device you want to operate and next 

press this button repeatedly to select the VCR, TV 

or  DVD. A green light will be momentarily lit to 

indicate the chosen function.

Before the first time you want to control


a DVD or VCR by using this remote

control, you have to set it up depending on the 

brand of the device to be used. For more details, 

refer to chapter “Remote Control Configuration 

for VCR or DVD” on page 33.


a) PAP (Picture And Picture):


For more details, please refer to the section 

“Using PAP (Picture And Picture)”.


b) Teletext:


Buttons with green symbols are also used for 

teletext operation. For more details, please 

refer to the section “Teletext” of this manual.


NexTView:


For more details, please refer to the section 

“NexTView” of this manual.


Joystick:
a) If Media Selector is switched to TV:


•When MENU is switched on, use these 

buttons to operate the menu system. For 

details refer to “Introducing and Using 

the Menu System” on page 11.

• When MENU is switched off, press OK to 

show an overview of all TV channels. Then 

press

or

to select the channel and

then press

button to watch the selected 

channel. 


b) If Media Selector is switched

to VCR or DVD:


Using these buttons you can control

the main functions of your VCR or DVD.


Fastext: 


These buttons are also used for 

Fastext operation. For more details please refer 
to the “Fastext” chapter in the “Teletext” 
section of this manual.


Selecting Sound effect: 


Press this button 

repeatedly to change the sound effect.


Adjusting TV Volume: 


Press 

this button to adjust the volume 
of the TV.


01GBKF50/42SX200U.fm  Page 6  Tuesday, January 7, 2003  10:53 AM

Summary of Contents for Grand Wega KF-42SX200U

Page 1: ...R 4 087 135 32 1 Instruction Manual KF 50SX200U KF 42SX200U 2003 by Sony Corporation GB 00COKF50 42SX200U fm Page 1 Tuesday January 7 2003 10 52 AM ...

Page 2: ...with the following instructions The wires in this mains lead are coloured in accordance with the following code Blue Neutral Brown Live As the colours of the wires in the mains lead of this apparatus may not correspond with the coloured markings identifying the terminals in your plug proceed as follows The wire which is coloured blue must be connected to the terminal which is marked with the lette...

Page 3: ...ly Tuning 9 Menu System Changing the Screen Format 11 Introducing and Using the Menu System 11 On Screen display Menus Guide 12 Using the Menu System Adjusting the Picture 13 Adjusting the Sound 14 Using the Features menu 16 Manually Tuning the TV 17 Labelling a channel 18 Skipping programme positions 19 Using the Further Programme Preset function 20 Inputting your personal ID 21 Using the Demo Mo...

Page 4: ...ore moving the TV Avoid uneven surfaces quick steps or excessive force If the set has been dropped or damaged have it checked immediately by qualified service personnel Additional Safety Information Safety Information Safety Information When moving the TV set two persons are needed To prevent damage DO NOT push on the speaker grills on each side of the screen Do not grasp the front panels to preve...

Page 5: ...nput source selection button Volume control buttons On Off Switch Standby indicator By pressing the On Off button on the Remote Control to turn the TV off the standby indicator light up in red By pressing the On Off on the TV set to turn the TV off the standby indicator lights up in amber Headphone jack Audio Input jacks S Video Input jack Press on the mark on the front of the TV set to reveal the...

Page 6: ...ction Teletext of this manual Displaying the menu system Press this button to display the menu on the screen Press again to remove the menu display from the screen Selecting Picture mode Press this button repeatedly to change the picture mode Muting the Sound Press to mute TV sound Press again to restore the sound Selecting TV mode Press to switch off PAP Multi PIP Teletext or video input Displayi...

Page 7: ...dispose of used batteries in an environmental friendly way Inserting Batteries into the Remote Control Installation Make sure you insert the batteries using the correct polarities 01GBKF50 42SX200U fm Page 7 Tuesday January 7 2003 10 53 AM ...

Page 8: ...wall or a pillar etc or VCR The Scart lead is optional however if you use a Scart lead to connect your VCR it can improve picture and sound quality when using it If you do not use a Scart lead after automatically tuning the TV set refer to the Manually Tuning the TV section of this instruction manual to tune in the set to the output of your VCR Also refer to your VCR instruction manual to find the...

Page 9: ...BBC2 programme 2 4 The Auto Tuning menu appears on the screen in the selected language then press the button on the remote control to select Yes 5 A new menu appears automatically on the screen asking you to check that the aerial is connected Confirm that the aerial is connected and then press the button to start the automatic tuning The TV starts to automatically search and store all available br...

Page 10: ... your selected broadcast channel then press The selected broadcast channel now moves to its new programme position and the other broadcast channels move accordingly 3 Repeat steps b1 and b2 if you wish to change the order of the other channels 7 Press the button to exit and return to the normal TV screen The TV set is now ready for use First Time Operation Programme Sorting Select Prog Confirm PRO...

Page 11: ...n 2 To higlight the desired menu or option push the joystick or To enter to the selected menu or option push To return to the last menu or option push To alter settings of your selected option push or To confirm and store your selection press 3 Press the button to remove the menu from the screen Your TV set uses an on screen menu system to guide you through the operations Use the following buttons...

Page 12: ... SWF RTL SAT MDR DDI DSF RTL 2 KAB 1 Manual Set Up Select Enter Language Country Manual Programme Preset Further Programme Preset RGB Set Up Personal ID Demo Manual Set Up Select Enter Language Country Manual Programme Preset Further Programme Preset RGB Set Up Personal ID Demo Manual Set Up Select Enter Language Country Manual Programme Preset Further Programme Preset RGB Set Up Personal ID Demo ...

Page 13: ...lected Only avalaible for NTSC colour signal e g USA video tapes 4 Push the joystick or to alter the selected item then press the button to store the new adjustment 5 Repeat steps 3 and 4 to alter the other items 6 Press the button to exit and return to the normal TV screen Changing the Picture Mode Quickly You can quickly change the Picture Mode without entering the Picture Control menu screen 1 ...

Page 14: ...ft Right Auto Vol Off volume level changes according to the Control broadcast signal On volume level of the channels will stay the same independent of the broadcast signal e g in case of advertisement Dual Sound For a stereo broadcast Mono Stereo For a bilingual broadcast Mono for mono channel if available A for channel 1 B for channel 2 Headphones When listening to the TV through the headphones s...

Page 15: ...ic and the double D symbol are trademarks of Dolby Laboratories The BBE High Definition Sound system is manufactured by Sony Corporation under license from BBE Sound Inc It is covered by U S Patent No 4 638 258 and No 4 482 866 The word BBE and BBE Symbol are trademarks of BBE Sound Inc Changing Sound Mode Quickly You can quickly change Sound mode without entering the Sound Control menu screen 1 P...

Page 16: ...s the picture size to eliminate any dark areas on the TV picture Format Correction Off 4 3 14 9 is selected only if Auto Format is set to Normal On Smart mode is selected automatically for or Full 4 3 14 9 broadcast Sleep Timer Off 10 min 20 min 90 min One minute before the TV set switches into standby mode the time remaining is displayed on the screen automatically When watching the TV press the ...

Page 17: ...the channel of the VCR signal Then press the button to store or push to continue searching for the desired channel c For external input sources EXT push to select the input source to which you have connected your equipment AV1 AV2 AV3 or AV4 Then press the button to store 9 Repeat steps 4 to 8 a b or c if you wish to store more channels 10 Press the button to exit and return to the normal TV scree...

Page 18: ...ber or a blank then push to confirm this character Select the other four characters in the same way 8 After selecting all the characters press the button 9 Repeat steps 5 to 8 if you wish to label other channels 10 Press the button to exit and return to the normal TV screen When you select a named channel the name will appear for a few seconds Picture Adjustment Select Enter Menu Picture Mode Cont...

Page 19: ...You can programme this TV set to skip any unused programme numbers when they are selected with the PROG buttons To cancel this function afterwards proceed in the same way as described below but by selecting Off instead of On in step 6 Skipping Programme positions Picture Adjustment Select Enter Menu Picture Mode Contrast Brightness Colour Sharpness Reset AI Noise Reduction Colour Tone Personal On ...

Page 20: ...ps 5 and 6b to adjust the volume level of the other channels c AFT Push the joystick or to fine tune the channel frequency over a range of 15 to 15 then press the button Repeat steps 5 and 6c if you wish to fine tune other channels d DECODER Push the joystick or to select AV1 for a decoder connected to the Scart 1 1 or AV3 for a decoder connected to the Scart 3 q 3 SMARTLINK then press the button ...

Page 21: ...ered above will be displayed You will not be able to select and change this option Menu System Menu System You can programme this TV set with a personal code using up to eleven characters letters and numbers By using this function it will be possible to identify your TV set if it is ever stolen This code can only be input once Make sure you make a note of it in this instruction manual Inputting Yo...

Page 22: ...of the available picture functions Note Press the button on the remote control to stop the demonstration and return to the normal TV screen Picture Adjustment Select Enter Menu Picture Mode Contrast Brightness Colour Sharpness Reset AI Noise Reduction Colour Tone Personal On Off Normal Set Up Auto Tuning Programme Sorting Select NexTView AV Preset Manual Set Up Select Start Auto Tuning Start Enter...

Page 23: ... and return to the normal TV screen Menu System Menu System When connecting an RGB source such as a DVD player to Scart connector 1 1 or 2 2 you may need to readjust the H Centre of the picture Adjusting the H Centre picture for an RGB source 1 Picture Adjustment Select Enter Menu Picture Mode Contrast Brightness Colour Sharpness Reset AI Noise Reduction Colour Tone Personal On Off Normal Set Up A...

Page 24: ...umn highlighted push the joystick or to select a letter number or blank then push to confirm this character Select the other four characters in the same way 7 After selecting all the characters press the button 8 Repeat steps 4 to 7 if you wish to select the picture size or label other input sources 9 Press the button to exit and return to the normal TV screen Whenever the equipment with the label...

Page 25: ...at 4 3 Press again to switch PAP off Selecting PAP source 1 To change the source of the left screen With PAP switched on press the number buttons to select a TV channel or press to select a video source 2 To change the source of the right screen With PAP switched on press the button on the remote control When the symbol appears at the bottom of the right screen press the number buttons to select a...

Page 26: ...ine is displayed showing the number of subpages Select the sub page by pressing or To freeze a Teletext page Press the button to freeze the page Press again to cancel the freeze Revealing the index page Press the button to reveal the index page normally page 100 Fastext only available if the TV station broadcasts Fastext signals When the colour coded menu appears at the bottom of a teletext page p...

Page 27: ...a time coded page such as an alarm page at a time specified by you After you have displayed the Time Page sub menu 1 Press the numbered buttons on the remote control to enter the three digits of the desired page 2 Press the numbered buttons again to enter the four digits of the desired time 3 Press the button to store the desired time The time is displayed in the top left corner of the screen At t...

Page 28: ...e broadcast is running at some future time Using the Individual Setting menu You can make a personal list of the types of programmes you wish to view on the programme guide 1 Push the joystick or to select the icon then push to to display the Individual Setting menu 2 Push the joystick or to select your chosen item on the screen then press the button to confirm your choice 3 Repeat step 2 for all ...

Page 29: ... PDC then press the button repeatedly to select On or Off With this setting on you have the guaranteed recording of the whole broadcast should there be a change in the TV programme This only works if the selected channel broadcasts a VPS PDC signal Speed Push the joystick to select Speed then press the button repeatedly to select between SP for standardplay or LP for longplay With longplay you can...

Page 30: ...al No output No output No output Audio signal to headphones Optional Connections Using the following instructions you can connect a wide range of optional equipment to this TV set Connecting Optional Equipment PlayStation is a product of Sony Computer Entertainment Inc PlayStation is a trademark of Sony Computer Entertainment Inc 1 2 B C H I DVD VCR S VHS Hi8 DVC camcorder Dolby Surround Amplifier...

Page 31: ...to Centre in Remember that the maximum input level of this input is 30 W Be careful never to exceed this For mono equipment Connect the phono plug to the L G S I socket on the front of the TV and select the 4 input signal using the instructions on this page below Select and View the Input Signal In order to get the input signal of a connected equipment onto the TV screen you need to select the sym...

Page 32: ...CR Direct recording while watching TV you only need to press just one button on the VCR to record this programme Automatically switching on with the TV set in standby mode pressing the Play z button on your VCR automatically switches the TV on If you have connected a decoder to a VCR which supports the Smartlink feature select the menu Further Programme Preset in the Manual Set Up menu and select ...

Page 33: ...hat you entered the correct code or try the next code listed against the brand Your brand codes may be lost if weak batteries are not replaced within a few minutes To reset your brand of DVD or VCR please repeat the above steps A small label is added inside the battery door to allow you to record your brand codes Not all brands are covered and not all models of every brand may be covered Remote Co...

Page 34: ...ing the TV set Grasp the right side of the front panel with your fingers and pull it forward Be careful not to catch your fingernails 3 Loosen the screw with an object such as a coin and remove the lamp cover 4 Loosen the two screws and pull out the lamp Loosen two screws with the hexagon key supplied Pull out the lamp by the handle The lamp is still extremely hot immediately after the power is tu...

Page 35: ... the TV set so that you can view the screen from within the areas shown below Optimum Viewing Area Horizontal viewing area Optimum viewing position Vertical viewing area Optimum viewing position 65º 30º 30º 65º 2 m and more 2 m and more 01GBKF50 42SX200U fm Page 35 Tuesday January 7 2003 10 56 AM ...

Page 36: ...input selectable audio video output and Smartlink interface Front Terminals q 4 S video input 4 pin DIN 4 video input phono jack 4 audio inputs phono jacks 2 Headphones jack minijack stereo Sound output 2 x 20 W music power 2 x 15 W RMS Centre SP input 30 W RMS using as the centre speaker Power consumption 210 W Standby Power consumption 1 W Dimensions w x h x d KF 50SX200U Approx 1376 x 898 x 384...

Page 37: ...tures menu Using the MENU system select the Picture Adjustment menu Adjust the colour balance Turn off any equipment connected to the Scart connectors on the rear of the TV set Adjust the RF Attenuator ATT For details please refer to the section Using the Further Programme Preset function Adjust Fine Tuning AFT to obtain better picture reception For details please refer to the section Using the Fu...

Page 38: ...28 25 32 56 27 Emley Moor 44 51 47 41 37 North West 28 Winter Hill 55 62 59 65 48 North East 29 Bilsdale West Moor 33 26 29 23 30 Caldbeck 30 34 28 32 56 31 Chatton 39 45 49 42 32 Pontop Pike 58 64 61 54 Scotland 33 Angus 57 63 60 53 34 Black Hill 40 46 43 50 37 35 Sandale 22 67 36 Caldbeck 28 32 56 37 Craigkelly 31 27 24 21 48 38 Darvel 33 26 23 29 39 Durris 22 28 25 32 67 40 Eitshal Lewis 33 26 ...

Page 39: ...http www sony net Sony España S A Printed in Spain Ecological Paper Totally Chlorine Free 02BCKF50 42SX200U fm Page 1 Tuesday January 7 2003 11 00 AM ...

Reviews: