background image

GB

29

R

e

co

rdi

n

g/
P

la

yba

ck

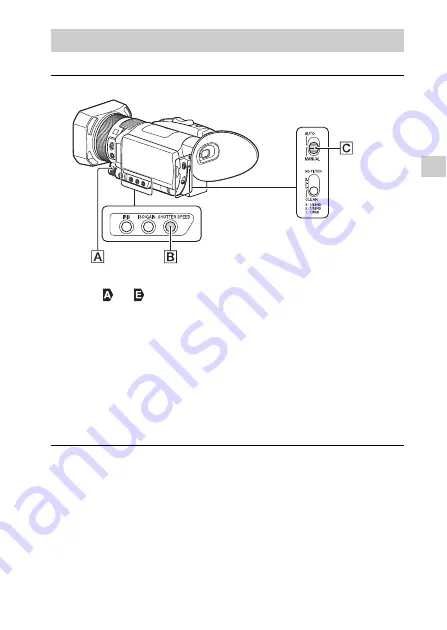
You can adjust and fix the shutter speed manually.

Adjusting the shutter speed

1

Set the AUTO/MANUAL switch 

 to “MANUAL.”

2

Press the SHUTTER SPEED button 

.

• The 

 or 

 next to the shutter speed value disappears, and the 

shutter speed value is highlighted.

3

Turn the manual dial 

 to adjust the value and press 

the 

/

/

/

/SET button to enter.

• When [60i] is selected: You can select from 1/8 to 1/10000 (1/6 - 1/

10000 when shooting with 24p).

• When [50i] is selected: You can select from 1/6 to 1/10000.
• The denominator of the set shutter speed appears on the LCD 

monitor. For example, [100] appears on the LCD monitor when you 
set the shutter speed to 1/100 second. The larger the value on the 
LCD monitor is, the faster the shutter speed is.

Summary of Contents for FDR-AX700

Page 1: ...ng Playback Saving images Customizing your camcorder Others Digital 4K Video Camera Recorder Operating Guide http rd1 sony net help cam 1710 h_zz Help Guide Web manual Refer to Help Guide for in depth instructions on the many functions of the camera ...

Page 2: ...nd keep it away from children If you think batteries might have been swallowed or placed inside any part of the body seek immediate medical attention Read these instructions Keep these instructions Heed all warnings Follow all instructions Do not use this apparatus near water Clean only with dry cloth Do not block any ventilation openings Install in accordance with the manufacturer s instructions ...

Page 3: ... temperature above 60 C 140 F such as in direct sunlight or in a car parked in the sun Do not incinerate or dispose of in fire Do not handle damaged or leaking lithium ion batteries Be sure to charge the battery pack using a genuine Sony battery charger or a device that can charge the battery pack Keep the battery pack out of the reach of small children Keep the battery pack dry Replace only with ...

Page 4: ...FCC radio frequency RF Exposure Guidelines This equipment has very low levels of RF energy that is deemed to comply without testing of specific absorption rate SAR The available scientific evidence does not show that any health problems are associated with using low power wireless devices There is no proof however that these low power wireless devices are absolutely safe Low power Wireless devices...

Page 5: ...h the instructions may cause harmful interference to radio communications However there is no guarantee that interference will not occur in a particular installation If this equipment does cause harmful interference to radio or television reception which can be determined by turning the equipment off and on the user is encouraged to try to correct the interference by one or more of the following m...

Page 6: ...dicates that the product and the battery shall not be treated as household waste On certain batteries this symbol might be used in combination with a chemical symbol The chemical symbols for mercury Hg or lead Pb are added if the battery contains more than 0 0005 mercury or 0 004 lead By ensuring these products and batteries are disposed of correctly you will help prevent potentially negative cons...

Page 7: ...ecycling of this product or battery please contact your local Civic Office your household waste disposal service or the shop where you purchased the product or battery For Customers in Singapore For Customers in U A E For Customers in Malaysia ...

Page 8: ... device 40 Using the Wi Fi function 42 Customizing your camcorder 46 Using the menus 46 Others 49 Precautions 49 Specifications 52 Parts and controls 57 Index 64 You will find further information such as the following functions in Help Guide FOCUS AREA LOCK ON AF AF DRIVE SPEED AF SUBJ SWITCH SENS S Q MOTION SUPER SLOW MOTION CTRL W SMARTPHONE PICTURE PROFILE HDR PROXY recording XAVC S DIRECT menu...

Page 9: ...in the computer using the PlayMemories Home software AVCHD Compatibility with recording devices other than computers is good Data can be saved in the computer or can be created into supporting media using the PlayMemories Home software 2 Press the MENU button select REC OUT SET REC SET REC FORMAT desired setting value Setting with a higher bit rate makes image quality higher Selectable setting val...

Page 10: ...5p 60i 50i SEL REC FORMAT Bit rate Actual movie format 60i 1080 120p 100Mbps 100 Mbps 1 920 1 080 120p 1080 120p 60Mbps 60 Mbps 1 920 1 080 120p 1080 60p 50Mbps 50 Mbps 1 920 1 080 60p 1080 60p 25Mbps 25 Mbps 1 920 1 080 60p 1080 30p 50Mbps 50 Mbps 1 920 1 080 30p 1080 30p 16Mbps 16 Mbps 1 920 1 080 30p 1080 24p 50Mbps 50 Mbps 1 920 1 080 24p 50i 1080 100p 100Mbps 100 Mbps 1 920 1 080 100p 1080 10...

Page 11: ...o the appropriate TV system for the country region in which you intend to watch the movies For the country region where you can watch TV in each setting refer to the Help Guide 60i 50i SEL REC FORMAT 1 Bit rate Actual movie format 60i 1080 60i FX Max 24 Mbps 1 920 1 080 60i 1080 60i FH Avg 17 Mbps 2 1 920 1 080 60i 1080 60i LP Avg 5 Mbps 2 1 920 1 080 60i 50i 1080 50i FX Max 24 Mbps 1 920 1 080 50...

Page 12: ... quantity Camcorder 1 AC Adaptor 1 Power cord mains lead 1 Wireless remote commander 1 A button type lithium battery is already installed Large eyecup 1 Lens hood 1 Lens cap attached to the lens 1 USB cable 1 Operating Guide This manual 1 Rechargeable battery pack NP FV70A 1 ...

Page 13: ...r cord mains lead to your camcorder and the wall outlet wall socket Align the mark on the DC plug with that on the DC IN jack The POWER CHG charge lamp turns orange The POWER CHG charge lamp turns off when the battery pack is fully charged Disconnect the AC Adaptor from the DC IN jack of the camcorder Battery pack DC plug AC Adaptor Wall outlet wall socket DC IN jack Power cord mains lead ...

Page 14: ...ps 50i PROXY REC MODE OFF Typical recording time shows the time when you repeat starting stopping recording switching the SHOOTING MODE zooming etc The recording time shows the time when recording with the LCD monitor open To use your camcorder connected to the wall outlet wall socket Connect the camcorder to the wall outlet wall socket in the same way as Charging the battery pack You can use the ...

Page 15: ...BATT battery release lever and remove the battery pack To charge the battery pack abroad You can charge the battery pack in any countries regions using the AC Adaptor supplied with your camcorder within the AC 100 V 240 V 50 Hz 60 Hz range Do not use an electronic voltage transformer ...

Page 16: ...ss the MENU button select OTHERS BEEP OFF with the SET button 1 Open the LCD monitor of your camcorder and turn the power on You can also turn on the power by extending the viewfinder or by pressing the On Standby button To extend the viewfinder grip both side of the viewfinder and pull it out horizontally When you use your camcorder for the first time the CLOCK SET screen appears 2 Follow the ins...

Page 17: ...the viewfinder is hard to see If you cannot see the picture in the viewfinder clearly under bright circumstances use the supplied large eyecup To attach the large eyecup stretch it slightly and fit it over the groove on the camcorder You can attach the large eyecup facing either the right or left side If the viewfinder is extended while the battery pack NP FV100A sold separately is attached the la...

Page 18: ...til it clicks The Preparing image database file Please wait screen appears if you insert a new memory card Wait until the screen disappears Memory card slot A accepts either Memory Stick media or an SD card Memory card slot B accepts an SD card only Insert the card with the notched corner in the direction as illustrated Memory card slot A Memory card slot B ...

Page 19: ...mory card AVCHD SD SDHC SDXC memory card Class 4 or faster or U1 or faster XAVC S 4K 60 Mbps HD 60 Mbps HD 50 Mbps or less SDHC SDXC memory card Class 10 or faster or U1 or faster 4K 100 Mbps HD 100 Mbps SDHC SDXC memory card U3 S Q MOTION SUPER SLOW MOTION SDHC SDXC memory card Class 10 or faster or U1 or faster Recording formats Supporting memory cards Photos Memory Stick PRO Duo media Memory St...

Page 20: ...ry Stick Micro media or microSD memory card insert into a dedicated card adaptor and connect it to the camcorder To repair the image database file charge the battery pack fully in advance Movies saved on SDXC memory cards cannot be imported to or played back on computers or AV devices not supporting the exFAT file system by connecting this product to these devices with the USB cable Confirm in adv...

Page 21: ...ton You can only select a slot that already has a memory card inserted While movies are being recorded on the memory card you cannot switch the slot even if you press the SLOT SELECT button To format the memory card To ensure stable operation of the memory card it is recommended to format the memory card with your camcorder before the first use To format the memory card press the MENU button selec...

Page 22: ...sly LCD BRIGHT is fixed to NORMAL When the memory card access lamp is lit or flashing in red your camcorder is reading or writing data on memory card Do not shake or apply strong force to your camcorder do not turn the power off and do not remove the memory card battery pack or the AC Adaptor The image data may be destroyed If a movie file size exceeds 2 GB while recording in AVCHD format the camc...

Page 23: ...replace only the one in the slot whose access lamp is off Even if you press the SLOT SELECT button while recording movies you cannot switch the slot currently being used When the remaining recording time of the memory card being used is less than 1 minute and the other slot has recordable memory card inserted or appears on the camcorder screen The indicator turns off when the memory card is switch...

Page 24: ... and B is different Approximate recording time available 1 When using a Sony memory card 2 When recording with the default setting REC FORMAT 2160 30p 60Mbps 60i or 2160 25p 60Mbps 50i PROXY REC MODE OFF 3 Approximate recording time when recording with the following setting REC FORMAT 1080 60p 50Mbps 60i or 1080 50p 50Mbps 50i PROXY REC MODE OFF 4 Approximate recording time when recording with the...

Page 25: ...itor and switch the shooting mode to photo mode by selecting REC OUT SET SHOOTING MODE PHOTO with the SET button You cannot take photos when the camcorder is in movie mode 2 Press the PHOTO button lightly to adjust the focus then press it fully Power zoom lever ...

Page 26: ...to manual appears 2 Move the ZOOM FOCUS switch and turn the manual lens ring FOCUS You can manually adjust the focus by turning the manual lens ring ZOOM You can manually adjust the zoom by turning the manual lens ring changes to when the focus cannot be adjusted any farther or changes to when the focus cannot be adjusted any closer ...

Page 27: ... to the iris value disappears and the iris value is highlighted 3 Turn the manual dial to adjust the value and press the SET button to enter The volume of the light increases the more that you open the aperture decreasing F value The volume of the light decreases the more that you close the aperture increasing F value ...

Page 28: ...e by AGC automatic gain control Adjusting the gain 1 Set the AUTO MANUAL switch to MANUAL 2 Press the ISO GAIN button The or next to the gain value disappears and the gain value is highlighted 3 Turn the manual dial to adjust the value and press the SET button to enter ...

Page 29: ...ighted 3 Turn the manual dial to adjust the value and press the SET button to enter When 60i is selected You can select from 1 8 to 1 10000 1 6 1 10000 when shooting with 24p When 50i is selected You can select from 1 6 to 1 10000 The denominator of the set shutter speed appears on the LCD monitor For example 100 appears on the LCD monitor when you set the shutter speed to 1 100 second The larger ...

Page 30: ...s automatic adjustment set the ND filter to 1 If flashes during the iris automatic adjustment set the ND filter to 2 If flashes during the iris automatic adjustment set the ND filter to 3 When an appropriate brightness is achieved the ND filter indicator stops flashing and remains lit on the screen If flashes set the ND FILTER switch to CLEAR The ND filter icon will disappear from the screen Adjus...

Page 31: ... or off the date and time display on the thumbnails by pressing the DISPLAY button 2 Touch the memory card you want to play back You can also select the desired memory card memory card A or memory card B with the SET button Press the SET button to display the thumbnails in that media THUMBNAIL playback button Memory cards Previous Next Movie thumbnails Playback mode Current movie data ...

Page 32: ...ding Displayed when audio is recorded in Dolby Digital format appears with the movie that has been most recently played back or recorded If you touch the movie with you can continue playback from the previous time 3 Touch the playback mode and select the desired image quality of movies 4 Touch twice the thumbnail of the movie you want to play back You can also select the movie or photo to be playe...

Page 33: ...not be able to play back images recorded on other devices with your camcorder Operations of playing back movies When playback from the selected movie reaches the last movie the screen returns to the thumbnail screen Touch during pause to play back movies slowly The playback speed increases based on the number of times that you touch Notes Stop Previous Slow Fast forward Next Slow Fast reverse Play...

Page 34: ...oom with or with the power zoom lever When you touch the enlarged image the touched point will be displayed at the center of the screen To adjust the volume Press the MENU button and select AUDIO SET VOLUME with the SET button To return to the recording mode Press the THUMBNAIL playback button Next Previous ...

Page 35: ...umbnail you want to delete is displayed on the selected thumbnail Press and hold the thumbnail down to preview the image Touch to return to the previous screen You can select up to 100 images at one time Touch Do not remove the battery pack the AC Adaptor or the memory card that contains the movies or photos from your camcorder during the deletion It may damage the memory card Notes DELETE ...

Page 36: ...t the type of playback images being selected and the HDMI output settings Playing back images 1 Connect the HDMI OUT terminal of the camcorder to the HDMI IN jack of a TV using the HDMI cable sold separately Signal flow 2 Set the input of TV to HDMI IN 3 Play back images on the camcorder HDMI cable sold separately ...

Page 37: ...160p 1080i 480i 576i 4K image quality 1080p 480i 576i 720p 480i 576i 1080i 480i 576i High definition image quality HD 480p 576p 480i 576i Standard image quality High definition TV AUTO 2160p 1080p 480i 576i 2160p 720p 480i 576i 2160p 1080i 480i 576i 1080p 480i 576i 720p 480i 576i 1080i 480i 576i High definition image quality HD 480p 576p 480i 576i Standard image quality XAVC S HD AVCHD 4K TV or Hi...

Page 38: ...f your TV does not have an HDMI jack connect the Multi Micro USB Terminal of the camcorder to the video audio input jacks of the TV using an AV cable sold separately The camcorder does not support BRAVIA Sync ...

Page 39: ...s Home can be downloaded from the following URL http www sony net pm To check the computer system You can check the computer requirements for the software at the following URL http www sony net pcenv What you can do with PlayMemories Home Viewing images on Calendar Sharing images on PlayMemories Online Import images from the camcorder Creating movie discs Uploading images to network services Playi...

Page 40: ...website for the latest storage environment http www sony net You can store images by connecting to a recorder with an analog AV cable sold separately Movies are copied with standard definition image quality page 41 How to store movies Device Cable Image quality Recording format Media Recorder without a USB jack AV cable sold separately Standard definition image quality DVD Computer USB cable suppl...

Page 41: ...lti Micro USB Terminal of your camcorder using an AV cable sold separately Signal flow For how to save images also refer to the instruction manual of your recording device Movies are copied with standard definition image quality How to connect a device AV cable sold separately ...

Page 42: ...r App Store depending on the country or the region In that case search for PlayMemories Mobile If PlayMemories Mobile is already installed in your smartphone update the software to the latest version The Wi Fi function described here is not guaranteed to work on all smartphones and tablets The Wi Fi function of the camcorder cannot be used connected to a public wireless LAN To use the One touch fu...

Page 43: ... Connecting to a Wi Fi network using the QR Code page 43 Connecting to a Wi Fi network using the QR Code Using your smartphone as a wireless remote commander 1 On the smartphone select Settings then select More to check that NFC is enabled 2 Touch the smartphone on the camcorder 3 Operate the connected smartphone Notes 1 Press the MENU button select NETWORK SET CTRL W SMARTPHONE The QR Code SSID a...

Page 44: ...nitor of the camcorder Perform the following operations When Connect with the camera is displayed select Connect Android Perform the following operations Follow the on screen instruction and install the profile setting information If you are required to enter the pass code during installation enter it set to the iPhone On Home select Settings Wi Fi Select the SSID of the camcorder iPhone iPad ...

Page 45: ...D of the camcorder registered on your smartphone If the camcorder cannot be connected with the smartphone by NFC and by reading the QR Code connect by using the SSID and the password For more details refer to Help Guide Depending on local electrical interference or the smartphone s capabilities the live view images may not be displayed smoothly Images recorded with the camcorder cannot be saved in...

Page 46: ... to select a desired menu item To finish the MENU press the MENU button Select RETURN to return to the previous menu screen MENU button MENU END CAMERA SET STBY AGC LIMIT WB PRESET WB OUTDOOR LEVEL WB TEMP SET WB SET AE SHIFT D EXTENDER ZOOM SET 100 MENU END OTHERS OFF STBY 100 LANGUAGE DATE REC BEEP REC LAMP REMOTE CONTROL 60i 50i SEL MEDIA FORMAT REPAIR IMAGE DB FILE ...

Page 47: ...O BACK LIGHT 1 NIGHTSHOT 1 NIGHTSHOT LIGHT 1 COLOR BAR 1 PICTURE PROFILE 1 REC OUT SET SHOOTING MODE REC SET 1 IMAGE SIZE 2 FILE NUMBER 2 VIDEO OUT AUDIO SET VOLUME AVCHD AUDIO FORMAT 1 AUDIO REC LEVEL 1 INT MIC WIND 1 MIC SELECT 1 AUDIO OUTPUT TIMING 1 DISPLAY SET HISTOGRAM ZEBRA PEAKING PHASE AF FRAMES 1 PHASE DETECT AF AREA 1 MARKER FOCUS MAG RATIO CAMERA DATA DISPLAY AUDIO LEVEL DISPLAY 1 ZOOM...

Page 48: ...e thumbnail or playback screen is displayed 7 Displayed when you press the MENU button while playing back AVCHD movie UB TIME REC NETWORK SET CTRL W SMARTPHONE Wi Fi SET AIRPLANE MODE NETWORK RESET OTHERS STATUS CHECK CAMERA PROFILE S Q BUTTON SETTING 1 ASSIGN BUTTON CLOCK SET AREA SET DST SET SUMMERTIME LANGUAGE DATE REC 1 5 BEEP REC LAMP REMOTE CONTROL 60i 50i SEL MEDIA FORMAT REPAIR IMAGE DB FI...

Page 49: ...nction to make sure the image and sound are recorded without any problems Television programs films video tapes and other materials may be copyrighted Unauthorized recording of such materials may be a violation of the copyright laws Compensation for the content of recordings cannot be provided even if recording or playback is not possible due to a malfunction of the camcorder memory card etc The c...

Page 50: ... battery temperature goes down If you turn on the power without letting the camcorder and battery cool enough the power may turn off again or you may be unable to record movies Deactivating wireless LAN Wi Fi NFC etc temporarily When you board an airplane you can deactivate the Wi Fi function temporarily Press the MENU button select NETWORK SET AIRPLANE MODE ON Wireless LAN We assume no responsibi...

Page 51: ...GB 51 Others Initialize your camcorder page 48 All settings including the clock setting are reset Contact your Sony dealer or local authorized Sony service facility ...

Page 52: ...lass 1 or faster 1 SDXC memory card Class 10 or UHS speed class 1 or faster 1 AVCHD Photo Memory Stick PRO HG Duo SD card Class 4 or faster or UHS speed class 1 or faster 1 Capacity of 4 GB or more is required Image device 1 0 type Exmor RS CMOS sensor Recording pixels photo 16 9 Max 14 20 mega pixels 5 024 2 824 Gross Approx 21 00 mega pixels Effective movie 16 9 Approx 14 20 mega pixels Effectiv...

Page 53: ...k φ 2 5 mm 1 Screen LCD monitor 8 8 cm 3 5 type 1 555 200 dots Viewfinder 1 0 cm 0 39 type OLED 2 359 296 dots Wireless LAN Supported standard IEEE 802 11 b g n Frequency 2 4 GHz Supported security protocols WEP WPA PSK WPA2 PSK Configuration method WEP WPA PSK WPA2 PSK Access method Infrastructure Mode NFC NFC Forum Type 3 Tag compliant General Power requirements DC 7 4 V battery pack DC 8 4 V AC...

Page 54: ...k and are trademarks or registered trademarks of Sony Corporation InfoLITHIUM is a trademark of Sony Corporation BRAVIA is a trademark of Sony Corporation Blu ray Disc and Blu ray are trademarks of the Blu ray Disc Association Dolby and the double D symbol are trademarks of Dolby Laboratories The terms HDMI and HDMI High Definition Multimedia Interface and the HDMI Logo are trademarks or registere...

Page 55: ...R COLORADO 80206 THIS PRODUCT IS LICENSED UNDER THE AVC PATENT PORTFOLIO LICENSE FOR THE PERSONAL USE OF A CONSUMER OR OTHER USES IN WHICH IT DOES NOT RECEIVE REMUNERATION TO i ENCODE VIDEO IN COMPLIANCE WITH THE AVC STANDARD AVC VIDEO AND OR ii DECODE AVC VIDEO THAT WAS ENCODED BY A CONSUMER ENGAGED IN A PERSONAL ACTIVITY AND OR WAS OBTAINED FROM A VIDEO PROVIDER LICENSED TO PROVIDE AVC VIDEO NO ...

Page 56: ...pplied GPL LGPL Source code is provided on the web Use the following URL to download it http oss sony net Products Linux We would prefer you do not contact us about the contents of source code Copies of the licenses in English are stored in the internal memory of this product Establish a Mass Storage connection between this product and a computer and read the files in the LICENSE folder in PMHOME ...

Page 57: ...facture s accessories are not guaranteed If you use a shoe adaptor sold separately you can also use accessories compatible with an Active Interface Shoe To prevent failure do not use a commercially available flash with high voltage synchro terminals or with reverse polarity ASSIGN5 IRIS PUSH AUTO button N mark 43 Touch an NFC enabled smartphone to the mark to establish a connection with the camcor...

Page 58: ... USB Terminal VIDEO OUT jack 41 MIC jack PLUG IN POWER Power zoom lever 22 25 34 Cable clamper Dedicated to fix the HDMI cable only Do not attach other objects such as the shoulder strap to here Hook for shoulder strap ...

Page 59: ... 26 AF MF button 26 MENU button 46 Manual dial 27 28 29 Attaching the lens hood Align the marks on the lens hood to those on the camcorder and turn the lens hood in the direction of the arrow until it is locked If you attach or remove a 62 mm 2 1 2 in PL filter or MC protector remove the lens hood ...

Page 60: ...13 SET button 46 ASSIGN6 button POWER CHG charge lamp 13 Grip belt Tripod receptacles 1 4 inch For 1 4 20 UNC screws For attaching a tripod with a screw shorter than 5 5 mm sold separately Some tripods may not be designed to attach in the proper direction BATT battery release lever 15 ...

Page 61: ...GB 61 Others Eye sensor Viewfinder 17 Large eyecup 17 AUTO MANUAL switch 27 28 29 ND FILTER switch 30 Battery pack 13 headphones jack SHUTTER SPEED button 29 ISO GAIN button 28 IRIS button 27 ...

Page 62: ...peaker LCD monitor touch panel On Standby button 16 WHITE BALANCE button ASSIGN1 S Q button ASSIGN2 STATUS CHECK button ASSIGN3 PICTURE PROFILE button DISPLAY button 31 Memory card slot A Memory card access lamp 18 Memory card slot B Memory card access lamp 18 ...

Page 63: ...ed Wireless Remote Commander your video device may also operate In that case select a commander mode other than DVD2 for your video device or cover the sensor of your video device with black paper To change the battery of the Wireless Remote Commander While pressing on the tab inset your fingernail into the slit to pull out the battery case Place a new battery with the side facing up Insert the ba...

Page 64: ...ng images to your computer 39 Install 42 iOS 42 Iris 27 IRIS button 27 ISO GAIN button 28 L LCD monitor 62 Lens hood 59 M Manual lens ring 26 Manual recording 26 Memory card 18 21 31 Memory card slot 18 Memory Stick PRO Duo 19 Memory Stick PRO Duo M2 19 Memory Stick PRO HG Duo 19 MENU button 46 59 Menu lists 47 Menus 46 Movies 22 N ND filter 30 ND FILTER switch 30 NFC 43 O One Touch functions NFC ...

Page 65: ...recording 24 SLOT SELECT button 21 62 Smartphone 42 Software 39 42 Specifications 52 Supplied items 12 T THUMBNAIL playback button 31 Touch panel 62 Tripod 60 Troubleshooting 50 TV 36 U USB cable 40 V Viewfinder 17 W Wall outlet wall socket 14 Wi Fi 42 Windows 39 Wireless remote commander 63 X XAVC S 4K 9 XAVC S HD 9 Z Zoom 22 ZOOM FOCUS switch 26 ...

Page 66: ...GB 66 ...

Page 67: ...GB 67 Others ...

Page 68: ... 2017 Sony Corporation Printed in China Additional information on this product and answers to frequently asked questions can be found at our Customer Support Website http www sony net GB ...

Reviews: