- 7 -
9
GB
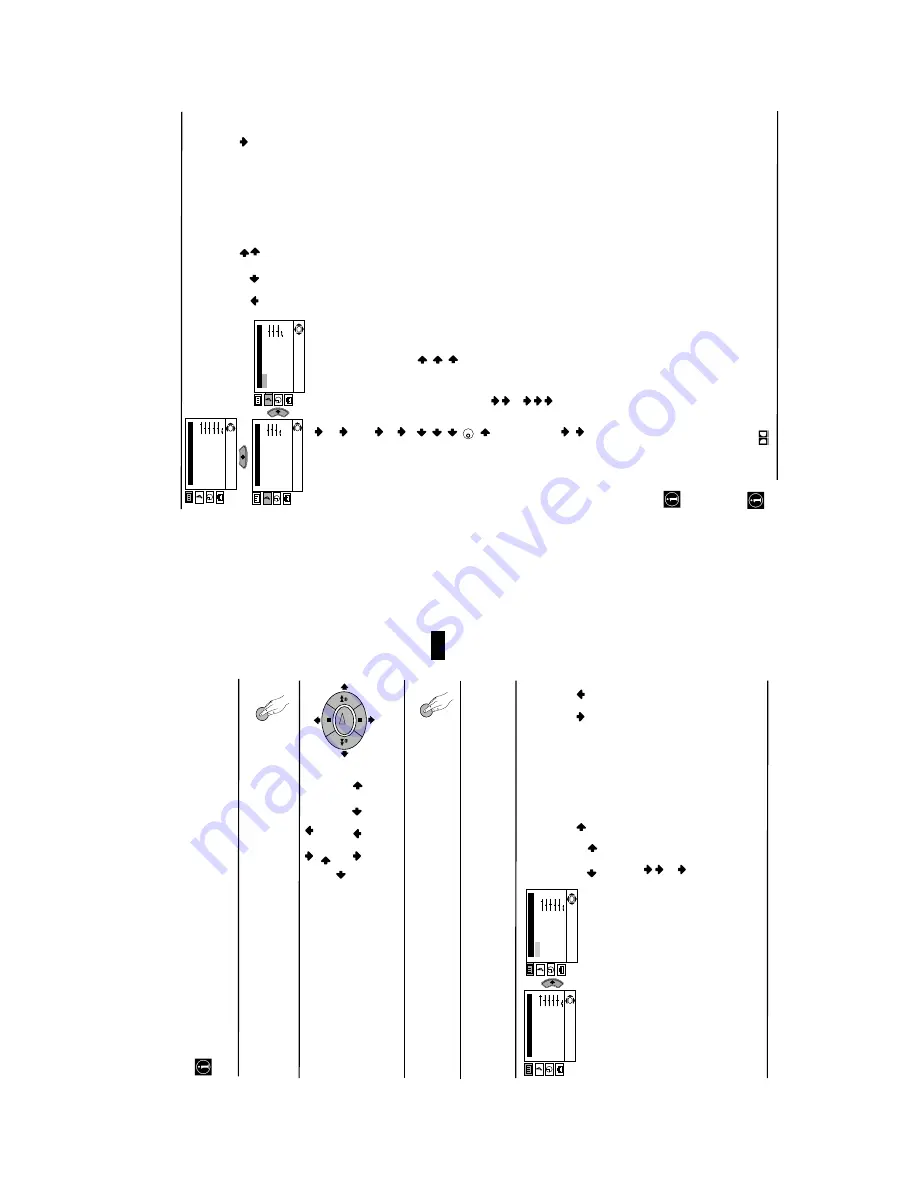
Introducing and Using the Menu System
Your TV uses an on-screen menu system to guide you through the operations. Use the
following buttons on the Remote Control to operate the menu system:
1
Press the
MENU
button to switch the first level menu on.
Menu System
2
•
To highlight the desired menu or option, press
or
.
•
To enter to the selected menu or option, press
.
•
To return to the last menu or option, press
.
•
To alter settings of your selected option, press
//o
r
.
•
To confirm and store your selection, press
OK
.
3
Press the
MENU
button to remove the menu from the screen.
continued...
Menu Guide
PICTURE ADJUSTMENT
The
“Picture Adjustment
” menu allows you to
alter the picture adjustments.
To do this: after selecting the item you want to
alter press
, then press repeatedly
/
/
or
to adjust it and finally press
OK
to
store the new adjustment.
This menu also allows you to customise the
picture mode based on the programme you are
watching:
Personal
(for individual settings).
Live
(for live broadcast programmes, DVD
and Digital Set Top Box receivers).
Movie
(for films).
Level 1
Level 2
Level 3 / Function
Picture Adjustment
Mode: Personal
Contrast
Brightness
Colour
Sharpness
Hue
Reset
OK
Picture Adjustment
Mode: Personal
Contrast
Brightness
Colour
Sharpness
Hue
Reset
OK
•
Brightness, Colour
and
Sharpness
can only be altered if “Personal” mode is selected.
•
Hue
is only available for NTSC colour signal (e.g: USA video tapes).
•
Select
Reset
and press
OK
to reset the picture to the factory preset levels.
MENU
MENU
OK
10
Picture Adjustment
Mode: Personal
Contrast
Brightness
Colour
Sharpness
Hue
Reset
OK
Sound Adjustment
Ef
fect: Natural
T
reble
Bass
Balance
Reset
Dual Sound: Mono
Auto volume:
On
OK
Sound Adjustment
Ef
fect: Natural
T
reble
Bass
Balance
Reset
Dual Sound: Mono
Auto volume:
On
OK
Menu System
SOUND ADJUSTMENT
The
“Sound Adjustment
” menu allows you to
alter the sound adjustments.
To do this: after selecting the item you want to
alter, press
. then press repeatedly
/
/
or
to adjust it and finally press
OK
to store the new adjustment.
Level 1
Level 2
Level 3 / Function
Effect Natural:
enhances clarity, detail and presence of sound by using
“BBE High Definition Sound system
”
*
.
Dynamic:
“BBE High Definition Sound system
”
*
intensifies clarity
and presence of sound for better intelligibility and
musical realism.
Dolby
**
Virtual:
simulates the sound effect of Dolby Prologic surround.
Off:
flat
response.
Treble
Less
More
Bass
Less
More
Balance
Left
Right
Reset
Resets the sound to the factory preset levels.
Dual Sound:
•
For a stereo broadcast:
Mono
.
Stereo
.
•
For a bilingual broadcast:
Mono
(for mono channel if available).
A
(for channel 1).
B
(for channel 2).
Auto Volume:
On:
volume level changes according to the broadcast signal.
Off:
volume level of the channels will stay the same, independent of the
broadcast signal (e.g. in the case of advertisements).
•
If you are listening to the TV through headphones, the
“Effect
” option will automatically switched to
Off.
•
If you switch
“Effect
” to
“Dolby Virtual
”, the
“Auto Volume
” option will automatically be switched
to
“Off
” and vice versa.
*
The
“BBE High Definition Sound system
” is manufactured by Sony Corporation under license
from BBE Sound, Inc. It is covered by U.S. Patent No. 4,638,258 and No. 4,482,866. Teh word
“BBE
” and BBE Symbol are trademarks of BBE Sound, Inc.
**
This TV has been designed to create the
“Dolby Surround
” sound effect by simulating the sound
of four speakers with two speakers, when the broadcast audio signal is Dolby Surround encoded.
The sound effect can also be improved by connecting a suitable external amplifier (for details refer
to
“Connecting to external audio Equipment
” on page 19).
**
Manufactured under license from Dolby Laboratories.
“Dolby
”,
“Pro Logic
” and the double-D
symbol
are trademarks of Dolby Laboratories.
K
continued...
Summary of Contents for FD Trinitron KV-29LS60K
Page 27: ... 27 A Schematic Video Audio Processors Audio Output Vertical Deflection page 1 2 ...
Page 29: ...A B C D E F G H I J K L M N 1 2 3 4 5 6 7 8 9 10 11 29 A PrintedWiring Board Conductor side A ...
Page 30: ...A B C D E F G H I J K L M N 1 2 3 4 5 6 7 8 9 10 11 30 A PrintedWiring Board Conductor side B ...
Page 35: ... 35 G Board Schematic Diagram Power Supply ...
Page 36: ... 36 D Board Schematic Diagram Deflection ...
Page 38: ...A B C D E F G H I J K L M N 1 2 3 4 5 6 7 8 9 10 11 38 C Board Schematic R G B Out ...
Page 40: ... 40 M Board Schematic Diagram Micro Processor ...
Page 68: ......


