background image

5

Chapter 5  Setting Up the Camcorder

5-25

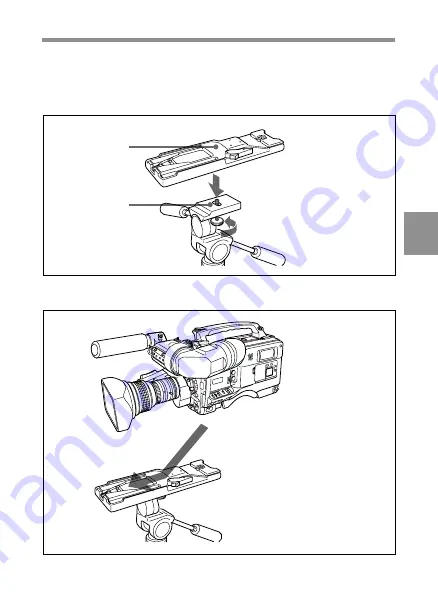
5-6 Tripod Mounting

You can easily mount and dismount the camcorder on a tripod by using
the supplied tripod adaptor.

1

Attach the tripod adaptor to the tripod.

2

Mount the camcorder on the tripod adaptor.

Tripod adaptor

Select the screw hole in the
tripod adaptor which best fits
the screw on your tripod
camera mount and thus gives
the best balance for the
camcorder.

Camera mount

Slide the camcorder forward
along the groove in the adaptor
until it clicks.

Summary of Contents for F900H

Page 1: ...HD CAMCORDER HDW F900 HDW F900H OPERATION MANUAL English 1st Edition Revised 3 HDW F900 F900H ...

Page 2: ...ment generates uses and can radiate radio frequency energy and if not installed and used in accordance with the instruction manual may cause harmful interference to radio communications Operation of this equipment in a residential area is likely to cause harmful interference in which case the user will be required to correct the interference at his own expense You are cautioned that any changes or...

Page 3: ...ial E3 urban outdoors and E4 controlled EMC environment ex TV studio Pour les clients européens Ce produit portant la marque CE est conforme à la Directive sur la compatibilité électromagnétique EMC 89 336 CEE émise par la Commission de la Communauté européenne La conformité à cett directive implique la conformité aux normes européennes suivantes EN55103 1 Interférences électromagnétiques émission...

Page 4: ... folgenden Europäischen Normen EN55103 1 Elektromagnetische Interferenz Emission EN55103 2 Elektromagnetische Empfindlichkeit Immunität Dieses Produkt ist für den Einsatz unter folgenden elektromagnetischen Bedingungen ausgelegt E1 Wohnbereich E2 kommerzieller und in beschränktem Maße industrieller Bereich E3 Stadtbereich im Freien und E4 kontrollierter EMV Bereich z B Fernsehstudio ...

Page 5: ... 2 13 2 5 Setup Menu Operating Section 2 27 2 6 Time Code System 2 29 2 7 Warnings and Indications 2 35 2 8 Warnings and Indications on the Display Panel 2 38 2 9 Indicators on the Viewfinder HDVF 20A not supplied 2 42 Chapter 3 Recording and Playback 3 1 About Cassettes 3 1 3 1 1 Loading and Unloading a Cassette 3 1 3 1 2 Preventing Accidental Erasure 3 4 3 2 Recording 3 5 3 2 1 Basic Procedure 3...

Page 6: ...4 4 Setting the Time Data 4 17 4 4 1 Setting the User Bits 4 17 4 4 2 Setting the Time Code 4 19 4 4 3 Entering the Real Time in the VITC 4 21 4 4 4 Synchronizing the Time Code 4 23 4 5 Setup Menu Display on the Viewfinder Screen 4 28 4 5 1 Basic Use of the Setup Menu 4 31 4 6 Status Display on the Viewfinder Screen 4 34 4 6 1 Layout of the Status Display on the Viewfinder Screen4 34 4 7 Using the...

Page 7: ...in Case of an OPERATOR File 4 93 Chapter 5 Setting Up the Camcorder 5 1 Power Supply 5 1 5 1 1 Using a BP L60A Battery Pack 5 1 5 1 2 Avoiding Breaks in Operation Due to Dead Batteries 5 4 5 1 3 Using an AC Adaptor 5 5 5 1 4 Using the Anton Bauer Ultralight System 5 6 5 2 Adjusting the Viewfinder 5 7 5 2 1 Adjusting the Viewfinder Position 5 7 5 2 2 Detaching the Viewfinder 5 9 5 3 Mounting the Le...

Page 8: ...aintenance 6 1 Testing the Camcorder Before Shooting 6 1 6 1 1 Preparations for Testing 6 1 6 1 2 Testing the Camera 6 2 6 1 3 Testing the VTR 6 6 6 2 Maintenance 6 10 6 2 1 Cleaning the Video Heads 6 10 6 2 2 Cleaning the Viewfinder 6 10 6 3 Operation Warnings 6 14 Appendix Specifications A 1 Video Camera Section A 2 VTR Section A 3 Supplied Accessories A 6 Recommended Additional Equipment A 6 Gl...

Page 9: ... elements provide a compact and lightweight unit with excellent image quality Existing 2 3 inch lenses can be used A new integrarted circuit techonolgy of the digital signal processing has improved picture quality and functionability The camcorder can operate with any one of 8 different formats 59 94I 60I 30P 29 97P 50I 25P 24P and 23 98P The 12 bit AD converter has greatly improved picture qualit...

Page 10: ...hite balance setting appropriate for the lighting conditions Character display functions on the viewfinder indicate switch settings automatic black and white balance adjustment status indications and warnings The warning system uses various types of warning indicators and sounds to inform you of VTR faults end of tape low battery etc The camcorder is equipped with a dual wheel filter disk for adju...

Page 11: ...ble to shorten time for setting with duplicating the stored reference file to the other cameras through the Memory Stick Correction value to use a lens extender and for each lens can be stored as a lens file and then can be recalled It is possible to shorten time for adjustment when replacing the lens A high performance viewfinder is adjustable forward backward and sideways and has a full range of...

Page 12: ...econds of recording on the tape enables you to quickly confirm recorded contents No playback adaptor is needed to see the color playback image on the monitor screen The 3 times normal speed search function provides quick positioning of the tape LTC1 and VITC2 recording and LTC playback can be performed Compatible with the Tele File3 Memory Label system By pressing the RET button on the lens while ...

Page 13: ...ears without charging the camcorder power supply Optional long life battery packs are available Pressing the VTR START button on the camcorder or the VTR button on the lens ensures recording continuity from the very next frame Two analog audio input channels and the microphone can be recorded at the same time Connecting the HDCA 901 camera adaptor not supplied allows you to input four audio input ...

Page 14: ...er not supplied is use to instruct how to operate the unit Viewfinder related equipment Fog proof filter Part No 1 547 341 11 BKW 401 Viewfinder Rotation Bracket Viewfinder HDVF 20A HD Electronic Viewfinder HDVF C30W HD Electronic Viewfinder Video monitor for color image check while shooting Remote control equipment RCP 700 Series or RM B150 Remote Control Unit MSU 700A 750 Master Setup Unit ...

Page 15: ...ion manuals for the connected equipment HDCA 901 for the input of the audio channels 3 and 4 and the HD SDI output Camera adaptor Audio signal source External microphone C 74 etc CAC 12 Microphone Holder Audio equipment WRR 810A 860A UHF Portable Tuner Power source AC power supply 100V AC Battery BC L100 Battery Charger AC 550 AC Adaptor BP L60A Battery Pack ...

Page 16: ... damp places Places subject to severe vibration Near strong magnetic fields In direct sunlight or close to heaters for extended periods To prevent electromagnetic interference from portable communications devices The use of portable telephones and other communications devices near this unit can result in misoperations and interference with audio and video signals It is recommended that the portabl...

Page 17: ...wer supply 1 Battery attachment Attach a BP L60A battery pack 2 DC IN external power input connector XLR type 4 pin male To operate the HDW F900 using an AC power supply connect an AC 550 AC Adaptor with the DC output cable supplied with the adaptor To use an external battery connect its DC output cable to the DC IN connector Continued ...

Page 18: ...reaker is tripped automatically to shut off the power supply and protect the equipment After performing internal checks or adjustments use a pointed object such as a pen to press down lightly on this button If there is no problem the power will again be supplied 4 POWER switch This switch turns the main power supply on and off ...

Page 19: ...ccessory Attachments Accessory attachments 1 Shoulder strap posts Attach the supplied shoulder strap to these posts 2 Light shoe Attach an optional accessory such as a video light to this shoe 3 Lens mount special bayonet mount Use this for mounting the lens Lens cable clamp Continued ...

Page 20: ...r protection from dust always insert this cap when no lens is mounted 6 Tripod mount When using the unit on a tripod attach the supplied tripod adaptor 7 LENS connector 12 pin Fit the lens cable to this connector Contact your Sony representative for more information about the lens you are using 8 Shoulder pad You can move the shoulder pad forwards or backwards by loosening the two screws Do this t...

Page 21: ...crophone connects to this connector You can connect a microphone other than the supplied one as long as it corresponds to an external power supply system The connector supplies power 48 V to the microphone 3 MIC MENU knob This knob adjusts the audio level of the front microphone To adjust the front microphone level set the DISPLAY switch to ON then push the MENU switch to CANCEL The audio level in...

Page 22: ...tions of Parts and Controls 2 6 4 5 6 7 8 9 0 ADVANCE PRESET F RUN SET DIAG R RUN NDF DF REGEN REAL TIME AUDIO IN AUDIO SELECT REAR MIX CH 1 CH 2 FRONT SHIFT ON OFF SET MANUAL AUTO LEVEL CH 1 0 10 CH 2 0 10 CUE IN Audio functions 2 ...

Page 23: ...gnal source is the microphone connected to the MIC IN connector REAR The input signal source is the audio equipment connected to the AUDIO IN CH 1 CH2 connectors You can also record audio signals in audio channels 3 and 4 You can select the input signals to be recorded for audio channels 3 and 4 by using the AU REC CH 3 4 item on the VTR SETUP page of the MAINTENANCE menu The following three input...

Page 24: ...2 or audio channels 3 and 4 The PB AUDIO CH item on the VTR SETUP page of the MAINTENANCE menu allows you to select the audio signal to be played back For more information refer to the Maintenance Manual 9 AUDIO IN CH 1 CH 2 audio channel 1 and channel 2 input connectors XLR type 3 pin female and LINE MIC 48 V ON line input microphone input external power supply 48 V ON switches These are audio in...

Page 25: ...Functions of Parts and Controls 2 9 Minimum Maximum Audio functions 3 qa ALARM volume control This control adjusts the speaker or earphone alarm volume At the minimum position no sound can be heard ALARM volume control Continued ...

Page 26: ...trol adjusts the speaker or earphone volume for sounds other than the alarm sound At the minimum position no sound can be heard MONITOR volume control qd MONITOR audio channel select switch This switch selects the audio channel to be output from the speaker or earphone CH 1 Channel 1 audio MIX Mixed sound of channels 1 and 2 CH 2 Channel 2 audio During playback the signals of the audio channels se...

Page 27: ...ual warnings If an earphone is plugged into to the EARPHONE jack the speaker sound is automatically cut off See Section 6 3 Operation Warnings page 6 14 for information about alarms 1 E E sound Electric to Electric sound The term E E sound refers to an audio signal that has passed though the amplifier but has not been recorded on the tape In other words you can directly monitor the recording input...

Page 28: ...s off the built in speaker and you hear the alarms about the camcorder s operation and status through the earphone qh Tap for measure hook This is the hole for the M3 screw effective screw length 6mm located at the position of the flange focal length You can use this tap to attach the hook for a tape measure to measure the distance between the position of the flange focus and an object The effecti...

Page 29: ...ious warnings and messages related to the settings or operating conditions of the camcorder a zebra pattern1 safety zone marker2 and center marker3 1 Zebra pattern The zebra pattern aids in manual iris adjustment by indicating areas of the picture where the video level is approximately 70 and 100 and above 2 Safety zone marker The safety zone marker is a rectangle indicating the effective picture ...

Page 30: ...een to make focusing easier It has no effect on the camera output signal 5 DISPLAY ASPECT display aspect control switch Use this switch to turn the markers and aspect mask function on or off DISPLAY When MARKER on the MARKER page of the OPERATION menu is set to ON pushing this switch to DISPLAY toggles the markers on the viewfinder screen on and off ASPECT When MASK on the MARKER page of the OPERA...

Page 31: ...vel is 100 and above are to be displayed at the same time For information about how to set the zebra pattern is to be displayed to indicate areas of 100 or more see Section 4 8 5 Setting the Viewfinder page 4 60 7 TALLY switch This switch controls the TALLY indicator setting its brightness HIGH or LOW or turning it off HIGH The TALLY indicator gets brighter OFF The TALLY indicator does not operate...

Page 32: ...nt rear positioning lever Use this lever to move the viewfinder forward or backward qa Cameraman tally indicator This indicator lights while the camcorder is operating Slide the window open when you shoot keeping your eye away from the viewfinder This indicator flashes when the battery level is running low or the tape is nearing its end qs Viewfinder stopper Pull up this stopper to detach the view...

Page 33: ...er to match the light source illuminating the subject The outer knob selects the color temperature of the CC Color Conversion filter and the inner knob selects the type of ND Neutral Density filter When this selector is adjusted the new setting will be indicated on the viewfinder screen for about 3 seconds The white balance is stored in memory for each CC filter qf qg qh qj qk ql qd Continued ...

Page 34: ...B 3200K C 4300K D 6300K FILTER selector inner setting and ND filter selection FILTER selector inner setting ND filter selection 1 Clear 2 1 4 ND 3 1 16 ND 4 1 64 ND Examples of shooting conditions and appropriate filters Shooting condition CC filter ND filter Sunrise and sunset B 3200 K 1 clear inside studio Clear skies A 5600 K or 2 1 4 ND or D 6300 K 3 1 16 ND Cloudy or raining D 6300 K 1 clear ...

Page 35: ...nob When the DISPLAY switch is set to ON or when the lens is using the automatic iris operation with the DISPLAY switch set to OFF pressing and turning the MIC MENU knob sets the iris override 1 iris in 1 4 iris steps The iris override setting returns to 0 when you turn off the camcorder then on again qh AUTO W B BAL automatic white black balance adjustment switch This switch activates the white b...

Page 36: ... that is output to the VTR viewfinder and video monitor between the color bar signal and the camera output BARS Outputs the color bar signal The DCC indicator automatically goes off When the AU REC 1 KHz item on the VTR SETUP page of the MAINTENANCE menu is set to either 0 dB or 20 dB the 1 kHz audio signal is also output with the color bar signals CAM Outputs the camera signal It also switches DC...

Page 37: ...o memories for each CC filter so a total of eight adjustments can be stored When the FILTER selector outer knob is at the same position as it was when this WHITE BAL switch was adjusted the stored value is called from memory and the camcorder automatically adjusts itself to that value When this switch is adjusted the new setting will be indicated on the setting change adjustment progress message d...

Page 38: ... genlocked or when the time code is to be synchronized with external equipment Use the MAINTENANCE menu to adjust the genlock H phase phase of Horizontal sync signal For details refer to the Maintenance Manual Also assigning the RETURN function to the assignable switch allows you to view the image of the input signal on the viewfinder For details see 4 8 8 Setting the D5600K Mode Assignable Switch...

Page 39: ...nnect and use the MSU 700A 750 Master Setup Unit not supplied Shooting and recording playback functions 5 ws MONITOR OUT connector BNC type This connector outputs the HD video signal 75 ohm terminated Y PB PR To include the text on the viewfinder screen with the output signal push the DISPLAY switch to MENU while pushing the MENU switch to CANCEL Text output is cancelled when you turn the camcorde...

Page 40: ...2 Chapter 2 Locations and Functions of Parts and Controls 2 24 2 1 ª EJECT REW 6 0 STOP p PLAY F FWD Shooting and recording playback functions 6 Press on the tab Opening the cover ...

Page 41: ...press the VTR START button there is a short delay before recording starts but power consumption is less than in standby mode and battery life is extended When the switch is set to SAVE the VTR SAVE indicator in the viewfinder lights STBY Standby mode Recording starts as soon as you press the VTR START button Avoid allowing the camcorder to remain in STBY standby mode for a long time wg EJECT casse...

Page 42: ...n and indicator Press this button to view the recorded picture in the viewfinder or on the color video monitor The indicator lights during playback The 3 times normal speed search function is provided to make it far quicker to find a desired location of the tape Press the REW button or F FWD button during playback to view the 3 times normal speed search picture wl STOP button Press this button to ...

Page 43: ...menu operating section 1 Memory Stick compartment Open the cover of the Memory Stick compartment Insert the Memory Stick not supplied with the notch facing upward and the label facing toward you into the slot 2 MIC MENU knob Use this knob to change the page selection or a setting within the setup menu Continued ...

Page 44: ...ght page 4 50 4 DISPLAY switch Use this switch to change the display on the viewfinder screen ON A message or character indicating the camcorder s settings or operation status is displayed on the viewfinder screen OFF The display on the viewfinder screen disappears MENU The setup menu is displayed on the viewfinder screen 5 Assignable switches 1 2 You can assign the desired functions to each of as...

Page 45: ...r inputs an HD reference signal when the camera is to be genlocked or when the time code is to be synchronized with external equipment By assigning the RETURN function to the assignable switch es you can see the image of the return video signal on the viewfinder For details see 4 8 8 Setting the D5600K Mode Assignable Switches and PB VIDEO on page 4 66 1 Continued ...

Page 46: ...tor BNC type To synchronize the time code with an external time code connect the reference time code input here 3 TC OUT time code output connector BNC type To synchronize the time code of an external VTR with that of the camcorder connect this connector to the time code input lock connector of the external VTR 2 3 ...

Page 47: ... 4 5 7 8 9 0 OFF ON DISPLAY LIGHT RESET HOLD WARNING CTL TC U BIT ADVANCE PRESET F RUN SET DIAG R RUN NDF DF REGEN REAL TIME AUDIO IN AUDIO SELECT REAR MIX CH 1 CH 2 FRONT SHIFT ON OFF SET MANUAL AUTO LEVEL CH 1 0 10 CH 2 0 10 CUE IN Time code functions 3 Continued ...

Page 48: ...ndications on the Display Panel page 2 38 for more information about the counter display 5 RESET counter reset button This button resets the time data displayed on the counter display section to 00 00 00 00 and the user bit data to 00000000 6 DISPLAY LCD switch Depending on the settings of the F RUN SET R RUN switch and the REAL TIME switch this switch selects data to display in the counter displa...

Page 49: ...nuous Regardless of the setting of the F RUN SET R RUN switch the camcorder operates in R RUN mode For more information see Make the time code continuous on page 4 20 0 F RUN SET R RUN free run set recording run switch This switch selects the operating mode for the internal time code generator F RUN The time code generator keeps running regardless of the operation state of the VTR Use this positio...

Page 50: ...recorded as VITC user bit data SET Sets the real time 1 Drop frame mode To eliminate the discrepancy between the actual time and the time code value generated by the time code generator when the format is set to either 29 97 PsF or 59 94 I in the MULT FORMAT page of the MAINTENANCE menu drop frame mode drops two frames frames 00 and 01 from the time code value at the beginning of each minute excep...

Page 51: ... Indications The camcorder supplies you visual information and warnings by means of its indicators without you having to use the speaker earphone or viewfinder Warning and indication functions 5 3 1 2 4 6 7 8 PRESET F RUN SET DIAG R RUN NDF DF REGEN REAL TIME ON OFF SET Continued ...

Page 52: ...The TALLY indicator does not operate LOW The TALLY indicator gets dimmer 3 DIAG self diagnostics button Pressing this button when the VTR is stopped switches the camcorder to self diagnostics mode In self diagnostics mode it is possible to carry out a display panel test a VTR test or a camera test and display the test result To exit from self diagnostics mode press this button once more For more i...

Page 53: ...he relationships between the operation of the indicator and the meanings of the indications 7 LIGHT switch This switch controls the display panel light ON Turns the panel light on OFF Turns the panel light off 8 Display panel VTR error messages battery status tape status audio level time data and so forth are displayed on this panel For more information see Section 2 8 Warnings and Indications on ...

Page 54: ...s and Indications on the Display Panel Tape status battery status and level indicators Tape status battery status and level indicators Audio channel 1 level meter Audio channel 2 level meter Battery status indicator Fully charged Nearly dead BATT flashes Dead battery battery must be charged BATT and E flash Tape status indicator Full at beginning Close to end TAPE flashes End tape must be replaced...

Page 55: ...pears automatically on the display section of the display panel For more information refer to the Maintenance Manual Lights in the self diagnostic mode testing display panel camera and VTR For more information refer to the Maintenance Manual Lights during playback Warning indicators RF Lights if the recording heads are clogged SERVO Lights if the servo motor fails HUMID Lights if condensation is o...

Page 56: ...tor is on hold Lights when VITC is selected for the time code Lights when the camcorder is synchronized with an external time code Lights when the time code CTL or real time is displayed Lights in the following way when the HOLD button is pressed Time counter display Shows the time code CTL user bits and real time The table on the next page lists the details of the displayed items and switch setti...

Page 57: ...he REAL TIME switch setting then by the F RUN SET R RUN switch setting and finally by the DISPLAY switch setting Switch settings related to time code and displayed information REAL TIME F RUN SET R RUN DISPLAY switch Displayed switch position switch position position information ON or OFF SET TC or CTL Time code U BIT User bits F RUN or R RUN CTL CTL TC Time code U BIT User bits SET Any position A...

Page 58: ...LLY indicator Not used in the camcorder 2 BATT indicator Starts flashing when the battery voltage supplied to the camcorder drops below the minimum level and stays lit when the battery is exhausted To prevent interruption during operation replace the battery as soon as this indicator starts flashing TALLY REC VTR SAVE BATT 1 2 3 4 5 Viewefinder screen ...

Page 59: ... Note This indicator will be brighter than usual for a moment after it is first lit This is only a warning and not a malfunction When flashing The servo system of the VTR section is unlocked and so on For more information on the status by which the TALLY REC indicator will light or flash see 6 3 Opeation Warnings on page 6 14 4 VTR SAVE indicator Lights up when the VTR section is set to power save...

Page 60: ......

Page 61: ... A 3 for information about the cassettes you can use in the camcorder 3 1 1 Loading and Unloading a Cassette Loading a cassette 1 Turn on the POWER switch Note If the interior of the VTR section is damp the HUMID indicator will light If this happens wait until the indicator goes off before going on to step 2 HUMID display POWER switch Continued Recording and Playback ...

Page 62: ...on and close the cassette lid completely by pressing near the engraved PUSH Notes To insert the tape correctly make sure the tape in the cassette is facing up towards you before you try to close the cassette lid When inserting the tape be careful that you don t hit the tape against the tape holder Insert the cassette Push and close the cassette lid Cassette lid Window outward Cassette holder ...

Page 63: ...ere is no slack Checking the tape for slack Unloading a cassette With the power supply on press the EJECT button to open the cassette lid Then take out the cassette If you are not going to insert another cassette close the cassette lid It is possible to take out the cassette and close the cassette lid unless the battery voltage drops below about 10 5 V Do not repeat this unloading operation ...

Page 64: ...ually You need not return the screw to its original position after taking out the cassette Although the cassette lid is not locked turning on the power makes the cassette lid operable again 3 1 2 Preventing Accidental Erasure The following procedure prevents cassettes from being recorded inadvertently Preventing accidental erasure 1 Turn the power off 2 Open this rubber cover 3 Pushing on the scre...

Page 65: ... on the camcorder and loading a cassette Follow the procedure below Basic procedure for shooting from power supply to cassette loading 1 Attach a fully charged battery pack For details see 5 1 Power Supply on page 5 1 2 Set the POWER switch to ON Check that the HUMID indicator does not appear and that the BATT indicator shows at least five segments If HUMID indicator appears wait until it disappea...

Page 66: ...e protected There is no slack in the tape Basic procedure for shooting from adjusting the black balance and white balance to stopping recording After turning on the power and loading a cassette set the switches and selectors as shown below and begin operation Switch and selector settings before shooting F RUN SET R RUN F RUN or R RUN set as needed Iris Automatic AUDIO SELECT CH 1 CH 2 AUTO Zoom Au...

Page 67: ... black balance and white balance to stopping recording 1 Push the AUTO W B BAL switch to BLK to adjust the black balance For detailed information on how to adjust the black balance see 4 1 1 Adjusting the Black Balance on page 4 2 2 Select the CC filter and ND filter to match the lighting conditions and adjust the white balance Continued ...

Page 68: ...page 4 5 3 Aim the camera at the subject and adjust the focus and zoom 4 If necessary set the electronic shutter for an appropriate mode and speed For more information see Section 4 2 Setting the Electronic Shutter page 4 9 5 To start recording press the VTR START button or the VTR button on the lens Or if the VTR S S function is assigned to either of the assignable switches 1 2 these assignable s...

Page 69: ...e at an appropriate point When the camcorder is in the recording pause mode Pressing the VTR START button on the camcorder or the VTR button on the lens positions the tape at the appropriate point automatically However the time taken before recording starts depends on the setting of the VTR SAVE STBY switch If the VTR SAVE STBY switch is in the SAVE position it takes about 4 seconds before recordi...

Page 70: ...ause 1 Turn on the power again 2 Press the RET button on the lens The camcorder positions the tape at the appropriate point Note however that this function works only for continuously recorded material or consecutively joined segments totaling at least 4 seconds in length 3 Press the VTR START button on the camcorder or the VTR button on the lens to start recording ...

Page 71: ...ULT FORMAT page of the MAINTENANCE menu trecording may not continu smoothly Noise and so on occurs at the point where recordings are continued Continuous recording after rewinding or fast forward after removing the cassette or on a tape that has been partly recorded 1 Looking in the viewfinder press the PLAY button to start playback 2 Press the STOP button at the desired point to begin recording T...

Page 72: ... and Playback 3 12 3 Press the RET button The tape will rewind and will be positioned at the desired point to continue recording 4 Press the VTR START button on the camcorder or the VTR button on the lens to start recording ...

Page 73: ...back In this case if you attach an HDCA 901 Camera Adaptor you can see the recorded images on an HD monitor connected to the HDCA 901 Note To use this function you have to choose the settings for the output signal For detailed information see 4 8 8 Setting the D5600K Mode Assignable Switches and PB VIDEO on page 4 66 You may also view the picture by pressing the PLAY REW button or PLAY F FWD butto...

Page 74: ...ack the camcorder is ready to start recording again By assigning the LENS RET function to the assignable switch es using the OPERATION menu you can use the assignable switch es in the same way as the RET button on the lens For details see 4 8 8 Setting the D5600K Mode Assignable Switches and PB VIDEO on page 4 66 Note The recording review functions only works if the recording you have made is at l...

Page 75: ... allows you to change the setting so that the image seen through the camera is sent to the viewfinder and the MONITOR OUT connector even while you are playing back a video tape The HD SDI output from the HDCA 901 Camera Adaptor not supplied is switched to that of the recorded image during the playback regardless of the PB VIDEO setting For detailed information see 4 8 8 Setting the D5600K Mode Ass...

Page 76: ...s the timecode of the recording start is recorded on the memory label 3 While shooting press the RET button on the lens to create the shot marker The timecode valid when you press the RET button is recorded on the label as the shot marker To confirm that the RET button is pressed Set the DISPLAY switch to ON Whenever you press the RET button the circle lights up on the right side of the REC lamp i...

Page 77: ...the surrounding temperature has changed greatly When the GAIN selector values have been changed by using the setup menu It is not usually necessary to adjust the black balance when using the camcorder after it has been briefly off White balance adjustment Always readjust the white balance when the lighting conditions change Viewfinder screen displays When the black balance white balance adjustment...

Page 78: ...ments are performed in the following order clamp level black set and black balance Manual black balance adjustment can be selected from the setup menu Follow the procedure below to adjust the black balance 1 Set the switches as shown in the figure below GAIN switch Set as low as possible OUTPUT DCC switch CAM DISPLAY switch OFF ...

Page 79: ...tch returns to the center position and the adjustment is completed During adjustment the following message is displayed on the viewfinder screen The black balance adjustment ends in a few seconds with the message ABB OK and the adjustment setting is automatically stored in memory AUTO W B BAL switch ABB EXECUTING Continued ...

Page 80: ...tomatic black balance adjustment cannot be made If the black balance adjustment cannot be completed normally the error message ABB NG will appear for about 3 seconds on the viewfinder screen If this error message is displayed retry the black balance adjustment If the error message occurs again an internal check is necessary Refer to the Maintenance Manual for information about this internal check ...

Page 81: ...s as shown in the figure below If the setting on the GAIN selector or WHITE BAL switch is changed a message reporting the set position appears for about 3 seconds in the setting change and adjustment progress message display area of the viewfinder screen FILTER selector GAIN switch Set as low as possible OUTPUT DCC switch CAM DISPLAY switch OFF Continued WHITE BAL switch A or B ...

Page 82: ...ds in the setting change and adjustment progress message display area of the viewfinder screen 3 Place a white test card under the same lighting conditions as the subject to be shot and zoom up to it Alternately any white object such as a cloth or a wall could be used The absolute minimum white area is as follows Rectangle centered on the screen The lengths of the sides are 70 of the length or the...

Page 83: ... the lens to automatic 5 Push the AUTO W B BAL switch to WHT and release the switch The switch returns to the center position and the adjustment is completed During adjustment the message AWB EXECUTING is displayed in the lower left portion of the viewfinder screen The white balance adjustment ends in a second with the message AWB OK and the adjustment setting is automatically stored in the memory...

Page 84: ... If this error message is displayed retry the white balance adjustment If the error message occurs again an internal check is necessary Refer to the Maintenance Manual for information about this internal check If you have no time to adjust the white balance Set the WHITE BAL switch to PRST The white level is reset to the value saved in the reference file factory setting 3200K The white balance is ...

Page 85: ...tter speed 60I 59 94I 1 100 1 125 1 250 1 500 1 1000 1 2000 sec 50I 1 60 1 125 1 250 1 500 1 1000 1 2000 sec 30PsF 29 97PsF 1 40 1 50 1 60 1 120 1 125 1 250 1 500 1 1000 sec 25PsF 1 33 1 50 1 60 1 100 1 125 1 250 1 500 1 1000 sec 24PsF 23 98PsF 1 32 1 48 1 50 1 60 1 96 1 125 1 250 1 500 1 1000 sec 60I 59 94I 30 0 to 4300 Hz 50I 25 0 to 4700 Hz 30PsF 29 97PsF 30 0 to 2700 Hz 25PsF 25 0 to 2300 Hz 2...

Page 86: ...ting could make the flicker even worse Color flicker is particularly likely to happen when the power supply is 60 Hz However if the power supply is 50 Hz setting the shutter speed to 1 100 can reduce this flicker 4 2 2 Selecting the Shutter Mode and Speed Setting the shutter mode standard mode ECS mode and standard mode shutter speed Use the SHUTTER selector to select a shutter mode or a standard ...

Page 87: ...ogress message display area of the viewfinder screen e g SS 1 250 3 Before the message from step 2 disappears push the SHUTTER selector to SEL again and repeat until the desired mode or speed appears Pushing the SHUTTER selector to SEL repeatedly allows you to cycle through all of the pre selected settings of mode and speed Continued SHUTTER selector ...

Page 88: ...ange the speed with the PAINT menu For more information see Section 4 9 Paint Menu page 4 72 Standard mode a ECS mode a The illustration shows the cycle through of the shutter speed in the case where 60 I or 59 94 I format is selected on the MULT FORMAT page of the MAINTENANCE menu When another format is selected the shutter speed corresponding to the selected format appears For detailed informati...

Page 89: ...els Manually adjusting the audio levels of the audio input from the AUDIO IN CH 1 CH 2 connectors Follow the procedure described below to adjust the audio levels of the audio input from the AUDIO IN CH 1 CH 2 connectors which is entered to channels 1 and 2 Manual adjustment of the audio levels of AUDIO IN CH 1 CH 2 Continued 3 2 1 ADVANCE PRESET F RUN SET DIAG R RUN NDF DF REGEN REAL TIME AUDIO IN...

Page 90: ...the AUDIO SELECT switches corresponding to the channel selected in step 1 to MANUAL 3 Adjust the LEVEL controls corresponding to the channel selected in step 1 so that at the maximum sound level the level meter indicates 20 dB The second bar from the top may turn on occasionally but do not allow the top bar to go on If it goes on the audio level is too high 40 30 10 0 20 Corresponding values These...

Page 91: ...rder Microphone audio level manual adjustment 1 1 Set the AUDIO IN switch es corresponding to the desired channel s of the front microphone to be recorded or adjusted to FRONT 2 Set the AUDIO SELECT switch es for the desired channel s to be recorded or adjusted to MANUAL Continued ADVANCE PRESET F RUN SET DIAG R RUN NDF DF REGEN REAL TIME AUDIO IN AUDIO SELECT REAR MIX CH 1 CH 2 FRONT SHIFT ON OFF...

Page 92: ...dio level so that at the maximum sound level the level meter indicates 20 dB The MIC MENU knob can be adjusted from 0 to 100 in 101 steps The second bar from the top may turn on occasionally but do not allow the top bar to go on If it goes on the audio level is too high Note The LEVEL controls on the left side of the camcorder do not function when the AUDIO IN switch is set to FRONT 6 Push the MEN...

Page 93: ...IME AUDIO IN AUDIO SELECT REAR MIX CH 1 CH 2 FRONT SHIFT ON OFF SET MANUAL AUTO LEVEL CH 1 0 10 CH 2 0 10 CUE IN 4 4 Setting the Time Data 4 4 1 Setting the User Bits By setting the user bits up to 8 hexadecimal digits you can record user information such as the date time or scene number on the time code track Follow the procedure below to set the user bits Setting the user bits 1 Set the DISPLAY ...

Page 94: ... digits A to F are displayed as follows Hexadecimal A B C D E F Display A b C d E F Resetting a modified numeric value to 00 00 00 00 To reset a numeric value that was modified press the RESET button 5 Set the F RUN SET R RUN switch to F RUN or R RUN corresponding to the desired time code run mode The specified user bits will be recorded for both LTC and VITC Storing the user bits in memory The us...

Page 95: ...L TC U BIT ADVANCE PRESET F RUN SET DIAG R RUN NDF DF REGEN REAL TIME AUDIO IN AUDIO SELECT REAR MIX CH 1 CH 2 FRONT SHIFT ON OFF SET MANUAL AUTO LEVEL CH 1 0 10 CH 2 0 10 CUE IN 4 4 2 Setting the Time Code Follow the procedure below to set the time code Setting the time code 1 Set the DISPLAY switch to TC 2 Set the PRESET REGEN switch to PRESET 3 Set the REAL TIME switch to ON or OFF 4 Set the F ...

Page 96: ...s modified press the RESET button 7 Set the F RUN SET R RUN switch to F RUN or R RUN F RUN Free run The time code generator keeps running regardless of the operating state of the VTR R RUN Recording run The time code generator runs only while recording Make the time code continuous When the F RUN SET R RUN switch is set to R RUN recording a number of scenes on the tape normally produces continuous...

Page 97: ...10 CH 2 0 10 CUE IN 4 Press the RET button on the lens This reads the previous recording and synchronizes the internal time code generator thus allowing the new time code recorded to follow on consecutively Or press the assignable switch if it is assigned to the LENS RET function on the OTHERS page of the OPERATION menu For details see 4 8 8 Setting the D5600K Mode Assignable Switches and PB VIDEO...

Page 98: ...user bits that were set are recorded in the LTC By flipping the internal switch you can enter the user bits in the VITC and the real time in the LTC Refer to the Maintenance Manual for more information Displaying the user bits being recorded in the VITC Set the DISPLAY switch to U BIT and then press and hold down the HOLD button The user bits that are being recorded in the VITC are displayed while...

Page 99: ...egeneration of an external time code You can also synchronize the time code generators of external VTRs with the internal generator of this camcorder Connections for time code synchronization Connect both the reference video signal and the external time code as illustrated below Example 1 Synchronizing with an external time code External time code Reference video signal GENLOCK IN TC IN Continued ...

Page 100: ...number of camcorders for time code synchronization MONITOR OUT Y channel Master camcorder Camcorder to be synchronized MONITOR OUT Y channel Camcorder to be synchronized MONITOR OUT Y channel To another camcorder to be synchronized TC OUT TC IN TC OUT TC OUT TC IN GENLOCK IN GENLOCK IN ...

Page 101: ...1 2 3 5 4 5 Procedure for time code synchronization Follow the procedure below to synchronize the time code Synchronizing the time code 1 Turn the POWER switch to ON 2 Set the F RUN SET R RUN switch to F RUN 3 Set the PRESET REGEN switch to PRESET Continued ...

Page 102: ...edure the time code is immediately synchronized with the external time code and the counter display will show the value of the external time code However wait for a few seconds until the sync generator stabilizes before recording If the frequency of the reference video signal is not the same as the frame frequency of the camcorder the camera cannot be correctly genlocked In such a case the time co...

Page 103: ...external power supply during time code synchronization To maintain a continuous power supply connect the external power supply to the DC IN connector before removing the battery pack You may lose time code synchronization if you remove the battery pack first Camera synchronization during time code synchronization During time code synchronization the camera is genlocked to the reference video signa...

Page 104: ...the VF DISP switch is set to MENU the OPERATION menu is displayed on the viewfinder screen TOP MENU The menus of the camcorder are classified into categories according to the frequency of use number of users and so on The TOP MENU allows you to select the desired menu categories DISPLAY switch MIC MENU knob ...

Page 105: ...gs inside the HDW F900 camcorder Refer to the Maintenance Manual for more information The TOP MENU has the following submenus USER menu This menu allows you to register items used frequently This menu can contain up to 60 pages You can add or delete items using the USER MENU CUSTOMIZE menu USER MENU CUSTOMIZE menu This menu allows you to add desired menu pages or items or delete them to suit your ...

Page 106: ...is required to use this menu Although you can also use an external remote control panel or master setup unit to set the items on this menu this menu is effective when using the camcorder by itself outdoors This menu allows you to perform almost the same settings as those of the PAINT menu of the MSU 700A 750 Master Setup Unit not supplied MAINTENANCE menu This menu contains items for performing ca...

Page 107: ... are available Point the arrow to TOP on the right top on each page then press the MIC MENU knob Push the MENU switch to the CANCEL side twice 4 5 1 Basic Use of the Setup Menu 1 Switch the DISPLAY switch from OFF to MENU The OPERATION menu will be displayed Continued MENU switch DISPLAY switch MIC MENU knob ...

Page 108: ... MENU knob to move the arrow to the item you want to set 5 Push the MIC MENU knob The arrow changes to a flashing question mark Page number VF DISPLAY 1 TOP EX ON BATT ON ZOOM OFF TAPE ON ND ON TC OFF CC ON AUDIO ON IRIS ON WHITE ON MESSAG ALL D5600K ON GAIN ON SHUTT ON VF DISPLAY 1 TOP EX ON BATT ON ZOOM OFF TAPE ON ND ON TC OFF CC ON AUDIO ON IRIS ON WHITE ON MESSAG ALL D5600K ON GAIN ON SHUTT O...

Page 109: ...n the DISPLAY switch to MENU again the values that were displayed when you interrupted the setting operations will reappear so you can continue making settings 7 Push the MIC MENU knob The question mark changes to an arrow to confirm the setting 8 To continue changing the settings of items on the same page repeat steps 4 to 7 To move to another page 1 Turn the MIC MENU knob to move the arrow to th...

Page 110: ...Y page of the OPERATION menu or with related switches are displayed at the top and bottom of the screen The messages that give details of the settings and adjustment progress and results can also be made to appear for about 3 seconds while settings are being changed during adjustment and after adjustment For information about marker display see Section 4 8 3 Setting the Marker Display page 4 55 Fo...

Page 111: ...mory W A Displayed when the WHITE BAL switch is set to A W B Displayed when the WHITE BAL switch is set to B W P Displayed when the WHITE BAL switch is set to PRST 5 indicator This indicator lights when the setting of the camcorder is changed from the normal setting to other settings which are different from ones set on the IND page of the OPERATION menu For details see 4 8 2 Selecting the Items f...

Page 112: ... indicates the time code value qa Iris setting This indicator indicates the f stop iris setting of the lens When the lens is fully opened the iris setting is highlighted For detailed information on how to set the fully open iris see the Maintenance Manual qs Remaining tape This indicator indicates the remaining tape recording time in minutes of the VTR Example of remaining tape indicator Display T...

Page 113: ...and channel 2 The peak indication of the VTR level meter is related as follows to the audio level when an 1 kHz sine wave is input qf Shutter speed This indicator indicates the shutter speed However if the SHUTTER switch is set to OFF nothing is displayed VTR level meter indicator Audio channel 1 level indicator Audio channel 2 level indicator ...

Page 114: ...enu USER PAGE 1 through USER PAGE 5 are provided You can place up to ten desired menu items on each of these pages 4 7 1 Setting Desired Menu Pages on the USER Menu 1 Display the TOP MENU screen For details on displaying the TOP MENU screen see To display the TOP MENU screen on page 4 29 2 Turn the MIC MENU knob to select USER MENU CUSTOMIZE then push the MIC MENU knob The PAGE EDIT screen appears...

Page 115: ... 3 Turn the MIC MENU knob to select the number for which the menu page is to be set then push the MIC MENU knob The operation select screen appears 4 Turn the MIC MENU knob to select SELECT and push the MIC MENU knob The PAGE SELECT screen appears Continued ...

Page 116: ...screen then push the MIC MENU knob The arrow changes to a question mark 2 Turn the MIC MENU knob until the desired menu page appears then push the MIC MENU knob The question mark changes to an arrow 3 Turn the MIC MENU knob to select a menu page to be set then push the MIC MENU knob The selected menu page is set on the USER Menu and the screen returns to the TOP MENU screen To change the order of ...

Page 117: ...the selected page is to be moved then push the MIC MENU knob The selected page moves to the position pointed by the arrow To delete a page 1 Display the TOP MENU screen 2 Turn the MIC MENU knob to select USER MENU CUSTOMIZE then push the MIC MENU knob The PAGE EDIT screen appears 3 Turn the MIC MENU knob to select the menu page to be deleted then push the MIC MENU knob The operation select screen ...

Page 118: ... MENU screen on page 4 29 3 Turn the MIC MENU knob to select USER MENU CUSTOMIZE then push the MIC MENU knob The PAGE EDIT screen appears 4 Turn the MIC MENU knob to move the arrow to U1 at the top of the screen then push the MIC MENU knob The arrow changes to a question mark 5 Turn the MIC MENU knob to select any of U2 through U6 then push the MIC MENU knob A USER PAGE setting screen appears U2 U...

Page 119: ...to the first line then push the MIC MENU knob The ITEM SELECT screen appears 7 Select an item to be set following the procedure below To select from among items 1 through 10 1 Turn the MIC MENU knob to select an item to be set then push the MIC MENU knob The operation select screen appears Continued ...

Page 120: ...t items 11 and after 1 Turn the MIC MENU knob to move the arrow to the figure at the top of the screen then push the MIC MENU knob The arrow changes to the question mark 2 Turn the MIC MENU knob until a desired item appears then push the MIC MENU knob The question mark changes to the arrow 3 Turn the MIC MENU knob to select an item to be set then push the MIC MENU knob The operation select screen ...

Page 121: ...then push the MIC MENU knob The TOP MENU screen is restored To change the order of the items You can change the order of the items by the same method as that for the menu pages To delete an item You can delete an item by the same method as that for the menu pages 4 7 3 Displaying the USER Menu 1 Display the TOP MENU screen For details on displaying the TOP MENU screen see To display the TOP MENU s...

Page 122: ...SER pages 1 Turn the MIC MENU knob to move the arrow to the figure at the top of the screen then push the MIC MENU knob The arrow changes to a question mark 2 Turn the MIC MENU knob until the desired menu page appears then push the MIC MENU knob The selected page is displayed ...

Page 123: ...finder screen 1 VF DISPLAY Page 4 48 indicators IND setup 2 IND Page 4 50 Marker setup 3 MARKER Page 4 55 Gain selector setup 4 GAIN SW Page 4 58 Viewfinder setup 5 ZEBRA VF DTL Page 4 60 Auto iris setup 6 AUTO IRIS Page 4 62 Battery setup 7 BATT ALARM Page 4 64 D5600K assignable switches 8 OTHERS Page 4 66 setup and PB VIDEO Operator file 9 OPERATOR FILE Page 4 69 Lens file selection 10 LENS FILE...

Page 124: ...ure below to select the items to be displayed on the viewfinder screen 1 Set the DISPLAY switch to MENU The OPERATION menu appears on the viewfinder screen 2 Turn the MIC MENU knob until the VF DISPLAY page appears and push the MIC MENU knob The VF DISPLAY page appears The current setting of an item appears to the right of the item VF DISPLAY 1 TOP EX ON BATT ON ZOOM OFF TAPE ON ND ON TC OFF CC ON...

Page 125: ...in indicator a SHUTT Shutter speed and ECS mode indicator a BATT Power voltage indicator a TAPE Remaining tape indicator a TC Time code indicator a AUDIO Audio level indicator a MESSAGE Settings for the message to be displayed ALL Indicates all of the messages WRM Indicates warning messages and higher AT Indicates the auto setup information and higher OFF Does not indicate any messages a Three set...

Page 126: ...g 5 To continue setting other items repeat steps 3 and 4 6 To end menu operations turn the DISPLAY switch to ON The menu disappears from the viewfinder screen and the display indicating the current status of the camcorder appears along the top and bottom of the viewfinder screen 4 8 2 Selecting the Items for Which the IND is to Light To select the items for which the indicator is to light up on th...

Page 127: ...o the right of the item The above IND page indicates the default settings All items have been set to ON at the factory However you can change the normal condition as to whether the indicator lights or does not light at the NORMAL column IND 2 TOP IND NORMAL ND ON 1 CC ON B WHITE ON B D5600K ON OFF GAIN ON 0DB SHUTT ON OFF FAN ON AUTO1 EXT ON OFF FORMAT ON 23 98PsF Continued ...

Page 128: ... page of the OPERATION menu GAIN Goes off when the GAIN switch is set to L SHUTTER Goes off when the electronic shutter is not used FAN Goes off when FAN mode is set to AUTO 1 on the MAINTEANCE menu EXT Goes off when the lens extender is not in use i e EX is OFF FORMAT Goes off when the format 23 98 PsF is selected 3 Perform the desired settings for each item Select whether the indicator lights or...

Page 129: ...ush the MIC MENU knob The question mark changes back to the arrow to confirm the setting When you select ON in step 2 then perform the setting for the normal operation status in the NORMAL column That is select the setting so that the indicator does not light When you select OFF in step 2 go to step 4 3 Turn the MIC MENU knob to move the arrow to the NORMAL column of the item you selected in step ...

Page 130: ...and ECS mode FAN AUTO 1 AUTO 2 MIN or MAX EXT ON or OFF of the extender FORMAT Video format multi format 59 94I 60I 30PsF 29 97PsF 50I 25PsF 24PsF or 23 98PsF The question mark changes back to the arrow to execute the setting Example To display the indicator when ND filter 1 or 2 is selected Select ON for the item ND in the IND column then display 1 2 in the NORMAL column and execute the setting 4...

Page 131: ... function which dims all areas except the markers on or off Follow the procedure below to select the marker display 1 Set the DISPLAY switch to MENU 2 Turn the MIC MENU knob until the MARKER page appears and push the MIC MENU knob The current setting of an item appears to the right of the item MARKER 3 TOP MARKER ON CENTER ON 3 SAFETY ZONE ON 90 0 EFFECT OFF ASPECT MODE 4 3 MASK OFF 50 VAR WIDTH C...

Page 132: ...To display the effective pixel area set to ON ASPECT MODE Select the aspect mode among 16 9 15 9 14 9 13 9 4 3 VAR H VAR V VISTA 1 or VIST 2 MASK To make the areas out of the selected aspect marker dimmer set to ON If this item is set to ON you can set the mask level 0 to 100 VAR WIDTH Effective only when VAR H or VAR V is selected at the ASPECT MODE item VAR H You can change the aspect size horiz...

Page 133: ... want to set and push the MIC MENU knob The arrow changes to a question mark 2 Turn the MIC MENU knob to change the desired setting and push the MIC MENU knob The question mark changes back to the arrow to execute the setting 4 To continue setting other items repeat step 3 5 To end menu operations turn the DISPLAY switch to ON The menu disappears from the viewfinder screen and the display indicati...

Page 134: ...ding to the L M and H positions of the GAIN selector which switches the gain of the video amplifier Follow the procedure below to set the gain 1 Set the DISPLAY switch to MENU 2 Turn the MIC MENU knob until the GAIN SW page appears and push the MIC MENU knob The GAIN SW page appears The current setting of an item appears to the right of the item GAIN SW 4 TOP LOW 0 dB MIDDLE 6 dB HIGH 12 dB ...

Page 135: ...IC MENU knob The arrow changes to a question mark 4 Turn the MIC MENU knob to change the desired setting and push the MIC MENU knob The question mark changes back to the arrow to confirm the setting Any of 3 0 3 6 12 or 18 dB can be set for each of the L M and H positions in any sequence To change the gain corresponding to another switch position return to step 3 5 To end menu operations turn the ...

Page 136: ...ON menu to select items related to the viewfinder 1 Set the DISPLAY switch to MENU 2 Turn the MIC MENU knob until the ZEBRA VF DTL page appears and push the MIC MENU knob The ZEBRA VF DTL page appears The current setting of an item appears to the right of the item ZEBRA VF DTL 5 TOP ZEBRA ON 1 ZEBRA1 70 ZEBRA2 100 VF DTL 0 ON ...

Page 137: ... in the viewfinder does not affect the recorded image 3 Turn the MIC MENU knob to move the arrow to the item you want to set and push the MIC MENU knob The arrow changes to a question mark 4 Turn the MIC MENU knob to change the desired setting and push the MIC MENU knob The question mark changes back to the arrow to confirm the setting 5 To continue setting other items repeat steps 3 and 4 6 To en...

Page 138: ... of the OPERATION menu to select items related to the automatic iris 1 Set the DISPLAY switch to MENU 2 Turn the MIC MENU knob until the AUTO IRIS page appears and push the MIC MENU knob The AUTO IRIS page appears The current setting of an item appears to the right of the item AUTO IRIS 6 TOP WINDOW 1 OVERRIDE 0 ...

Page 139: ...trations below indicate the area where light detection occurs Note The override returns to 0 when you turn the camcorder off then on again 3 Turn the MIC MENU knob to move the arrow to the item you want to set and push the MIC MENU knob The arrow changes to a question mark 4 Turn the MIC MENU knob to change the desired setting and push the MIC MENU knob The question mark changes back to the arrow ...

Page 140: ... BATT ALARM page of the OPERATION menu to select the type of battery that is currently being used When you change this setting the alarm voltage automatically changes to the value set on the MAINTENANCE menu 1 Set the DISPLAY switch to MENU 2 Turn the MIC MENU knob until the BATT ALARM page appears and push the MIC MENU knob The BATT ALARM page appears The current setting of an item appears to the...

Page 141: ...DP BEFORE END Displays the ALARM voltage set on the MAINTENANCE menu a END Displays the END voltage set on the MAINTENANCE menu a When AC ADP is selected appears at the position where the voltage should be displayed that is no values are displayed 3 Turn the MIC MENU knob to move the arrow to the item you want to set and push the MIC MENU knob The arrow changes to a question mark 4 Turn the MIC ME...

Page 142: ...Mode Assignable Switches and PB VIDEO Use the OTHERS page of the OPERATION menu to turn on the gain amplifier providing an electrical equivalent of 5600K to assign the function of the assignable switches 1 and 2 placed on the setup menu operating section and to select the video signals during playback 1 Set the DISPLAY switch to MENU 2 Turn the MIC MENU knob until the OTHERS page appears and push ...

Page 143: ... Outputs recorded video signals to the viewfinder MONITOR OUT connector and the HD SDI OUT connector a SDI ONLY Outputs the camera image to the viewfinder and the MONITOR OUT connector and the recorded video signals to the HD SDI OUT connector a a This HD SDI OUT connector is standard on the HDCA 901 Camera Adaptor not supplied 3 Turn the MIC MENU knob to move the arrow to the item you want to set...

Page 144: ...t assign the function to the assignable switch D 12 dB Assigns the ON OFF function for additional 12 dB gain in the digital picture element to the assignable switch D 24 dB Assigns the ON OFF function for additional 24 dB gain in the digital picture element to the assignable switch VTR S S Assigns the VTR S S start stop function to the assignable switch LENS RET Assigns the same function as that o...

Page 145: ...firm the setting 5 To continue setting other items repeat steps 3 and 4 6 To end menu operations turn the DISPLAY switch to ON The menu disappears from the viewfinder screen and the display indicating the current status of the camcorder appears along the top and bottom of the viewfinder screen 4 8 9 Saving or Reading Setup Data to or from the Memory Stick Use the OPERATOR FILE page of the OPERATIO...

Page 146: ...nsisting of up to 14 alphanumeric characters symbols and spaces CAM CODE Displays the camera model code that is saved on the memory stick DATE Displays the date when the data was saved 4 8 10 Selecting the Lens File Use the Lens File page of the OPERATION menu to change the lens file according to the lens in use 1 Set the DISPLAY switch to MENU 2 Turn the MIC MENU knob until the LENS FILE page app...

Page 147: ...he MIC MENU knob to display the name of the lens in use in this case the lens file number corresponding the name of the lens displayed appears then push the MIC MENU knob The question mark changes back to the arrow and the name and the iris setting of the selected lens file 5 To end menu operations turn the DISPLAY switch to ON The menu disappears from the viewfinder screen and the display indicat...

Page 148: ... files for each group 20 groups to a Memory Stick For information about how to set items see Section 4 5 1 Basic Use of the Setup Menu page 4 31 For detailed information on the Paint Menu refer to the Maintenance Manual Selecting the PAINT menu 1 While pushing the MIC MENU knob change the DISPLAY switch from OFF to MENU The TOP menu screen will appear 2 Turn the MIC MENU knob to move the arrow unt...

Page 149: ... RECALLED is being displayed for about 3 seconds If you do not any operation while this message is being displayed all current detailed adjusted settings and switch settings and returns the setting to the standard settings If you push the MIC MENU knob while this message is being displayed operation is cancelled and all current detailed adjusted settings and switch settings are remained as they ar...

Page 150: ...on or off BLK ON OFF Turns black gamma correction on or off GAM KNEE ON OFF Turns knee correction on or off WHT ON OFF Turns white clipping on or off CLIP DETAIL ON OFF Turns the detail signal on or off LVL ON OFF Turns the level depend function of the DEP detail signal on or off SKIN DTL ON OFF Turns the skin detail on or off MATRIX ON OFF Turns linear matrix correction on or off SW STATUS ...

Page 151: ...s the R G B and master flare level GAMMA 99 0 99 Adjusts the R G B and master gamma correction curve V MOD 99 0 99 Adjusts the R G B and master V modulation shading FLARE ON OFF Turns the flare correction circuit on or off V MOD ON OFF Turns the V modulation shading on or off TEST 1 Selects the test signal 2 1 Outputs the analog test signal OFF 2 Outputs the digital test signal OFF Does not output...

Page 152: ...is table into your camcorder via a Memory Stick When a user gamma table is selected gamma LEVEL COARSE or ON OFF and knee POINT SLOPE ON OFF or AUTO KNEE or both may become disabled This is because the gamma and knee are compulsorily fixed when creating the gamma curve Item LEVEL COARSE TABLE GAMMA TEST Description Sets the R G B and master gamma correction curve Sets the master gamma correction c...

Page 153: ...ideo level which the Y black gamma affects Turns the Y black gamma correction function on or off Selects the test signal 1 Outputs the analog test signal 2 Outputs the digital test signal OFF Does not output any test signal Setting 99 0 99 15 25 35 50 ON OFF 99 0 99 15 25 35 50 ON OFF 1 2 OFF Page Item Setting Description SATURATION SATURATION 99 99 Sets the saturation choosing between black and w...

Page 154: ...er knee slope level Sets the R G B and master of the white clipping level Sets the knee saturation level Turns the knee correction circuit on or off Turns the knee saturation function on or off Turns the white clipping function on or off Selects the test signal 1 Outputs the analog test signal 2 Outputs the digital test signal OFF Does not output any test signal Setting 99 0 99 99 0 99 99 0 99 99 ...

Page 155: ... 99 ON OFF Description Sets the general level of the detail signal Sets the detail limiter Sets the crispening level Sets the level of the V detail signal Sets the frequency of the H signal Sets the level depend Turns the detail correction function on or off Turns the level depend function on or off Sets the level of the fine detail signal Turns the fine detail function on or off Sets the knee ape...

Page 156: ...ch channel of the skin gate function on or off Any one of channels is set to on PHASE AUTO Sets automatically the region of each channel the skin detail function affects 0 359 Adjusts the center phase of the hue being processed by the skin tone detail function to each channel WIDTH 0 90 Adjusts the width of the hue being processed by the skin tone detail function to each channel SAT 99 0 99 Adjust...

Page 157: ...ption Sets arbitrary R G or R B user set matrix coefficients Sets arbitrary G R or G B user set matrix coefficients Sets arbitrary B R or B G user set matrix coefficients Turns the linear matrix correction function on or off Turns the preset matrix on or off Selects the preset matrix Turns the user matrix correction function on or off Turns the multi matrix correction function on or off a You cann...

Page 158: ... matrix correction function affects in every sixteen axis mode Adjusts the satulation level the multi matrix correction function affects in every sixteen axis mode Clears the HUE and SAT values in each phase to 0 Automatic color detection function Detects the color axis by focusing on a subject when you center that subject in the detection gate and push the MIC MENU knob Turns the linear matrix co...

Page 159: ... frequency in the case where 60 I or 59 94 I format is selected in the MULT FORMAT page of the MAINTENANCE menu When another format is selected the shutter speed and ECS frequency are as follows Shutter speed 60I 59 94I 1 100 1 125 1 250 1 500 1 1000 1 2000 sec 50I 1 60 1 125 1 250 1 500 1 1000 1 2000 sec 30PsF 29 97PsF 1 40 1 50 1 60 1 120 1 125 1 250 1 500 1 1000 sec 25PsF 1 33 1 50 1 60 1 100 1...

Page 160: ...mory Stick Each group has five scene files a WRITE Writes five scene files saved in the CAM t MS memory of the camcorder into a Memory Stick with the group number selected using the GP item FILE ID Writes comments to the scene files to be saved in the memory stick CAM CODE Displays the name of the model of the file created DATE Displays the date when the file was created Page SCENE FILE Descriptio...

Page 161: ... items refer to the maintenance manual Selecting the MAINTENANCE menu 1 While pushing the MIC MENU knob change the DISPLAY switch from OFF to MENU The TOP menu screen will appear 2 Turn the MIC MENU knob to move the arrow until it points to MAINTENANCE 3 Push the MIC MENU knob The MAINTENANCE menu screen will appear To return to the TOP menu from the PAINT menu The following two methods are availa...

Page 162: ...F Page Item Setting WHITE SHADING V SAW R G B 99 0 99 V PARA R G B 99 0 99 H SAW R G B 99 0 99 H PARA R G B 99 0 99 WHITE R G B 99 0 99 V MODE R G B M 99 0 99 ON OFF Page Item Setting BLACK SHADING V SAW R G B 99 0 99 V PARA R G B 99 0 99 H SAW R G B 99 0 99 H PARA R G B 99 0 99 BLK SET R G B 99 0 99 BLACK R G B M 99 0 99 MASTER GAIN 3 0 3 6 12 18 dB ...

Page 163: ...270 293 315 338 HUE 99 0 99 SAT 99 0 99 ALL CLEAR Clears paint values of HUE and SAT for each PHASE to 0 MATRIX ON OFF OHB MATRIX ON OFF Page Item Setting AUTO IRIS WINDOW 1 2 3 4 5 6 OVERRIDE 99 0 99 IRIS LEVEL 99 0 99 APL RATIO 99 75 99 IRIS GAIN 99 0 99 Page Item Setting CAM ID DATE CAM ID 14 letters DATE TIME Date time Continued ...

Page 164: ...ed format in the NEXT column In the CURRENT column the currently selected format is displayed Newly selected format is executed after the power is turned off and on It is then displayed in the CURRENT column on this page Page Item Setting VTR SETUP FF REW AUDIO EE CUE PB AUDIO CH 1 2 3 4 AU REC CH 3 4 AUTO 1 2 CH MUTE AU REC 1KHz MUTE 0 dB 20 dB AU EMPHASIS ON OFF TC OUT TCG PB TCG CTL TIMER 24H 1...

Page 165: ...n AC ADP is selected END END Shutdown voltage 11 0 V to 17 V ineffective when AC ADP is selected DC IN TYPE LITHIUM DIGITAL OTHERS 1 OTHERS 2 AC ADP BEFORE END Alarm voltage 11 0 V to 17 V ineffective when AC ADP is selected END END Shutdown voltage 11 0 V to 17 V ineffective when AC ADP is selected Page Item Setting OTHERS 1 H PHASE 3072 0 1023 MONITOR OUT Y 30 0 30 Pb Pr 30 0 30 Continued ...

Page 166: ...RESUME OPE MENU ALL OFF DATA TYPE 1 2 3 4 5 6 a WHITE MEMORY 8 2 COLOR BAR FULL 16 9 SMPTE 16 9 FULL 4 3 SMPTE 4 3 a Display type of the date 1 Y Mn D Year Month Day Month is expressed in figures 2 Mn D Month Day Month is expressed in figures 3 D M Y Day Month Year 4 D M Day Month 5 M D Y Month Day Year 6 M D Month Day ...

Page 167: ...ou can recreate suitable setup condition rapidly using data in the Memory Stick 4 11 1 Handling the Memory Stick The Memory Stick can be inserted or removed from the camcorder with the power turned on or off Removing the Memory Stick 1 Open the cover of the Memory Stick compartment 2 Push the eject button after confirming that the access indicator of the Memory Stick is not lit The Memory Stick po...

Page 168: ... insertion slot until it clicks into place Then close the cover Inserting the Memory Stick Notes If it does not fit into the slot properly or if there is some resistance when you insert it the Memory Stick may be turned around or upside down Do not force the Memory Stick into the slot Confirm the direction of the notch and arrow on the Memory Stick before inserting the Memory Stick and then try in...

Page 169: ... outdoors exposed to a burning sun or a place near a heater direct sunlight high humidity excessive dust When storing and carrying the Memory Stick keep it in its original case to ensure protection of important data When carrying the camcorder with the Memory Stick inserted close the cover Avoid removing the Memory Stick from the insertion slot while the access indicator is lit Do not format the M...

Page 170: ... the procedure below Writing data to the Memory Stick 1 Set the DISPLAY switch to MENU The page that was on the screen when the last menu operation ended appears on the viewfinder screen When this MENU is first used the lowest page number of the previously selected will appear 2 3 4 1 5 MENU switch ...

Page 171: ... the MIC MENU knob OPERATOR FILE page 3 Move the arrow by turning the MIC MENU knob until it points to WRITE CAM t MS and push the MIC MENU knob WRITE OK appears If no Memory Stick has been inserted the message NO MEMORY STICK will appear Insert a Memory Stick OPERATOR FILE READ MS CAM WRITE CAM MS PRESET FILE ID CAM CODE HDW F900 DATE 2000 01 0 Continued Reads data Reads user preset data Indicate...

Page 172: ...witch to ON The setup menu disappears from the viewfinder screen and the displays indicating the current status of the camcorder appear along the top and bottom of the viewfinder To read user preset data Current settings of items related to the OPERATION menu can be saved as user preset data You can read user preset data by selecting PRESET on the OPERATOR FILE page The current settings related to...

Page 173: ...tick Slide the switch right to the write protect position It is now impossible to write or delete data on the Memory Stick If you set the write protect switch to the write protect position in step 4 when pushing the MIC MENU knob in the previous section page 4 87 MEMORY STICK LOCKED appears and the already saved data will not be overwritten Write protect switch on the Memory Stick ...

Page 174: ...n the data was not written Data write error messages Error message NO MEMORY STICK MEMORY STICK LOCKED MEMORY STICK ERROR flashing Reason No Memory Stick is inserted The write protect switch on the Memory Stick is set to the write protect position Circuit or Memory Stick fault Action Insert or reinsert the Memory Stick Set the write protect switch to the write enable position Check the circuitry o...

Page 175: ...llow the procedure below Reading saved data from a Memory Stick 1 Set the DISPLAY switch to MENU The page that was on the screen when the last menu operation ended appears on the viewfinder screen When this menu is first used the lowest numbered one of the currently selected pages appears MENU switch Continued ...

Page 176: ...tory settings 3 Move the arrow by turning the MIC MENU knob until it points to READ MS t CAM 4 push the MIC MENU knob A message READ OK asking whether or not data is to be read from the Memory Stick appears If no Memory Stick is inserted the message NO MEMORY STICK appears Insert a Memory Stick Reads data Writes data Reads user preset data Indicates file ID setting OPERATOR FILE READ OK READ MS CA...

Page 177: ...ead from the Memory Stick overwrite the data stored in the camcorder 5 Push the MIC MENU knob When the reading is completed the message COMPLETE appears 6 To end the menu operations set the DISPLAY switch to ON The setup menu disappears from the viewfinder screen and the displays indicating the current status of the camcorder appear along the top and bottom of the viewfinder ...

Page 178: ...was not read Data read error messages Error message NO MEMORY STICK MEMORY STICK ERROR flashing FILE ERROR flashing Reason No Memory Stick is inserted Circuit or Memory Stick fault The memory contains data that cannot be read with this camcorder Action Insert or reinsert the Memory Stick Recheck and consult a Sony representative Do not try to read data written with another camcorder ...

Page 179: ...r with the data 1 Turn the MIC MENU knob until the arrow points to FILE ID on the OPERATOR FILE page 2 Push the MIC MENU knob The character table consisting of three lines appears OPERATOR FILE READ MS CAM WRITE CAM MS PRESET FILE ID CAM CODE HDW F900 DATE 2000 01 01 OPERATOR FILE 9 TOP 0123456789 ABCDEFGHIJKLMNOPQRS TUVWXYZ Ins Del PRESET FILE ID CAM CODE HDW F900 DATE 2000 01 01 FILE ID consisti...

Page 180: ...ss the MIC MENU knob the highlighted character moves to the right one by one Or highlight the T or t in the character table then push the MIC MENU knob The highlighted character moves to the right or left according to the selected direction each time you push the MIC MENU knob 2 Turn the MIC MENU knob until the desired character is highlighted in the character table Example To enter S OPERATOR FIL...

Page 181: ...ter a character 4 Enter the remaining characters by repeating step 3 By pushing the MIC MENU knob when the last position of the 14 characters is highlighted the entered FILE ID is executed and the character table disappears OPERATOR FILE 9 TOP 0123456789 ABCDEFGHIJKLMNOPQRS TUVWXYZ Ins Del PRESET FILE ID S CAM CODE HDW F900 DATE 2000 01 01 OPERATOR FILE 9 TOP 0123456789 ABCDEFGHIJKLMNOPQRS TUVWXYZ...

Page 182: ... while the character table is displayed on the screen The entered FILE ID is cancelled and the original one appears To delete entered characters 1 Push the MIC MENU knob until the character to be deleted is highlighted Each time you push the MIC MENU knob the highlighted character moves to the right one by one Or highlight the T or t in the character table then press the MIC MENU knob The highligh...

Page 183: ...C MENU knob A space is placed and highlighted before the character highlighted in step 1 Characters after this move down one by one Add the desired character at the highlighted position OPERATOR FILE 9 TOP 0123456789 ABCDEFGHIJKLMNOPQRS TUVWXYZ Ins Del PRESET FILE ID CAM CODE HDW F900 DATE 2000 01 01 OPERATOR FILE 9 TOP 0123456789 ABCDEFGHIJKLMNOPQRS TUVWXYZ Ins Del PRESET FILE ID CAM CODE HDW F90...

Page 184: ......

Page 185: ...der A BP L60A lithium ion battery pack AC power using AC 550 5 1 1 Using a BP L60A Battery Pack When a BP L60A Battery Pack is used the camcorder will operate continuously for about 80 minutes Before use charge the battery pack with a BC L100 Battery Charger It takes about 2 5 hours to charge one BP L60A For more information refer to the BC L100 manual Note on using the battery pack A warm battery...

Page 186: ...ry pack against the back of the camcorder aligning the side line of the battery pack with the line on the camcorder 2 Slide the battery pack down until its LOCK arrow points at the matching line on the camcorder BP L60A Align these lines Back of camcorder Matching line on the camcorder LOCK arrow ...

Page 187: ...Chapter 5 Setting Up the Camcorder 5 5 3 LOCK Detaching the battery pack Detaching the battery pack Holding the button in pull the battery pack up ...

Page 188: ...arged internal battery pack then remove the DC output cable of the external battery from the DC IN connector The power source will switch to the internal battery pack To use an external battery again connect a fully charged external battery to the DC IN connector before unloading the internal battery pack The power source will switch to the external battery Continuous operation when operating with...

Page 189: ... the camcorder to the AC power supply through the AC 550 AC Adaptor as shown in the following figure and turn the POWER switch of the AC 550 on Connecting to an AC power source Wall outlet AC 550 AC Adaptor Power switch on DC output cable supplied with the AC 550 DC OUT DC IN ...

Page 190: ... the Anton Bauer Corporation has developed for its Ultralight System Ultralight System By installing this system on the camcorder you can switch the video light on and off automatically as you start and stop VTR operation using the VTR START button on the camcorder or the VTR button on the lens Contact your Sony representative for more information ...

Page 191: ...sting the position to the left or right Adjusting the position to the left or right 1 Loosen the viewfinder left right positioning ring 2 Slide the viewfinder to the most convenient position 3 Tighten the viewfinder left right positioning ring Storing the camcorder in the carrying case Always store the camcorder with the viewfinder moved fully in the direction opposite to the barrel and the viewfi...

Page 192: ...ng the position backward or forward Adjusting the position backward or forward 1 Loosen the viewfinder front rear positioning lever 2 Slide the viewfinder longitudinally to the most convenient position 3 Tighten the viewfinder front rear positioning lever ...

Page 193: ... Viewfinder Detaching the viewfinder 1 Point the viewfinder barrel up or down 2 Loosen the viewfinder left right positioning ring 3 Holding the viewfinder stopper up slide the viewfinder in the direction indicated by the arrow and detach it Viewfinder stopper Continued ...

Page 194: ...them The viewfinder rotation bracket By fitting a BKW 401 Viewfinder Rotation Bracket not supplied you can rotate the viewfinder out of the way so that your right leg does not hit the viewfinder while you are carrying the camcorder For more information refer to the BKW 401 manual Using the BKW 401 Viewfinder Rotation Bracket ...

Page 195: ... Mounting the lens 1 Push the lens locking lever up and remove the lens mount cap from the lens mount 2 Align the center slot in the lens mount with the center pin on the lens and insert the lens into the mount 3 Holding the lens in place push the lens locking lever down to mount the lens 4 Connect the lens cable to the LENS connector 5 Secure the lens cable with the cable clamps ...

Page 196: ...e focal length The position of the controls for adjusting the flange focal length vary somewhat from lens to lens Check the identification of the various controls in the lens manual Adjusting the flange focal length 1 Set the iris to manual 2 Open the iris Place the flange focal length adjustment chart about 3 m 10 ft away from the camera lit well enough to provide a satisfactory video output leve...

Page 197: ... the focus ring and focus on it 6 Set the zoom ring to wide angle 7 Turn the Ff ring until the chart is in focus being careful not to disturb the focus ring 8 Repeat steps 4 to 7 until the chart stays in focus all the way from wide angle to telephoto 9 Tighten the Ff ring fixing screws ...

Page 198: ... using the extension cable or attached to the camcorder Using the microphone detached from the camcorder Using the supplied microphone detached from the camcorder Note When using the supplied microphone with an extension cable always use an external power supply type cable Connect to the MIC IN connector Set the AUDIO IN switch for the desired recording channel to FRONT ...

Page 199: ...20A HD Electronic Viewfinder not supplied is used attach the microphone as follows 1 Loosen the screw and open the microphone holder 2 Place the microphone in the microphone holder Microphone holder Place the microphone in the holder so that UP is at the top Close the microphone holder Tighten the screw Continued ...

Page 200: ...is used The HDVF C30W is not equipped with the microphone holder Attach the CAC 12 Microphone Holder not supplied to the camcorder first then attach the supplied microphone For detailed information on how to attach the CAC 12 follow the procedure of steps 2 3 and 4 described in Using an external microphone attached to the camcorder in 5 5 2 Using an External Microphone on pages 5 19 to 5 20 Connec...

Page 201: ... ON swtich to 48 V ON If a microphone you use is not the external power supply type set the LINE MIC 48 V ON switch to MIC Using a detached external microphone Using a detached external microphone Set the AUDIO IN switch for the channel to which the microphone is connected to REAR AUDIO IN CH 1 or CH 2 External microphone Set the LINE MIC 48 V ON switch to 48 V ON if you use an external power supp...

Page 202: ...n noise from the VTR and can also attach a long microphone Note however that use of the CRS 3P requires a microphone holder A Part No 3 680 581 01 which is not supplied with the CRS 3P The procedure for attaching an external microphone using a CAC 12 and CRS 3P is shown below Refer to the microphone holder or cradle suspension manual for more information 1 Assemble the CRS 3P Cradle Suspension and...

Page 203: ...Chapter 5 Setting Up the Camcorder 5 5 19 2 Remove the external microphone holder attachment screws 3 Attach the CAC 12 Microphone Holder Screws removed in step 2 CAC 12 Continued ...

Page 204: ...p the Camcorder 5 5 20 3 2 1 1 2 3 4 Open the CAC 12 and remove the microphone adaptor 5 Mount the assembly from step 1 in the CAC 12 Open the CAC 12 Loosen the screw Microphone adaptor Close the CAC 12 Tighten the screw ...

Page 205: ...AUDIO IN connector for channel 1 or 2 Set the corresponding AUDIO IN switch to REAR Set the LINE MIC 48V ON switch to 48V ON or MIC in accordance with the type of the microphone power supply Note When you connect a microphone to the AUDIO IN connector for channel 1 and 2 set the appropriate LINE MIC 48V ON switch to MIC Microphone ...

Page 206: ...Battery Pack 1 1 Attach the tuner fitting not supplied to the back of the camcorder 1 Pass a screwdriver through the holes and tighten the screws 2 Loosen the adjustment screws 3 Adjust the metal fitting position for a BP L60A Battery Pack to be attached and tighten the adjustment screws to fix its position 4 Attach the BETACAM holder kit supplied with the tuner 2 Attach the battery pack For more ...

Page 207: ...onnector of the camcorder and the audio output cable to the AUDIO IN connector for channel 1 or channel 2 WRR 860A AUDIO IN for CH 1 or CH 2 Set the LINE MIC 48 V ON switch for the channel to which the audio out cable is attached to MIC Set the AUDIO IN switch for the channel to which the audio out cable is attached to REAR DC OUT ...

Page 208: ...nt that supplies the line input signal to the AUDIO IN CH 1 or CH 2 connector Line input connection LOCK Set the LINE MIC 48 V ON switch for the channel to which the audio signal source is connected to LINE Set the AUDIO IN switch for the channel to which the audio signal source is connected to REAR Audio equipment AUDIO IN for CH 1 or CH 2 ...

Page 209: ...pod adaptor 1 Attach the tripod adaptor to the tripod 2 Mount the camcorder on the tripod adaptor Tripod adaptor Select the screw hole in the tripod adaptor which best fits the screw on your tripod camera mount and thus gives the best balance for the camcorder Camera mount Slide the camcorder forward along the groove in the adaptor until it clicks ...

Page 210: ... If this happens press the red button against the level a second time and move the lever as shown below until the pin returns to the stowed position If the pin remains in the engaged position you will not be able to mount the camcorder on the tripod adaptor If the pin remains in the engaged position Stowed position Pin Lever Red button Press the red button against the lever and move the lever in t...

Page 211: ...5 Chapter 5 Setting Up the Camcorder 5 27 5 7 Attaching the Shoulder Strap Attach the supplied shoulder strap as shown below Attaching the shoulder strap Shoulder strap post Continued ...

Page 212: ...etting Up the Camcorder 5 28 Attaching the shoulder strap Removing the shoulder strap Pull up the strap to lock the fitting Removing Attaching Clip Press here and pull in the direction shown by the arrow to release ...

Page 213: ...ctory setting backward or forward by up to 10 mm 3 8 inch This adjustment helps you get the best balance for shooting with the camcorder on your shoulder Adjusting the shoulder pad position 1 Loosen the two screws 2 Slide the shoulder pad backward or forward until it is in the most convenient position 3 Tighten the screws 1 3 2 Shoulder pad ...

Page 214: ...nd here To attach a video light or other accessory open the velcro tape Back of camcorder Hook A Hook B Hook C Front of camcorder Close the velcro tape You can insert and remove cassette tapes here To attach the BKW 401 Viewfinder Rotation Bracket not supplied remove hook C from hook A and insert the end of the microphone in here You can operate switches and controls on the camcorder from here To ...

Page 215: ...e battery packs here Front of camcorder To fit the WRR 810A 860A UHF Portable Tuner open the velcro tape To connect external equipment pass the cables through here and tighten the drawstring When no external equipment is used fold this up and connect it to the velcro tape on the bottom Insert the viewfinder barrel here let the eyecup protrude and tighten the drawstring ...

Page 216: ...ting Up the Camcorder 5 32 Front of camcorder Bottom of camcorder Back of camcorder Close the velcro tape To mount the camcorder on the tripod adaptor attach it through these holes Front of camcorder Back of camcorder ...

Page 217: ...r disconnecting the remote control cable When you turn off the camcorder power the settings and adjustments made with the switches and controls of the remote control unit are canceled The settings and adjustments made with the setup menu are saved but some of them are not written in the setup card Connecting the RM B150 Remote Control Unit not supplied Use the black cable supplied with the RM B150...

Page 218: ...necting the remote control unit Extension cable lengths An extension cable is supplied with the RCP 700 series or RM B150 Remote Control Unit and MSU 700 Master Setup Unit The length of each cable is as follows RCP 700 series 10 meters RM B150 100 meters MSU 700A 750 200 meters Remote control cable Remote Control Unit RCP 700 Series or RM B150 Remote connector REMOTE connector Master Setup Unit MS...

Page 219: ...he HUMID indicator does not appear and that the BATT indicators shows at least five segments If the HUMID indicator appears wait until it disappears If the BATT indicator does not show at least five segments replace the battery pack with a fully charged one 3 Check that there are no obstructions near the cassette lid and then press the EJECT button to open the cassette lid 4 After checking the poi...

Page 220: ...en moving the camcorder from a cold place to a warm place be sure no cassette is loaded in the camcorder Whenever you turn on the power check that the HUMID indicator does not appear If it appears wait until it disappears before loading a cassette For more information see Section 3 1 1 Loading and Unloading a Cassette page 3 1 and Section 6 3 Operation Warnings page 6 14 6 1 2 Testing the Camera S...

Page 221: ...nd check that the setup menu page changes to the next page 3 Push the MIC MENU knob and check that settings of each item of the selected page are displayed 4 Turn the MIC MENU knob and check that the arrow moves within the page 5 Push the MIC MENU knob and check that the arrow changes to a question mark 6 Turn the MIC MENU knob and check that the setting of the selected item or the ON OFF indicato...

Page 222: ...tter setting changes on the viewfinder screen 7 Pointing the camera at a suitable subject focus the camera and check the picture on the viewfinder screen 8 Set both of the AUDIO IN switches to FRONT and check that when sound is input to a microphone connected to the MIC IN connector on the front of the camcorder the audio level indication appears on the viewfinder screen 9 Check that setting the Z...

Page 223: ...is ring manually adjusts the iris correctly 5 Hold down the instant automatic iris button on the lens and point the camera at objects of different brightness Check that the iris ring turns as the instant automatic adjustment is made 6 Set the iris switch on the lens back to AUTO and check the following points when the GAIN selector is moved from L to M to H For objects of the same brightness the i...

Page 224: ...LCD switch to CTL 5 Press the VTR START button and check the following points The tape reels are turning The counter indication is changing The REC indicator in the viewfinder is on The RF and SERVO indicators on the display panel are off 6 Press the VTR START button again and check that the tape stops and that the REC indicator in the viewfinder goes off 7 Repeat the checks of steps 5 and 6 this ...

Page 225: ...1 Set the AUDIO IN switches to FRONT 2 Set the AUDIO SELECT switches to AUTO 3 Aim the microphone connected to the MIC IN connector at a suitable sound source Check that the level indications for both channels correspond to the sound level 3 Testing the manual audio level adjusting functions 1 Set the AUDIO IN switches to FRONT 2 Set the AUDIO SELECT switches to MANUAL 3 Set the DISPLAY switch to ...

Page 226: ...n hear the sound from the microphone in the earphone 4 Turn the MONITOR control and check that the earphone volume changes accordingly 5 Testing external microphones 1 Connect external microphones to the AUDIO IN CH 1 CH 2 connectors 2 Set the LINE MIC 48V ON switches to MIC 3 Set the AUDIO IN switches to REAR 4 Aim the microphones at a sound source 5 Check that the audio level meter in the displa...

Page 227: ...et the F RUN SET R RUN switch to R RUN 4 Press the VTR START button and check that the tape starts and that the counter indication changes 5 Press the VTR START button again and check that the tape stops and that the counter indication also stops changing 6 Set the F RUN SET R RUN switch to F RUN and check that the counter indication changes regardless of whether the tape is running 7 Set the DISP...

Page 228: ...the procedure described in Loading a cassette page 3 1 2 After the cleaning cassette is inserted the tape runs automatically in PLAY mode for about 3 seconds to clean the head 3 After the tape runs the cleaning cassette is automatically evacuated Note Do not run the cleaning cassette 5 or more times consecutively 6 2 2 Cleaning the Viewfinder Use a dust blower to clean the CRT screen and mirror in...

Page 229: ...ng procedure see the following Detaching the eyepiece on the next page 2 Remove the eyecup from the eyecup holder 3 Remove the protecting filter together with the packing rig from inside the eyecup folder 4 Detach the protecting filter from the packing ring 1 3 4 2 Viewfinder barrel Eyecup holder Protecting filter Packing ring Eyecup ...

Page 230: ...epiece locking ring fully counterclockwise to line up the red match mark on the locking ring with the red match mark on the viewfinder barrel 2 Detach the eyepiece Locking ring Locking ring match mark Match mark on the viewfinder barrel Match mark on end of eyepiece ...

Page 231: ... on the viewfinder barrel Fog proof filter Depending on the temperature and humidity the protecting filter may mist because of vapor or your breath To ensure that the viewfinder is always clear replace the protecting filter with a fog proof filter Part No 1 547 341 11 not supplied Fitting the fog proof filter Replace the protecting filter on the packing ring with the fog proof filter Be sure to co...

Page 232: ...uous beep RF Continuousa a SERVO Continuous Continuous HUMID Continuous a b SLACK Continuous TAPEc Flashinga a TAPE and E Flashing BATT Flashing d BATT and E Flashing No indication on the display panel Operation warnings When a problem occurs either at power on or during operation warnings are given by the WARNING indicator and TALLY indicator in the 6 3 Operation Warnings a During recording b Dur...

Page 233: ...cueing do not operate If another problem also occurs its indication is given priority Corrective action Clean the heads If recording is still substandard turn off the power and consult your Sony representative Turn off the power and consult your Sony representative Note that this indication may be given momentarily when the tape starts moving but this does not indicate a problem Turn off the power...

Page 234: ...when an extremely bright object is being shot it is more likely to occur with a faster electronic shutter speed Vertical smear Aliasing When patterns of stripes or lines are shot they may appear jagged Vertical tails show on the image Monitor screen Bright object mercury lamp the sun reflections etc ...

Page 235: ...C supply when recording Operating temperature 0 C to 40 C 32 F to 104 F Operating humidity 25 to 85 relative humidity Storage temperature 20 C to 60 C 4 F to 140 F Mass Approx 8 kg 17 lb 10 oz with lens cassette and BP L60A Battery Pack Dimensions Dimensions in mm Appendix 340 380 37 208 265 140 ...

Page 236: ...e picture elements 1920 H x 1080 V Imager Configuration RGB 3 CCDs Spectral system F1 4 prism system with quartz filter Built in filters CC filter A 5600K B 3200K C 4300K D 6300K ND filter 1 Clear 2 1 4 ND 3 1 16 ND 4 1 64 ND Lens mount Special bayonet type Sensitivity 60 I 59 94 I 89 9 reflection chart 2000 lx F10 standard ...

Page 237: ...ime 40 minutes at 30 frames using BCT 40HD video cassette 48 minutes at 25 frames using BCT 40HD video cassette 50 minutes at 24 frames using BCT 40HD video cassette Fast forward time Approx 6 minutes using BCT 40HD video cassette Rewind time Approx 6 minutes using BCT 40HD video cassette Continuous recording time Approx 80 minutes using BP L60A Battery Pack ...

Page 238: ... NRZI PR IV Error correction Reed Solomon code Error concealment Adaptive three dimensional Audio with standard playback machine Frequency response 20 Hz to 20 kHz 0 5 dB 1 0 Dynamic range 85 dB min emphasis ON Distortion 0 08 max Cross talk 70 dB max Wow and flutter Below measurable limit Input output connectors Signal inputs AUDIO IN CH 1 CH 2 XLR 3 pin female 60 dBu 4 dBu 0 dBu 0 775 Vrms MIC I...

Page 239: ...W Signal outputs MONITOR OUT BNC type Y PB PR 1 0 Vp p 75 W unbalanced AUDIO OUT XLR 5 pin male 0 dBm TC OUT BNC type 1 0 Vp p 75 W EARPHONE minijack 8 Ω to 18 dBs variable Others DC IN XLR 4 pin male 11 to 17 V DC DC OUT 4 pin 11 to 17 V DC maximum current 0 1 A LENS 12 pin REMOTE 8 pin ...

Page 240: ...Operation Manual 1 Maintenance Manual 1 Recommended Additional Equipment Viewfinder HDVF 20A HD Electronic Viewfinder HDVF C30W HD Electronic Viewfinder Power supply and related equipment BP L60A Battery Pack BC L100 Battery Charger for BP L60A Battery Pack AC 550 AC Adaptor HDCAM cassette tapes BCT 22HD 40HD Memory label MLB 1M 100 Camera adaptor HDCA 901 ...

Page 241: ...ive for more information about these filters Equipment for remote control RCP 700 Series Remote Control Unit RM B150 Remote Control Unit MSU 700A 750 Master Setup Unit Audio equipment C 74 microphone ECM MS5 stereo microphone CAC 12 Microphone Holder CRS 3P Cradle Suspension WRR 810A 860A UHF Portable Tuner WRT 27 UHF Transmitter BTA 27 UHF Portable Tuner Attachment Kit For Audio equipment describ...

Page 242: ...quipment for maintenance and easier handling BCT HD12CL Cleaning Cassette LC HD7 Carrying Case LC 304SFT Soft Carrying Case EX 410 Extension Circuit Board Design and specifications are subject to change without notice ...

Page 243: ... levels of the R G and B channels of a video camera so that black has no color Black set A reference level for black balance adjustment CC filter Color Conversion filter An optical filter for adjusting the white balance by optically correcting the color temperature of the subject CCD Charge Coupled Device A solid state imager used in most video cameras in place of a pickup tube The device converts...

Page 244: ...n a color video monitor This signal is used to check chrominance functions of color television and video systems such as cameras and monitors Color temperature The temperature in Kelvins K to represent the color of a light source determined by heating a perfectly black body until its color matches that of the light source Color temperature is higher when the color is bluish and lower when reddish ...

Page 245: ...very tenth minute E E mode Electric to Electric mode When you operate a VTR in E E mode input video and or audio signals pass through electric circuits only and then come out from the output connectors without passing through electromagnetic conversion circuits such as recording heads You can use E E mode to directly check and monitor the input signals without recording them on tape EFP Electronic...

Page 246: ...or colored flashes caused by signal overload through extreme light reflections of polished objects or very bright lights As a result the dark part of the image becomes bleached looking Flicker Repeated change of brightness on the screen Genlock Generator lock To synchronize the pulse generator built into video equipment to an external reference master synch signal HAD Hole Accumulated Diode A CCD ...

Page 247: ...ll picture The output level is very low when tape runs slowly so an LTC read error is likely to occur while the VTR is playing back in slow motion See also Time code and VITC Memory Stick Memory Stick is the removable storage media used with the camcorder You can easily save and delete the data ND filter Neutral Density filter ND filters reduce the amount of incident light equally across the entir...

Page 248: ...unds are reproduced with less noise and pictures are reproduced clearly without snow Time code A digitally encoded signal that is recorded on video tape to identify each frame of video by hour minute second and frame number There are two kinds of recorded signals longitudinal time code LTC and vertical interval time code VITC Time code synchronization To synchronize the built in time code generato...

Page 249: ... of a color video camera so that any white object shot in that light is reproduced as a truly white image White shading When shooting a white object the upper and lower portions of the screen may appear magenta or green while the central portion appears white This is called white shading Zebra pattern In a video camera striped patterns that appear in the viewfinder screen to indicate areas of the ...

Page 250: ......

Page 251: ...8 3 5 6 1 6 14 Battery attachment 2 1 Battery status indicator 2 38 6 14 BC L100 Battery Charger 1 7 5 1 A 6 Hunting 4 8 Index A AC 550 AC Adaptor 1 7 2 1 5 1 5 5 Accessory attachments 2 3 AC power supply 1 7 5 5 Adjusting the flange focal length 5 12 Adjustments and settings for recording audio level 4 13 black balance and white balance 4 1 electronic shutter 4 9 memory stick operations 4 91 PAIN...

Page 252: ...wer supply 4 27 connection example 4 23 procedure 4 25 releasing time code synchronization 4 27 setting the user bits 4 26 Cameraman tally indicator 2 16 Cassette tape loading 3 1 preventing accidental erasure 3 4 slack checking 3 3 unloading 3 3 usable cassettes A 6 CC filter 2 18 4 6 Center marker 2 13 Cleaning BCT HD12CL cleaning cassette 6 10 A 8 video heads 6 10 viewfinder 6 10 Color playback...

Page 253: ...shutter See Shutter Equipment setup adjusting the flange focal length 5 12 adjusting the shoulder pad position 5 29 adjusting the viewfinder 5 7 attaching the shoulder strap 5 27 audio input system 5 14 connecting the remote control unit 5 33 mounting the lens 5 11 power supply 5 1 putting on the rain cover 5 30 storing the camcorder in the carrying case 5 7 tripod mounting 5 25 Error messages adj...

Page 254: ...s 4 58 GAIN selector 2 20 GENLOCK IN connector 2 22 2 29 H HDCA 901 2 8 A 6 HDVF 20A A 6 Head cleaning 6 10 HOLD button 2 32 HUMID indicator 2 39 3 5 6 1 6 14 I Iris setting indicator 4 36 4 49 L Lens locking lever 2 4 mounting 5 11 mount 2 3 mount cap 2 4 LENS connector 2 4 LEVEL controls 2 7 Light shoe 2 3 LIGHT switch 2 37 Line input audio 5 24 LTC 1 4 4 18 4 22 M Maintenance video head cleanin...

Page 255: ...A 750 1 6 5 34 A 7 N ND filter 2 18 4 6 Notes on CCD image sensors 6 16 O OPERATION menu finding a page 4 47 lighting the INDindicator 4 50 operator file 4 69 selecting the display items 4 48 selecting the lens file 4 70 setting the automatic iris 4 62 setting the assignable switches 4 66 setting the battery 4 64 setting the D5600K mode 4 66 setting the gain selector 4 58 setting the marker displa...

Page 256: ...REGEN switch 2 33 4 19 4 20 Protecting filter 6 11 Putting on the rain cover 5 30 R RCP 700 Series 1 6 5 33 5 34 A 7 Real time display 4 21 entering the real time in the VITC 4 21 REAL TIME switch 2 34 4 17 4 19 4 22 Recording basic procedure 3 5 cassette tape 3 1 A 6 checking the recording 3 13 continuous recording 3 9 shooting and recording playback functions 2 13 Recording review 3 14 Recording...

Page 257: ...ng the position 5 29 feature 2 4 Shoulder strap attaching the shoulder strap 5 27 shoulder strap posts 2 3 Shutter indicator 4 37 4 49 ECS mode 4 9 selecting mode and speed 4 10 setting the electronic shutter 4 9 shutter modes 4 9 standard mode 4 9 S EVS mode 4 9 4 12 SHUTTER selector 2 19 SLACK indicator 2 39 6 14 Speaker operation 2 11 testing 6 8 Specifications A 1 STOP button 2 26 Storage prec...

Page 258: ...de function 6 9 user bit functions 6 9 viewfinder 6 3 VTR section 6 6 zoom function 6 5 Testing the iris and zoom functions 6 5 Time code checking 6 9 displaying 2 32 2 40 free run mode 2 33 free run recording run switch 2 33 preset regeneration switch 2 33 resetting 2 32 setting 4 19 switch settings and displayed information 2 41 synchronizing 4 23 time code system 2 29 Time counter display 2 40 ...

Page 259: ...specifications A 3 testing 6 6 operation and status indicators 2 39 features 1 4 VTR buttons 3 9 VTR SAVE STBY switch 2 25 VTR START button 2 25 W WARNING indicator 2 37 6 14 Warnings and indications display panel indications 2 39 6 14 parts and controls 2 35 TALLY indicator 6 14 viewfinder screen displays 6 14 warning sound 2 9 6 14 warning system 6 14 White balance adjusting 4 5 error messages 4...

Page 260: ...Name Office Address Phone ...

Page 261: ... for use by the purchasers of the equipment described in this manual Sony Corporation expressly prohibits the duplication of any portion of this manual or the use thereof for any purpose other than the operation or maintenance of the equipment described in this manual without the express written permission of Sony Corporation ...

Page 262: ...Sony Corporation B P Company Printed in Japan 2003 04 13 2000 HDW F900 SY 3 203 941 04 1 ...

Reviews: