background image

Basic Operations

26

EN

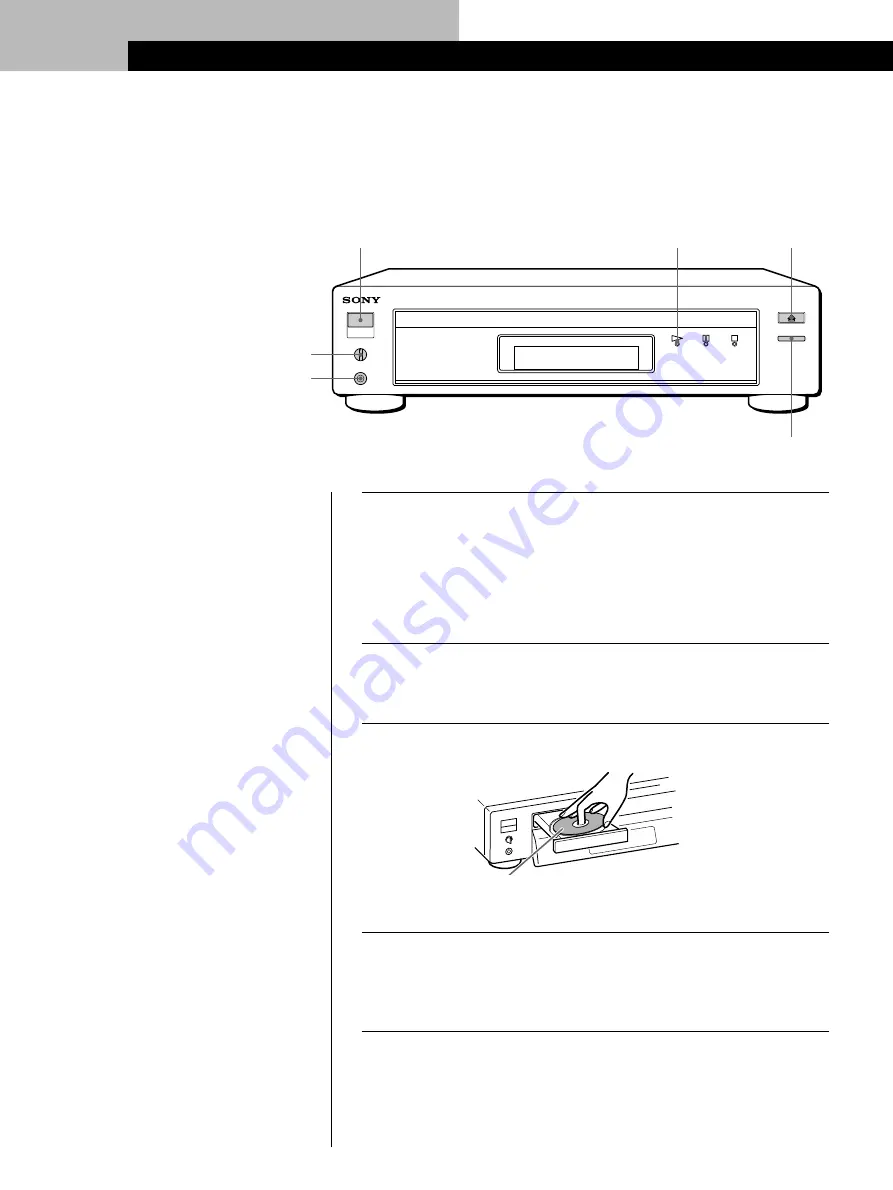
PANEL UP/DOWN

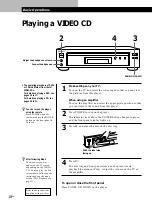
Make settings on your TV.

Turn on the TV and select the video input so that you can view
the pictures from this player.

When using an amplifier

Turn on the amplifier and select the appropriate position so that
you can listen to the sound from this player.

Press POWER to turn on the player.

The indicator (red) above the POWER button changes to green
and the front panel display lights up.

Press 

§

, and place the disc on the disc tray.

Press 

·

.

The disc tray and front panel close and the player starts
playback (Continuous Play).  Adjust the volume on the TV or
the amplifier.

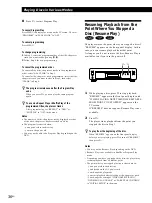
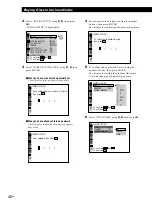
To open or close the front panel

Press PANEL UP/DOWN on the player.

Playing a CD

1

• The operating procedure of DVDs

or VIDEO CDs is different from
that of CDs.
For details on playing a DVD, see
pages 10 to 17.
For details on playing a VIDEO
CD, see pages 18 to 25.

z

You can turn on the player
using the remote

Press POWER when the
indicator above the POWER
button on the front panel is
lit in red.

2

Connect headphones.

Adjust the headphone volume.

2

4

3

3

4

With the label side
facing up

Basic Operations

Summary of Contents for DVP-S7000

Page 1: ...3 859 359 61 1 CD DVD Player Operating Instructions Manual de instrucciones EN ES C2 C2 1997 by Sony Corporation DVP S7000 ...

Page 2: ...ts with this product will increase eye hazard As the laser beam used in this CD DVD Player is harmful to eyes do not attempt disassemble the cabinet Refer servicing to qualified personnel only This label is located on the Laser protective housing inside the enclosure Welcome Thank you for purchasing the Sony CD DVD Player Before operating the unit please read this manual thoroughly and retain it f...

Page 3: ...sc Resume Play 36 Reducing the Picture Noise DNR 37 Changing the Sounds 37 Turning the Sub titles On and Off 38 Changing the Sub titles 38 Changing the Angles 39 Limiting Playback by Children Parental Control 39 Controlling the TV with the Supplied Remote 42 Settings and Adjustments Using the Menu 43 Settings for Playback PLAY MODE 44 Adjustments for Playback Picture VIDEO CONTROL 44 Settings for ...

Page 4: ... this player If you try to play these DVDs the message PLAYING THIS DISC PROHIBITED BY AREA LIMITS will appear on the TV screen Depending on the DVD no region code indication may be labeled even though playing the DVD is prohibited by the area limits Note on playback operations of DVDs and VIDEO CDs Some playback operations of DVDs and VIDEO CDs may be intentionally fixed by software producers Sin...

Page 5: ... PBC functions the menu screens moving pictures and still pictures are divided into sections called scenes Each scene is assigned a scene number enabling you to locate the scene you want Note on PBC Playback Control VIDEO CDs This player conforms to Ver 1 1 and Ver 2 0 of VIDEO CD standards You can enjoy two kinds of playback according to the disc type Disc type VIDEO CDs without PBC functions Ver...

Page 6: ...ble 1 S link cable 1 Remote commander remote RMT D100A 1 Sony SUM 3 NS batteries 2 Inserting batteries into the remote You can control the player using the supplied remote Insert two R6 size AA batteries by matching the and on the batteries When using the remote point it at the remote sensor g on the player z You can control Sony TVs with the g mark using the supplied remote See page 42 z When to ...

Page 7: ...deo deck If you view the pictures on your TV after making connections shown on the right a picture noise may appear Depending on the TV or amplifier the sound distortion may occur because the audio output level is high In this case set AUDIO ATT in CUSTOM SETUP to ON in the menu For details see page 46 z If your TV has an S video input connector Connect the component via the S VIDEO OUT connector ...

Page 8: ... not set DVD DIGITAL OUT in INITIAL SETUP to AC 3 Digital If you do a loud noise will suddenly come out from the speakers affecting your ears or causing the speakers to be damaged Optical cable not supplied CD DVD player Amplifier with a digital connector MD deck DAT deck etc Coaxial cable not supplied CD DVD player z If you have a digital component with a built in Dolby Digital decoder Connect th...

Page 9: ...PE in INITIAL SETUP to 4 3 pTo listen to the stereo sound through speakers connected to a normal amplifier or through TV speakers In the menu set DOWNMIX in INITIAL SETUP to NORMAL pTo listen to the sound through speakers connected to an amplifier or a TV that conforms to Dolby Pro Logic surround In the menu set DOWNMIX in INITIAL SETUP to SURROUND pTo listen to the sound through speakers connecte...

Page 10: ...Continuous Play Adjust the volume on the TV or the amplifier To open or close the front panel Press PANEL UP DOWN on the player Playing a DVD 1 The operating procedure of VIDEO CDs or CDs is different from that of DVDs For details on playing a VIDEO CD see pages 18 to 25 For details on playing a CD see pages 26 to 31 z You can turn on the player using the remote Press POWER when the indicator abov...

Page 11: ...e indication changes as follows SLOW 1 SLOW 2 Notes Depending on the DVD you may not do some of the operations described on the right When you play back a DVD at twice the normal speed in any direction the sounds of the picture will come out from the LINE OUT AUDIO 1 2 connectors The sounds are lower than the ones at normal speed In this case no sounds come out from the DIGITAL OUT OPTICAL and COA...

Page 12: ...FR1 FF2 FR2 z If you have made a mistake Press CLEAR then the correct number button z Each time you press SEARCH MODE TITLE SEARCH CHAPTER SEARCH and TIME SEARCH appear on the TV screen Note Depending on the DVD you may not do some of the operations described on the right Press Number buttons to select the chapter number then ENTER or 1 SEARCH MODE repeatedly until TITLE SEARCH appears on the TV s...

Page 13: ...e contents of the menu varies from disc to disc Press to select the title you want to play Depending on the disc you can use the number buttons to select the title Press ENTER The player starts playing the selected title 1 2 3 TITLE ENTER ENTER TITLE TITLE 1 1 TITLE 2 2 TITLE 3 3 TITLE 4 4 Notes Depending on the DVD you may not select the title Depending on the DVD a title menu may be simply calle...

Page 14: ...c Press to select the item you want to change Depending on the disc you can use the number buttons to select the item To change other items repeat Step 2 Press ENTER z If you want to select the language for the DVD menu Change the setting using INITIAL SETUP in the normal menu see page 47 Note Depending on the DVD a DVD menu may be simply called a menu in the instructions supplied with the disc Pr...

Page 15: ... displayed pDisplay information of the on screen display 2 mode DISPLAY Playing time of the current chapter Current language for the sub titles total number of languages for sub titles Current audio format Current language for the sound total number of languages for the sound Current chapter number total number of chapters in the current title Playing status Current play mode Playing time of the c...

Page 16: ... a disc the approximate bit rate of the playback picture is always displayed pDisplay information of the on screen display off mode No information is displayed Messages etc will be displayed Using the Front Panel Display You can check the information about the disc such as the total number of the titles or remaining time using the front panel display pDisplay information while playing the disc Bit...

Page 17: ...s TIME Playing time and number of the current title Press TIME Press TIME Remaining time of the current chapter Playing time and number of the current chapter Note Depending on the DVD the chapter number or time may not appear pChecking the remaining time Each time you press TIME while playing the disc the display changes as shown in the chart below The time information in the on screen display 1 ...

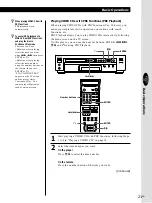
Page 18: ...amplifier To open or close the front panel Press PANEL UP DOWN on the player Playing a VIDEO CD 1 The operating procedure of DVDs or CDs is different from that of VIDEO CDs For details on playing a DVD see pages 10 to 17 For details on playing a CD see pages 26 to 31 z You can turn on the player using the remote Press POWER when the indicator above the POWER button on the front panel is lit in red...

Page 19: ...e the disc 6 To return to Continuous Play mode Press 6 P p 7 z If you want to change the playback speed during Slow motion play Two speeds are available SLOW 1 and SLOW 2 Each time you press the indication changes as follows SLOW 1 SLOW 2 z When RESUME appears on the front panel display You can resume playback from the point where you stopped the VIDEO CD For details on playing from the beginning ...

Page 20: ...ess SEARCH MODE TRACK SEARCH SCENE SEARCH and VIDEO INDEX SEARCH appear on the TV screen Note Some discs do not allow you to start playing from a particular scene In this case if you do Scene Search before you start playing the player starts playing from scene 1 If you do Scene Search while playing a disc the player starts playing from the current scene Press Number buttons to select the track num...

Page 21: ...DEO CD on page 18 Select the item number you want On the player Press to select the item number On the remote Press the number button of the item you want z When playing VIDEO CDs with PBC functions PBC playback starts automatically z To cancel PBC playback of a VIDEO CD with PBC functions and play the disc in Continuous Play mode There are two ways Before you start playing select the track you wa...

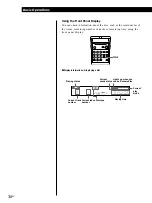
Page 22: ... of the player and the information about the disc using the on screen display on the TV screen Press DISPLAY Each time you press the button the on screen display changes as follows On screen display 1 On screen display 2 On screen display off 3 Do the following On the player press to select the item number then press ENTER On the remote press the number button of the item you want then press ENTER...

Page 23: ... Status of the video control Playing status Playing time of the current track Playing time of the current track Current scene number Playing time of the current track Current track number Current index number n z What is a track See page 5 z What is a scene See page 5 Each time you press TIME the information changes as shown below Playing time of the current track Remaining time of the current tra...

Page 24: ...Current sound status Lights up when you can do Resume Play Current play mode Current track number Current index number Disc type Playing time of the current track Playing status Current play mode Current track number total number of tracks Status of the video control Current index number n z What is play mode See page 44 Each time you press TIME the information changes as shown below Playing time ...

Page 25: ...current track Remaining time of the disc Press TIME Press TIME Press TIME pChecking the remaining time in Continuous Play mode Each time you press TIME while playing a disc the display changes as shown in the chart below The time information in the on screen display 1 or 2 mode also changes each time you press TIME Playing time of the disc Press TIME Note While you are doing Shuffle Play or Progra...

Page 26: ...n the disc tray Press The disc tray and front panel close and the player starts playback Continuous Play Adjust the volume on the TV or the amplifier To open or close the front panel Press PANEL UP DOWN on the player Playing a CD 1 The operating procedure of DVDs or VIDEO CDs is different from that of CDs For details on playing a DVD see pages 10 to 17 For details on playing a VIDEO CD see pages 1...

Page 27: ...ck Press π During playback To Press Pause P Resume play after pause P or Stop play and remove the disc 6 6 P p z When RESUME appears in the front panel display You can resume playback from the point where you stopped the CD For details on playing from the beginning of the disc see page 36 π ...

Page 28: ...TER or 1 SEARCH MODE repeatedly until INDEX SEARCH appears on the TV screen 2 Number buttons to select the index number then ENTER or 3 When you find the point you want press to return to the normal speed 3 ENTER Number buttons ENTER SEARCH MODE z What is a track See page 5 z What is an index See page 5 z If you want to change the search speed Two speeds are available FF1 or FR1 and FF2 or FR2 Eac...

Page 29: ...r playing time and index number are always displayed pDisplay information of the on screen display 2 mode pDisplay information of the on screen display off mode No information is displayed Messages etc will be displayed DISPLAY Current index number Playing status Current play mode Current track number total number of tracks Current index number Current track number Playing time of the current trac...

Page 30: ...out the disc such as the total number of the tracks remaining number of tracks or remaining time using the front panel display pDisplay information while playing a disc TIME Playing time 1 2 3 4 5 6 7 8 9 0 Playing status Current play mode Current track number Current index number Disc type Lights up when you can do Resume Play Current sound status ...

Page 31: ...he display changes as shown in the chart below The time information in the on screen display 1 or 2 mode also changes each time you press TIME Playing time and number of the current track Remaining time of the current track Playing time of the disc Press TIME Press TIME Press TIME Remaining time of the disc Press TIME Note While you are doing Shuffle Play or Program Play the playing time of the di...

Page 32: ... To cancel repeating all the titles or all the tracks on a disc Press MENU to display the menu on the TV screen Then set REPEAT in PLAY MODE to OFF page 44 Repeating the current title or chapter You can repeat only the current title or chapter in Continuous Play mode You may not be able to do Repeat Play depending on the DVD pRepeating the current title While the title you want is being played pre...

Page 33: ...the menu on the TV screen Then select A B REPEAT in PLAY MODE A B REPEAT is highlighted 2 Select SET using and press ENTER The on screen display for setting the point A appears indicating the current chapter or track number and playing time 3 When you find the starting point point A of the portion to be played repeatedly press ENTER The display for setting the point B appears REPEAT A also appears...

Page 34: ...Play depending on the DVD MENU ENTER To set press ENTER MENU VIDEO CONTROL CUSTOM SETUP INITIAL SETUP To quit press PLAY MODE OFF ON REPEAT SHUFFLE PROGRAM ALL OFF OFF ON OFF OFF A B REPEAT then MENU ENTER VIDEO CONTROL CUSTOM SETUP INITIAL SETUP REPEAT OFF PLAY MODE SHUFFLE PROGRAM A B REPEAT ALL OFF OFF OFF OFF To set press ENTER MENU To quit press then VIDEO CONTROL CUSTOM SETUP INITIAL SETUP P...

Page 35: ... 01 02 03 04 CLEAR CHAPTER TITLE 01 02 03 04 ALL 05 CHAPTER 01 PROGRAM SETUP To set press then ENTER MENU Pressing PLAY starts Program Play To quit press To set press thenENTER MENU Pressing PLAY starts Program Play VIDEO CONTROL PLAY MODE CUSTOM SETUP INITIAL SETUP PROGRAM SETUP TITLE 01 02 03 04 05 06 ALL CLEAR 01 02 03 04 CLEAR CHAPTER TITLE To quit press VIDEO CONTROL CUSTOM SETUP INITIAL SETU...

Page 36: ...ect the AC power cord you change the play mode you start playback after selecting a title chapter or track you change the setting of VIDEO ASPECT RATIO DVD MENU LANGUAGE or PARENTAL CONTROL in INITIAL SETUP in the menu π 8 Press to start Program Play To cancel Program Play Press MENU to display the menu on the TV screen Then set PROGRAM in PLAY MODE to OFF To cancel programming Press MENU To chang...

Page 37: ...e CD Press MENU to display the menu Then select L R STEREO in CUSTOM SETUP to change the sound page 46 However this setting does not affect the output from the DIGITAL OUT connectors when you play a CD Note Depending on the DVD you may not be able to change the languages even if multilingual sounds are recorded on the DVD You will hear The sound of the left channel The sound of the right channel T...

Page 38: ...le to change the sub titles even if multilingual subtitles are recorded on the DVD Depending on the DVD you may not change the sub titles following the language for the sound even if AUDIO FOLLOW is displayed SUB TITLE CHANGE Turning the Sub titles On and Off Z With DVDs on which sub titles are recorded you can turn the sub titles on and off whenever you want while playing the DVD Press SUB TITLE ...

Page 39: ...ally selected Notes The number of angles varies from disc to disc or from scene to scene The number of angles that can be changed on a scene is that of angles recorded for that scene Depending on the DVD you may not be able to change the angles even if multi angles are recorded on the DVD ANGLE CHANGE Number buttons MENU Continued ANGLE DVD 1 2 3 4 5 6 7 8 9 0 ENTER VIDEO CONTROL CUSTOM SETUP INIT...

Page 40: ...Enter a password in 4 figures using the number buttons then press ENTER The display for confirming the password appears 5 To confirm your password enter it using the number buttons then press ENTER The display for setting the playback limitation level and changing the password appears 6 Select STANDARD using then press 2 Select INITIAL SETUP using then press INITIAL SETUP is highlighted 3 Select P...

Page 41: ...ress ENTER A check mark p appears on the left of the selected level The lower the value is the more strict the limitation To return to the normal screen Press MENU To turn off the Parental Control function and play the DVD after entering your password Set LEVEL to OFF in Step 9 then press To change the password 1 In Step 5 select CHANGE PASSWORD using then press or ENTER The display for changing t...

Page 42: ...upplied Remote Z You can control Sony TVs with the g mark using the supplied remote By pressing TV POWER TV VIDEO VOL CH You can Turn on or off the TV Select the input source for the TV Adjust the volume of the TV Change the channel of the TV TV VIDEO CH VOL TV POWER ...

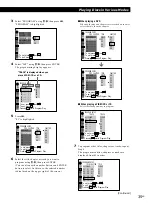
Page 43: ...display playback limitation children etc For details on each menu item see pages 44 to 47 In the menu select the item or setting from left to right Use to go to the right item or setting Use to go back to the left item or setting 1 Press MENU to display the menu on the TV screen 2 Select the main item you want using and then press or ENTER The selected main item is highlighted 3 Select the item yo...

Page 44: ...tronger the intensity ADJUST 5 0 5 adjusts the value for the picture color intensity 0 RESET resets the value to 0 Settings for Playback PLAY MODE PLAY MODE allows you to set various playback modes as described on pages 32 to 36 Default settings are underlined Note Depending on the disc you may not be able to set playback modes You can set Shuffle Program and Repeat Play only during stop for VIDEO...

Page 45: ...o set press then To quit press Settings for Display and Sound CUSTOM SETUP CUSTOM SETUP allows you to set the display and sound according to the playback conditions Default settings are underlined pAUTO PLAY Selects the setting of Auto Play when you connect the AC power cord to the AC outlet OFF does not start playing a disc automatically TIMER starts playing a disc automatically when you connect ...

Page 46: ...rom the LINE OUT AUDIO 1 2 connectors according to audio equipment to be connected OFF turns off the audio attenuation ON reduces the audio output level so that no sound distortion occurs Note The setting does not affect the output from the DIGITAL OUT connectors pL R STEREO Selects the setting of the sound of the VIDEO CD from the LINE OUT AUDIO 1 2 and DIGITAL OUT connectors or the sound of the ...

Page 47: ...ects the analog output from the LINE OUT AUDIO 1 2 connectors and digital output from the DIGITAL OUT OPTICAL and COAXIAL connectors when DVD DIGITAL OUT is set to PCM pDVD DIGITAL OUT Switches the outputting methods of audio signals from the DIGITAL OUT OPTICAL and COAXIAL connectors on the rear panel of the player PCM when the player is connected to an audio component without a built in Dolby Di...

Page 48: ...cord mains lead need to be changed have it done at a qualified service shop only On placement Place the player in a location with adequate ventilation to prevent heat build up in the player Do not place the player on a soft surface such as a rug that might block the ventilation holes on the bottom Do not place the player in a location near heat sources or in a place subject to direct sunlight exce...

Page 49: ...t the remote sensor g on the player Replace all the batteries in the remote with new ones if they are weak The picture noise appears Clean the disc This player features the copy protection function developed by Macrovision Copy protection signals are recorded on some DVDs When you play these discs the picture noise will appear on some TVs and projectors The picture noise appears when the player is...

Page 50: ...n in the language you want In the menu select the language for the on screen display in OSD LANGUAGE in INITIAL SETUP page 47 The language for the sound cannot be changed when you play a DVD Multilingual sound is not recorded on the DVD Changing the language for the sound is prohibited on the DVD The language for the sub titles cannot be changed when you play a DVD Multilingual sub titles are not ...

Page 51: ...ctions are provided with the DVD Multi angle function Various angles or viewpoints of the video camera for a scene are recorded on some DVDs Multilingual function Several languages for the sound or sub titles in a picture are recorded on some DVDs Parental Control A function of the DVD for playback limitation of the disc by the age of the users according to the limitation level in each country The...

Page 52: ...8 26 Connect the headphones to this connector º PANEL UP DOWN button 10 18 26 Moves the front panel up and down Disc tray 10 18 26 Place a disc on the tray PREV button 12 20 28 Press to go back to the preceding chapter or track NEXT button 12 20 28 Press to go to the next chapter or track DNR button 37 Reduces the picture noise TITLE button 13 Displays the title menu on the TV screen DVD MENU butt...

Page 53: ... S video input connector on the TV or VCR 4 COMPONENT VIDEO OUT connectors 7 Connects to the monitor or projector with component video input connectors Y B Y R Y that conform to output signals from the player 5 S LINK connector 9 Connects to the S link connector on an external component 6 DIGITAL OUT OPTICAL connector 8 Connects to an audio component using the optical cable 7 DIGITAL OUT COAXIAL c...

Page 54: ...TV POWER button 42 Turns the TV power on and off POWER button 10 18 26 Turns on and off the power of the player SLOW buttons 11 19 Plays a disc in slow motion 7STEP buttons 11 19 Plays a disc frame by frame SEARCH MODE button 12 20 28 Press to select the unit for search track index etc TIME button 16 24 30 Displays the playing time of the disc etc on the front panel display DNR button 37 Reduces t...

Page 55: ...02 Serbo Croatian 1503 Singhalese 1505 Slovak 1506 Slovenian 1507 Samoan 1508 Shona 1509 Somali 1511 Albanian 1512 Serbian 1513 Siswati 1514 Sesotho 1515 Sundanese 1516 Swedish 1517 Swahili 1521 Tamil 1525 Telugu 1527 Tajik 1528 Thai 1529 Tigrinya 1531 Turkmen 1532 Tagalog 1534 Setswana 1535 Tonga 1538 Turkish 1539 Tsonga 1540 Tatar 1543 Twi 1557 Ukrainian 1564 Urdu 1572 Uzbek 1581 Vietnamese 1587...

Page 56: ...UP 46 Index L LETTER BOX 46 Locating a specific point 12 20 28 by monitoring 12 20 28 by observing the TV screen 12 20 M N Memory 44 Menu CUSTOM SETUP 45 INITIAL SETUP 46 PLAY MODE 44 VIDEO CONTROL 44 usage 43 O On screen display CD 29 DVD 15 language 47 VIDEO CD 22 P Q PAN SCAN 46 Parental control 39 51 PBC functions 21 PBC Playback 5 21 51 Playback Continuous Play 10 18 26 Program Play 34 Repeat...

Page 57: ...57EN Additional Information ...

Page 58: ...n este producto aumenta el riesgo para los ojos No intente desmontar el aparato ya que el haz láser empleado en este reproductor de CD DVD es perjudicial para los ojos Solicite asistencia técnica sólo a personal especializado Esta etiqueta se encuentra en el alojamiento de protección de láser dentro de la cubierta Bienvenido Gracias por adquirir el reproductor de CD DVD de Sony Antes de emplear la...

Page 59: ...dación de reproducción 36 Reducción del ruido de imagen DNR 37 Cambio del sonido 37 Activación y desactivación de los subtítulos 38 Cambio de los subtítulos 38 Cambio de los ángulos 39 Limitación de la reproducción para niños Control de limitación 39 Control del TV con el mando a distancia suministrado 42 Ajustes Empleo del menú 43 Ajustes para la reproducción PLAY MODE 44 Ajustes de la imagen de ...

Page 60: ...ipo DVD VIDEO es una marca comercial Este reproductor cumple con el sistema de color NTSC No es posible reproducir discos grabados en otros sistemas de color como PAL y SECAM Código de región de discos DVD que pueden reproducirse Determinados discos DVD presentan las indicaciones de código de región como 4 que indican el tipo de reproductor capacitado para reproducir los discos A menos que 4 se in...

Page 61: ...stos se le asigna un número que permite localizar el deseado Es posible que determinados discos no dispongan de capítulos grabados Pista Secciones de una imagen o de una pieza musical de un VIDEO CD o de un CD A cada pista se le asigna un número que permite localizar la deseada Indice Número que divide una pista en varias secciones para localizar con facilidad el punto deseado de un VIDEO CD o de ...

Page 62: ...de enlace S link 1 Mando a distancia RMT D100A 1 Pilas Sony SUM 3 NS 2 Inserción de las pilas en el mando a distancia Es posible controlar el reproductor con el mando a distancia suministrado Inserte dos pilas R6 tamaño AA haciendo coincidir las polaridades y de las mismas Cuando utilice el mando a distancia oriéntelo hacia el sensor remoto g del reproductor z Es posible controlar televisores Sony...

Page 63: ...as las conexiones mostradas a la derecha es posible que se produzca ruido de imagen Dependiendo del TV o del amplificador es posible que el sonido se distorsione debido a que el nivel de salida de audio es alto En este caso ajuste AUDIO ATT de CUSTOM SETUP en ON en el menú Para más información consulte la página 46 z Si el TV dispone de conector de entrada de S vídeo Conecte el componente mediante...

Page 64: ... causando daños a dichos altavoces Cable óptico no suministrado Reproductor de CD DVD Amplificador con conector digital platina de MD platina DAT etc Cable coaxial no suministrado Reproductor de CD DVD z Si dispone de un componente digital con decodificador Dolby Digital incorporado Conecte el componente mediante el conector DIGITAL OUT OPTICAL o COAXIAL con un cable óptico o coaxial no suministra...

Page 65: ...és de altavoces conectados a un amplificador normal o a través de altavoces de un TV En el menú INITIAL SETUP ajuste DOWNMIX en NORMAL pPara escuchar el sonido a través de altavoces conectados a un amplificador o TV que acepte el sistema de sonido periférico Dolby Pro Logic Surround En el menú INITIAL SETUP ajuste DOWNMIX en SURROUND pPara escuchar el sonido a través de altavoces conectados a un a...

Page 66: ...anel frontal Pulse PANEL UP DOWN en el reproductor Reproducción de discos DVD 1 El procedimiento de funcionamiento de los VIDEO CD o de los discos compactos es diferente al de los discos DVD Para obtener información sobre la reproducción de discos VIDEO CD consulte las páginas 18 a 25 Para obtener información sobre la reproducción de discos compactos consulte las páginas 26 a 31 z Es posible encen...

Page 67: ...0 Cada vez que pulse o la indicación cambia de la siguiente forma SLOW 1 SLOW 2 Notas Es posible que no pueda realizar algunas de las operaciones descritas a la derecha con determinados discos DVD Si reproduce un disco DVD al doble de la velocidad normal en cualquier sentido el sonido de la imagen se emitirá por los conectores LINE OUT AUDIO 1 2 El sonido es más bajo que el de la velocidad normal ...

Page 68: ...ación el botón numérico correcto z Cada vez que pulse SEARCH MODE La pantalla del TV mostrará TITLE SEARCH CHAPTER SEARCH y TIME SEARCH Nota Dependiendo del disco DVD es posible que no pueda realizar alguna de las operaciones descritas en la derecha Pulse Los botones numéricos para seleccionar el número del capítulo y a continuación ENTER o Se selecciona un capítulo en el título 1 antes de iniciar...

Page 69: ...a según el disco Pulse para seleccionar el título que desee reproducir Dependiendo del disco podrá utilizar los botones numéricos para seleccionar el título Pulse ENTER El reproductor inicia la reproducción del título seleccionado 1 2 3 TITLE ENTER ENTER TITLE TITLE 1 1 TITLE 2 2 TITLE 3 3 TITLE 4 4 Notas Dependiendo del disco DVD es posible que no pueda seleccionar el título Dependiendo del disco...

Page 70: ...opción que desee cambiar Dependiendo del disco será posible emplear los botones numéricos para seleccionar la opción Para cambiar otras opciones repita el paso 2 Pulse ENTER z Si desea seleccionar el idioma para el menú DVD Cambie el ajuste utilizando INITIAL SETUP en el menú normal consulte la página 47 Nota Dependiendo del disco DVD es posible que un menú DVD se denomine simplemente menú en las ...

Page 71: ...2 de indicación en pantalla DISPLAY Tiempo de reproducción del capítulo actual Formato actual de audio Idioma actual de los subtítulos número total de idiomas de los subtítulos Número de capítulo actual número total de capítulos en el título actual Estado de reproducción Modo actual de reproducción Tiempo de reproducción del capítulo actual Número de título actual Número de capítulo actual Estado ...

Page 72: ... de vídeo que se transmiten por segundo en un disco Cuanto mayor sea la velocidad de transmisión mayor será la cantidad de datos No obstante esto no siempre implica que puedan obtenerse imágenes de calidad superior 1 2 3 4 5 6 7 8 9 0 pInformación del modo 3 de indicación en pantalla Mientras reproduce un disco siempre se muestra la velocidad de transmisión de bits de la imagen de reproducción pIn...

Page 73: ...el título actual Pulse TIME Pulse TIME Tiempo restante del capítulo actual Tiempo de reproducción y número del capítulo actual Nota Dependiendo del disco DVD es posible que no aparezca el tiempo o número de capítulo pComprobación del tiempo restante Cada vez que pulse TIME durante la reproducción del disco el visor cambia como se muestra en la ilustración que aparece más adelante La información so...

Page 74: ...or Reproducción de VIDEO CD 1 El procedimiento de funcionamiento de los discos DVD o de los CD es diferente al de los discos VIDEO CD Para obtener información sobre la reproducción de discos DVD consulte las páginas 10 a 17 Para obtener información sobre la reproducción de CD consulte las páginas 26 a 31 z Es posible encender el reproductor con el mando a distancia Pulse POWER si el indicador situ...

Page 75: ...xtraer el disco 6 Para recuperar el modo de reproducción continua Pulse 6 P p 7 z Si desea cambiar la velocidad de reproducción durante el modo de cámara lenta Existen dos velocidades SLOW 1 y SLOW 2 Cada vez que pulse la indicación cambia de la siguiente forma SLOW 1 SLOW 2 z Si RESUME aparece en el visor del panel frontal Es posible reanudar la reproducción desde el punto donde detuvo el VIDEO C...

Page 76: ...RCH SCENE SEARCH y VIDEO INDEX SEARCH Nota Determinados discos no permiten iniciar la reproducción a partir de una escena específica En este caso si realiza la búsqueda de escenas antes de iniciar la reproducción el reproductor iniciará ésta a partir de la escena 1 Si realiza dicha búsqueda durante la reproducción de un disco el reproductor iniciará dicha reproducción a partir de la escena actual ...

Page 77: ... 18 Seleccione el número de opción que desee En el reproductor Pulse para seleccionar el número de opción En el mando a distancia Pulse el botón numérico de la opción que desee z Al reproducir discos VIDEO CD con funciones PBC La reproducción PBC se inicia automáticamente z Para cancelar la reproducción PBC de un VIDEO CD con funciones PBC y reproducir el disco en modo de reproducción continua Exi...

Page 78: ...ctor y la información sobre el disco mediante la indicación que aparece en la pantalla del TV Pulse DISPLAY Cada vez que pulse el botón la indicación en pantalla cambia de la siguiente forma Indicación en pantalla 1 Indicación en pantalla 2 Indicación en pantalla desactivada 3 Realice lo siguiente En el reproductor pulse para seleccionar el número de opción y a continuación pulse ENTER En el mando...

Page 79: ...l de vídeo Estado de reproducción Tiempo de reproducción de la pista actual Tiempo de reproducción de la escena actual Número de escena actual Tiempo de reproducción de la pista actual Número de pista actual Número de índice actual n z Descripción de pista Consulte la página 5 z Descripción de escena Consulte la página 5 Cada vez que pulse TIME la información cambia como se muestra a continuación ...

Page 80: ...ido actual Se ilumina si es posible realizar la reanudación de reproducción Modo de reproducción actual Número de pista actual Número de índice actual Tipo de disco Tiempo de reproducción de la pista actual Estado de reproducción Modo de reproducción actual Número de pista actual número total de pistas Estado del control de vídeo Número de índice actual n z Descripción de modo de reproducción Cons...

Page 81: ...rmación sobre el tiempo del modo 1 o 2 de indicación en pantalla también cambia cada vez que pulse TIME Nota Durante la reproducción aleatoria o de programa el tiempo de reproducción y restante del disco no aparece INDEX VIDEO 1 L 2 R HOUR MIN SEC CD TRACK INDEX VIDEO 1 L 2 R HOUR MIN SEC CD TRACK INDEX VIDEO 1 L 2 R HOUR MIN SEC CD TRACK INDEX VIDEO 1 L 2 R HOUR MIN SEC CD Tiempo restante de la p...

Page 82: ...ductor inicia la reproducción Reproducción continua Ajuste el volumen en el TV o en el amplificador Para abrir o cerrar el panel frontal Pulse PANEL UP DOWN en el reproductor Reproducción de CD 1 El procedimiento de funcionamiento de los discos DVD o de los VIDEO CD es diferente al de los CD Para obtener información sobre la reproducción de discos DVD consulte las páginas 10 a 17 Para obtener info...

Page 83: ...a Pulse Realizar una pausa P Reanudar la reproducción después de la pausa P o Detener la reproducción y extraer el disco 6 6 P p z Si RESUME aparece en el visor del panel frontal Es posible reanudar la reproducción desde el punto donde detuvo el CD Para obtener información sobre la reproducción del disco desde el principio consulte la página 36 π ...

Page 84: ...ENTER o 1 SEARCH MODE varias veces hasta que INDEX SEARCH aparezca en la pantalla del TV 2 Los botones numéricos para seleccionar el número de índice y a continuación ENTER o 3 Cuando encuentre el punto que desee pulse para recuperar la velocidad normal 3 ENTER Botones numéricos ENTER SEARCH MODE z Descripción de pista Consulte la página 5 z Descripción de índice Consulte la página 5 z Si desea ca...

Page 85: ...estra el número de pista actual tiempo de reproducción y número de índice pInformación del modo 2 de indicación en pantalla pInformación del modo de desactivación de indicación en pantalla No aparece ninguna información Aparecerán mensajes etc DISPLAY Número de índice actual Estado de reproducción Modo de reproducción actual Número de pista actual número total de pistas Número de índice actual Núm...

Page 86: ...otal de pistas número de pistas restantes o tiempo restante mediante el visor del panel frontal pInformación durante la reproducción de un disco TIME Tiempo de reproducción 1 2 3 4 5 6 7 8 9 0 Estado de reproducción Modo de reproducción actual Número de pista actual Número de índice actual Tipo de disco Se ilumina si es posible realizar la reanudación de reproducción Estado de sonido actual ...

Page 87: ...ón cambia como se muestra en la ilustración que aparece más adelante La información sobre el tiempo en el modo 1 o 2 de indicación en pantalla también cambia cada vez que pulse TIME Tiempo de reproducción y número de la pista actual Tiempo restante de la pista actual Tiempo de reproducción del disco Pulse TIME Pulse TIME Pulse TIME Tiempo restante del disco Pulse TIME Nota Durante la reproducción ...

Page 88: ...ina 34 Reproducción de programa página 34 Para cancelar la repetición de todos los títulos o todas las pistas de un disco Pulse MENU para que el menú aparezca en la pantalla del TV A continuación ajuste REPEAT de PLAY MODE en OFF página 44 Repetición del título o capítulo actual Es posible repetir sólo el título o capítulo actual en modo de reproducción continua Es posible que no pueda realizar la...

Page 89: ...U para que el menú aparezca en la pantalla del TV A continuación seleccione A B REPEAT en PLAY MODE La indicación A B REPEAT aparece resaltada 2 Seleccione SET con y pulse ENTER La indicación en pantalla de ajuste del punto A aparece indicando el número de capítulo o pista actual y el tiempo de reproducción 3 Pulse ENTER cuando encuentre el punto de inicio punto A de la parte que vaya a reproducir...

Page 90: ...eatoria se cancelará Es posible que no pueda realizar la reproducción aleatoria con determinados discos DVD MENU ENTER To set press ENTER MENU VIDEO CONTROL CUSTOM SETUP INITIAL SETUP To quit press PLAY MODE OFF ON REPEAT SHUFFLE PROGRAM ALL OFF OFF ON OFF OFF A B REPEAT then MENU ENTER VIDEO CONTROL CUSTOM SETUP INITIAL SETUP REPEAT OFF PLAY MODE SHUFFLE PROGRAM A B REPEAT ALL OFF OFF OFF OFF To ...

Page 91: ...GRAM SETUP To set press then ENTER MENU Pressing PLAY starts Program Play To quit press To set press thenENTER MENU Pressing PLAY starts Program Play VIDEO CONTROL PLAY MODE CUSTOM SETUP INITIAL SETUP PROGRAM SETUP TITLE 01 02 03 04 05 06 ALL CLEAR 01 02 03 04 CLEAR CHAPTER TITLE To quit press VIDEO CONTROL CUSTOM SETUP INITIAL SETUP PLAY MODE OFF SET ON REPEAT SHUFFLE ALL OFF OFF OFF OFF A B REPE...

Page 92: ...necta el cable de alimentación de CA cambia el modo de reproducción inicia la reproducción después de seleccionar un título capítulo o pista cambia el ajuste de VIDEO ASPECT RATIO DVD MENU LANGUAGE o PARENTAL CONTROL en INITIAL SETUP en el menú π 8 Pulse para iniciar la reproducción de programa Para cancelar la reproducción de programa Pulse MENU para que el menú aparezca en la pantalla del TV A c...

Page 93: ...ezca el menú A continuación seleccione L R STEREO de CUSTOM SETUP para cambiar el sonido página 46 No obstante este ajuste no afecta a la salida de los conectores DIGITAL OUT cuando reproduzca un CD Nota Dependiendo del disco DVD es posible que no pueda cambiar el idioma aunque el DVD contenga grabación de sonido en varios idiomas Escuchará El sonido del canal izquierdo El sonido del canal derecho...

Page 94: ...a cambiar los subtítulos aunque éste contenga subtítulos en varios idiomas Dependiendo del disco DVD es posible que no pueda cambiar los subtítulos en función del idioma del sonido aunque aparezca AUDIO FOLLOW SUB TITLE CHANGE Activación y desactivación de los subtítulos Z Con discos DVD que tengan subtítulos grabados podrá activar y desactivar dichos subtítulos cuando desee durante la reproducció...

Page 95: ...ero de ángulos varía en función del disco o de la escena El número de ángulos que puede cambiarse en una escena corresponde al de ángulos grabados para dicha escena Dependiendo del disco DVD es posible que no pueda cambiar los ángulos aunque dicho disco contenga múltiples ángulos ANGLE CHANGE ANGLE DVD Limitación de la reproducción para niños Control de limitación Z Es posible limitar la reproducc...

Page 96: ...n pulse To set press ENTER MENU VIDEO CONTROL PLAY MODE CUSTOM SETUP INITIAL SETUP TV TYPE VIDEO ASPECT RATIO To quit press DVD MENU LANGUAGE OSD LANGUAGE DOWNMIX DVD DIGITAL OUT VIDEO CD COLOR SYSTEM VIDEO CD DIGITAL OUT PARENTAL CONTROL 4 3 PAN SCAN ENGLISH SURROUND PCM NTSC OFF 4 3 16 9 ENGLISH then Entry password ENTER VIDEO CONTROL PLAY MODE CUSTOM SETUP INITIAL SETUP PARENTAL CONTROL Enter a...

Page 97: ...de control de limitación mientras se reproduce el disco En este caso introduzca la contraseña y a continuación cambie el nivel Al detener la reproducción del disco DVD el nivel volverá a ser el original 7 Seleccione un país como estándar para el nivel de limitación de la reproducción para ello utilice y a continuación pulse ENTER Aparece una marca de comprobación p a la izquierda del país seleccio...

Page 98: ...strado Z Es posible controlar televisores Sony con la marca g mediante el mando a distancia suministrado Pulsando TV POWER TV VIDEO VOL CH TV VIDEO CH VOL TV POWER Es posible Encender o apagar el TV Seleccionar la fuente de entrada para el TV Ajustar el volumen del TV Cambiar el canal del TV ...

Page 99: ...ación pulse o ENTER La opción principal seleccionada aparece resaltada 3 Seleccione la opción que desee con y pulse o ENTER 4 Seleccione el ajuste que desee con y pulse ENTER Aparece una marca de comprobación p a la izquierda del ajuste seleccionado Si aparece a la derecha del ajuste Hay más ajustes para seleccionarse a la derecha Pulse para realizar la selección Si aparece a la derecha de ADJUST ...

Page 100: ...RESET restaura el valor en 0 Ajustes para la reproducción PLAY MODE PLAY MODE permite ajustar diferentes modos de reproducción como se describe en las páginas 32 a 36 Los ajustes por omisión aparecen subrayados Notas Dependiendo del disco es posible que no pueda ajustar los modos de reproducción Puede ajustar la reproducción aleatoria de programa y repetida sólo durante la parada en el caso de dis...

Page 101: ...ustes de visualización y sonido CUSTOM SETUP CUSTOM SETUP permite ajustar la visualización y el sonido en función de las condiciones de reproducción Los ajustes por omisión aparecen subrayados pAUTO PLAY Selecciona el ajuste de reproducción automática al conectar el cable de alimentación de CA a la toma de red OFF la reproducción del disco no se inicia automáticamente TIMER la reproducción del dis...

Page 102: ...ajuste de la salida de los conectores LINE OUT AUDIO 1 2 en función del equipo de audio que conecte OFF desactiva la atenuación de audio ON reduce el nivel de salida de audio para que no se produzcan distorsiones de sonido Nota El ajuste no afecta a la salida de los conectores DIGITAL OUT pL R STEREO Selecciona el ajuste del sonido del VIDEO CD de los conectores LINE OUT AUDIO 1 2 y DIGITAL OUT o ...

Page 103: ...es LINE OUT AUDIO 1 2 y a la digital de los conectores DIGITAL OUT OPTICAL y COAXIAL si DVD DIGITAL OUT se ajusta en PCM pDVD DIGITAL OUT Conmuta los métodos de transmisión de las señales de audio de los conectores DIGITAL OUT OPTICAL y COAXIAL del panel posterior del reproductor PCM si el reproductor está conectado a un componente de audio sin decodificador Dolby Digital AC 3 incorporado AC 3 Dig...

Page 104: ... corriente mientras esté conectado a la toma mural aunque apague el propio reproductor Si no va a utilizar el reproductor durante mucho tiempo asegúrese de desconectarlo de la toma mural Para desconectar el cable de alimentación de CA cable de corriente tire del enchufe nunca del propio cable Si es necesario sustituir el cable de alimentación de CA cable de corriente acuda únicamente a un centro d...

Page 105: ...ituya todas las pilas del mando por otras nuevas si tienen poca energía Aparece ruido de imagen Limpie el disco Este reproductor dispone de la función de protección contra copias desarrollada por Macrovision Ciertos discos DVD cuentan con señales de protección contra copias Al reproducir estos discos en la platina de vídeo aparecerá ruido de imagen en determinados televisores y proyectores El ruid...

Page 106: ... mensajes no aparecen en la pantalla del TV en el idioma deseado En el menú seleccione el idioma de las indicaciones en pantalla en OSD LANGUAGE de INITIAL SETUP página 47 No es posible cambiar el idioma del sonido al reproducir un DVD No hay sonido grabado en varios idiomas en el DVD El cambio de idioma del sonido está prohibido en el DVD No es posible cambiar el idioma de los subtítulos al repro...

Page 107: ...e alta resolución y disfrutar de funciones PBC Este reproductor admite las dos versiones Glosario Velocidad de transmisión de bits Valor que indica la cantidad de datos de vídeo comprimidos en un DVD por segundo La unidad es Mbps Mega bit por segundo 1 Mbps indica que los datos transmitidos por segundo son 1 000 000 de bits Cuanto mayor sea la velocidad de transmisión de bits mayor será la cantida...

Page 108: ...riculares a este conector º Botón PANEL UP DOWN 10 18 26 Desplaza el panel frontal arriba y abajo Bandeja de discos 10 18 26 Coloque un disco en la bandeja Botón PREV 12 20 28 Púlselo para retroceder al capítulo o pista anterior Botón NEXT 12 20 28 Púlselo para pasar al capítulo o pista siguiente Botón DNR 37 Reduce el ruido de imagen Botón TITLE 13 Muestra el menú de títulos en la pantalla del TV...

Page 109: ...de entrada de S vídeo del TV o videograbadora 4 Conectores COMPONENT VIDEO OUT 7 Se conecta al monitor o proyector con conectores de entrada de vídeo de componente Y B Y R Y que permitan enviar señales del reproductor 5 Conector S LINK 9 Se conecta al conector de S link de un componente externo 6 Conector DIGITAL OUT OPTICAL 8 Se conecta a un componente de audio con el cable óptico 7 Conector DIGI...

Page 110: ...nde y apaga el TV Botón POWER 10 18 26 Enciende y apaga el reproductor Botones SLOW 11 19 Reproducen un disco a cámara lenta Botones 7STEP 11 19 Reproducen un disco fotograma a fotograma Botón SEARCH MODE 12 20 28 Púlselo para seleccionar la función de búsqueda pista índice etc de la unidad Botón TIME 16 24 30 Muestra el tiempo de reproducción del disco etc en el visor del panel frontal Botón DNR ...

Page 111: ...nga Tatar Twi Ukrainian Urdu Uzbek Vietnamese Volapük Wolof Xhosa Yoruba Chinese Zulu Not specified 1027 1028 1032 1039 1044 1045 1051 1052 1053 1057 1059 1060 1061 1066 1067 1070 1079 1093 1097 1103 1105 1109 1130 1142 1144 1145 1149 1150 1151 1157 1165 1166 1171 1174 1181 Código Idioma Código Idioma Código Idioma Código Idioma 1183 1186 1194 1196 1203 1209 1217 1226 1229 1233 1235 1239 1245 1248...

Page 112: ...Y Z VIDEO CONTROL 44 VIDEO CD 18 51 Visor visor del panel frontal 16 24 30 indicación en pantalla 15 22 29 Visor del panel frontal CD 30 DVD 16 VIDEO CD 24 Velocidad de transmisión de bits 16 51 L LETTER BOX 46 Localización un punto específico 12 20 28 mediante control 12 20 28 observando la pantalla del TV 12 20 empleo 43 M N Manejo de discos 48 Memoria 44 Menú CUSTOM SETUP 45 INITIAL SETUP 46 PL...

Reviews: